
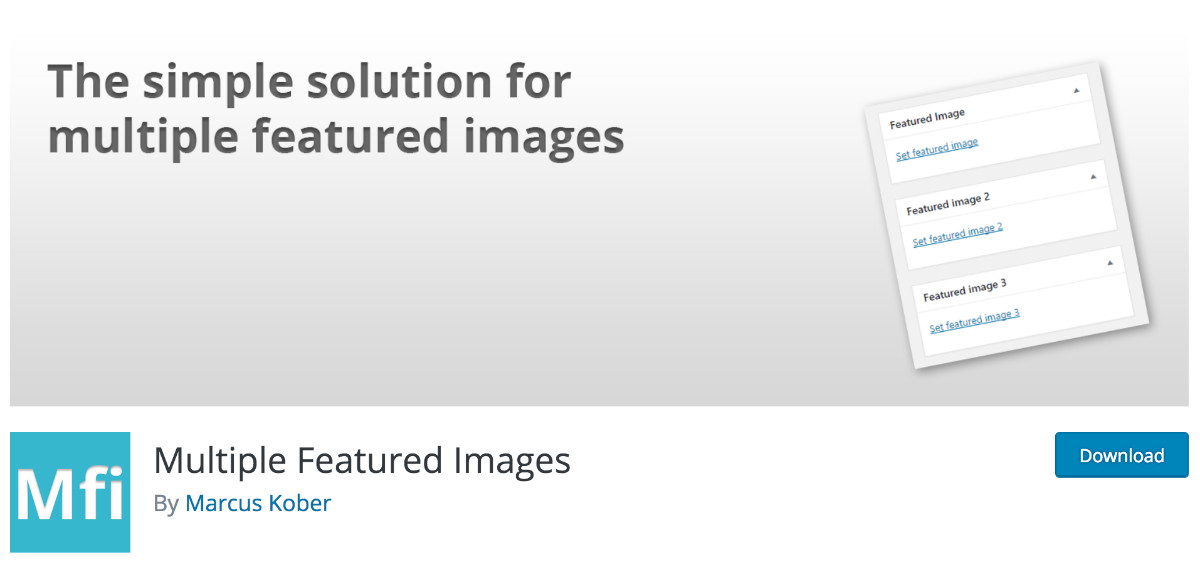
Has it ever happened to you to want to add several images to the front page to illustrate the same article? I am not talking about the images that are inserted into the body of the article, but rather about the image highlighted, which illustrates your article on the blog page and which is also at the top of the article, just under its title.
Well, in this article, we'll see how add different images to the headlines within the same article with the help of a plugin as well as some lines of code...
1 - Prerequisites to add multiple images to the front page
Although we were going to call for an extension to add multiple images to the front page In our Divi articles, we still need to add a few lines of code here and there... To complete this tutorial, you will need:
- of the create a child theme for Divi
- a code editor like Bracket or SublimText
- install and activate the extension Multiple Featured Images
- a little concentration and patience 😉
In the following example, I will add 3 images featured in addition to the image at the front of the base. We will then get 4 images at the front instead of 1. Obviously, you are not obliged to add so many and you can stop at two or three. images at the front. In this case, you will take care to slightly modify the code so that there are no errors...
2 - The code to be added to the functions.php file
Once you have installed and enabled the extension Multiple Featured Images, you will need to add a few lines of code to the file functions.php of your child theme Divi.
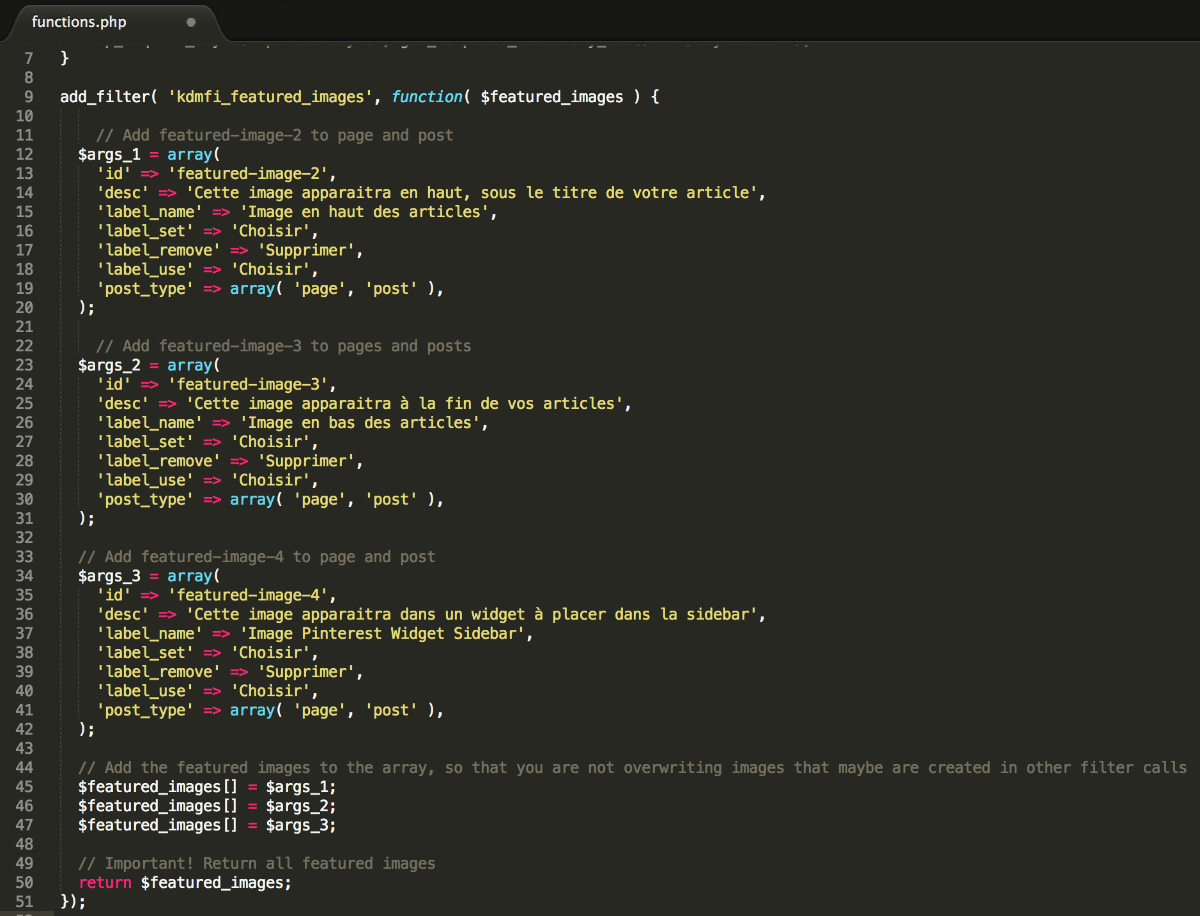
This code is added following the code already present in this file functions.phpHere is the text version:
add filter( 'kdmfi featured images', function( $featured images ) {// Add featured-image-2 to page and post$args 1 = array('id' => 'featured-image-2','desc' => 'This image will appear at the top, under the title of your article','label name' => 'Image at the top of articles','label set' => 'Choose','label remove' => 'Delete','label use' => 'Choose','post type' => array( 'page', 'post'),);// Add featured-image-3 to pages and posts$args 2 = array('id' => 'featured-image-3','desc' => 'This image will appear at the end of your articles','label name' => 'Image at the bottom of your articles','label set' => 'Choose','label remove' => 'Delete','label use' => 'Choose','post type' => array( 'page', 'post'),);// Add featured-image-4 to page and post$args 3 = array('id' => 'featured-image-4','desc' => 'This image will appear in a widget to be placed in the sidebar','label name' => 'Image Pinterest Widget Sidebar','label set' => 'Choose','label remove' => 'Delete','label use' => 'Choose','post type' => array( 'page', 'post'),);/ Add the featured images to the array, so that you are not overwriting images that may be created in other filter calls$featured images[] = $args 1$featured images[] = $args 2;$featured images[] = $args 3;// Important! Return all featured imagesreturn $featured images;});
This code is intended to add several images to the front page of your pages and articles. If you want to add these multiple images only in your articles, then you can change the line post type => array( 'page', 'post'), by post type => array( 'post'),
Just as if you want to add only one image to the front page (in addition to the one already in place), then your code should look like this:
add filter( 'kdmfi featured images', function( $featured images) {$args = array('id' => 'featured-image-2','desc' => 'Your description here.','label name' => 'Featured Image 2','label set' => 'Choose','label remove' => 'Delete','label use' => 'Choisir','post type' => array( 'page', 'post' ),$featured images[] = $args;return $featured images;});
Check out the differences between these two pieces of code and make your changes based on the number of images on the front page you want to insert.
For more information, you can see the instructions on the extension page.
3 - The code to be added in the single.php file
At this stage, new image inserts at the front must have appeared in your articles. If you try to add images, they will appear well at the back office level but not at the front office level. It's normal, there's still a little bit more to do...
You must duplicate the file single.php Divi theme (the parent theme) and add this copy to the directory of your child theme.
At the same time, you will need to edit this single.php file to add a few lines of code. These lines will make your new images appear on the front page. This means it's up to you to decide where to add these bits of code.
When I tested, I added two images at the front within my single.php in places like the top of my article and the bottom of my article:
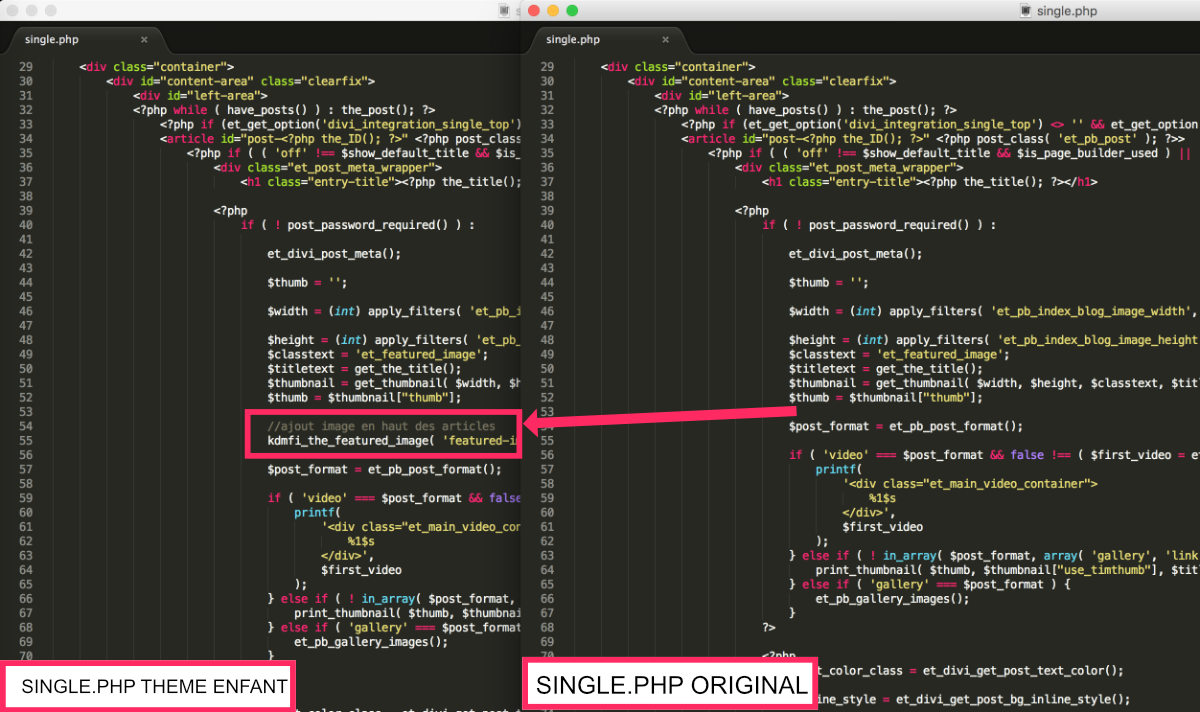
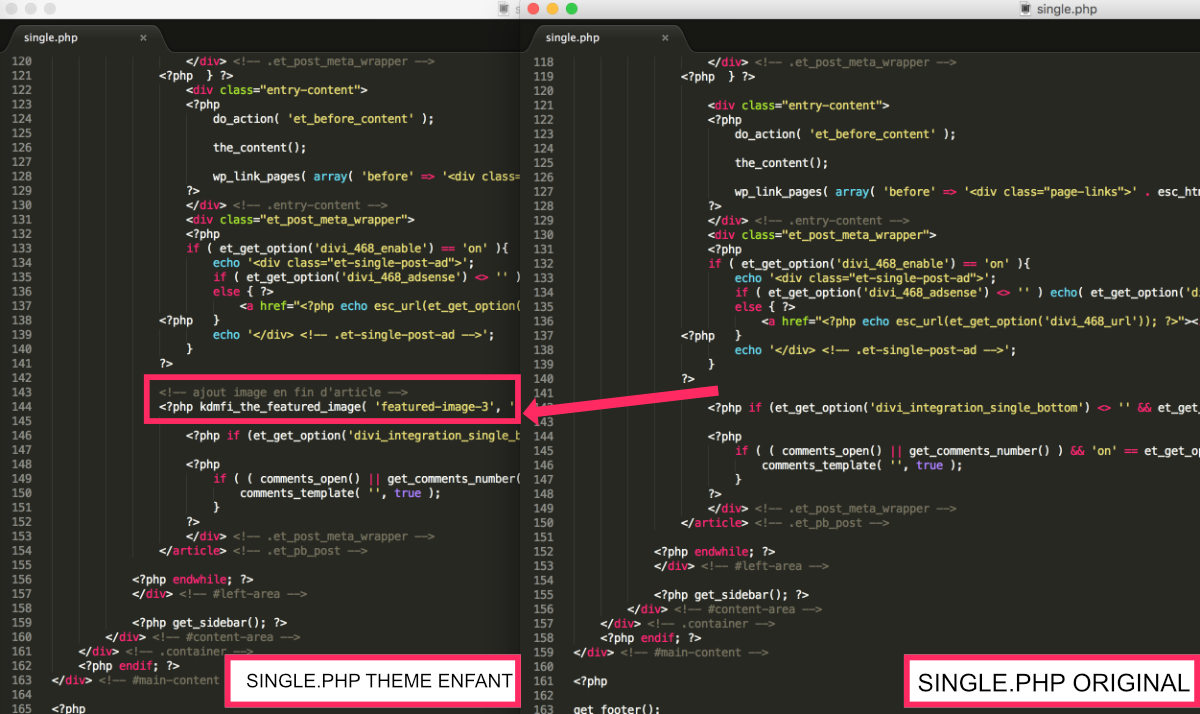
Here is the code to add:
kdmfi_the_featured_image( 'featured-image-2', 'full' );
Do not forget to modify it according to the number of images to add (featured-image-2, featured-image-3, featured-image-4 etc.).
4 - Change an option to Divi
For my example, the picture at the front page of my article that appears in the blog module or even in the page of my articles is different from the one found at the top of the article.
To achieve this result, you will not only need to add the code bit to the right place but also change a Divi option.
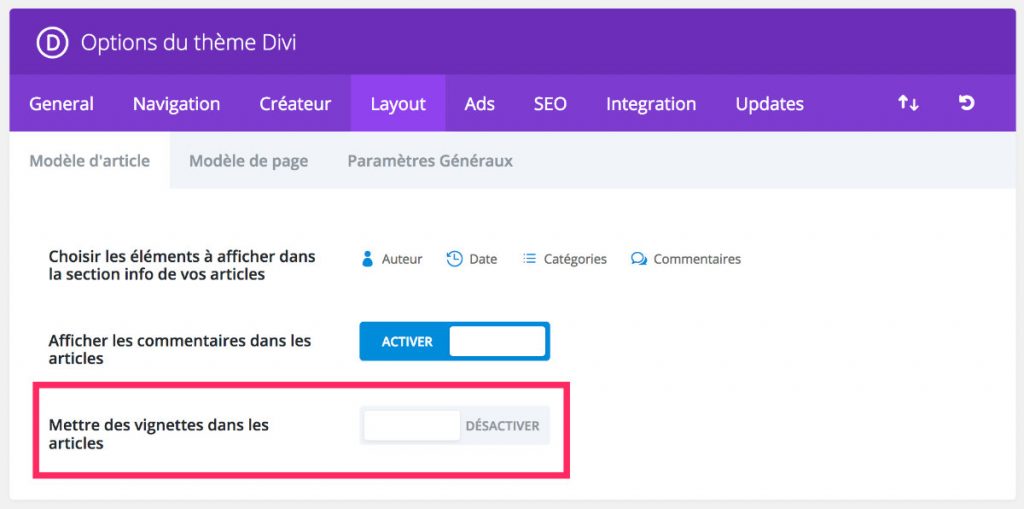
In the tab Divi > Theme Options > Layout, you will have to position the option "Putting thumbnails in articles" on "Disable". This will avoid finding you with two images afterwards under the title of your article.
5 - Using the Widget "Multiple Featured Image"
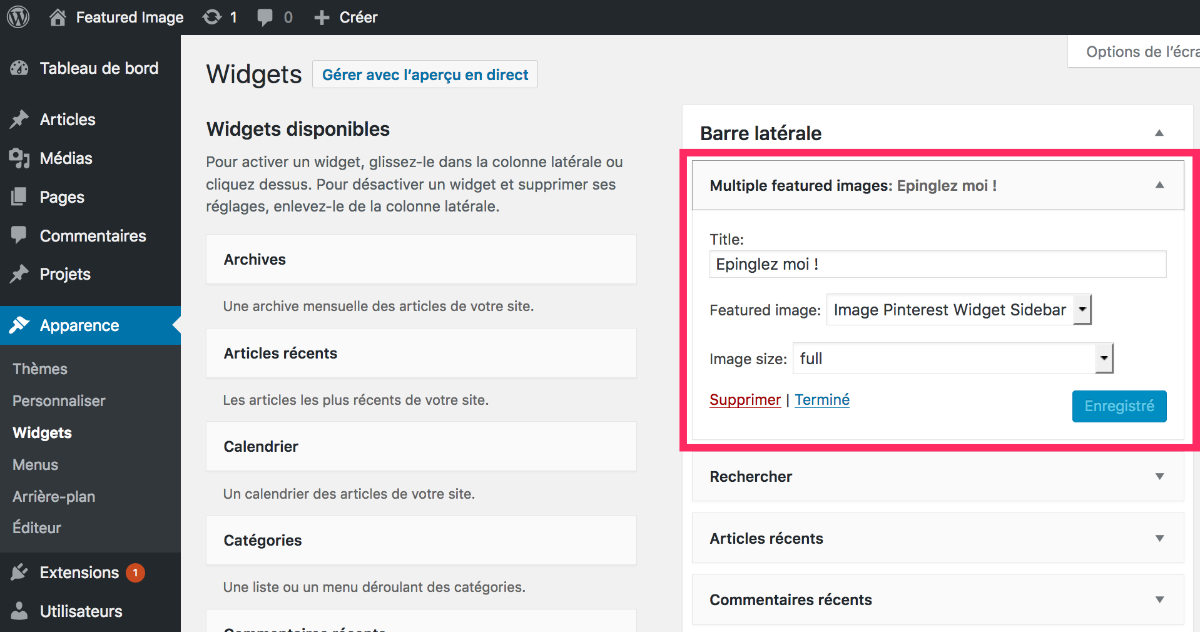
This widget, implemented thanks to the plugin Multiple Featured Images, will allow you easily add an image to the front page in the sidebar and/or in the footer of your site.
This image will display differently depending on your articles and the images you have assigned to this location. It is ideal to display the image intended for Pinterest for example or an advertising banner.
6 - In conclusion...
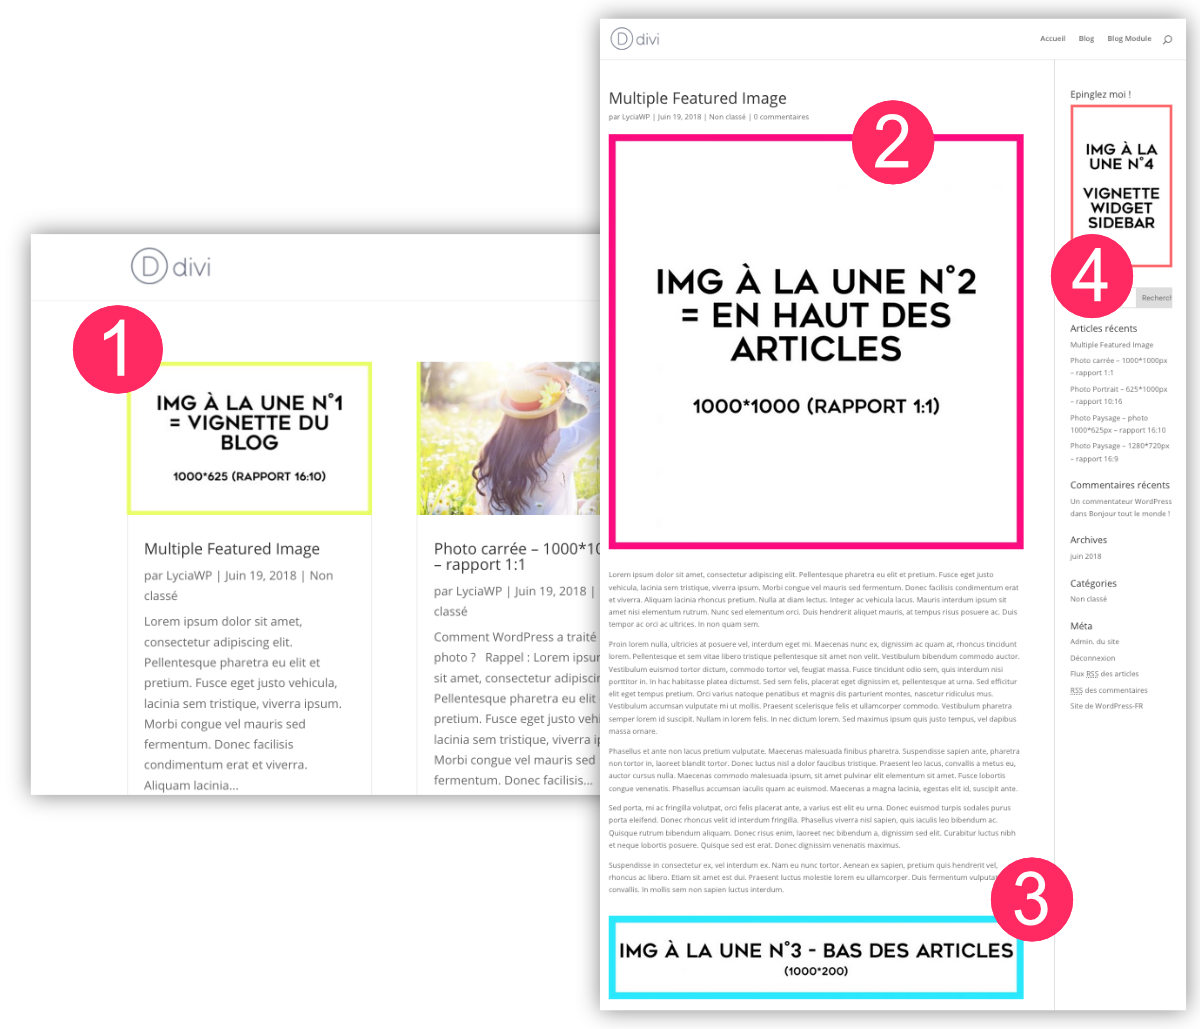
In this example, you may notice that the article displays four images on the front page:
- the first is the image at the front of the base
- the second is an image to the front which was added at the top of the article using the plugin and various pieces of code (in the single.php and in functions.php).
- the third is an image to the front which was added at the bottom of the article using the plugin and various pieces of code (in the single.php and in functions.php).
- the fourth is an image to the front which has been added with a widget provided for this purpose in the sidebar (and the code inserted in the functions.php).


Bonjour,
J’ai une petite question.
J’ai bien réussi a tout mettre en place comme expliqué dans le tuto
(qui d’ailleurs au passage je le souligne, est très bien expliqué et agréable a lire)
Cependant cela ne fonctionne plus quand mon post est crée par le thème Builder.
faut-il mettre le code ailleurs que dans single PHP pour que cela fonctionne ?
En gros je voudrais que les image 2 – 3 – 4 soit mise a la suite de mon image en avant 1 dans le post direct.
mais ma page post est crée avec le thème buidler comme vous l’avez expliqué dans un de vos articles. (ce qui me va très bien) mais pour le coup ne fonctionne pas.
Pourriez vous m’aider s’il vous plait, enfin m’expliquer comment faire surtout.
Bonjour Lycia,
Je vous ai écrit un message hier soir ici, je bloc complétement sur les images a la une
quand je l’utilise avec la page single.php tout fonctionne sans aucun souci
mais j’ai besoin de pouvoir utiliser cette solution en utilisant le thème Builder !
en faite je eux réussir a avoir deux colonne
1 colonne de gauche = les images à la une que l’on peu agrandir en cliquant dessus un peu comme si c’était une galerie
2 colonne de droite = le texte de mon article
j’ai créée avec theme builder ma page ou j’ai
en haut le titre avec image en fond = ok
en dessous deux colonne
colonne 1 (gauche) j’ai mis titre du post sans afficher le titre et les méta (j’affiche uniquement l’image a la une)
et je voudrais appeler en dessous les images a la une 2,3,4
colonne 2 (droite) j’ai mis publier un contenu pour afficher le contenu texte de mon article.
quel idée ou solution auriez vous pour que je puisse utiliser cette méthode ?
ps: pour info j’ai enregistrer mon nom et email en dessous de commentaires pour être enregistrer mais je doit retaper mon nom et email a chaque commentaire.
Salut Jan… Écoute, ici sur Astuces Divi, j’utilise 2 images à la une et aussi le Thème Builder. Donc les deux sont compatibles, plus ou moins, je pense. Si tu regardes mes articles, il y a une image « en anglais » à la fin de la barre latérale, et bien j’ai utilisé ce tuto ici présent… Mais j’ai fait cela dans une sidebar que j’appelle dans mon modèle d’article. Peut-être que tu devrais faire de même. Ensuite, il te suffit d’ajouter un module « barre latérale » où tu veux dans ton modèle et ton image devrait s’afficher. Voilà, je pense que l’astuce est là. Tiens-moi au courant.