
The last straight line before the end of the year is sometimes marked by a Advent calendar. The twinks love it What about us? We like it too! In this tutorial, I will teach you to create a Advent calendar online with Divi...and nothing else!
Here we go!
Create an Online Avant calendar with Divi: explanations in video
Before going further in this article, let me give you a video preview of how we can build a Digital Advent Calendar with Divi...
If the video is not displayed, meet here.
Understanding Divi's Display Conditions
If you watched the video, you realized it's pretty simple to Create an Advent Calendar with Divi because the page builder offers an essential functionality: display conditions based on date and time.
The whole design of this calendar is based on this rather unknown feature.
In fact, we do not often have the benefit of it, but here, these visibility options are highly appreciated and avoid adding extensions and extensions!
But how does it work? The detailed explanations are as follows:
As you know, all the modules, lines and sections of the Divi Builder are composed of 3 settings tabs: Content, Style and Advanced.
Conditions options are available in the Advanced tab of each item, which gives you a wide choice on how to use them: you can add a condition on a module, on a line or squarely on a section.

- So just go to the tab Advanced > Conditions the chosen element.
- Click on the "+" icon
- Choose the condition you want to use.
In the case of our Digital Advent Calendar, we will mainly need the condition based on time (in category Interaction), which is named Date & Time.
But I invite you to explore all the other types of conditions, some of which may be useful to you sometime. To know all about this, I invite you to consult the official article.
The Divi Date & Time condition then offers you other options, such as:
- "if after."
- "if before"
- "if a specific date"
- "if not a specific date"
- "if it's a specific day of the week"
- "if it's the first day of the month"
- "if this is the last day of the month"
For our Advent calendar, we will only need the first 3 options, namely:
- "if after."
- "if before"
- "if a specific date"
Now let's go to practice...
Step 1: Create the calendar template
To start, you need to create the calendar architecture:

If we consider that the Advent calendar beginning on 1 December and ending on 24 December, we will have to create 24 boxes to deliver your Digital bonus.
The simplest architecture would then be to create a section (blue) consisting of 4 rows/lines (green), cut into 6 columns each. That's the choice I made, but you can put it 6 rows/lines cut into 4 columnsIt'll do too!
Did you know that? You can test Divi for free by visiting on this page and by clicking on "TRY IT FOR FREE"
Step 2: Create Day-1 of your Advent Calendar
We'll focus first on the creation of the first day of the calendar, when it will work properly and have the perfect design, we will duplicate it 23 times (as I did in the video) - Yeah, let's save our time!
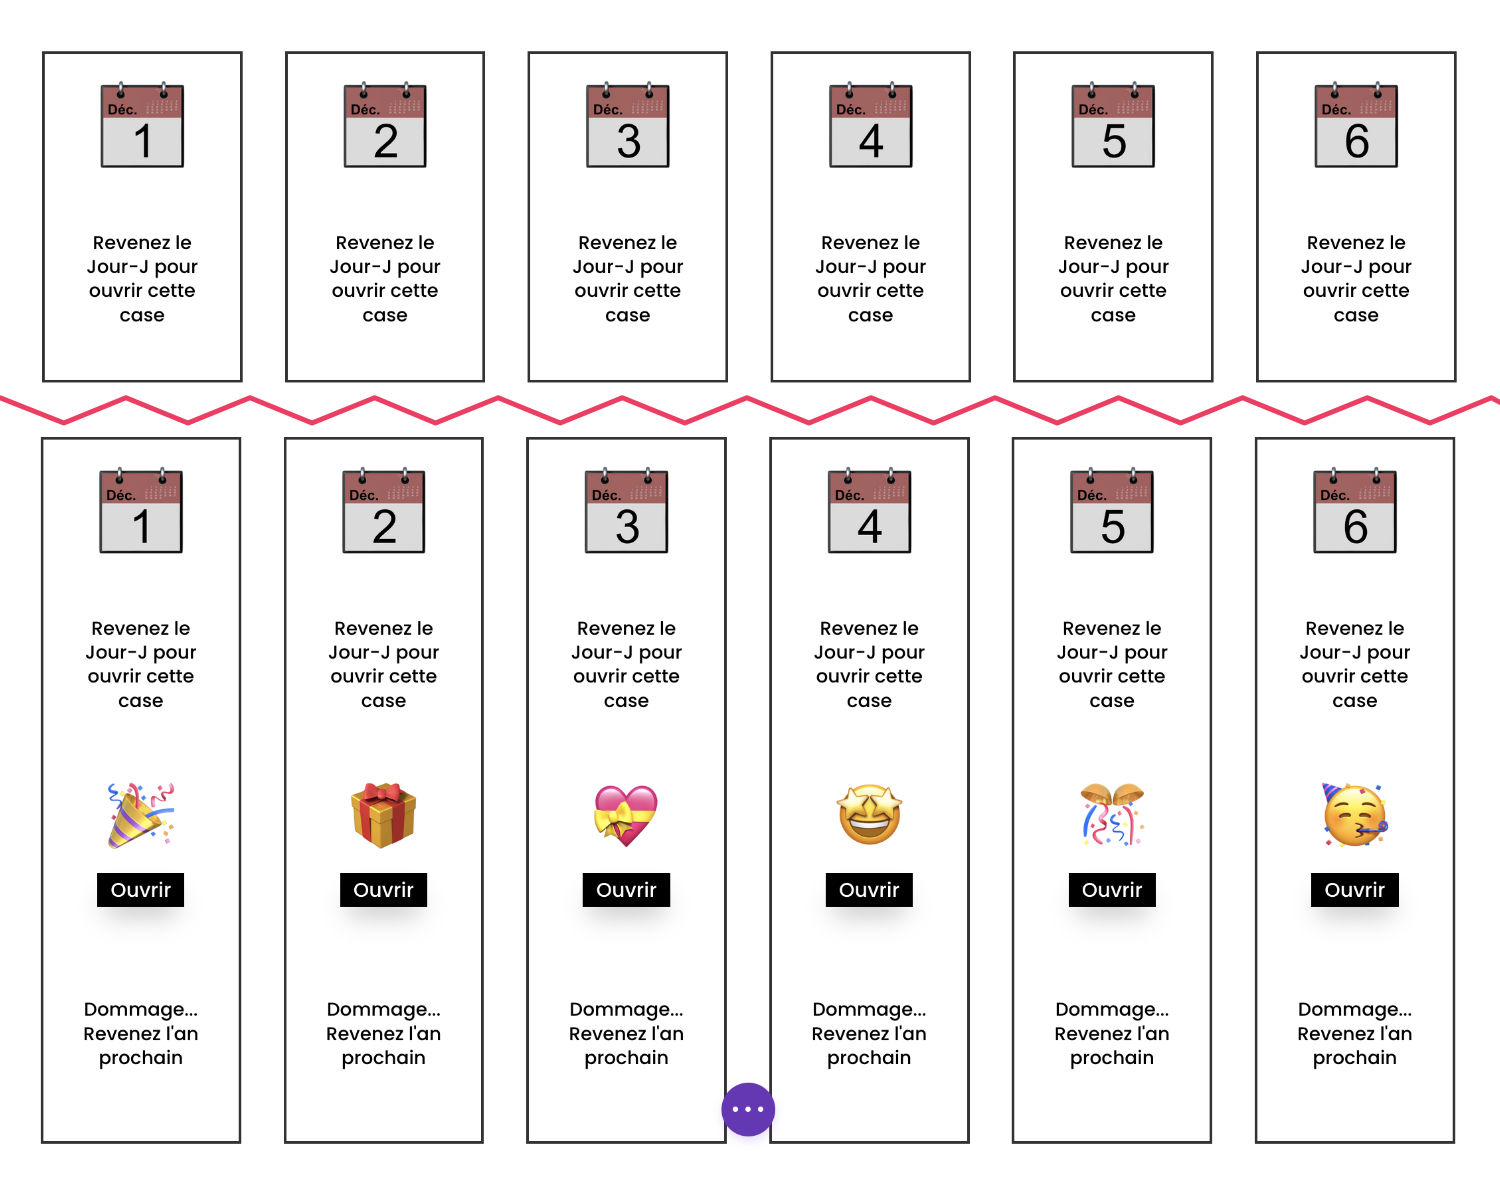
Each daily box will consist of 4 modules. Here are the details...
Module 1 that appears all the time
Within the first column, place a Text module or Image module. This is to display the title of the day 1 Dec, 2 Dec, 3 Dec, etc.
⚠️ This must always be visible.
Note: in this tutorial, I used a Text modulebut in my "real" Advent calendar, I created little emojis, so I used a Image module. It's up to you to imagine what's best for your needs...
Module 2 that appears before the date of day arrives
In my example, I simply used a text module. For example, you can place a text like "Come back on D-Day to open this box". Thus, the Internet user who would go through this in advance will understand that this box will only be available from 1 December.
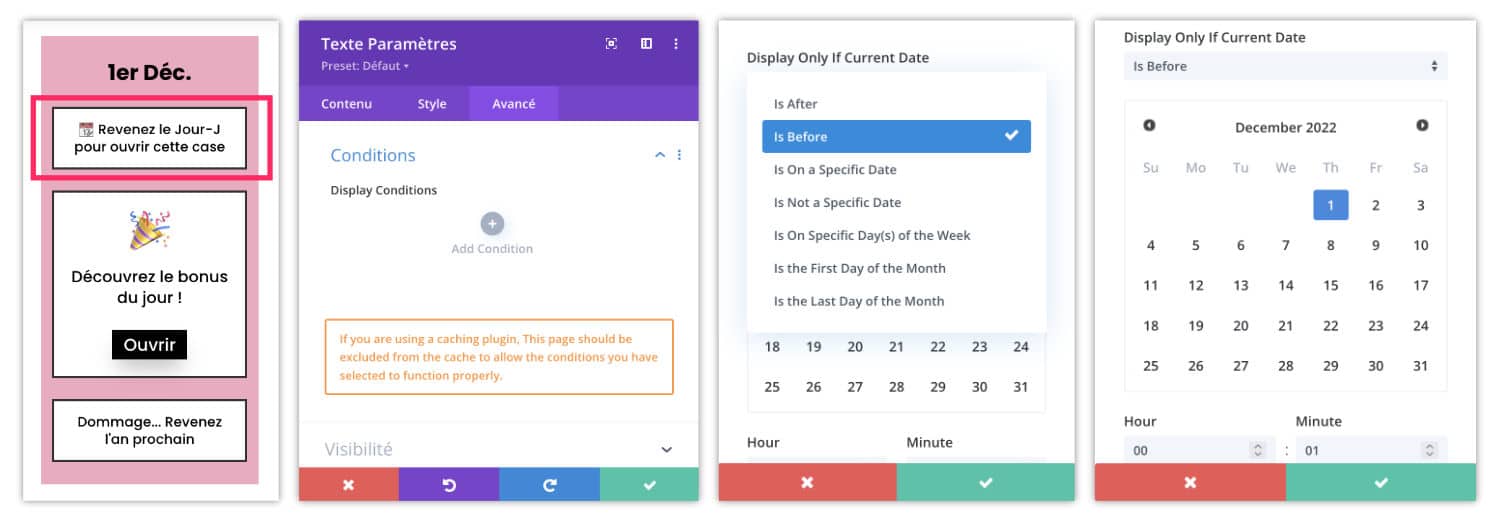
To make sure this is the case, go to the tab Advanced > Conditions then choose the option "Is before". You then access a Picker Date: choose the day in question (here, December 1).
Right below, there's the schedule to be defined.
For my part, I chose "0h01", so there is no ambiguity, we speak well of December 1.
Save your changes.
Module 3 that appears only on D-Day
You can use the most suitable module: a video module, an image, a text, a button, etc. For my example, I used a Call to Action module to add text and a button.
Text example: "Discover today's bonus"
Example of CTA: "Open"
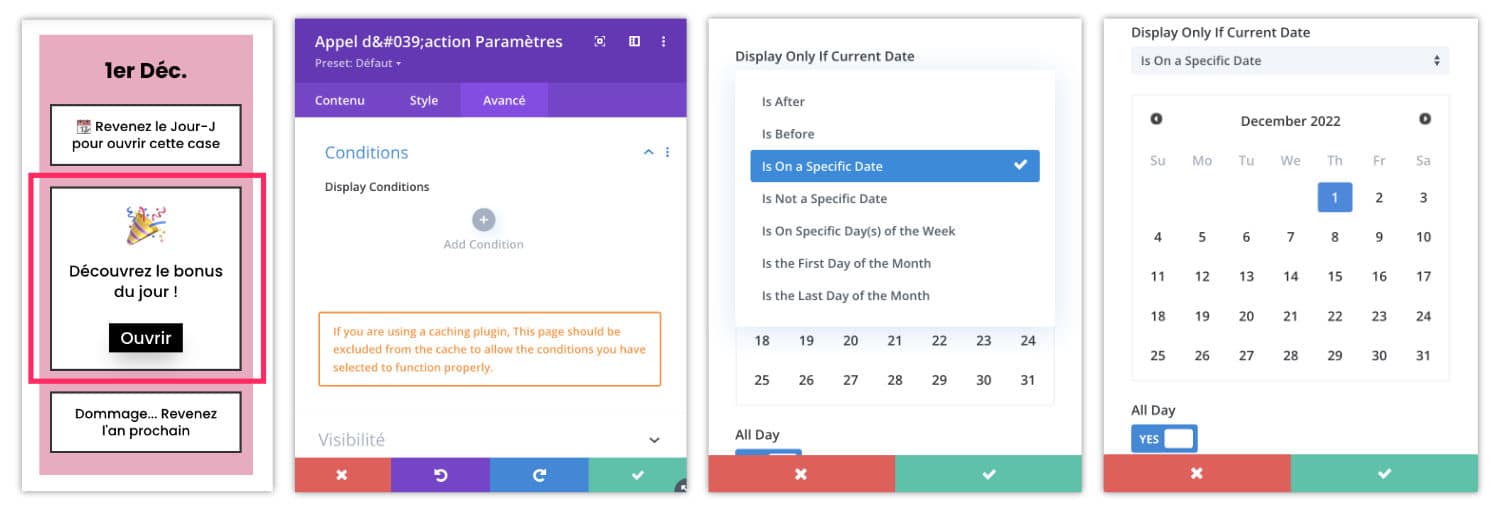
Care should be taken to display this module only on D-Day. For this, go to the tab Advanced > Conditions then choose the option "We have specific date". You then access a Picker Date: choose the day in question (here, December 1st) and activate the option All Day (just below).
Module 4 that appears after the date
Finally, the 4th module can very well be again a Text module. For my example, I indicated "Damage, come back next year".
This module will have to be displayed after the date has passed, so the next day.
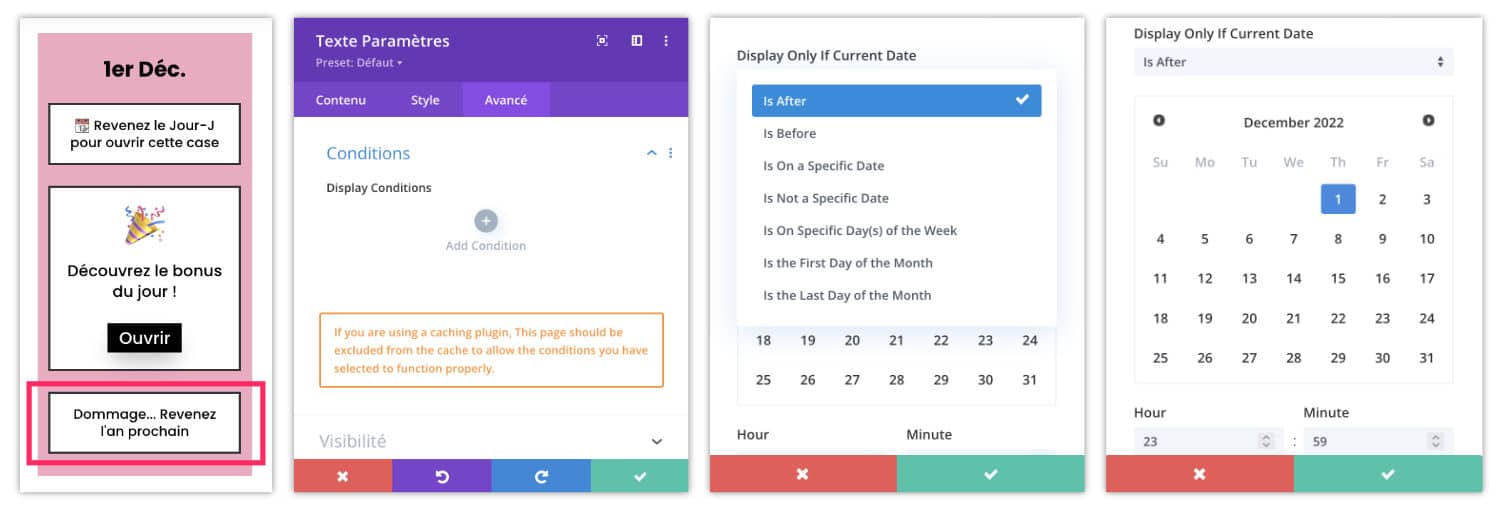
The action is quite similar to the previous: go to the tab Advanced > Conditions then choose the option "After", then choose the day in question - here, December 1 - at 11.59 p.m. (or even from the next day at 0h01 - you choose).
Step 3: Finishing the calendar & design
You can possibly do a test with shorter deadlines, just to check that everything works properly at the display level.
Warning: If you use a cache plugin, configure it to exclude your Advent calendar from cacheting, this could prevent its proper functioning.
My advice: fine-tune the design of this first box before duplicating it 23 times!
Some design ideas:
- add background color within column
- addition of an emoji or image
- adding a border or shadow within the column
- etc.
But above all, check the mobile version and do optimizations if necessary.
Once the first box is perfect, duplicate it.
💡 The trick is to do as I do in the video (at 5:15 minutes): duplicate the entire column, since it is composed of 4 modules, it is more productive in this way.
Step 4: Digital Bonus Delivery
Finally, there's one thing we haven't talked about yet: Deliver Digital Advent Calendar Bonuses ?
Well, there are many ways to do this, because it depends on what you want to deliver:
- Written Content
- Audio
- A video
- A PDF
- A link to external content
- A digital product for download
- A promo code in your shop
So there are thousands of ways to consider your layout!
Option 1: the easiest
We could very well. put the bonus directly in the box visible on D-Day (module 3). That would be the simplest way and one that would require the least work.
But be careful, if your content is imposing, it will extend the day's box and this can disrupt the overall calendar design.
On the other hand, if it is a simple link to external content (to a drive for example) or to a hidden promo of your shop, you can put it directly on the "Open" button.
Option 2: which requires more work
The other option would be to create a section dedicated to the grant of the bonus. That's the option I showed you in my video.
It's a lot more work, but you can put what you want in this part without too much constraint.
The idea would then be to create a new section below the calendar and set it a CSS ID that allows to create a link that will direct the user to the click of the "Open" button (good OK, that's not very clear this explanation 😱).
Step by step, it gives this:
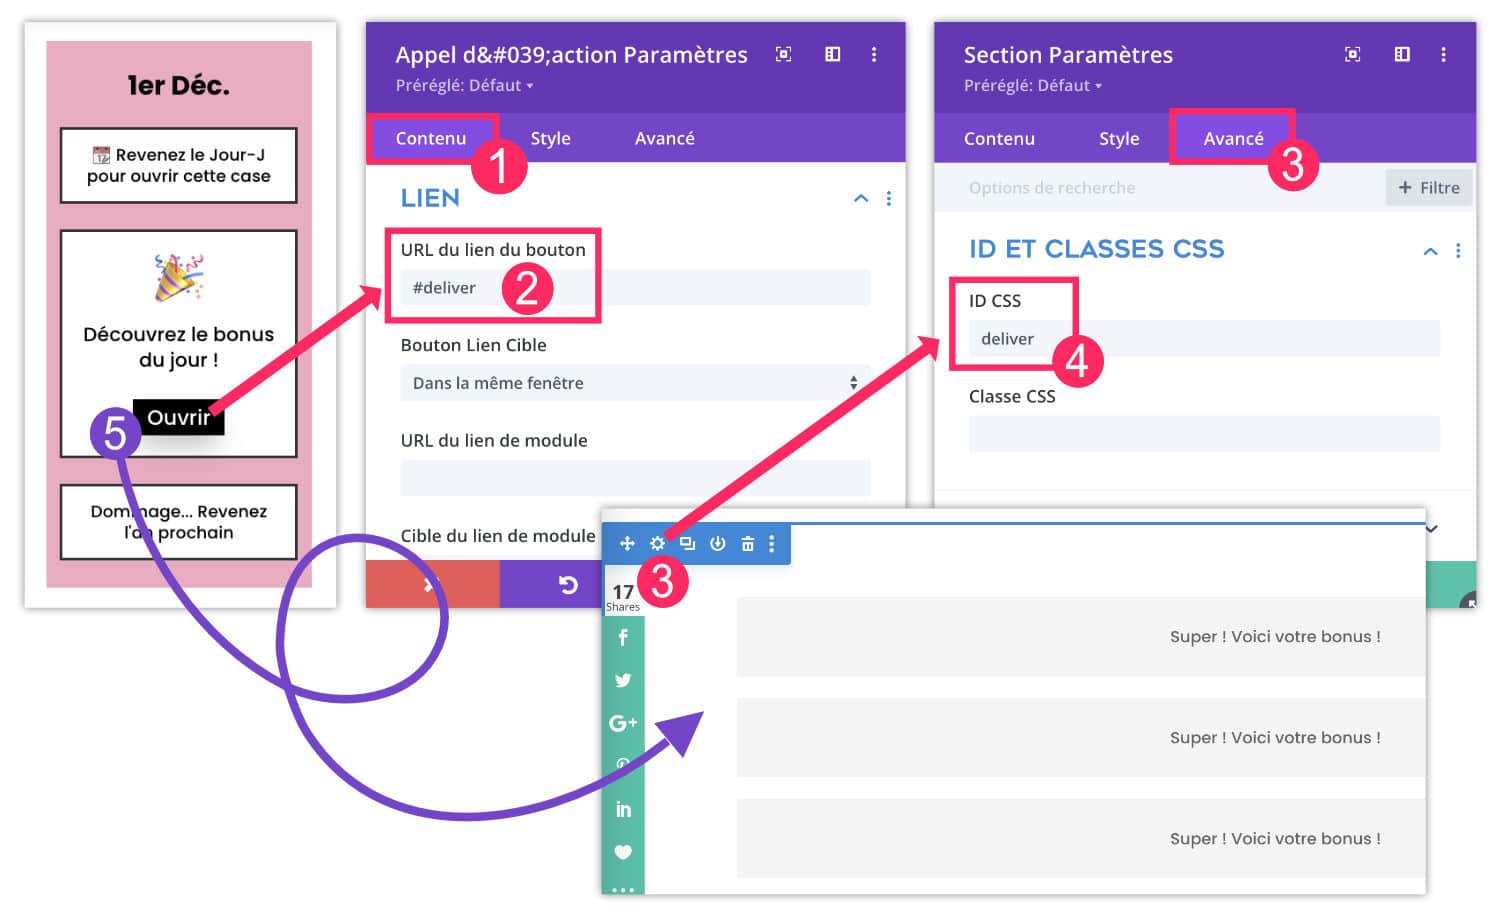
- In each box of the calendar (or preferably before duplicate your boxes, so you do the action only once), add Link anchor from the tab Contents > Link. For my example, the module being a Call to Action, I put the link on the button of this module.
- I choose a link anchor, for example #deliver.
- Under the calendar, add a section which will be used to deliver the bonuses. Open its settings and go to the tab Advanced.
- In the field CSS ID, enter a unique identifier, for example deliver.
- When the user clicks on the "Open" button, it will be redirected to the section that delivers the bonuses 🤩
Then, in your bonus section, add 24 lines/ranges (green). Each will contain a bonus for each playr. You can add all the modules you need: text, image, button, video, etc.
However, we must not forget that setting the visibility conditions for each of these lines. The bonus line 1 must be visible only on December 1, the bonus line 2 must be visible on December 2, and so on.
I think you know how to do it now, but here's a reminder:

- In line settings, go to the tab Advanced
- Add a condition Date & Time
- Opt for visibility at a specific date
- Select the correct date
- Enable the option "All day"
Here, your digital Advent calendar is ready! Finally, not quite, because you will have to fill each box with gifts now 🤪.
The Calendar of Advent Divi in image
Finally, it is true that this tutorial is very detailed, but in itself, it is not very complicated!
However, this remains a tedious exercise, as there is not only the Advent calendar design to plan, but also the work for realize the 24 bonuses !
Here is the image rendering of two different calendars:
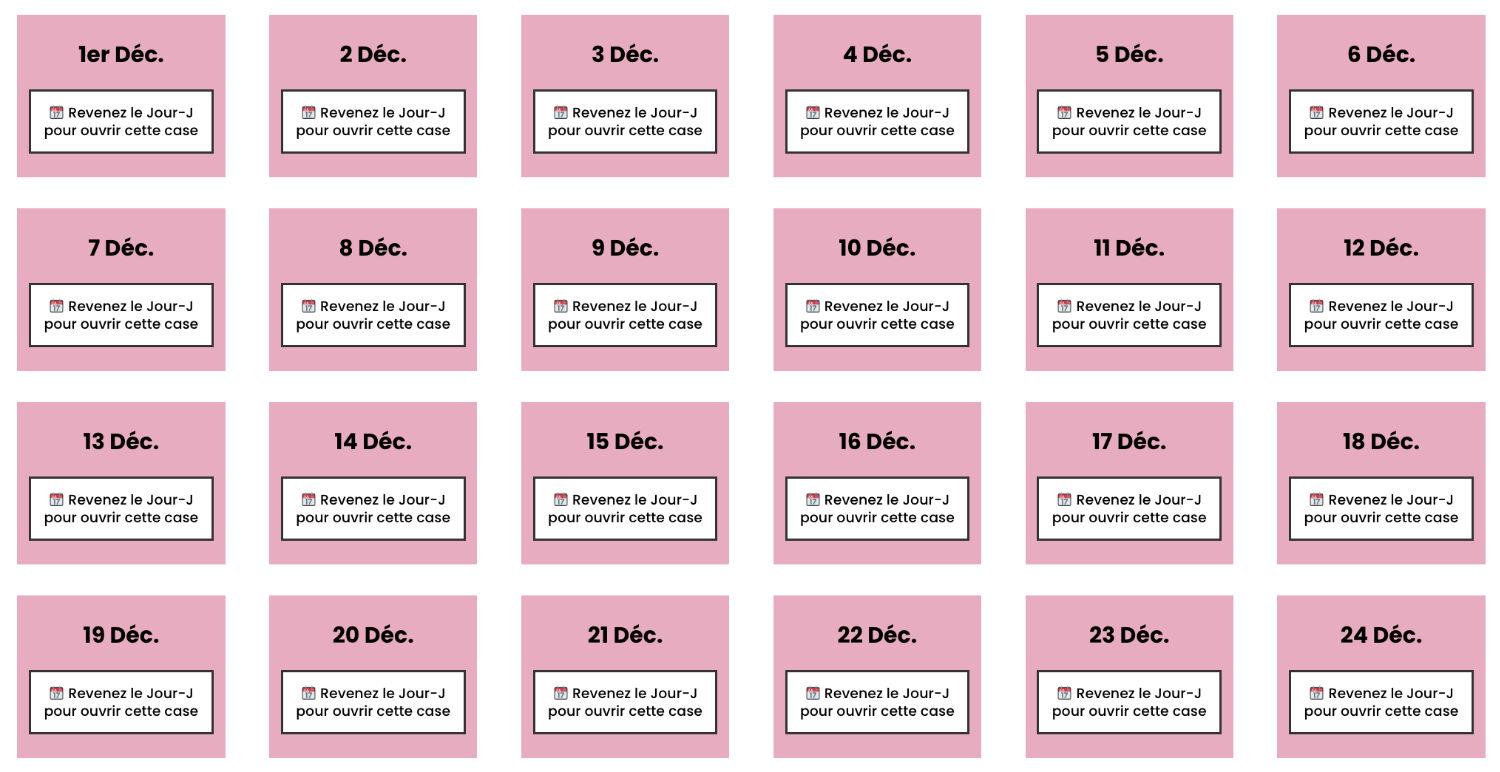
The following is the Divi Tip Advent Calendar : at the top of the image, this is the visible part, at the bottom of the image, this is the part when the Divi Builder is active.
In 2019 and 2020, Advent calendar had delighted hundreds of Internet users. By 2021, I had not had time to prepare it. I hesitated for 2022, because you understand it, it's a big cobblestone! But I'm glad to announce his return... To remember to visit it every day, I even prepared a reminder to add to your calendar. 👉 This way!
Need more resources on Divi? Visit ElegantThemes blog full of ideas and tutos! Or learn how to effectively use this theme through my training Divi !


Hello Lycia
merci pour tes explications didactiques !
Cela fait 3 ans que je voulais en faire un… mais j’hésitais sur l’outil et sur le concept des contenus.
Grâce à ta publication j’ai passé le cap avec seulement 5 dates.
Merciiiiiii !