
Even if Divi proposes choose a background color for your entire site, you will see that it is very simple to change this to get a different color on each page of your site.
The background color is visible only if you have chosen a design with the embossed layout of Divi.
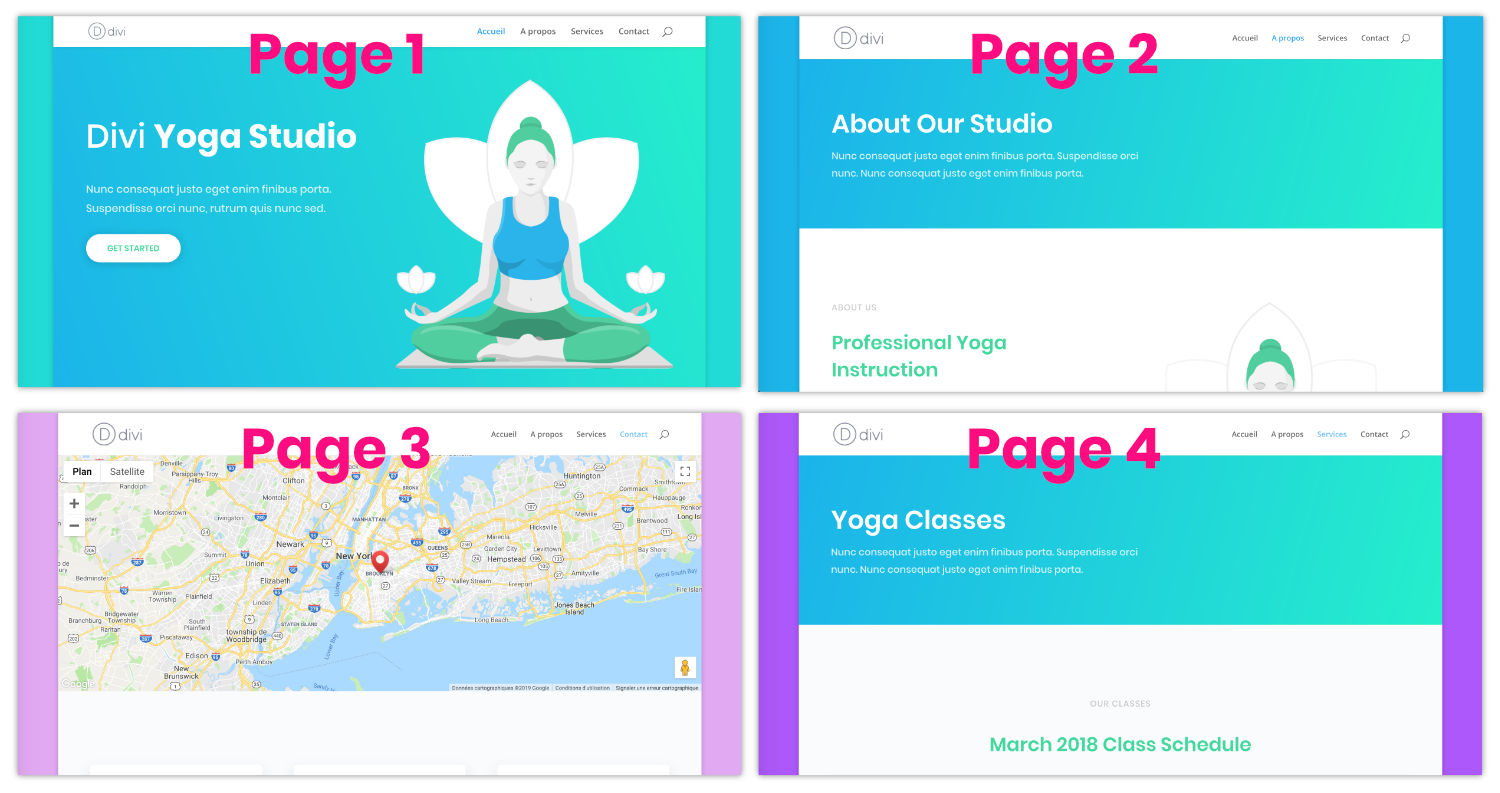
Do you want to give a different atmosphere for each page of your site? A dedicated color that differs every time the user navigates within your pages?
The theme Divi does not propose this option natively but it is very easy to remedy it, with only a few CSS lines.
Here is the program:
- Enable embossed layout
- Set a default background color
- Obtain the identifier of each page
- Edit CSS to get a different background color on each page
- Here's the video result!
- Declination with gradient background
Announcement: This article contains affiliate links that you will easily recognize. The classical links are in purple and sponsored links are in pink.
1 - Enable embossed layout
To make the background color of your site appear, the embedded layout of Divi must be enabled. For this, just go to the tab Appearance > Customize > General Settings > Layout Settings > Enable embossed layout
Learn more about the embedded layout of Divi, read this article.
2 - Set a default background color
To define background color of your Divi site, you must be in possession of its HTML color code.
Even if this is not mandatory, it will be more accurate to use the exact color of your "brand" rather than define it "at sight".
If you need an idea, there are many sites that offer suggestions or color converters:
If you need to extract a color from a web page, I advise you to use an indispensable tool: a pipette that will collect for you the color codes of the web pages you visit. There isn't a single day without me using it...
- For Firefox: There is ColorZilla but you do not need to install plugin because this feature is native in Firefox.
- For Chrome: you can install Colour pipette or ColorZilla
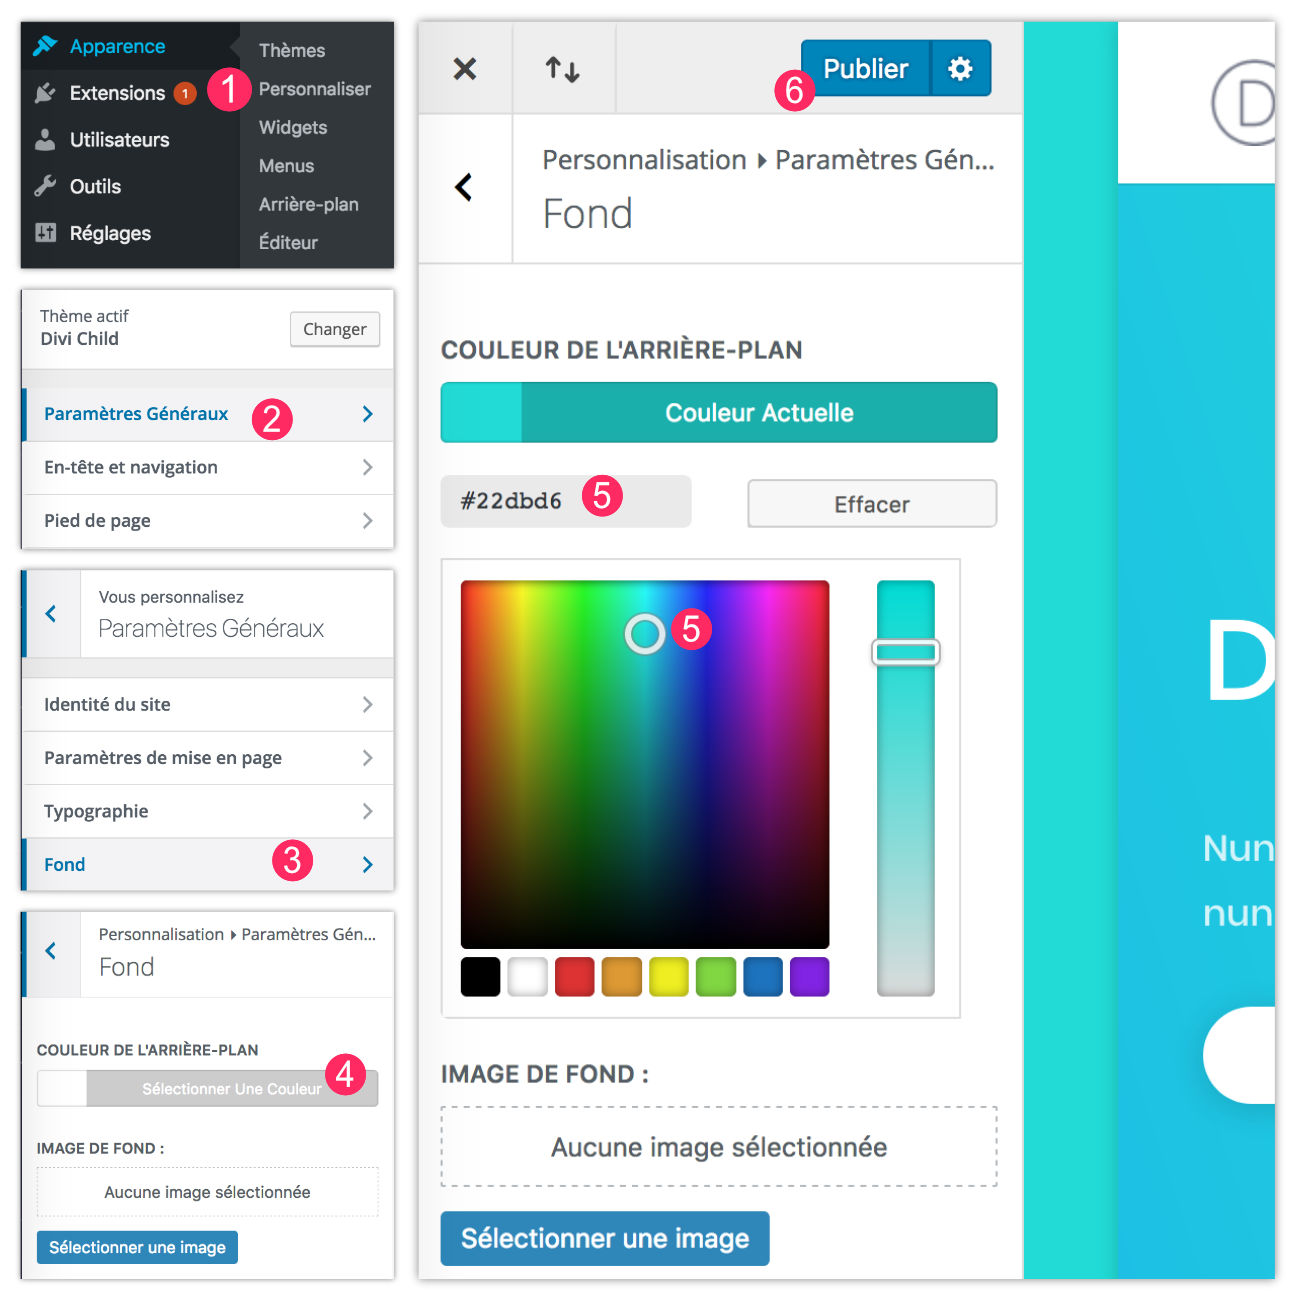
Once you know your color code, you can go to:
- Appearance > Customize
- Click General parameters
- Click Background
- Then on "Select a color" in the option "Background color"
- Set your color using the HEX cursor or code.
- Remember to click on "Publish" to save your changes.
Now, the whole of your site make the background color you just set appear (if the embossed layout is enabled, I repeat).
Do you know you can test Divi for free? See you on this page and click on "TRY IT FOR FREE"
3 - Obtain the identifier of each page
Before you start anything and use the CSS code that I propose after you, you must list the pages of your site that will be subject to a background color change. This will allow you to obtain values that are specific to your site: identifying your pages. This could be the contact page, the service page, the page about etc.
To obtain the page identifier to be modified:
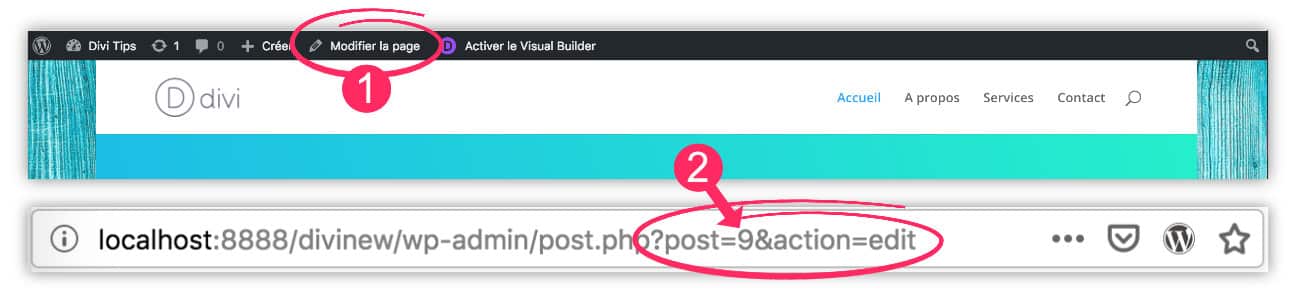
- See the administration of the page in question. You can do this very well from the front office by clicking on Edit Page (not on enable visual builder).
- Once in your page in "Edit" mode, just look at the URL bar of your browser. You will see a type URL monsite.com/wp-admin/past.php?post=9&action=edit. The number after [post=] is the identifier of your page.
It is therefore sufficient to identify these identifiers for all pages to be modified.
4 - Edit CSS to get a different background color on each page
Now that you have in your possession HTML color codes as well as your page identifiers, you will be able to adapt the following code.
To do this, just copy and paste the code below into the tab Appearance > Customize > Additional CSS changing values in red by your own values.
/* custom colors for each page */ .page-id-9.custom-background { background-color: #1bb5ea important; Page-id-28.custom-background { background-color: #AC58FA important; Page-id-25.custom-background { background-color: #e2a9f3 important; }
Explanation:
- .page-id-9: This is where you will need to change the identifier of your page. Change the 9 by the numbers that are specific to your pages.
- .custom-background: Don't change anything here. It's a CSS class of Divi. There must be no space between .page-id-9 and .custom-background
- background-color: #xxxxxx!important; : Here you can insert your HTML color code. The Important is not mandatory
5 - Here's the video result!
What do you say? Do you have any ideas?
6 - Decline with gradient background
The idea of getting a different color on each page is nice but you can also adapt this technique to get a gradient background color. Good idea?
In this case, you can use the following code:
*/ .page-id-9.custom-background { background-image: linear-gradient(to bottom right, #AC58FA, #1bb5ea); Page-id-28.custom-background { background-image: linear-gradient(to bottom right, #1bb5ea, #AC58FA); Page-id-25.custom-background { background-image: linear-gradient(to bottom right, #1bb5ea, #e2a9f3); Page-id-7.custom-background { background-image: linear-gradient(to bottom right, #e2a9f3, #1bb5ea);
}
To learn more about gradients in CSSI invite you to read this Article.


Bonjour,
Je n’arrive pas à utiliser une couleur de fond différente comme c’est indiqué.
Déjà, lorsque j’active la mise en page emboitée, cela créé une sorte de bordure sur toutes les pages de mon site web. Ensuite, malgré l’activation, la couleur de fond des articles de mon blog ne varie pas.
Merci
Mathilde
Bonjour Mathilde, si vous suivez le tuto vous devriez y parvenir. Il faut le faire manuellement sur chaque page/article comme indiqué dans ce tutoriel.
Bonjour Mathilde,
Thanks very much for these code. I love it:)!
Could You help me to change the background with your code but with animation gradient for all my sites not only for each module? What I have to do?
* couleurs changeantes */
.fun-color {
-webkit-animation: random 20s infinite;
animation: random 20s infinite;
}
@keyframes random {
15% { background-color:#EBEAE9; }
30% { background-color: #e0d3d0; }
45% { background-color: #fbf9f8; }
60% { background-color: #eae2df; }
75% { background-color: #f4eeec; }
}
Hi Ewa ! What do you want exactly ? « Background changing color » on all your website ?
Bonjour Lycia,
Je veux que plusieurs pages aient la même couleur de fond. J’ai essayé de regrouper tous les id des pages concernées avec une seule ligne de code (exemple ci-dessous)
.page-id-28, page-id-29, page-id-13.custom-background {
background-color: #AC58FA !important;
}
Mais cela ne fonctionne pas. Suis-je obligée d’écrire une ligne de code pour chaque page id ? ou bien ai-je fait une erreur dans le code ?
Merci pour ton aide
Salut Sandra !
Effectivement tu peux les regrouper normalement mais ton code ne me parait pas correct. Je ne suis pas devant l’ordinateur, je ne peux donc pas te donner le code exact (je l’ai pas en tête) mais déjà, je note qu’il manque un point devant deux de tes classes. Ensuite, si tu « colles » deux classes ensemble, ça n’aura pas le même sens. Un espace est peut-être nécessaire entre .custom-background et .page-id-xxx . Enfin, l’ordre de tes classes a une importance également… Donc tu n’es pas loin mais il faut tester avec les éléments que je viens de te donner…. 😉
Merci Lycia. Je vais faire des tests.
hallo, thanks; this works very well for a page-page, but some how i can’t make it work for a project-page ;the default color stay’s visible on both sides and a small horizontal line just above the bottom menu. I don’t understand. what can i do?
Hi Petra,
For a Project Page, you have to change the CSS Classes. You should try « postid-xxx » instead of « page-id-xxx », like this :
.postid-123.custom-background {
background-color: #1bb5ea !important;
}
instead of
.page-id-123.custom-background {
background-color: #1bb5ea !important;
}
I think, it would be fine 😉
thanks very much Lydia!
You’re Welcome !
Bonjour Lycia
Merci pour tous tes conseils.
Je suis en train de me familiariser avec Divi et je voudrais comprendre pourquoi je n’arrive pas à faire prolonger le fond dégradé dans la vue sur tablette et téléphone, en fonction des modules. Ainsi quand il s’agit d’un texte, le fond passe très bien mais dès qu’il y a un lecteur vidéo, le fond n’englobe pas totalement le lecteur, ce qui fait que je me retrouve avec un fond blanc sous le lecteur. As-tu une idée pour me sortir de ce pétrin ?
Cordialement
Salut JC, il faut que tu regarde le fond des modules où tu as ce problème : tu dois « jeter » la couleur d’arrière-plan afin d’avoir un fond transparent et ainsi rendre visible ton dégradé.
Bonjour
Encore merci Lucia pour ta réponse.
Une autre demande me vient à ce jour. Je souhaiterai donner aux visiteurs des articles de mon site la possibilité de lire « plus » ou « moins » le texte, surtout quand il peut être assez long. Je cherche depuis longtemps un module ou une possibilité de réaliser cela à partir d’un bouton ou d’une page qui se déroulerait, mais je ne trouve pas véritablement ou alors les infos sur le web sont trop compliquées pour mes neurones.
Aurais-tu une idée ?
D’avance merci
Ah désolée, je ne connais pas de plugin qui pourrait faire cela…