
One Divi custom font is a font that is not natively available within the Divi editor or even that of WordPress (Gutenberg). However, depending on your project or your client's project, it is likely to have to use specific fonts which have been tailor-made for the project or have been purchased on a dedicated platform. So we are far from the eternal Google Fonts That we find everywhere.
In this article, I will explain how to implement a custom font in your Divi projects. You will see that there are several ways, some simple and others more complex.
1 - Why use a custom font in Divi?
Not all web projects look the same, or at least should not look the same... That's why using a custom font - also called Custom Font - is a good starting point to differentiate your site from "common" sites.
A custom font lets you stick perfectly to your graphic chart. For example, the font used for your logo could be used on your website. Thus, homogeneity is created between your various communication media.
Do you know you can test Divi for free? See you on this page and click on "TRY IT FOR FREE"
2 - Font formats for the Web
Font files are available in several formats supported more or less well by browsers (Chrome, Firefox, Opera, Safari...).
TTF (TrueType Font) and OTF (OpenType Font) are the best supported font formats:
| Browser version | EOT | OTF/TTF | WOFF | WOFF2 | SVG |
|---|---|---|---|---|---|
| IE 8 | x | ||||
| IE 9-11 | x | x | x | ||
| EDGE 12-14 | x | x | |||
| FIREFOX 40 to 45 | x | x | x | ||
| CHROME 43-49 | x | x | x | ||
| SAFARI 8-9 | x | x | x | ||
| OPERA 32-35 | x | x | x | ||
| iOS SAFARI 8.4 to 9.1 | x | x | x | ||
| ANDROID 4.4-44 | x | x | |||
| CHROME for Android 46 | x | x | x |
So based on this table, you understand that depending on the font files you will import into your site, some browsers will not be able to interpret them.
For example, if you import fonts in EOT or SVG format, very few users will see them.
The solution would then be to import all font formats into your site so that all your users can benefit.
If you are not in possession of all these formats, you will need to generate them via FontSquirrel (we'll see about that later). But concretely, if you use TTF or OTF fonts, this should be largely enough (Who still uses Internet Explorer? Seriously! For my part, I haven't touched that since 1998).
The other solution, which is rather a backup solution, is to indicate in your code the basic fonts that must be supported by the browser in case it fails to display your custom font. For example, you can indicate Arial, Times New Roman, Verdana, Cursive, etc.
Don't delay! Discover the theme Divi here !
3 - Custom font vs Google Font
Here's a question you can ask yourself: why bother using a custom do since most WordPress themes, including Divi, allow to use the catalog of Google fonts (Google Fonts)
It is true that the choice is very broad and it is rare not to find shoes at his foot with the multitude of fonts available. Yet most of them are seen and reviewed. That's right... But there is also another point to be addressed: confidentiality.
Indeed, using this service, Google Fonts API provided the fonts requested when visiting a web page from Google servers. Everything is stored in the browser cache of your visitor and is updated if necessary. As a result, Google retrieves your visitor's IP address which is nothing but personal data. In this case, the GDPR should be respected and you should obtain the visitor's consent to view your policies.
Using Google Font is not illegal but your privacy page will have to inform your visitor, as required by the GDPR. You will also need to link to Google's privacy policy. To find out more about this, I advise you to read this article in detail.
It is also for these reasons that Divi proposes deactivation of Google Fonts fonts for your project:
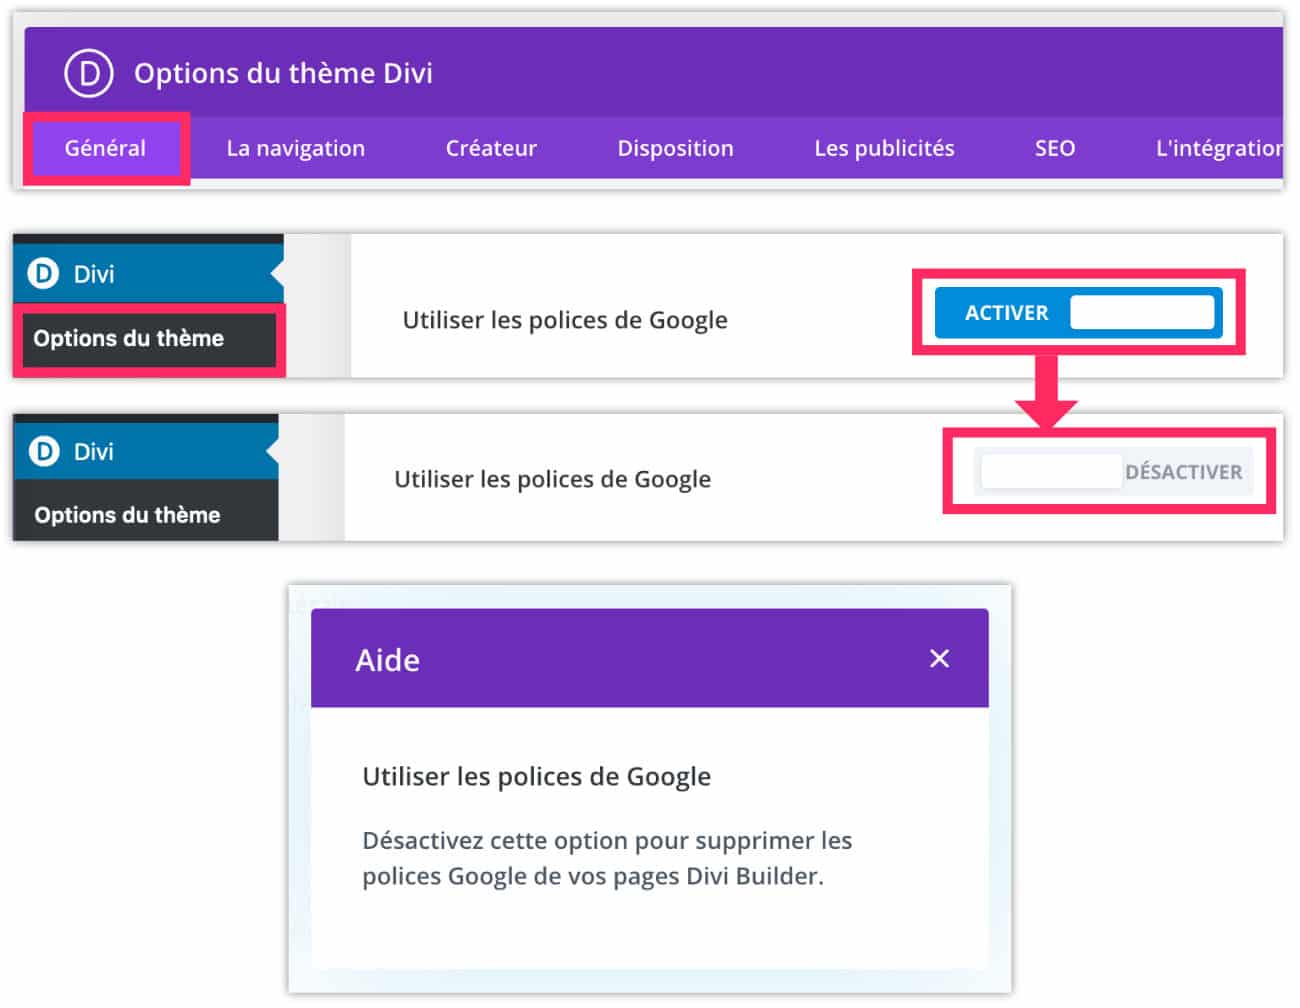
To disable Divi's Google Fonts, just go to the tab Divi > Theme Options > General and uncheck the option to use Google Fonts.
If you decide to dispense with this service, you will certainly need the continuation of this article...
4 - Where to find custom fonts?
There are lots of sites to find custom fonts but don't forget to respect copyright. Indeed, the Free fonts This is the first thing to remember.
Secondly, we must know that there are Premium fonts, i.e. paid fonts. In this case, refer to the license of these fonts as some can be used in your commercial projects and others only in your personal projects. So, make sure you find out.
Finally, here is a list of sites where you can find beautiful fonts:
In the Web, it is quite common to use a classic font for text body and a slightly more sophisticated font for your title fonts. Sites like Typespiration or FontJoy to find the right balance between the two.

5 - Custom font via the Divi Builder
This is the easiest option! Once you have found your ideal font(s) and are in possession of their files, here are the steps to install them in Divi:
5.1. - Be in possession of .ttf and .otf files at least
Depending on the platforms on which you found your fonts, you can be in possession of a font in format .ttf or .otf. For security, you need both, at least you're quiet...
So if you only have one in two, you can use a file converter:
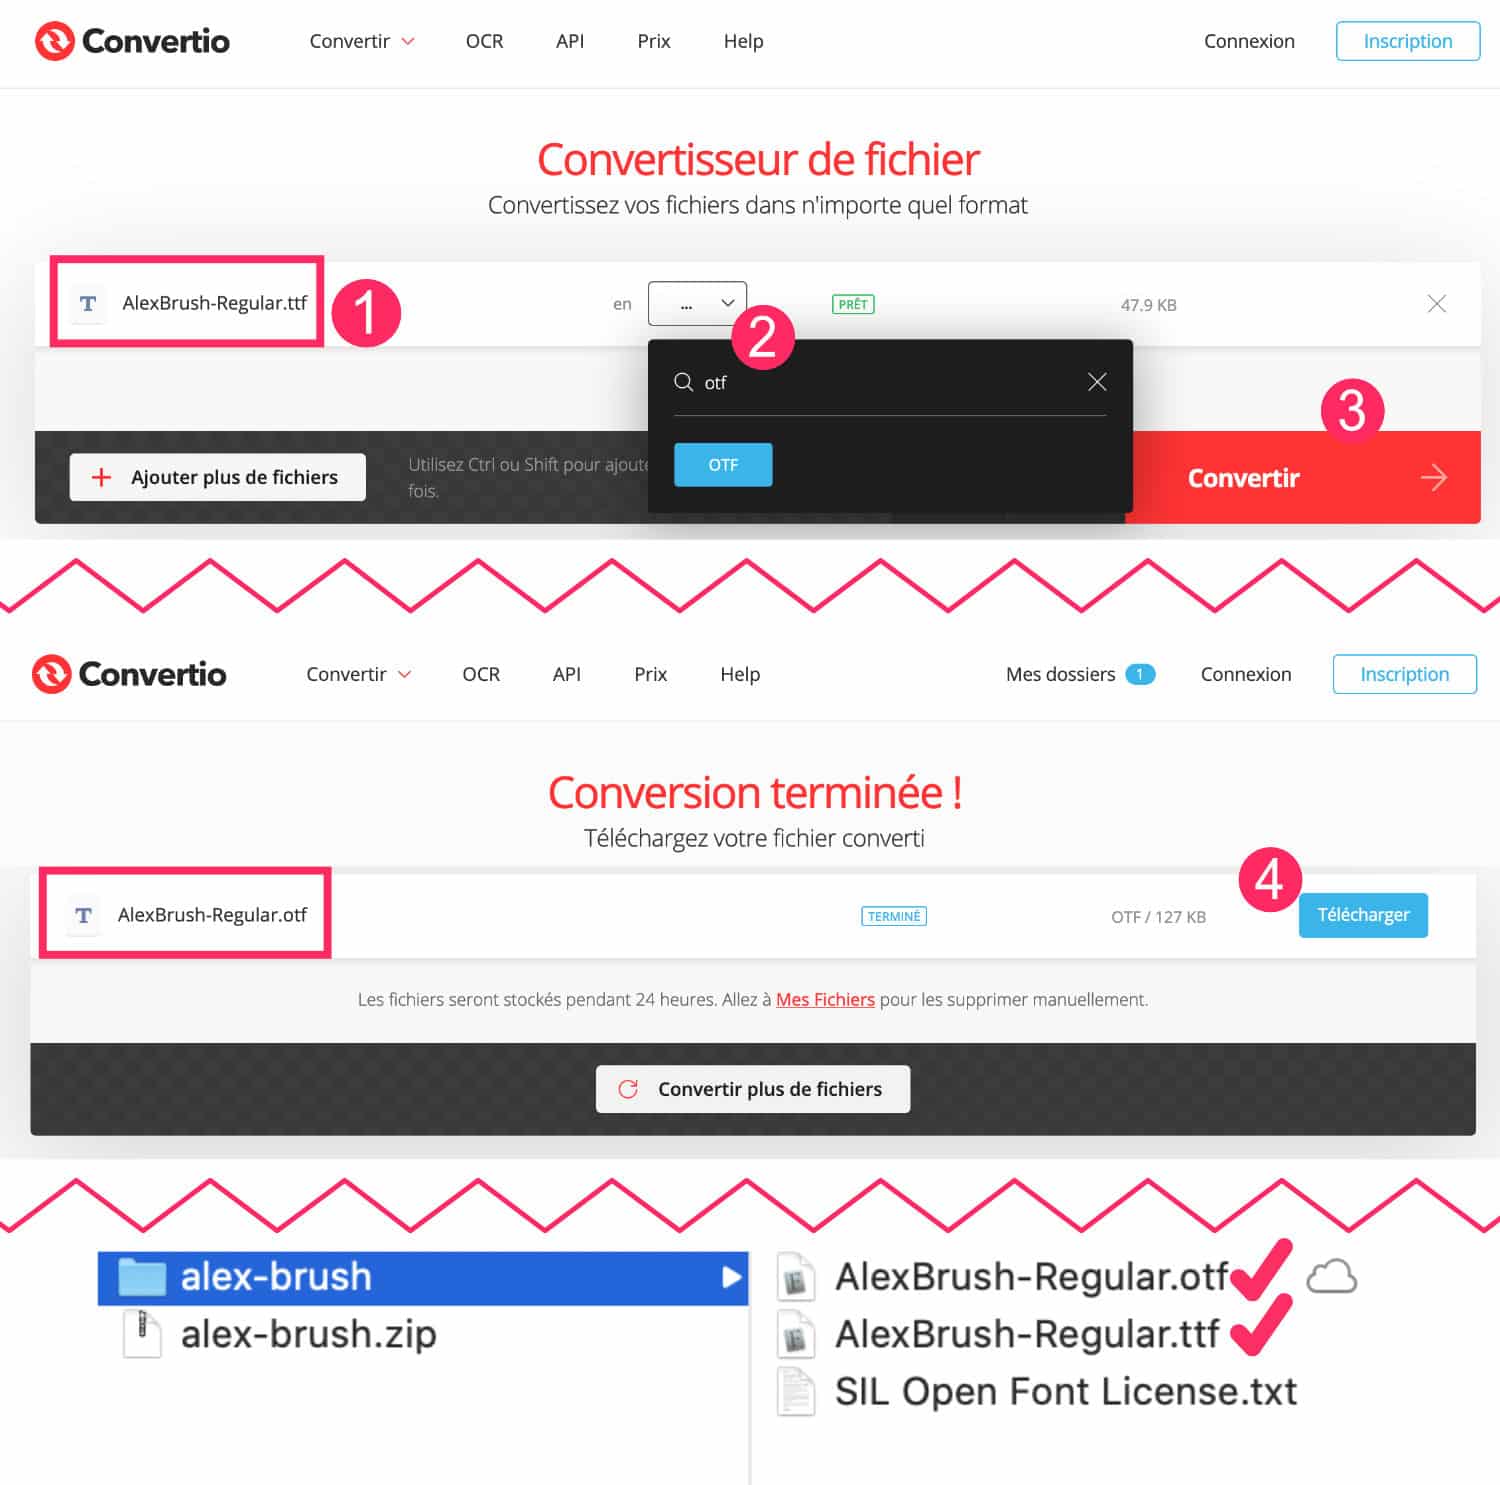
- See you on the converter Convertio.co and download your TTF or OTF file. For my example, this is about AlexBrush-Regular.ttf.
- Choose the format in which this file should be converted. In my case, I choose OTF because I already have the TTF file.
- Validate by clicking Convert.
- Download your file, you will need it...
Here you are now in possession of OTF and TTF files.
5.2. - Import custom fonts via the Divi Builder
The rest of the process is simple:
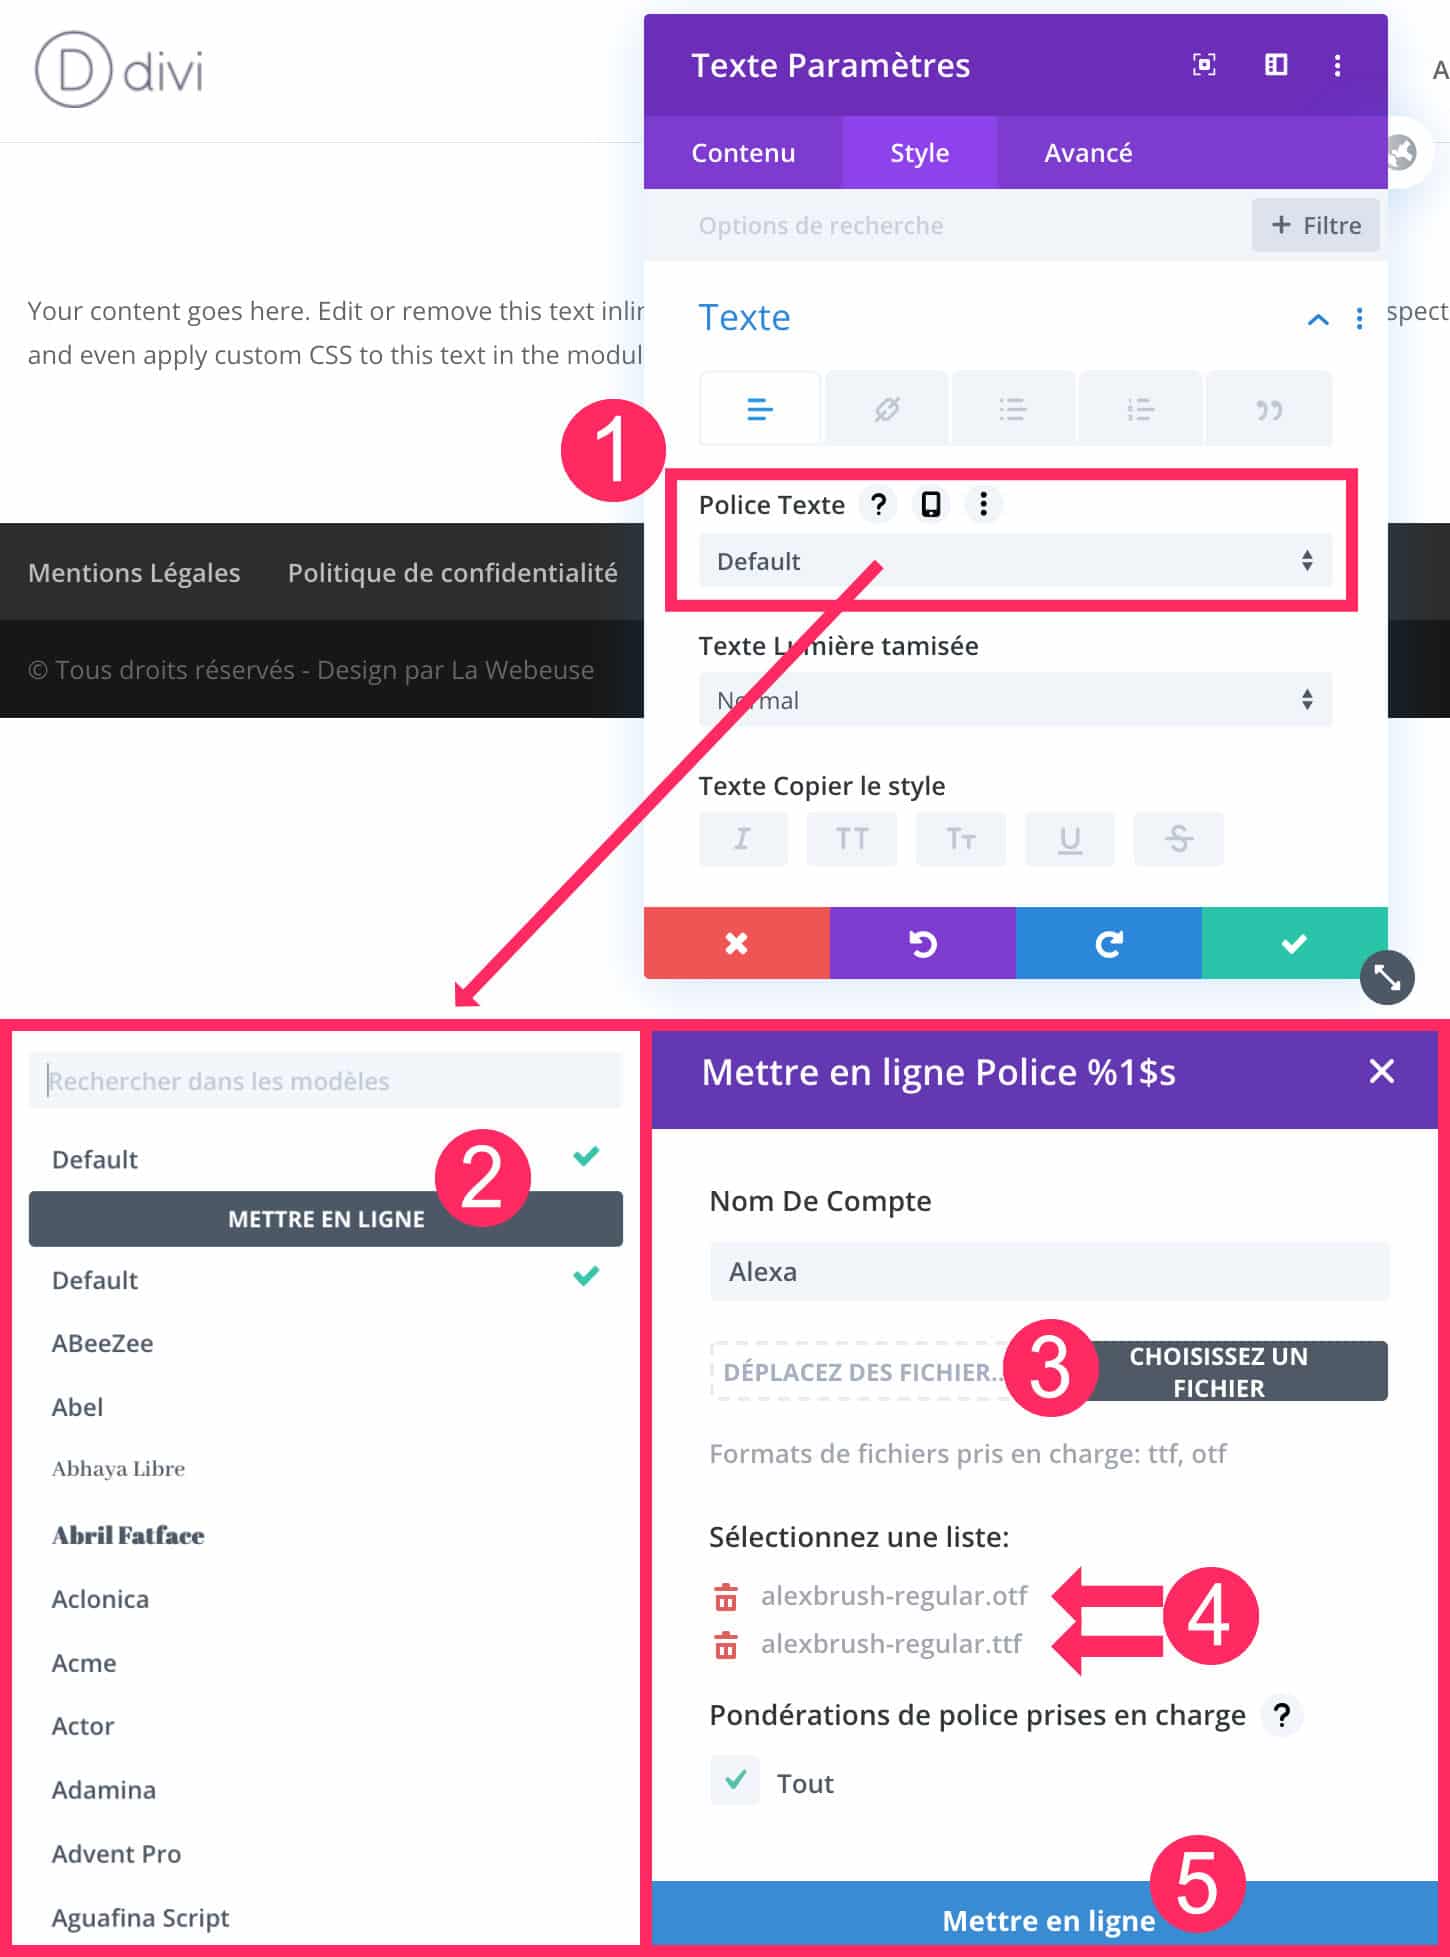
- Open a publication (page or article) with the Divi Builder and insert a Text module. Go to the tab Style to set the font by clicking on the drop down menu.
- From the drop-down menu, choose "Online".
- Choose custom font files. Also think about naming your police. For my example, I named him Alexa.
- At a minimum import OTF and TTF files.
- Validate by clicking online.
Here, your custom font should be functional...
5.3. - Set a default custom font
Now that you're in possession of your custom font, you could him assign the "default" role for your entire site.
So you don't need to define your new font every time you use the Divi Builder, so you will save a lot of time.
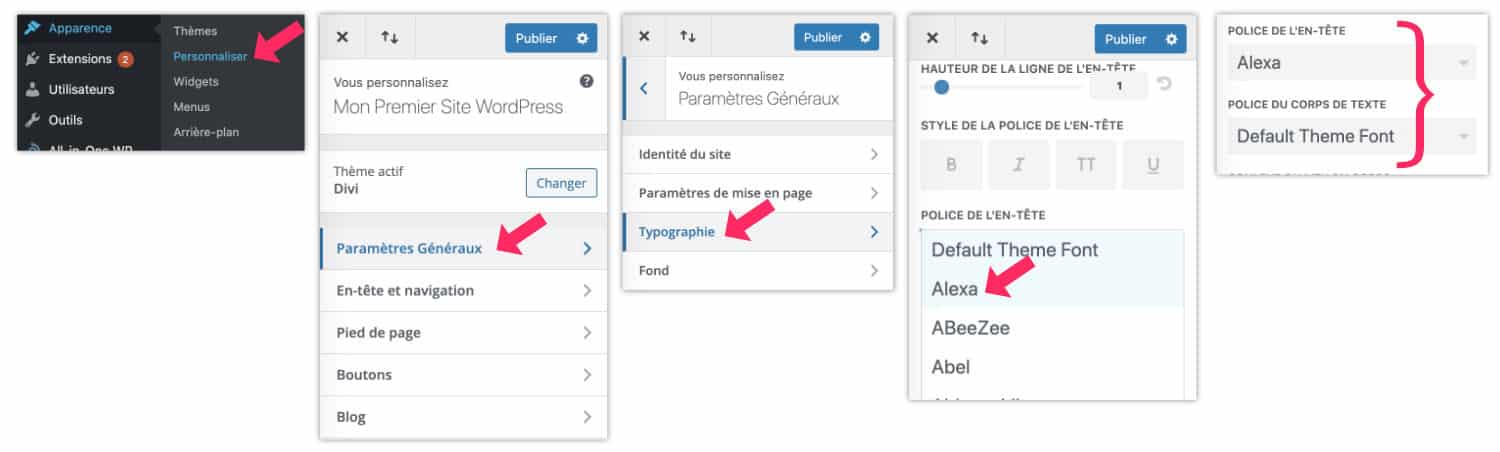
Just go to the tab Appearance > Customize > General settings > Typography and select your new font. You can set your font for all the titles of your site (header police) as well as your font for the body of the site.
5.4 - Problem when importing your font into Divi
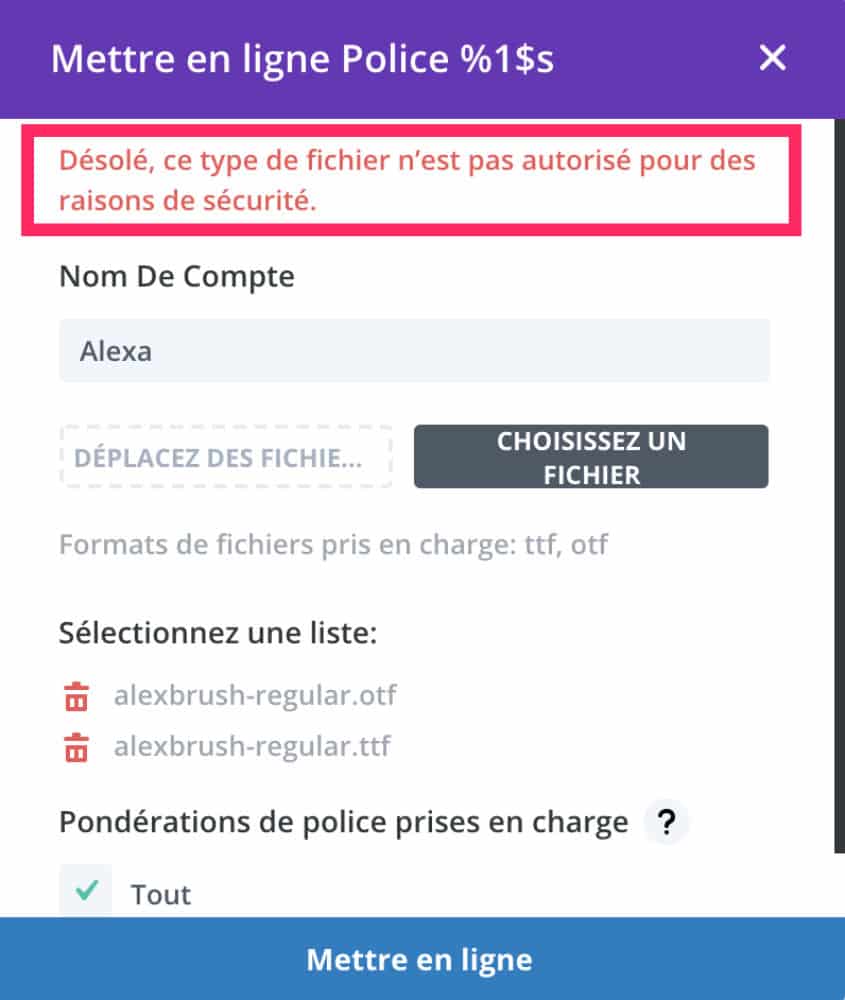
You may not be able to import your custom font into the Divi Builder, which states:
"Sorry, this type of file is not allowed for security reasons."
Two solutions are available to correct the problem:
5.4.1. - Solution #1: correct via wp-config.php
If you are comfortable with WordPress, your server and your FTP software, just edit the file wp-config.php present at the root of your site and enter the following line of code at the end of the file:
define('ALLOW_UNFILTERED_UPLOADS', true);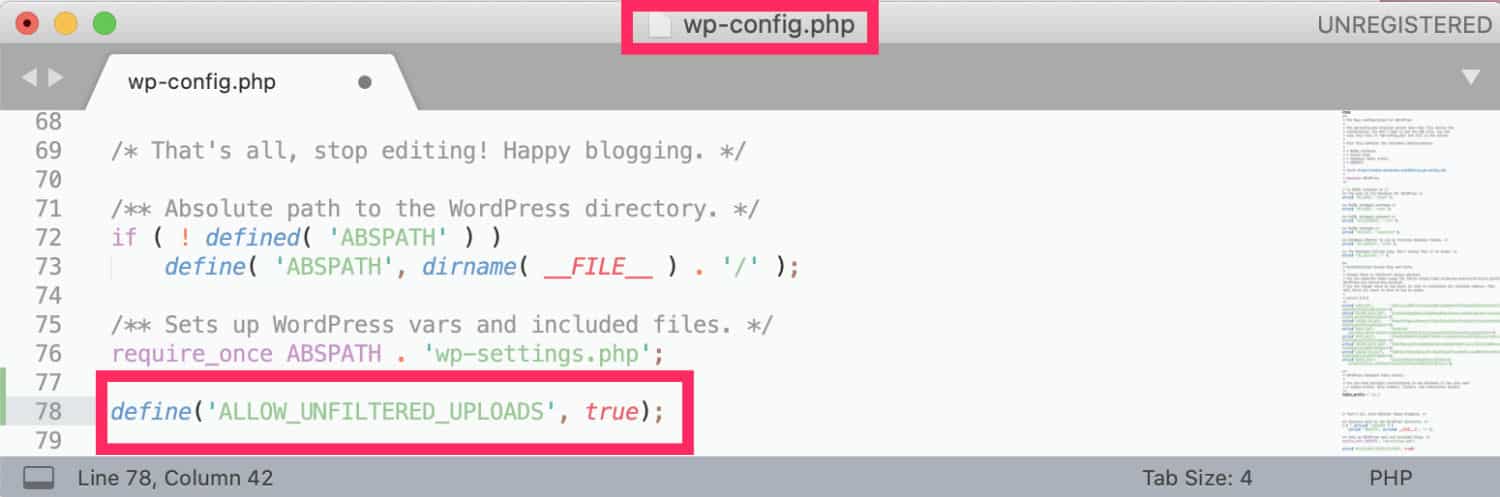
Attention, for security reasons, precisely, you will have to delete this line of code as soon as you have finished importing your custom fonts into Divi!
5.4.2. - Solution 2 : correct with an extension
If you are not at all comfortable with handling files within your server, then prefer the use of a dedicated extension:
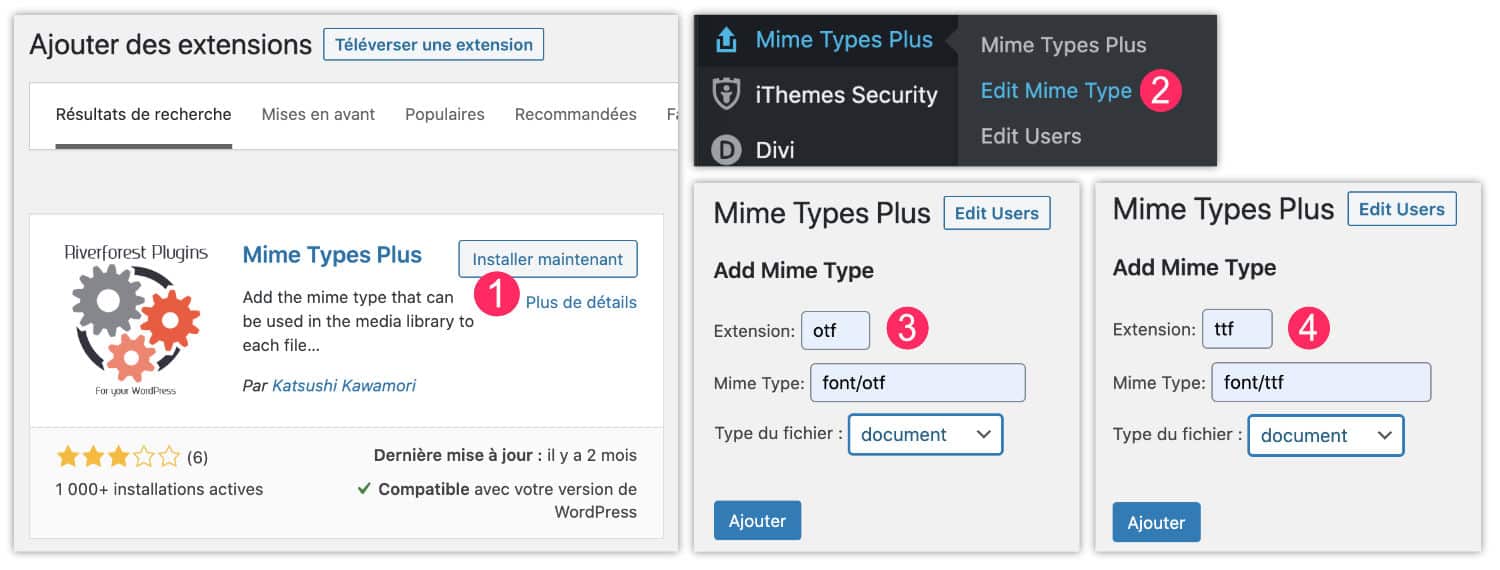
- Go to the tab Extensions > Add and look for extension Mime Types Plus. Install it and activate it.
- Go to the tab Mime Types Plus > Edit Mime Type.
- To allow OTF files: note otf in the extension field, font/otf in the Mime Type field and choose Document as a file type.
- To allow files TTF Note: ttf in the extension field, font/tff in the Mime Type field and choose Document as a file type.
Here you can start again the import (Step 5.2 of this article) and you should not encounter the problem anymore.
6 - Custom font in a child theme (method @font-face)
Another solution exists for implement a new font in your WordPress site, this is the @font-face method. This one works for any theme, not just Divi.
You just need to add files from your custom fonts within your child theme and add a few lines of code to its file style.css.
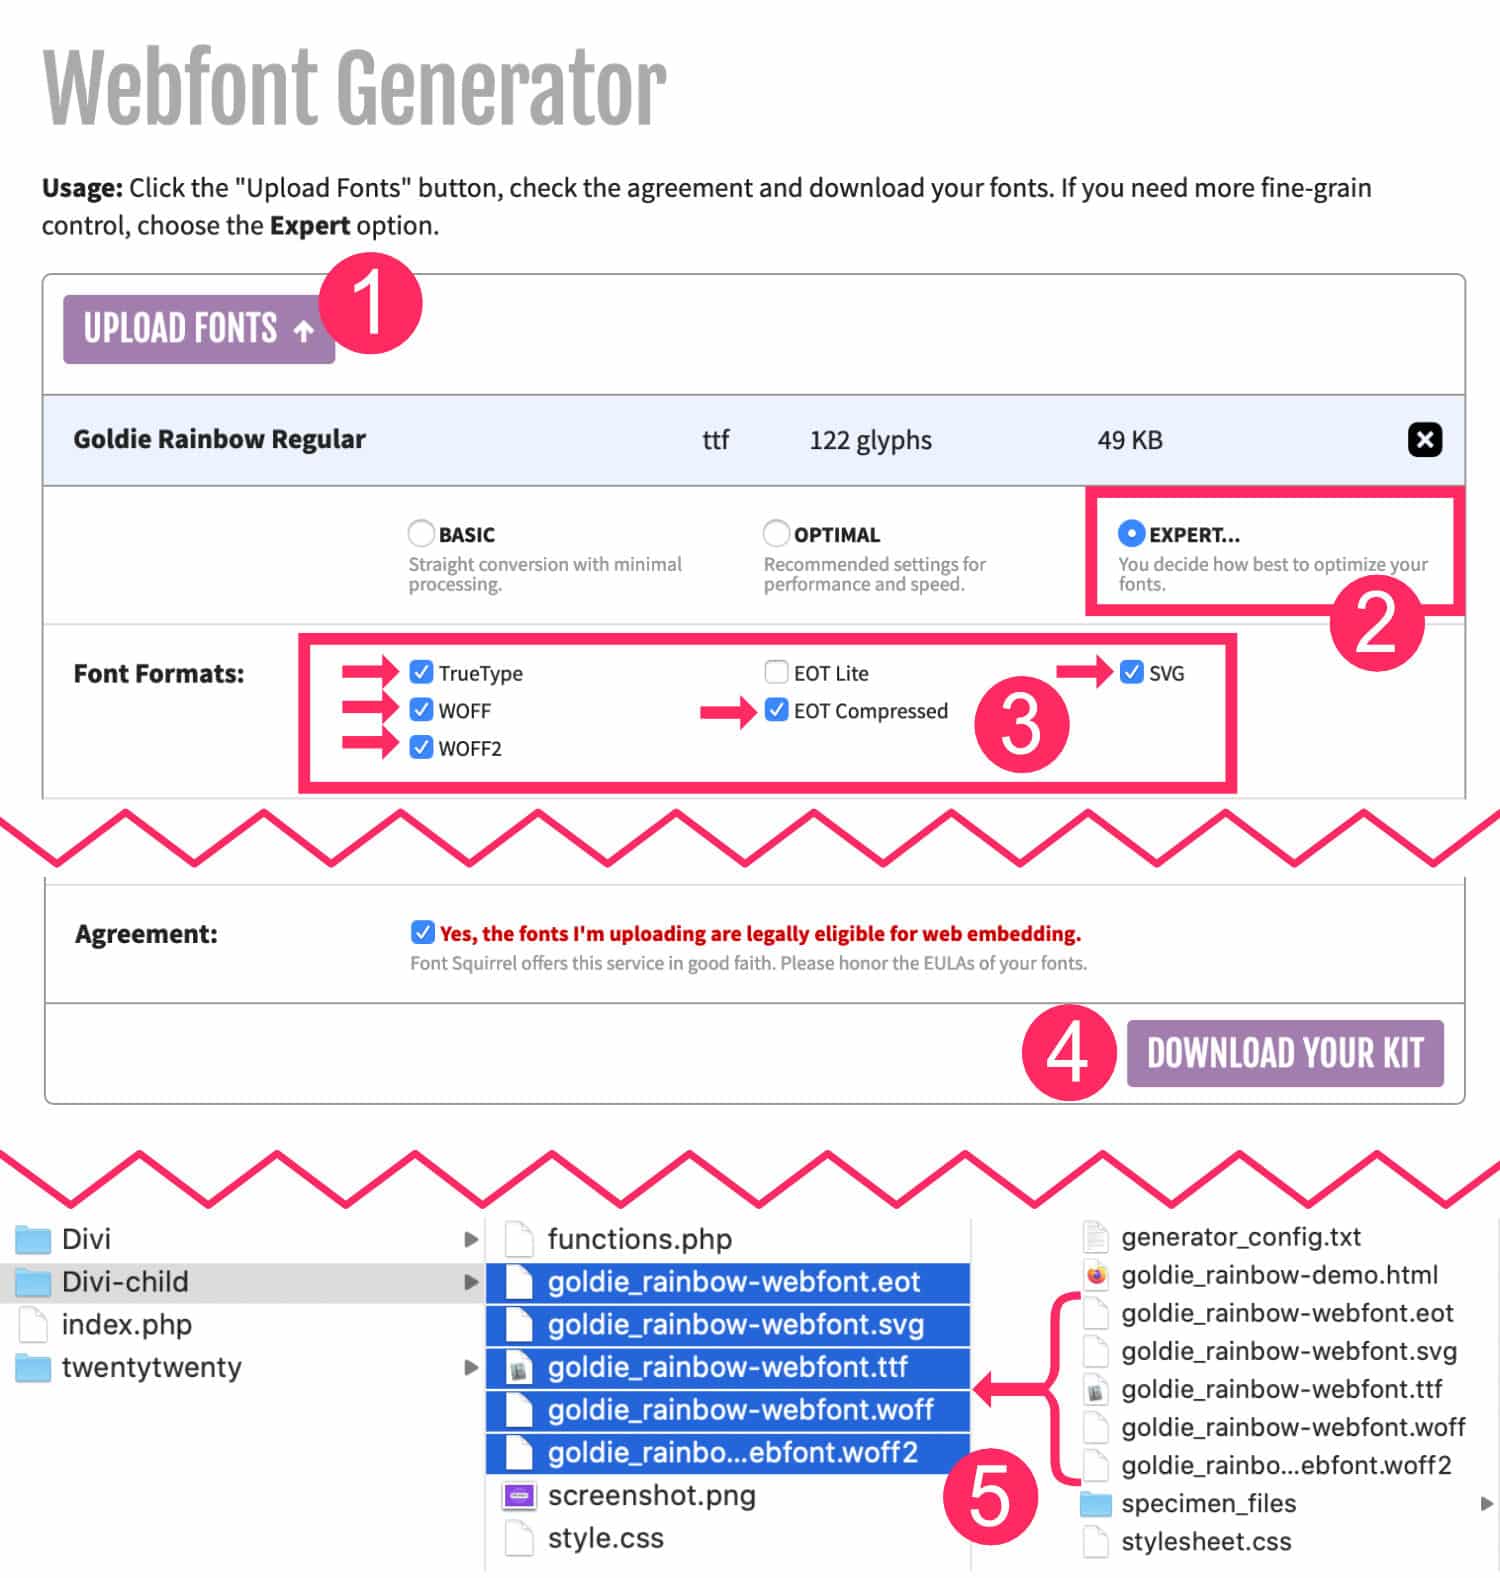
- See you on the official website of FontSquirrel and download the custom font file you have in your possession (e.g. OTF or TTF).
- Select Mode EXPERT.
- Check all file formats.
- Leave the other options as they stand and accept the terms. Click DOWNLOAD YOUR KIT.
- You are now in possession of a folder containing several files. Select the 5 font formats (EOT, SVG, TTF, WOFF and WOFF2) and place them at the root of your Divi child theme.

- Then open the file style.css of your child theme and place the code in the file stylessheet.css provided by FontSquirrel. This code looks like this:
@font-face {
    font-family: 'goldie_rainbowregular';
    src: url('goldie_rainbow-webfont.eot');
    src: url('goldie_rainbow-webfont.eot?#iefix') format('embedded-opentype'),
         url('goldie_rainbow-webfont.woff2') format('woff2'),
         url('goldie_rainbow-webfont.woff') format('woff'),
         url('goldie_rainbow-webfont.ttf') format('truetype'),
         url('goldie_rainbow-webfont.svg#goldie_rainbowregular') format('svg');
    font-weight: normal;
    font-style: normal;
}- Then specify which HTML tags should use this custom font. The CSS code might look like this:
h1 {
font-family: goldie_rainbowregular, Arial, sans-serif;
font-size: 48px;
}

h2 {
font-family: goldie_rainbowregular, Arial, sans-serif;
font-size: 36px;
}

h3 {
font-family: goldie_rainbowregular, Arial, sans-serif;
font-size: 24px;
}
As you see in the above code, the police "goldie rainbowregular" is used for Level 1, 2 and 3 titles. The second value (Arial) and the third value (without-serif) are Emergency police which will be taken into account by browsers in case they fail to load your custom font.
I can conceive that this method is much more complex than the previous one but it is the classic and universal way to add a custom font in a WordPress theme.
7 - Custom font via Divi settings
There is one final solution for add custom fonts in Divi. This is valid if your font is hosted elsewhere on the Web or if you need font Google Font that is not yet available in the Divi Builder (this can happen).
Here's how:
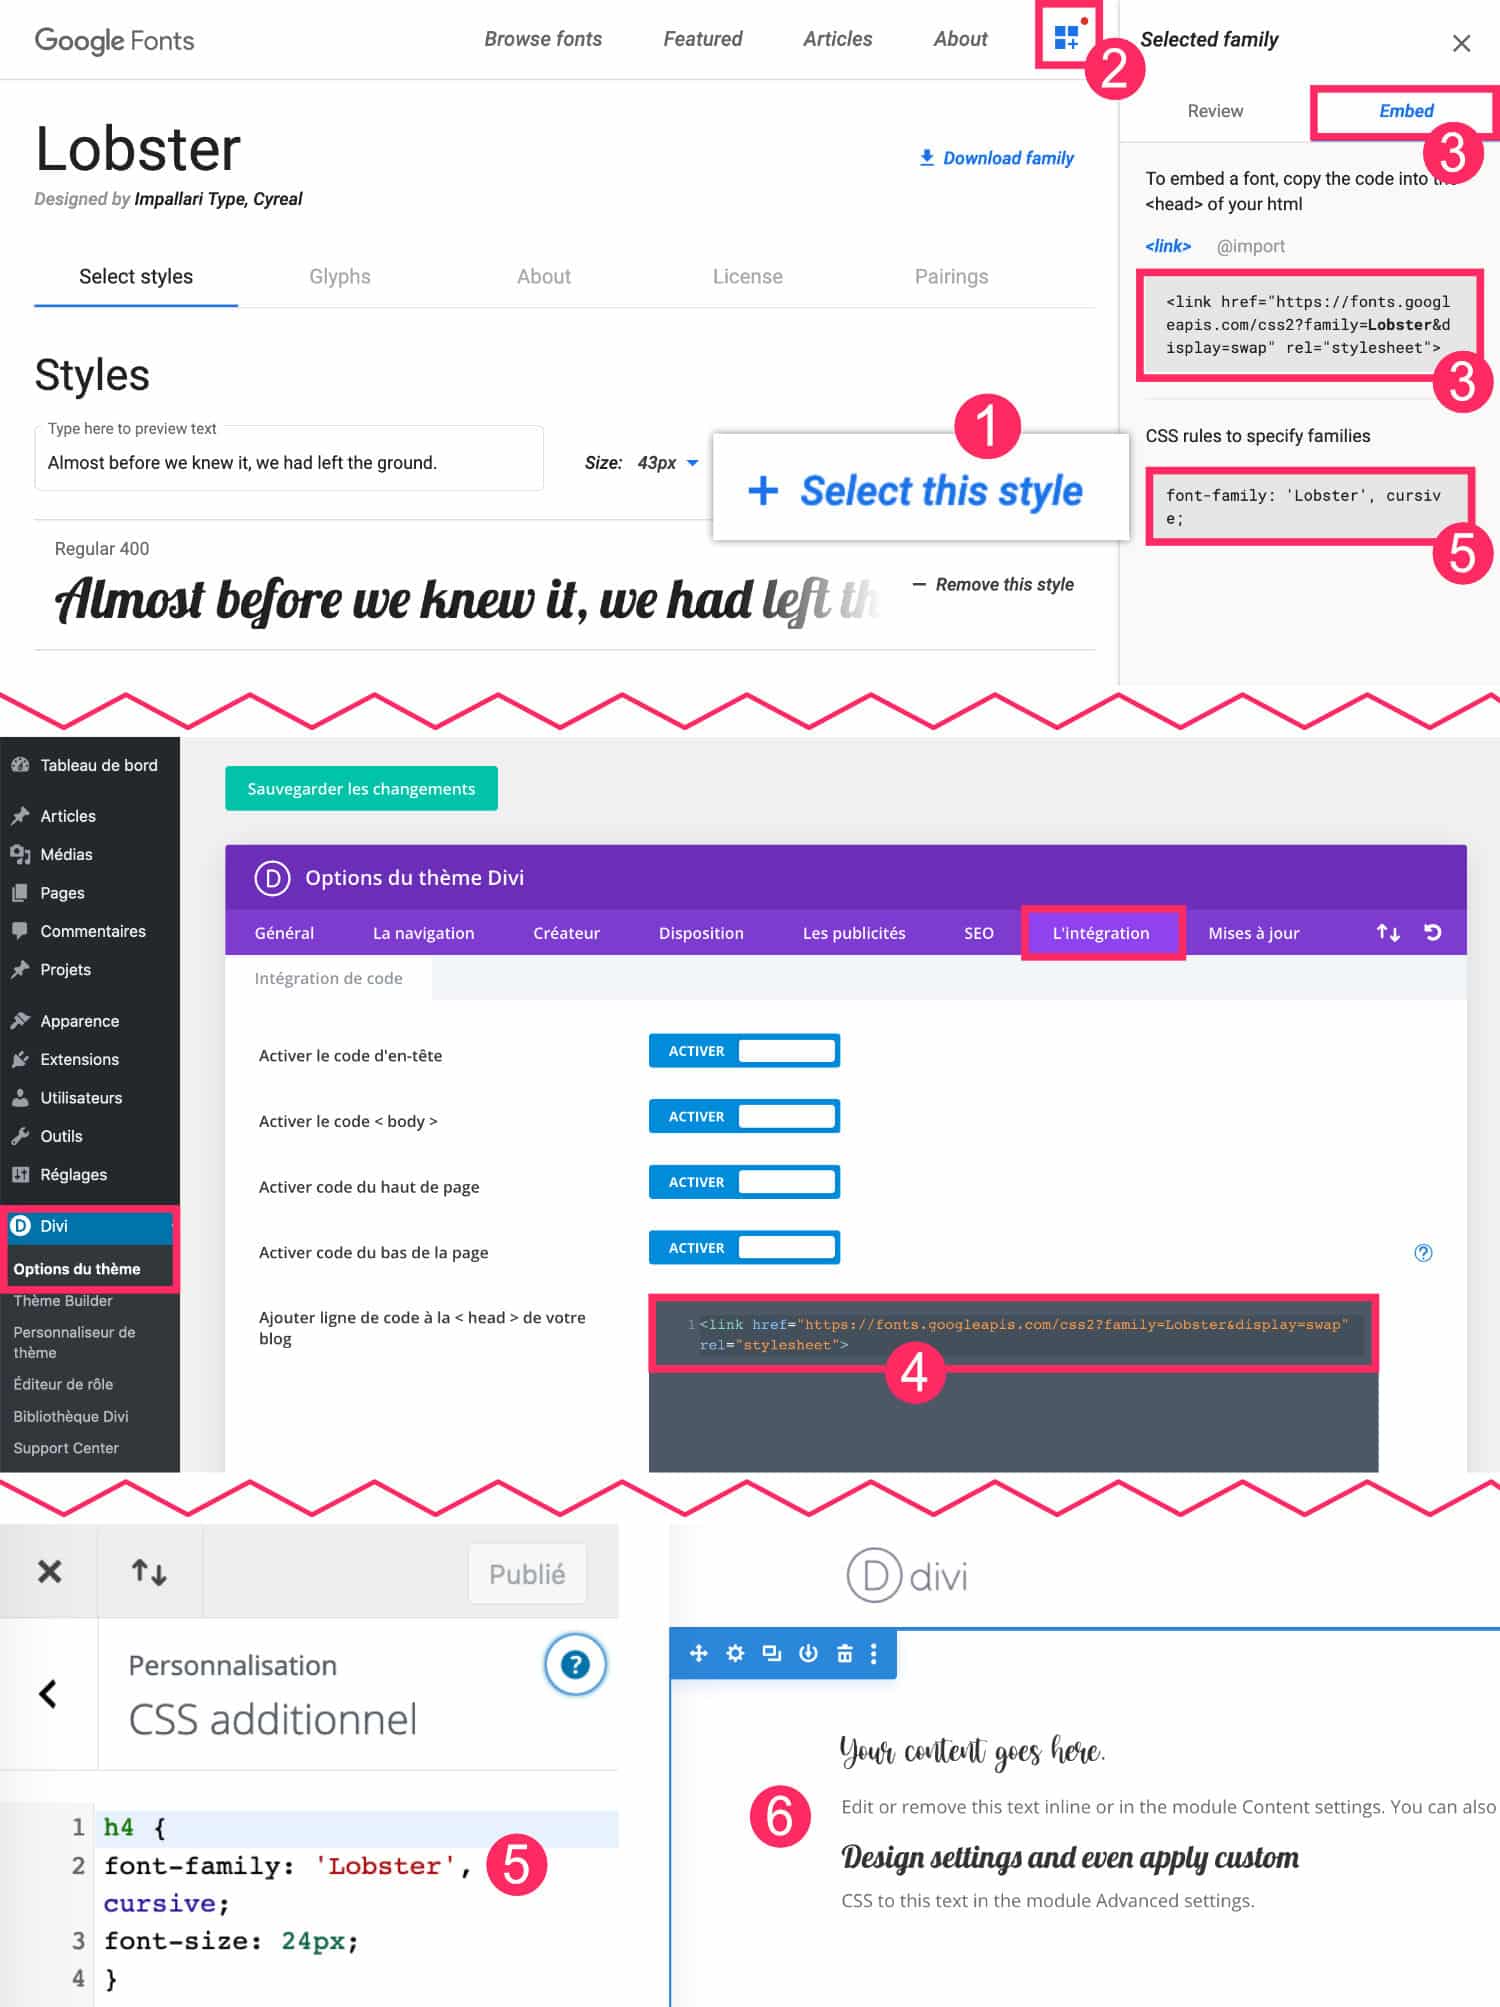
- Visit the website Google Fonts. Find your font and select it by clicking on +Select this style.
- A side panel opens.
- In the tab Embed, you will find the code to implement in Divi. Copy the first.
- Go back to the administration of your site on the tab Divi > Theme Options > Integration and paste this code in the first field, section
<head>the site. The code should look like this:
<link href="https://fonts.googleapis.com/css2?family=Lobster&display=swap" rel="stylesheet">
- Then, you will have to define in your CSS style sheet which elements should use this new font. For example, if I want my H4 titles to use the police Lobster, here is the code to add to the tab Appearance > Customize > Additional CSS :
h4 {
font-family: 'Lobster', cursive;
font-size: 24px;
}- Now, regardless of the editor used (Gutenberg or Divi), all fonts defined in the style sheet must be functional on the entire site.
8 - In conclusion...
Fonts, colors and images are the most important elements in a graphic charter and website design. Like all the time with WordPress, there are various ways to achieve its ends. I hope this tutorial will have helped you to better understand the operation of WordPress and Divi and have helped you advance your site projects.
To go further, here is a playlist that should interest you:
- How to download fonts in WordPress without plugin.
- 50 terms of typography used in webdesign.
- 3 tools to find a font from an image.
- 40 best free fonts.
- How to import TypeKit fonts into WordPress.
- How to create your own custom font.


Bonjour ! Merci pour ce post très constructif !
J’ai suivi à la lettre la méthode Mime Type Plus et l’ajout de police dans le divi builder !
A priori ça fonctionne très bien sur l’ensemble de mes sites, sauf sur un !
Je ne comprend pas, lorsque je visionne une page la police personnalisé s’affiche très bien, et si je recharge la page la police saute ! Auriez-vous un conseil ? Merci beaucoup !
Salut Anne Laure. Ça saute puis ça revient ? Ça peut venir du cache peut-être. As-tu un plugin de cache ?
Oui c’est ça ! Merci pour ta réponse rapide !
Ca saute et ça revient ! J’avais de prè-installé « WP Fastest Cache » et « WP-Optimize – Clean, Compress, Cache » que j’ai désactivé pour voir si ça venait de là… Mais pas de changement visible !
C’est exactement ça ! Merci de ta réponse rapide
La police saute et revient !
J’avais deux extensions pré-installé : WP Fastest Cache et WP-Optimize – Clean, Compress, Cache
! Je les ai désactivé mais rien ne change !
Alors si rien ne change, il faut investiguer : essaye avec une autre police pour voir si ça vient de là ou alors il peut y avoir un conflit ailleurs ?
J’ai changé la police mais le problème persiste ! Juste à ce niveau d’ailleurs… Sur d’autres polices personnalisées ça ne saute pas !
Désolée je sèche… ça vient peut-être des autres plugins…
Bonjour Lycia,
Sur la version wordpress 5.6.2, je ne trouve pas cette ligne de code dans le wp-config ?
Merci pour cet article.
Emilie
Bonjour Lycia,
Je viens de finir une refonte de site dans un sous-domaine et j’avais installé une police personnalisée dans Divi : le Faune (http://www.cnap.graphismeenfrance.fr/faune/). Tout fonctionnait bien mais lorsque j’ai déposé les fichiers à la racine du domaine, les polices ont sauté et je n’arrive pas à les rétablir. J’ai vérifié via le FTP : elles sont bien présentes dans le dossier fontes (.ttf et .otf). As-tu une idée ?
Merci d’avance pour tes lumières.
Sandrine
PS. Le site en question est ‘atelierdelta.eu’. Sur la page d’accueil, on peut voir un exemple d’italique dans le bloc du haut. Les fonds aussi ont disparus mais je les ai rétablis sur la page d’accueil et sur le page espace Public…
Désolée, j’avais mal lu, il faut lui ajouter cette ligne de code,
vous pouvez supprimer mon commentaire si vous voulez.
Merci encore pour votre site.
OK Super !
Salut Granon, c’est bizarre. Il y avait peut-être un problème de mise en cache ? C’est rentré dans l’ordre depuis ?
J’ai installé les polices à nouveau et tout est rentré dans l’ordre. Merci.
Super !
Merci pour le tutoriel ! Il fonctionne à merveille !
Super !
Bonjour,
Je voulais essayé de suivre votre tuto pour personnaliser ma typographie : mais dans le 5.3 – Définir une police personnalisée par défaut moi je tombe sur un side-barre « vide » j’ai juste un onglet widget qui est vide…
Est-ce que j’ai fait une erreur qui empêche les paramètres généraux de s’afficher?
En vous remerciant pour ce que vous faites et du temps que vous allez m’accorder,
Cordialement
François
Great article, super helpful!
Thank you Hank !
Bonjour François, il faut bien aller à l’onglet Apparence > Personnaliser > Paramètres généraux > Typographie. Il n’y a pas de Widget ici.
Bonjour,
Ma police n’apparait pas sur le mobile mais je la bien sur les autres écrans.
Savez-vous d’où ça pourrait venir ?
J’ai mis la police avec la méthode font-face
Merci d’avance
Bonjour Emilie, c’est bizarre. Peut-être as-tu un plugin de cache qui empêche cela ?
Bonjour Lycia,
Merci pour votre réponse.
En effet cela venait du plugin 🙂
Bonjour. Merci encore une fois pour ce super article. Vous êtes devenue ma référence. Bravo pour votre boulot.
J’ai une question. J’ai déjà installé une police en otf. Vous recommandez d’installer au moins deux formats. Comment rajouter le format ttf si possible sans avoir à rentrer dans le code? Sinon il me faudrait desinstaller ma police et la réinstaller avec les deux formats. Est-ce vraiment nécessaire si la version otf semble bien fonctionner sur différents navigateurs?
Merci pour votre réponse.
Bonjour,
Je ne sais pas si mon précédent commentaire a bien été enregistré.
J’ai déjà téléchargé ma police en otf et elle s’affiche bien sur les navigateurs mentionnées dans le tableau plus haut. Est-il malgré tout indispensable que je charge la version ttf sur le site? Si oui, comment faire pour la rajouter sans avoir à supprimer celle déjà installé? Ai-je une solution qui m’éviterait de rentrer dans le code du site svp? J’avoue que tout fonctionne et que j’aimerais éviter des manipulations que je ne maitriserai pas mais votre article m’interpelle.
Merci pour votre réponse.
Pardon Isabelle, je t’ai répondu par email. Non, c’est bon, le fichier OTF est suffisant normalement. Si tout fonctionne, pas besoin du TTF
Non, si tout fonctionne, pas besoin du second fichier.
Thank you so much for your help! Before reading your guide, I couldn’t even upload files downloaded directly from Google Fonts – I was going to rip my hair out!!!
I followed ‘5.4.2 – Solution #2: correct with an extension’ – the Mime Types Plus plugin is so easy to use.
Thank you so much again!
Un tout grand merci pour ton article. J’avais justement le problème avec le message d’erreur et grâce à toi, j’ai eu l’occasion de télécharger le plugin nécessaire pour lever se problème.
Merci 🙂
Super
Bonjour Lycia,
J’espère que tu vas bien.
Doit-on obligatoirement désactiver Google Font pour télécharger de nouvelles polices ? Car lorsque je tente d’en télécharger, je reçois ce message d’erreur : « Désolé, ce type de fichier n’est pas autorisé pour des raisons de sécurité. »
Merci pour ton aide !
Salut Mathilde, non il ne faut pas les désactiver. Mais à voir ton commentaire je comprends que tu n’as pas lu mon tutoriel en entier 😉
Great ! Thank you 😉
Bonjour Lycia,
j’ai une question à laquelle je n’arrive pas à trouver la solution :
Je dois utiliser une font d’Adobe (j’ai le compte CC), sur un site DIVI, mais je ne sais pas commet faire…
As-tu une idée ?
Merci d’avance,
Valérie
Bonjour Lycia 🙂
Merci beaucoup pour ces explications très détaillées ! J’ai essayé d’intégrer les polices avec la méthode Font face sur le FTP et en plus de mettre H1, H2 etc.. j’ai aussi ajouté « a, li, nav… » car je souhaitais que la police soit aussi mon corps de texte. Or finalement c’est toute l’interface de Divi qui devient cette typographie. Lorsque je suis dans le visual builder et que je clique sur l’engrenage pour modifier quelque chose toute la fenêtre Divi qui s’affiche est écrite dans cette même typographie. Y a t-il un moyen de faire en sorte que la police qu’on importe s’affiche pour tous les titres, corps de textes, listes à puce etc.. sauf pour l’interface Divi ?
Merci beaucoup !
Hello Aurore, non, en effet, tout prend la police que tu as codé. Si elle te dérange, pense à tes lecteurs, elle pourrait les déranger aussi ? Sinon, si tu penses que c’est acceptable, il faudra faire avec, aussi dans le back office 😉
Salut Valerie, je sais pas ? Est il possible d’obtenir les fichiers de cette police ? Si oui, tu suis simplement le tutoriel ici
Merci de ton retour Lycia,
j’ai eu la réponse de la part d’Adobe, et oui il faut une licence supplémentaire pour utiliser leur fonts en version web (alors que j’ai la licence…). Belle fin d’année à tous !
Ah ok merci pour l’info, c’est pas étonnant de leur part…
Merciiiiiiiiiiiiiiiiiiiiiiiiiiiiiiiiiiiiiiiiiii !
Décidément, c’est régulièrement grâce à ton blog que je trouve réponse à mes blocages ! trop chouette !
Super !
Oh génial, merci Lycia, j’avais le message d’erreur suite à l’importation des 2 formats, et grâce à Mime Types Plus le problème est résolu !! 🙂
Super Marine !
Merci beaucoup !!
Merci infiniment pour ce tuto !
D’habitude mes imports de police se passent sans encombre mais aujourd’hui ça ne fonctionnait pas. Jusqu’à ce que j’utilise la méthode Mime Types Plus que je ne connaissais pas.
Merci encore 😀
Super !
Bonjour Lycia,
Merci pour cet article qui me sauve la vie ahah !
Petite question : J’ai utilisé la méthode avec Mime Type Plus. Une fois que j’ai réalisé l’opération et que tout fonctionne, est-ce que je peux désinstaller l’extension ?
Merci encore,
I love Divi custom fonts! They make my blog look so professional.
Louis, oui, normalement, tu peux supprimer l’extension.
Encore un super article, super utile et super clair.
Merci Lycia!
Merci Jérôme