
The "Ken Burns" effect is a well-known, simple and effective effect to give a movement impression to static images. In this article, I explain how to simply add these effects to your full screen header or Divi slideshows with some CSS lines.
1 - What is the "Ken Burns" effect?
The "Ken Burns Effect" is an animation technique used mainly in video editing and video slideshows. It consists of applying a simulated camera motion to a fixed image, combining a front/rear zoom and a panoramic (lateral or vertical displacement).
This term comes from American documentary artist Ken Burns, which has widely popularized this technique in its historical films, especially to give dynamic to archival photographs.
These effects can be used in:
- Documentaries : to give life to historical photos.
- Slideshows : to make presentations more attractive.
- Video montages Software such as iMovie, Final Cut Pro, Premiere Pro, etc. usually offer these Ken Burns effects.
It is a simple but effective effect to capture the viewer's attention and give an impression of movement to static images.
Did you know that? You can test Divi for free by visiting on this page and by clicking on "TRY IT FOR FREE"
2 - Create the Ken Burns effect with some CSS lines
We will create 6 CSS classes that can then be applied to certain Divi modules. Add the following code to the Appearance > Customize > Additional CSS:
.kb-zoomout .et_pb_slide .et_parallax_bg,
.kb-zoomout .et_parallax_bg {
  animation: zoomout 7s forwards;
}

.kb-zoomin .et_pb_slide .et_parallax_bg,
.kb-zoomin .et_parallax_bg {
  animation: zoomin 7s forwards;
}

.kb-zoomin-right .et_pb_slide .et_parallax_bg,
.kb-zoomin-right .et_parallax_bg {
  animation: zoomin-right 7s forwards;
}

.kb-zoomout-right .et_pb_slide .et_parallax_bg,
.kb-zoomout-right .et_parallax_bg {
  animation: zoomout-right 7s forwards;
}

.kb-zoomin-left .et_pb_slide .et_parallax_bg,
.kb-zoomin-left .et_parallax_bg {
  animation: zoomin-left 7s forwards;
}

.kb-zoomout-left .et_pb_slide .et_parallax_bg,
.kb-zoomout-left .et_parallax_bg {
  animation: zoomout-left 7s forwards;
}

@keyframes zoomout {
  0% {
    transform: scale3d(1.5, 1.5, 1.5) translate3d(0px, 0px, 0px);
  }
  100% {
    transform: scale3d(1.1, 1.1, 1.1) translate3d(0px, 0px, 0px);
  }
}

@keyframes zoomin {
  0% {
    transform: scale3d(1.1, 1.1, 1.1) translate3d(0px, 0px, 0px);
  }
  100% {
    transform: scale3d(1.5, 1.5, 1.5) translate3d(0px, 0px, 0px);
  }
}

@keyframes zoomout-right {
  0% {
    transform: scale3d(1.5, 1.5, 1.5) translate3d(-150px, -20px, 0px);
  }
  100% {
    transform: scale3d(1.1, 1.1, 1.1) translate3d(0px, 0px, 0px);
  }
}

@keyframes zoomin-right {
  0% {
    transform: scale3d(1.1, 1.1, 1.1) translate3d(0px, 0px, 0px);
  }
  100% {
    transform: scale3d(1.5, 1.5, 1.5) translate3d(-150px, -20px, 0px);
  }
}

@keyframes zoomout-left {
  0% {
    transform: scale3d(1.5, 1.5, 1.5) translate3d(150px, -20px, 0px);
  }
  100% {
    transform: scale3d(1.1, 1.1, 1.1) translate3d(0px, 0px, 0px);
  }
}

@keyframes zoomin-left {
  0% {
    transform: scale3d(1.1, 1.1, 1.1) translate3d(0px, 0px, 0px);
  }
  100% {
    transform: scale3d(1.5, 1.5, 1.5) translate3d(150px, -20px, 0px);
  }
}
Here are some explanations:
- .kb-zoomin : Zoom in (enlargement). Animation: the element starts at 1.1x its normal size and gradually grows up to 1.5x.
- .kb-zoomout : Zoom back (reduction). Animation: the element starts at 1.5x its size and gradually returns to 1.1x.
- .kb-zoomin-right : Zoom forward with moving to the right. Animation: The element grows while moving to the right (-150px in X).
- .kb-zoomout-right : Zoom back with right movement. Animation: the element shrinks while moving to the right (-150px in X).
- .kb-zoomin-left : Zoom forward with left-hand movement. Animation: the element grows while moving to the left (+150px in X).
- .kb-zoomout-left : Zoom back with left hand movement. Animation: the element shrinks while moving to the left (+150px in X).
As a reminder: Here's how to add code to Divi.
3 - Add a Ken Burns effect to a "Full screen header" module
Once the CSS is added to your site, it will be very easy to add the effect on a full screen header for example. To do this, add a fullscreen section (violet section) to your page, and add a module in this section Header Full Screen.
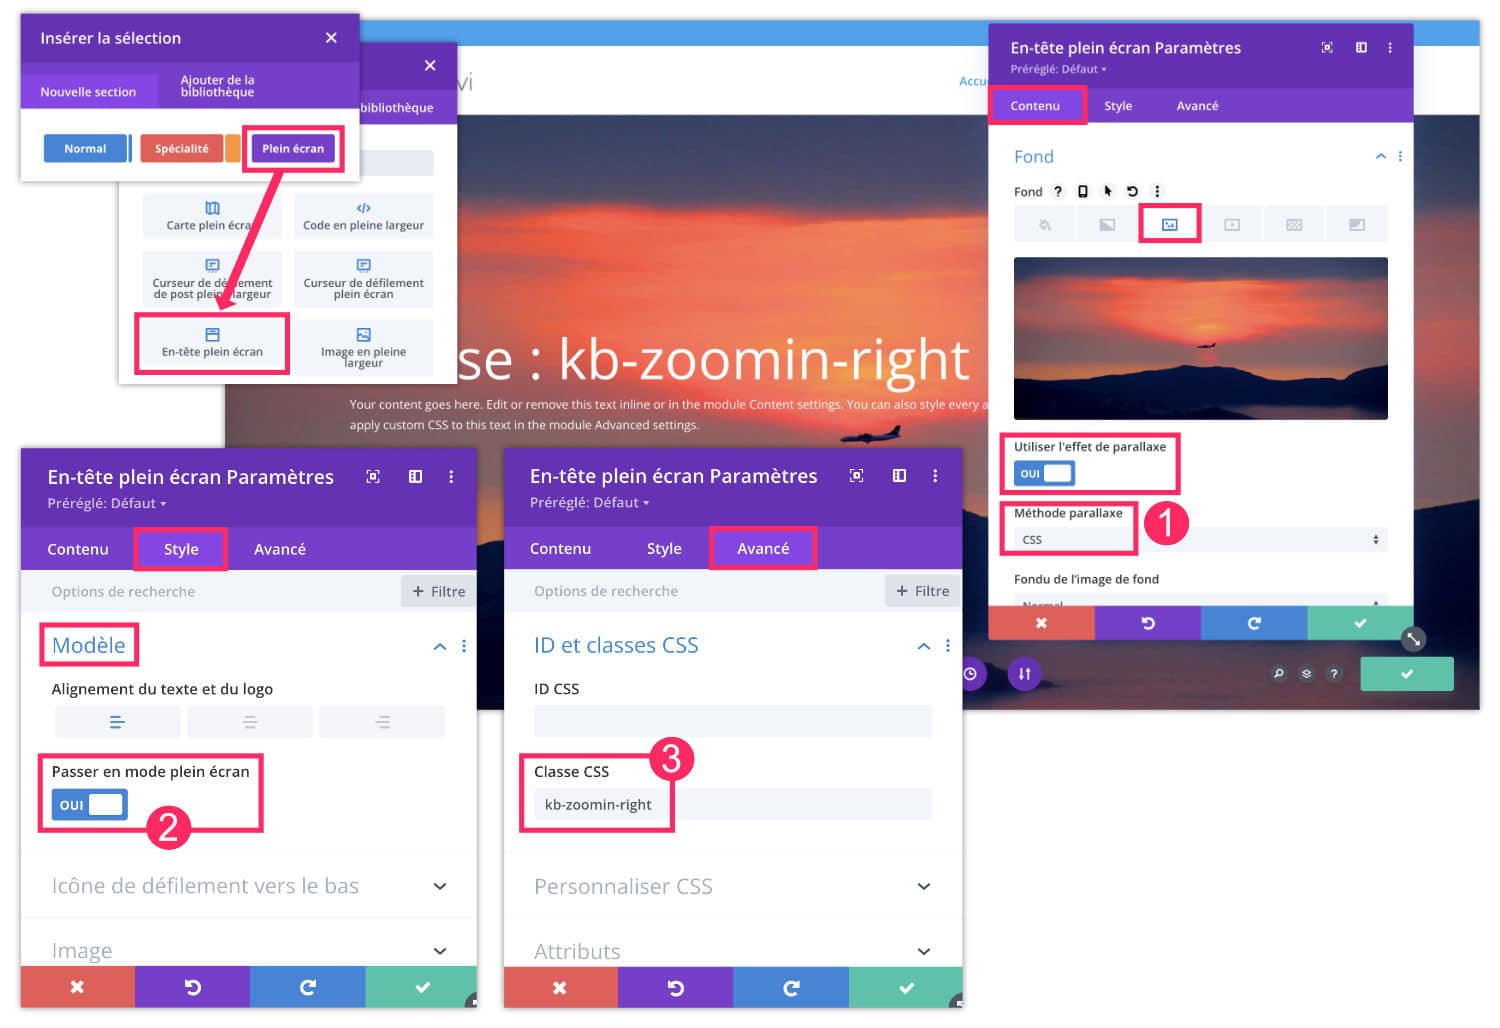
- From the Content tab of the Full Screen Header, add a background image. Activate the Parallax + CSS method option.
- Then, on the Style > Model tab: pass the image in full screen mode.
- Finally, on the Advanced tab, add one of the 6 CSS classes created previously.
There you go! Your image seems animated!
4 - Add the effect Ken Burns on a "Full Screen Scroller" (diapo)
The previously added CSS code also works on the module Full-screen scroller. You will proceed in the same way:
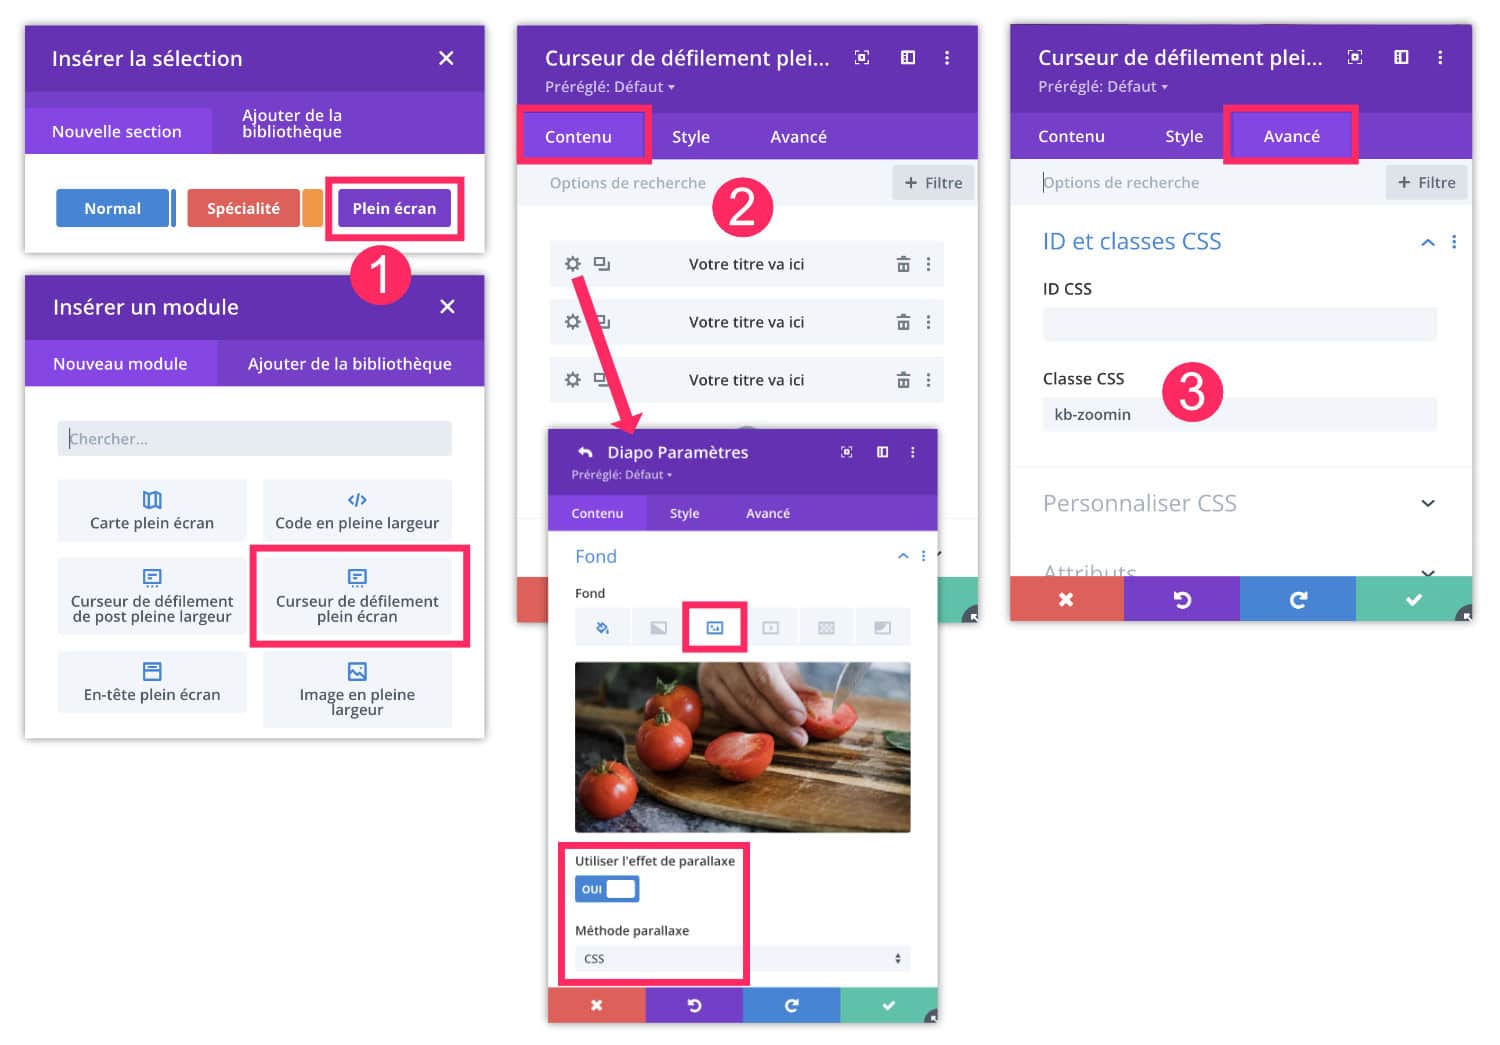
- Add a fullscreen section (violet section) and choose the Fullscreen Scroll Curder module.
- Add your slides without forgetting to put, for each of them, a background image with the parallax + CSS effect.
- On the Advanced tab, add one of the 6 CSS classes created previously.
And here's the result: with each slide change, the effect will be activated!
5 - In conclusion: an easy and simple zoom effect but a little limited...
If you tested this tutorial, you realized that it was not difficult to add a Ken Burns effect to some images. I find the effect successful and easy to implement.
However, you may have noticed that there are some limitations, in particular the fact that this animation only activates once the page is loaded. It's not awkward for a full screen header located at the beginning of the layout, but if you put this module at the end of the page, it will never be seen...
The code should be adapted with Javascript so that the animation is played only when the item enters the screen... Do not hesitate to ask for help from ChatGPT, for example, to achieve this...
As for the Scroll Curder, the animation comes out every slide change, so it's not a problem!
Tell me in comment if you like this effect Ken Burns!
Super tutoriel comme toujours avec Lycia !!!
Merci Justine 😉