
Show Header Hero on your homepage is a good practice to "advertise color". And if the main menu of the site is transparentThe rendering is beautiful...
This is what I propose you to achieve with this tutorial Divi easy, accessible even to beginners...
- 1 - What is a Header Hero?
- 2 - Why is a Header Hero better than a carousel?
-
3 - Creating a Header Hero with a transparent menu
- 3.1. - Global header with the Divi Theme Builder
- 3.2. - Add the logo and make the menu transparent
- 3.3 - Reduce internal margins
- 3.4. - Add titles and calls to action
- 3.5 - Add an overlay
- 3.6. - Center main menu
- 3.7 - Add a form of separation
- 3.8 - Set the main menu
- 3.9 - Change the background image according to the pages
- 4 - To conclude: other resources...
1 - What is a Header Hero?
One Header Hero is the term used in Web Design to describe a fullscreen image displayed when visiting a site. As a general rule, Header Hero located on the homepage only, but finally you can use it on any page, you see!
Often, the header hero is accompanied of a title (balisé en <H1>), d'une tagline (balisée en <H2> ou en <P>) et d'un Call to Action button (CTA). Take advantage of it to put a few keywords, it's always good for your SEO.
Note that the Header Hero must be inspiring and clearly indicate the objectives of your site. Also, it is not uncommon to see a video playing automatically instead of the image full screen image.
Moreover, the Divi full screen header module is perfect to realize this type of design, but in this tutorial we will build it ourselves because it does not allow to add a transparent menu inside...
2 - Why is a Header Hero better than a carousel?
My students or clients often ask me how to create a carousel- Yeah. I don't really like it.
The carousels are:
- Bad for user experience: If they are badly made or use images with a different ratio, it blows up the page sometimes and it's worse in mobile version... Not to mention the images that scroll too fast and we don't have time to read...
- Bad for SEO: If each slide is badly marked semantically, if the links are irrelevant and if the images are heavy, there is nothing worse for your SEO! I'm not saying it, Read this.
- Bad for loading pages: carousels can be heavy to load and this can slow down the performance of your site.
- And finally, Carousels are obsolete! And that's what I'm saying... We're not in the '80s anymore!
So here are several good reasons for building a Header Hero with a transparent menu rather than start your home page with the good old carousel.
3 - Creating a Header Hero with a transparent menu
Now let's get into the heart of the subject and create together your superb Header Hero and its transparent menu...
3.1. - Global header with the Divi Theme Builder
We're going use builder theme to create a global header which will appear on your entire site, we will see at the end of the tutorial how to modify it on the other pages.
If your wish is to use this design on the home page only, in this case do not create the global header, create a unique template for your home page (click on "+ add a new model" and assign it to your home page).
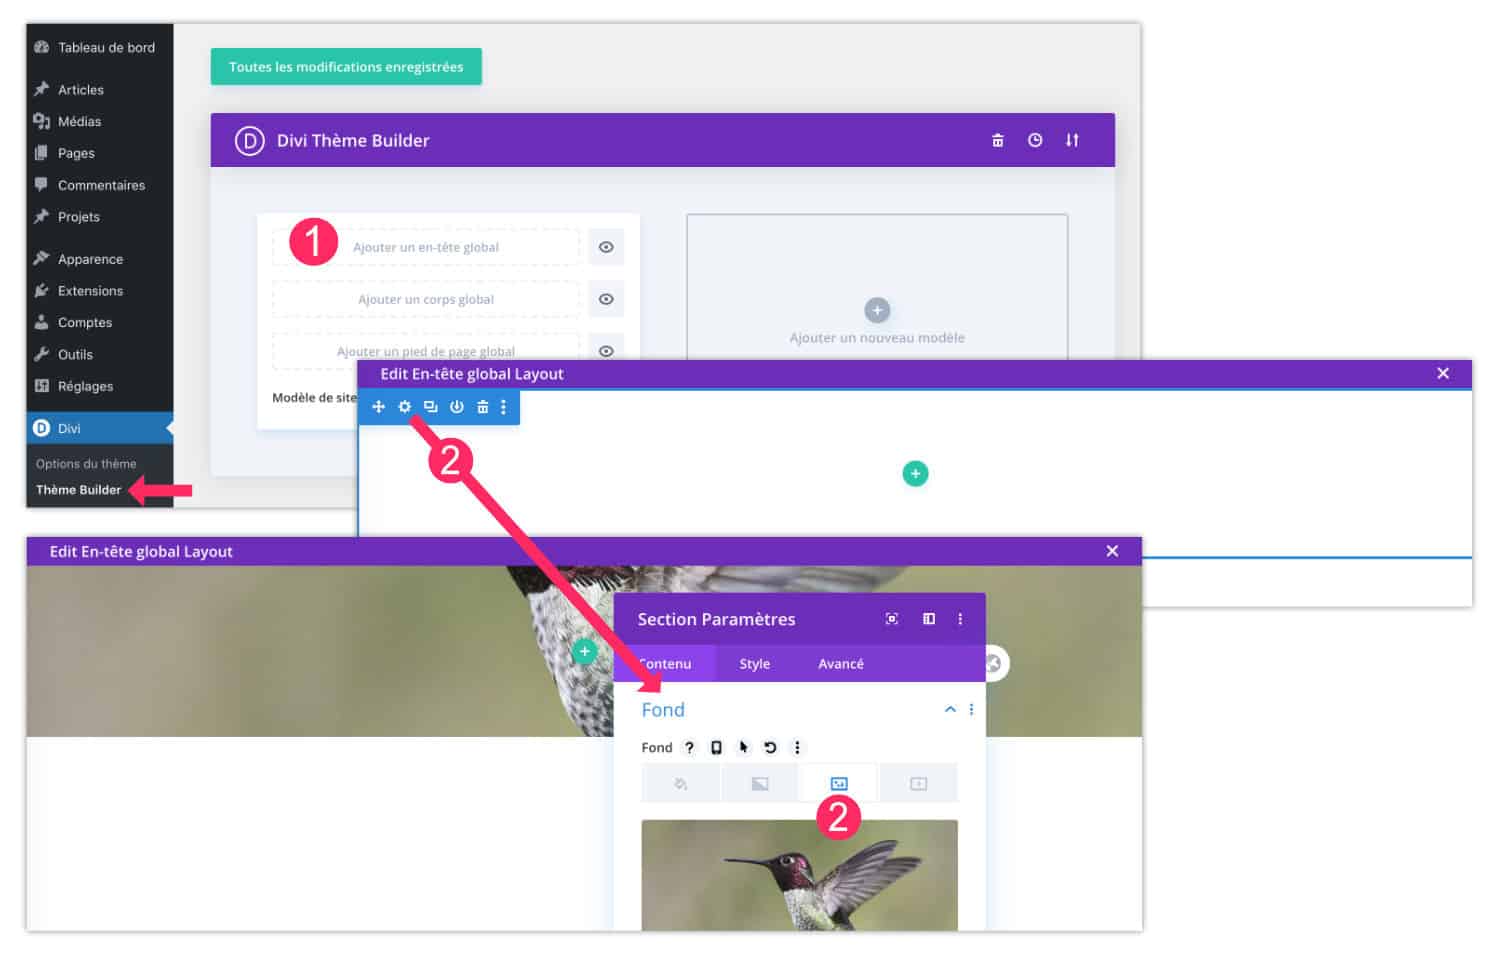
- Go to Divi > Theme Builder then click on Add Global Header.
- The building theme opens. Click on the toothed wheel of the section (blue) to access the settings. Go to the tab Contents > Background > Background to import your photo.
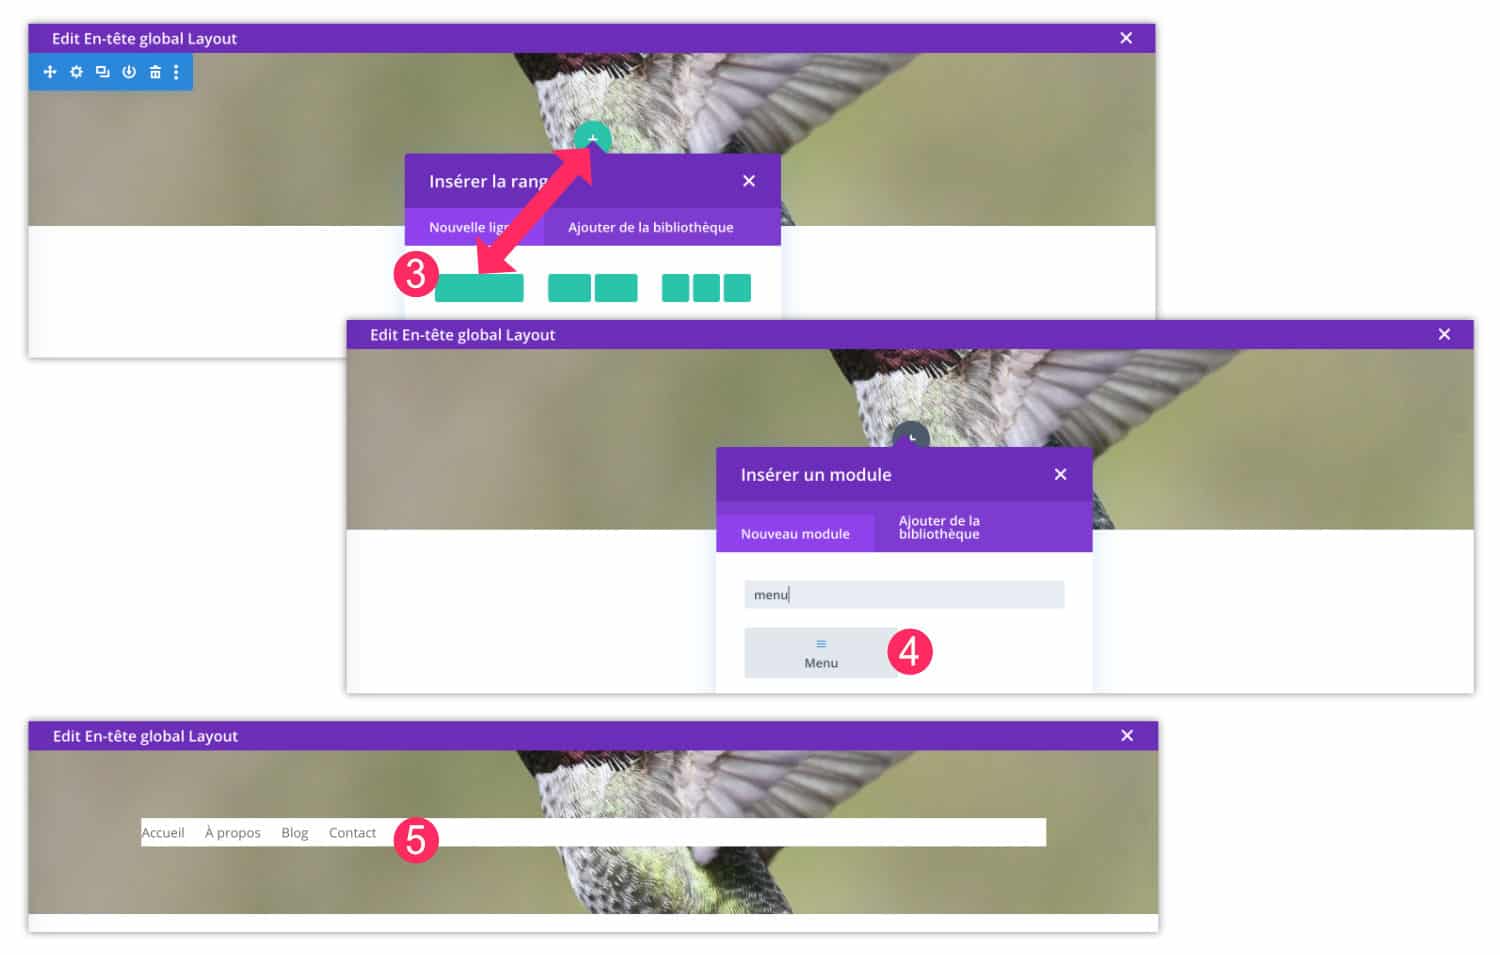
- Then add a row 1/1 (line).
- Add it Menu module.
- Select the menu to display. I specify that it must be created upstream in WordPress, on the tab Appearance > Menu.
3.2. - Add the logo and make the menu transparent
You can then add your logo if you wish.
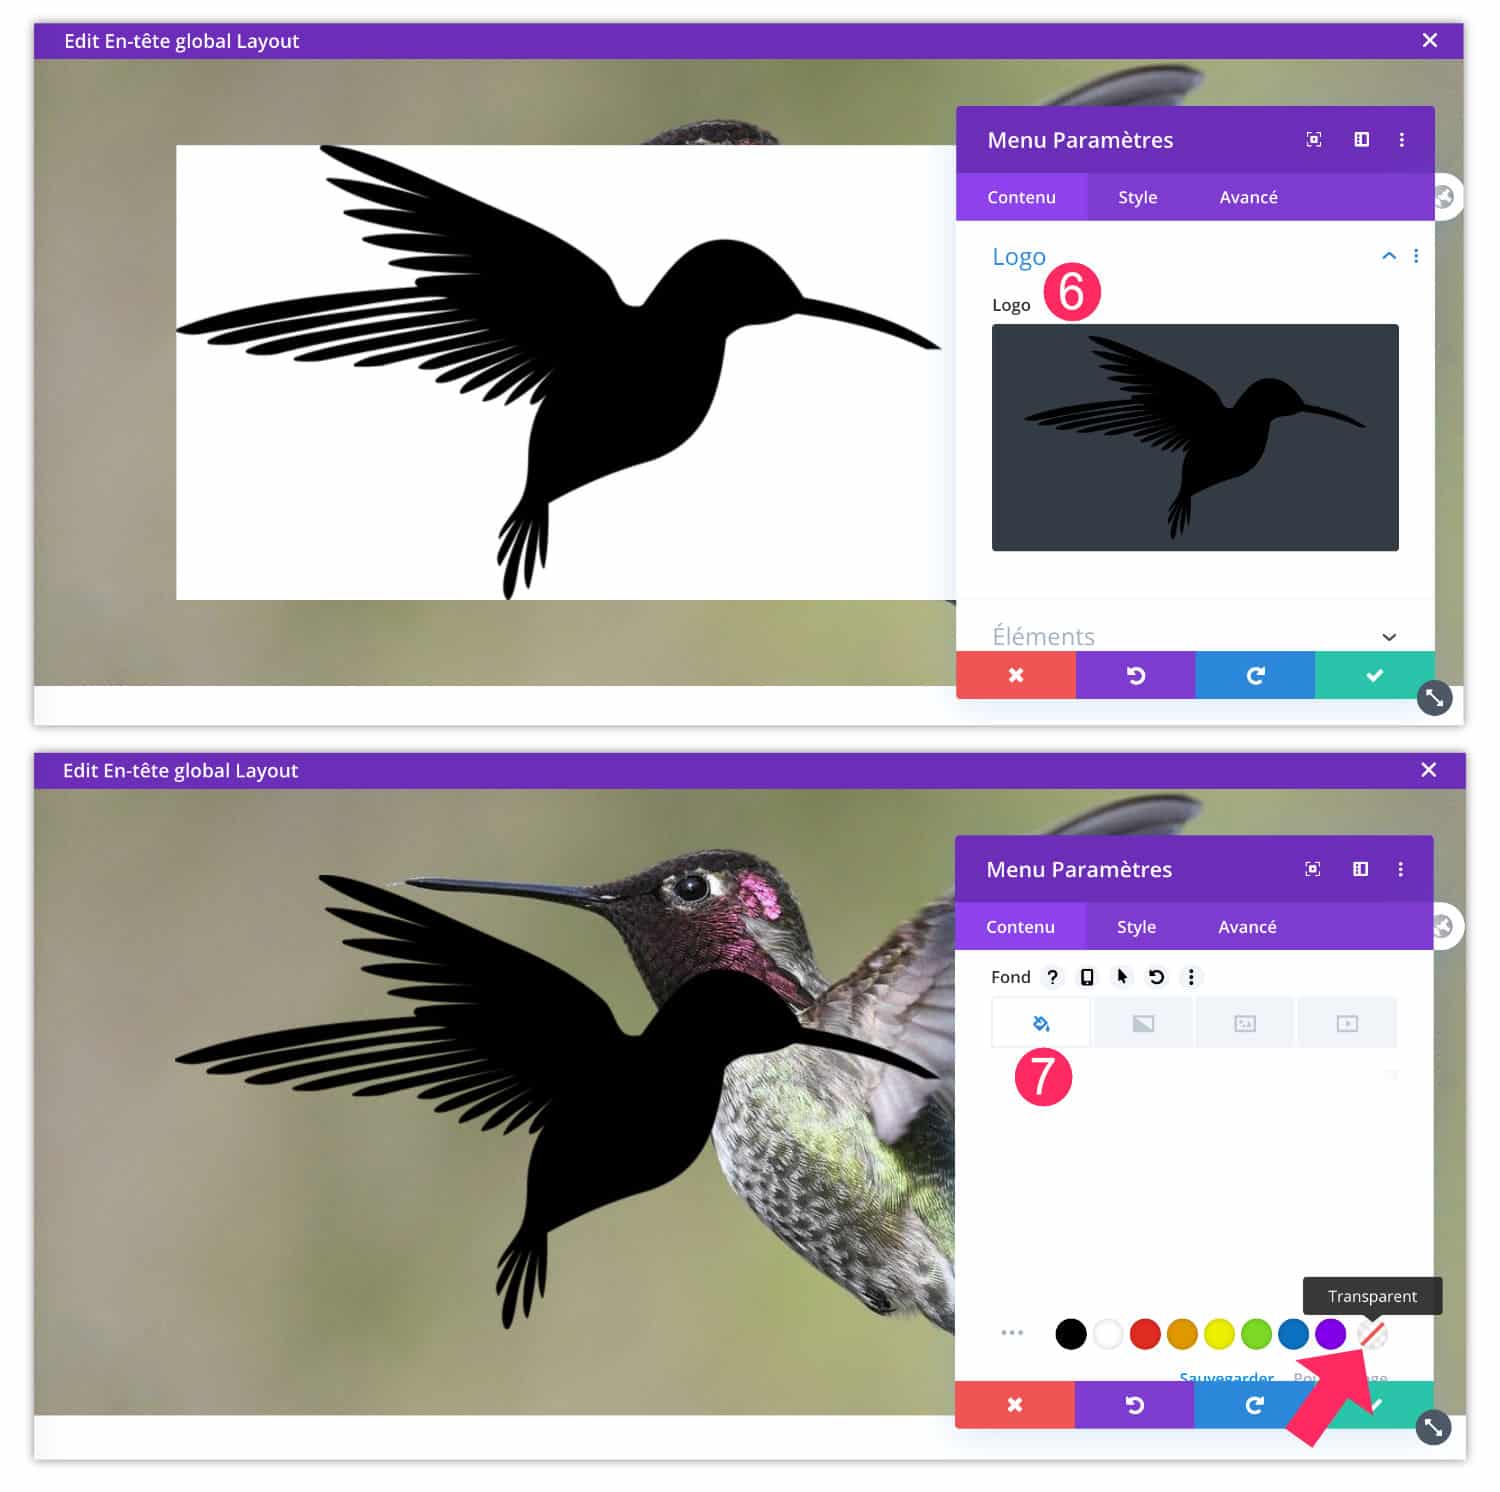
- Always in Menu module settings, go to the tab Contents > Logo to import it.
- Below, go to the tab Content > Background to remove the background and get a transparent menu.
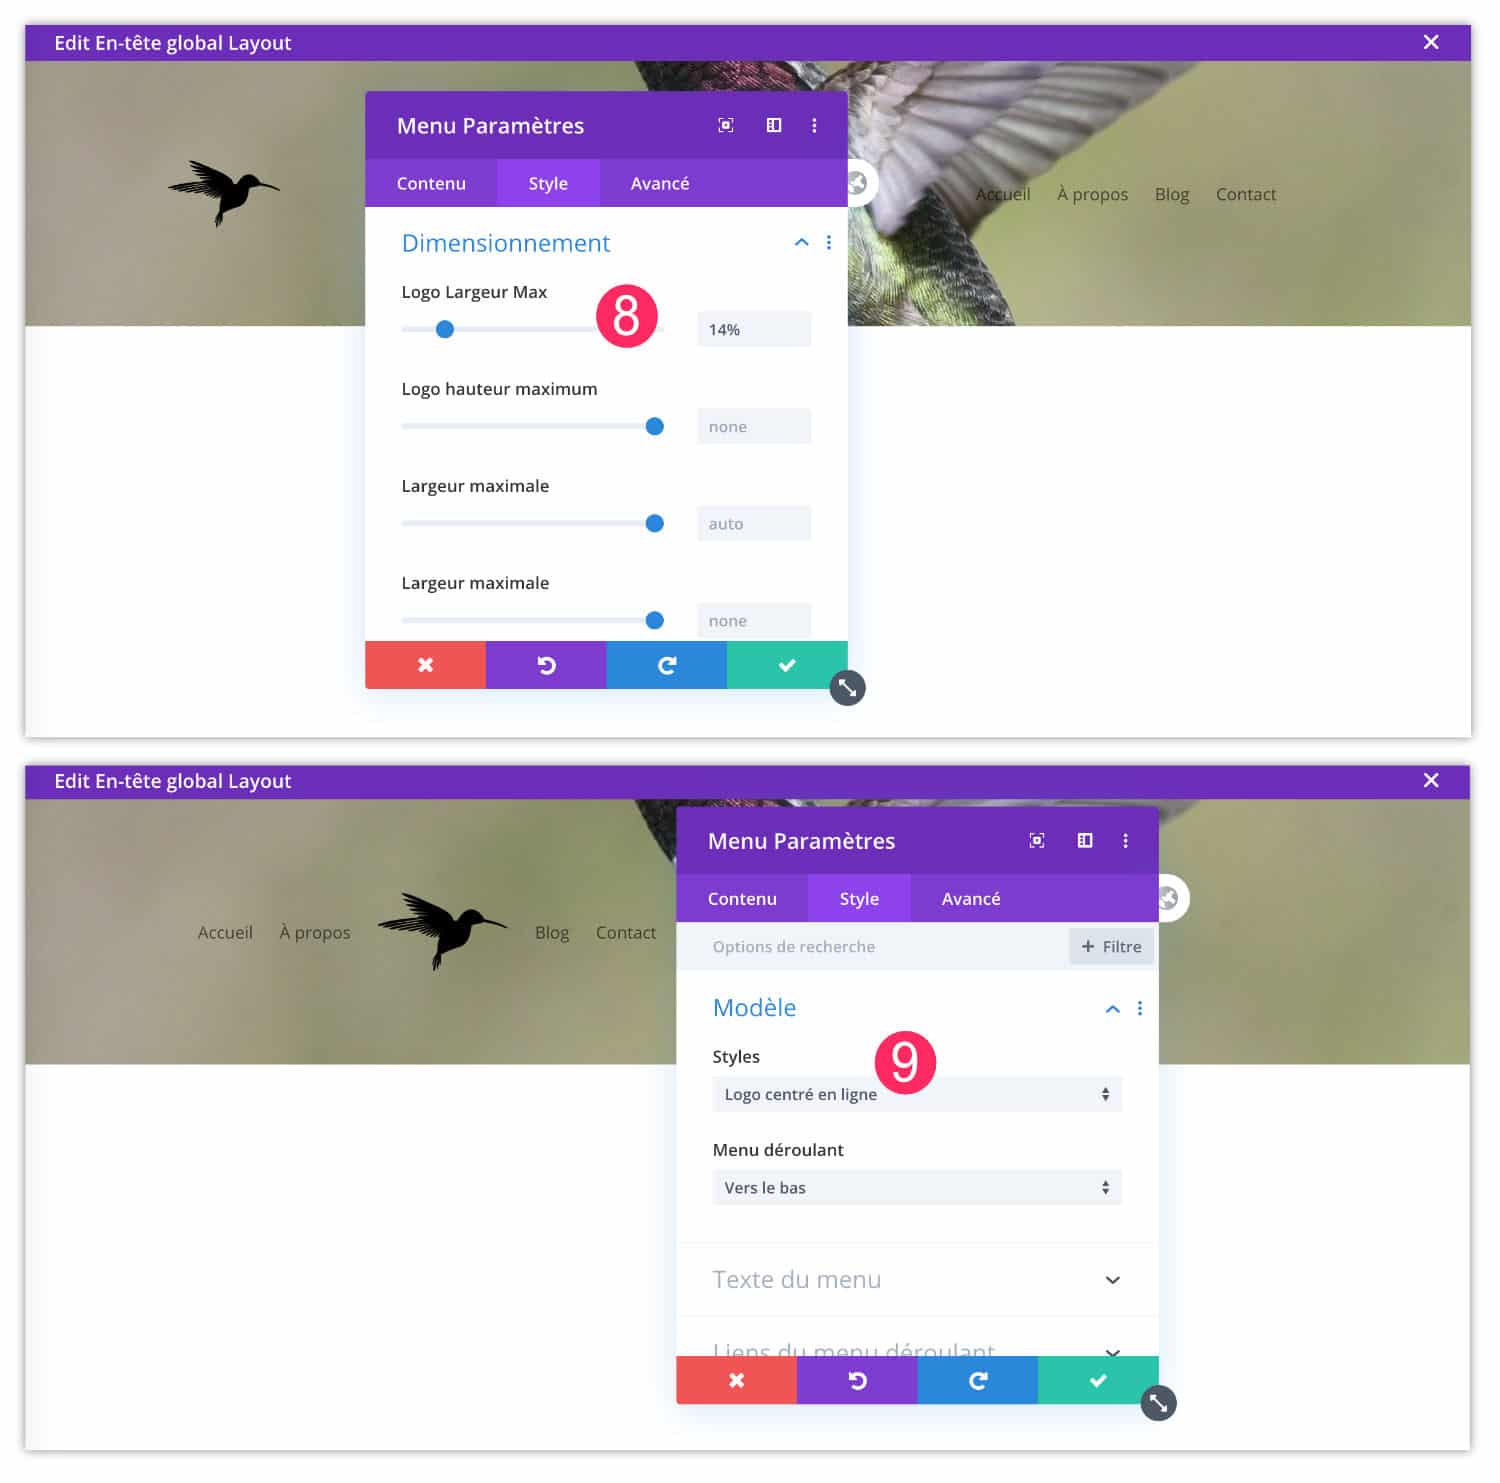
- Always in Menu module settings, go to the tab Style > Dimensioning to reduce the size of the logo.
- Go to the tab Style > Model to choose the menu template: left aligned, Centered (with logo above) or inline centered, I chose this one for my tutorial.
3.3 - Reduce internal margins
By default, the sections and lines (rows) of Divi have internal margins. This then impacts the height of your header.
Ideally, the menu should not be too wide (high) because it is not great to visit a site with a third of the screen used by the menu!
Then edit the items to remove these included default margins.
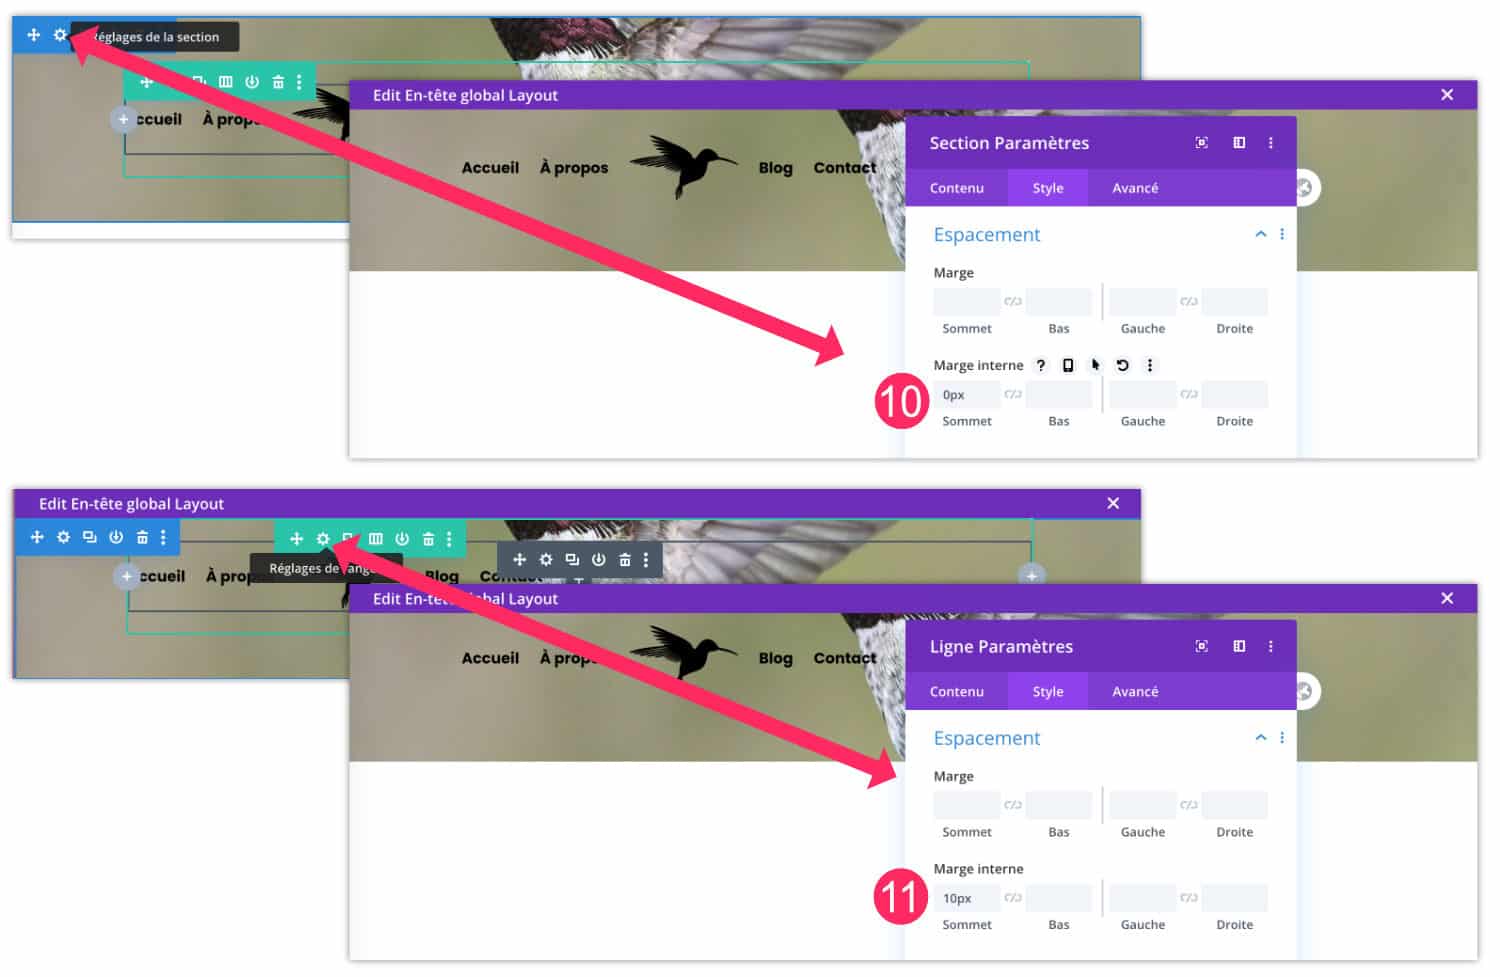
- Edit section settings (blue), go to the tab Style > Spacing and grab Internal margin 0px on top.
- Then edit the settings of the line (green), go to the tab Style > Spacing and grab 10px internal margin at the top (10px is an example, but if you put 0px, the logo may stick to the top of the screen).
3.4. - Add titles and calls to action
Finally, your Header Hero can not only display a transparent menu and one background imageIt wouldn't have much interest. Then add what you want, for example:
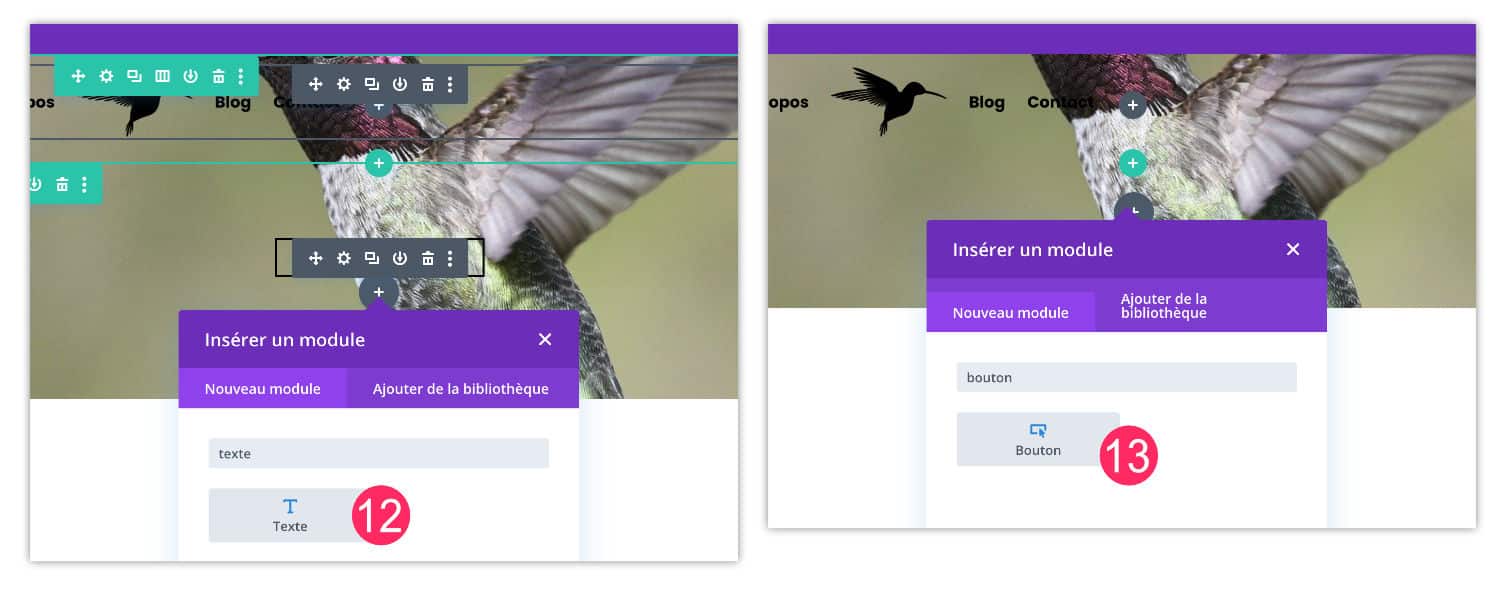
- Add a Text module to put a title H1 and a subtitle (tagline)
- Add a Button module to display a call to action to your store or contact form for example.
I let you configure the design of these two modules with the native options of Divi: choice of fonts, colors, sizes, margins (to make it airy), line height, etc.
Did you know that? You can test Divi for free by visiting on this page and by clicking on "TRY IT FOR FREE"
3.5 - Add an overlay
If you find that the text on your image is not legible enough, because of the colors that mix, then it would be interesting to add "overlay" That is, a semi-transparent color that is placed between the background image and the text:
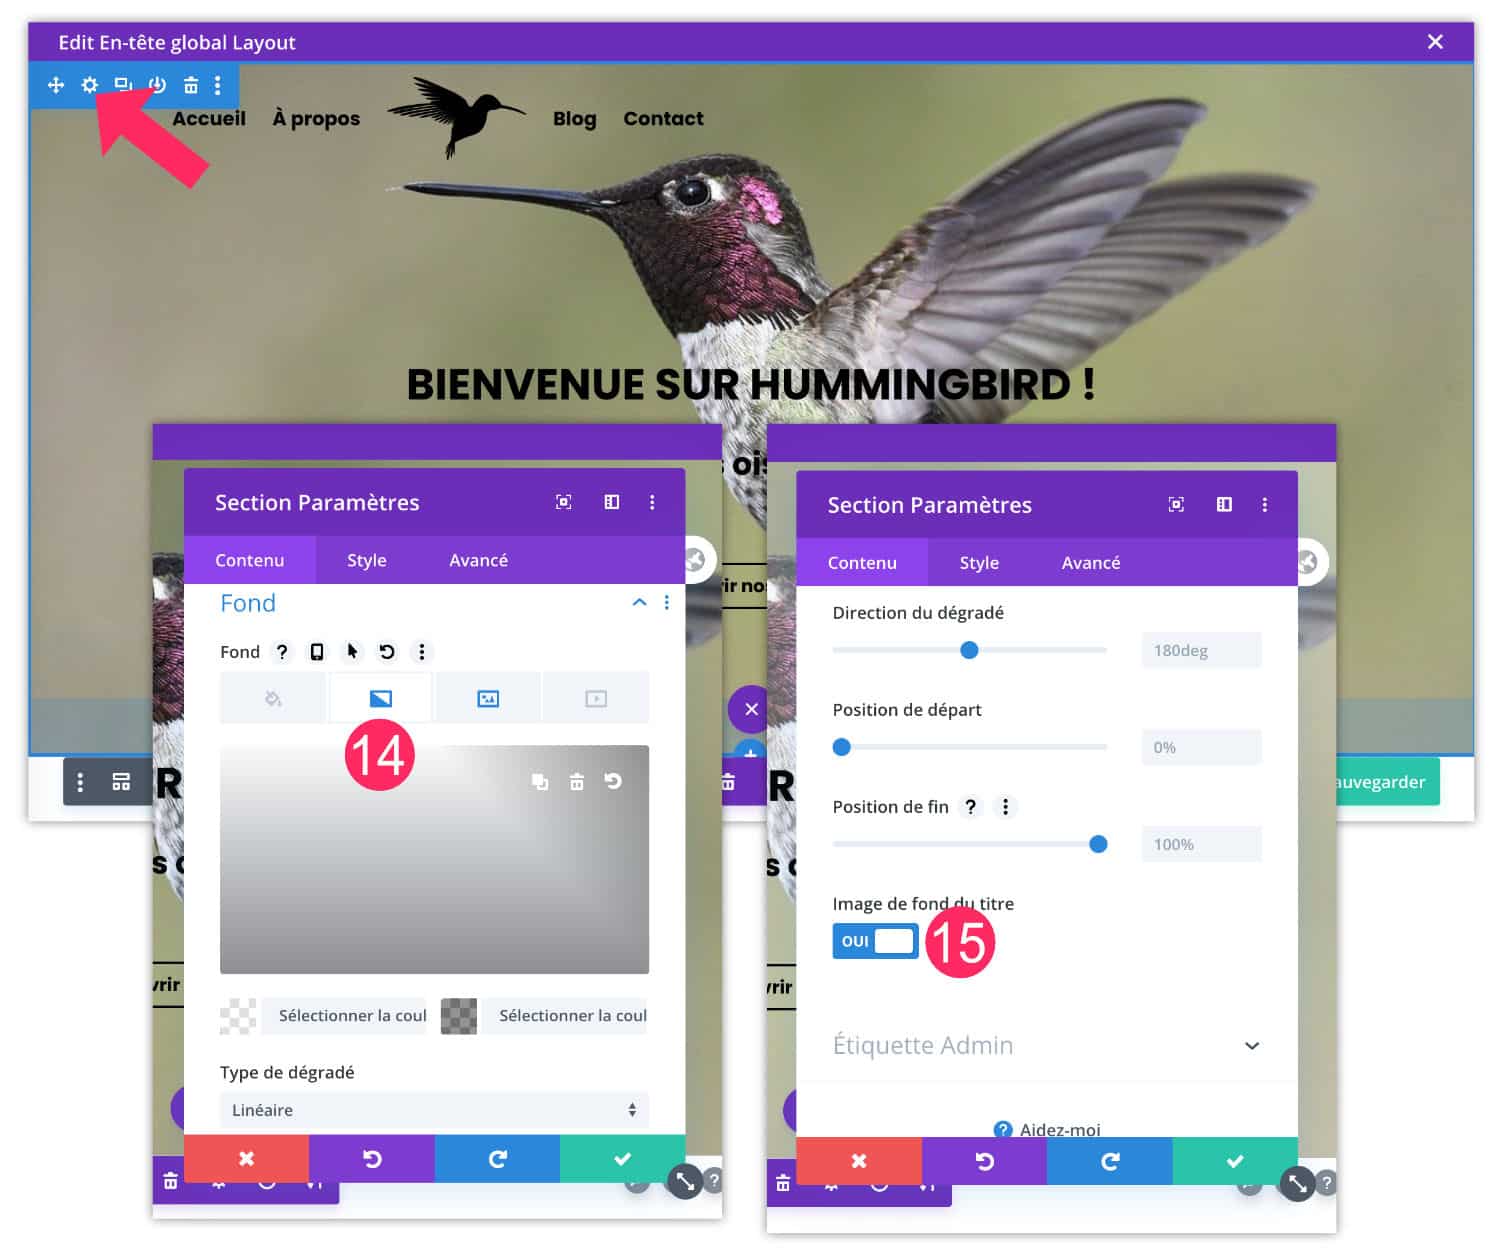
- Edit section settings (blue), go to the tab Contents > Background > Degraded. Choose 2 colors (this may be the same two) and add transparency.
- A little lower, activate the option Background image of the title. This allows the color gradient to position itself on the background image.

That's the result! I chose a gradient in the shades of white because my texts are black. I could have done the opposite with a dark overlay and white texts.
Attention: the option Background image of the title does not work in association with the option parallax. If you want to use these two options at the same time, read this tutorial that explains how to add an overlay to a parallel axis image.
3.6. - Center main menu
Finally, it is possible that your transparent menu is not centered. If so, here's how:
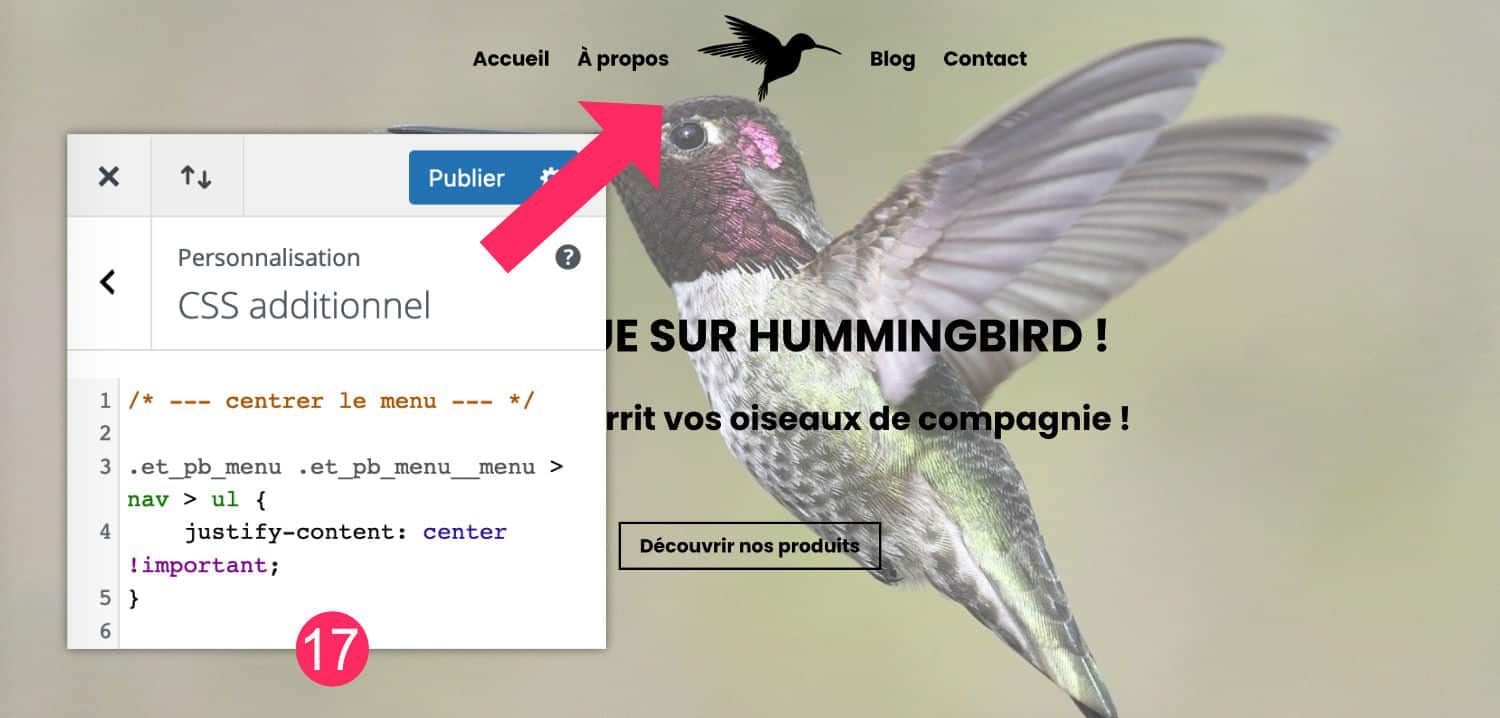
- In the administration of your site, go to the tab Appearance > Customize > Additional CSS and add the following code:
/* --- centrer le menu --- */

.et_pb_menu .et_pb_menu__menu > nav > ul {
    justify-content: center !important;
}
Well, that should fix the problem....
Don't delay! Discover the theme Divi here !
3.7 - Add a form of separation
To refine your design Header Hero, you can possibly add a separation form at the bottom of the section, also called Divider.
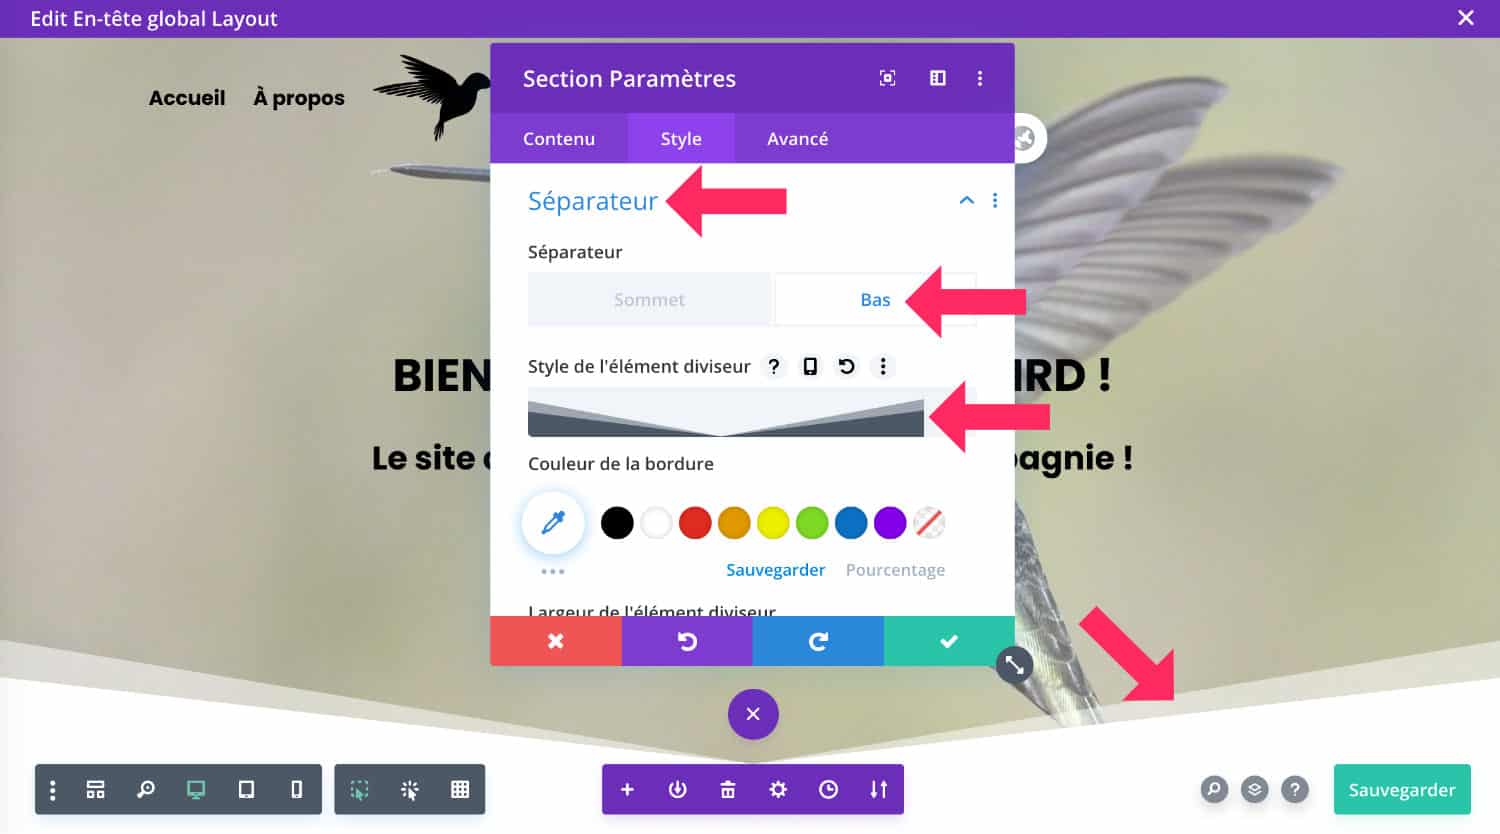
For this, go to the settings of the section (blue) and then to the tab Style > Separator > Bottom to choose the ideal shape. If necessary, add 50px or 100px internal margin at the bottom of the section, to enlarge the image and height of the Header Hero.
3.8 - Set the main menu
Your Header Hero Now he's done, he's got a good face, right?
It's not too bad, but I can see you coming! You will tell me that the menu is not fixed And so, we have to go up to the top of the page to find him... And it's true...
Let's see how to correct this:
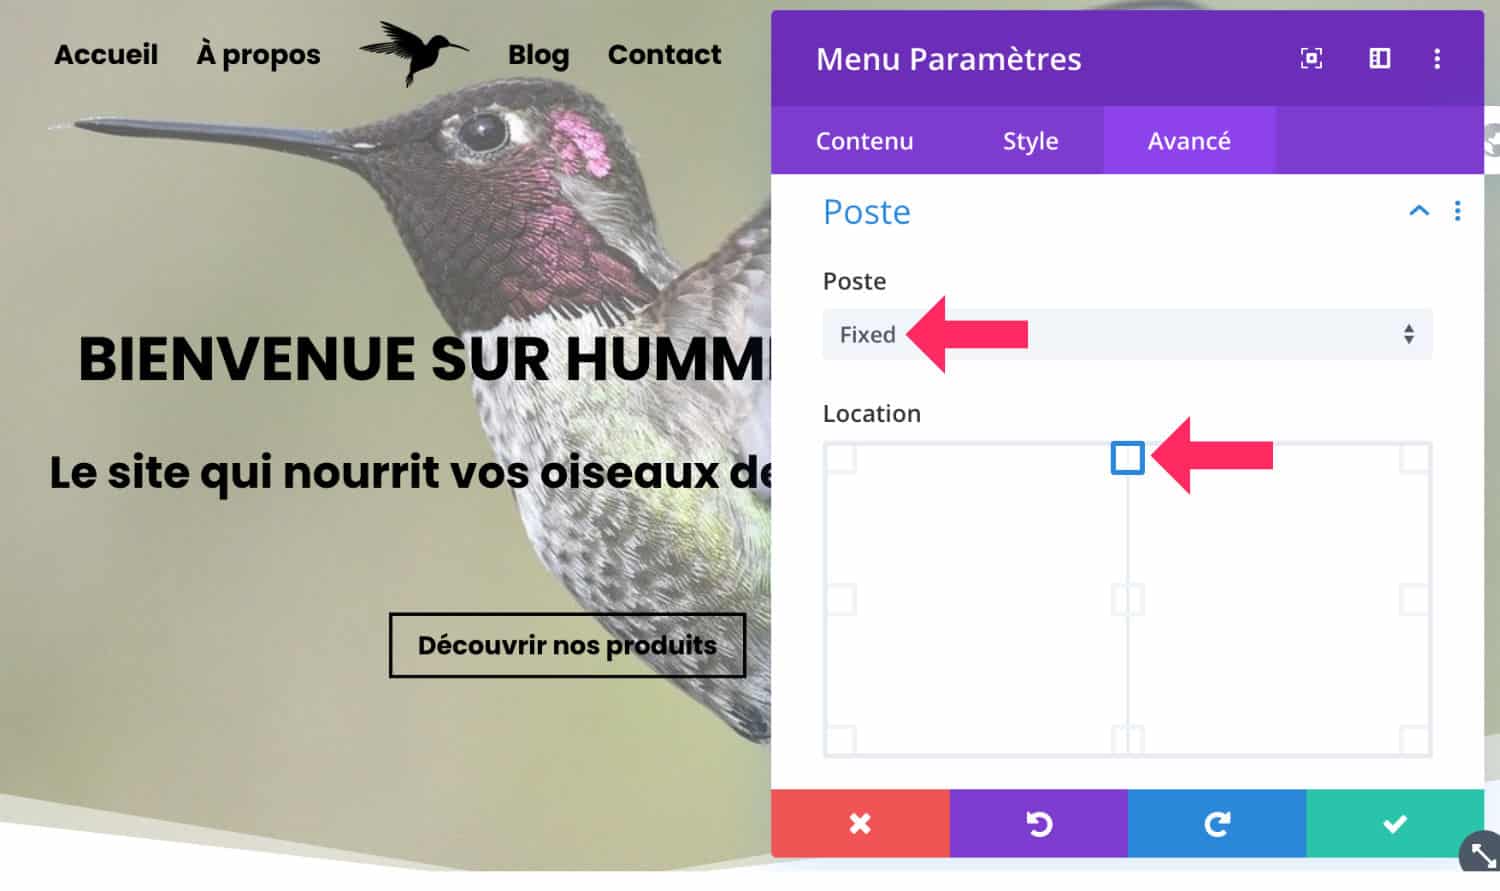
Go to the Menu module settings then go to the tab Advanced > Post (it means "position"). Choose fixed positiond and place the location Up in the middle.
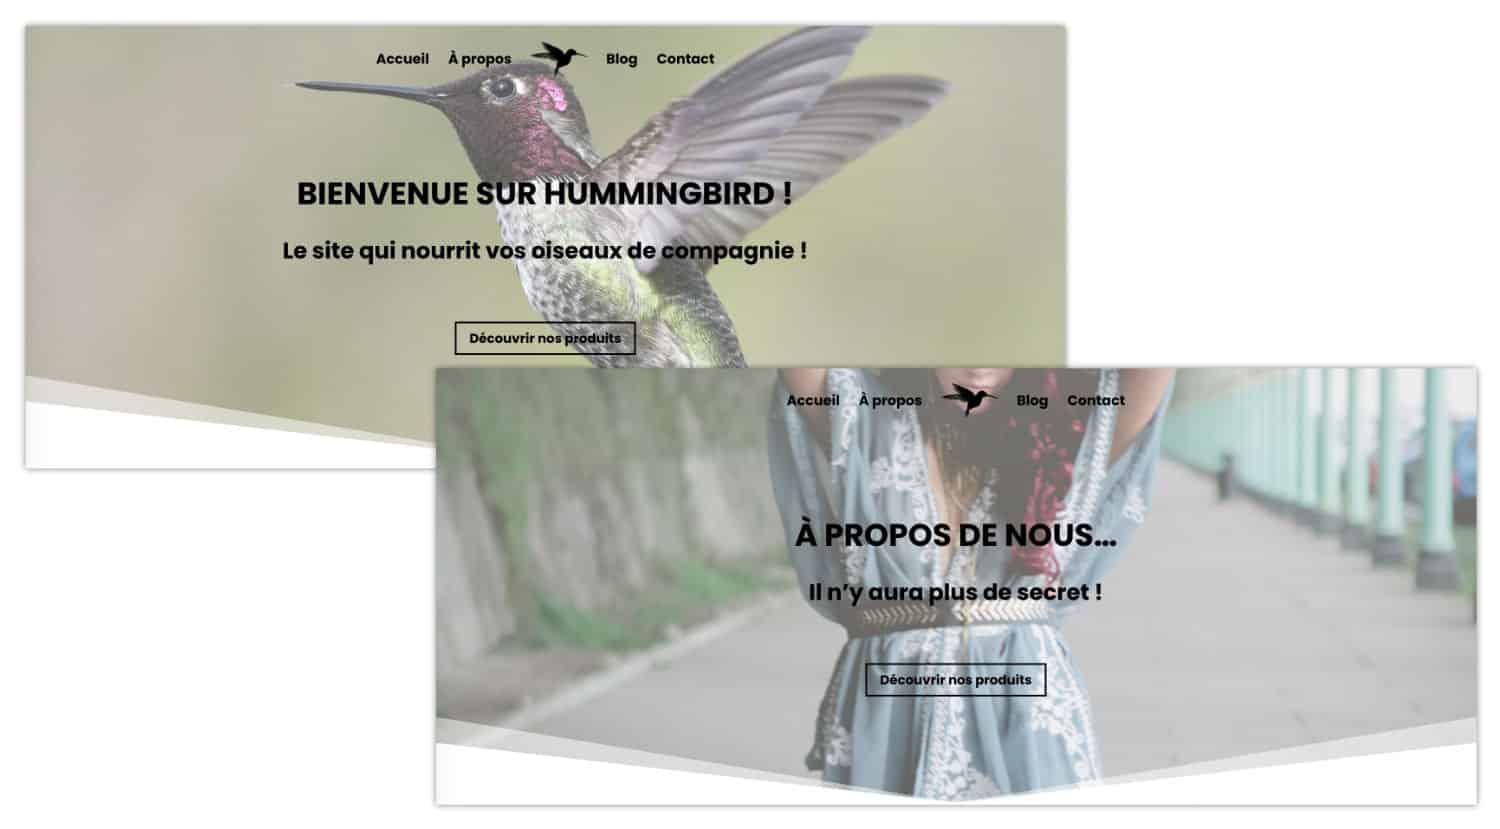
There are other ways of make the Divi menu fixed, but this one fits our needs so it's perfect... The final rendering is as follows:
Now it's better!
3.9 - Change the background image according to the pages
And here too I saw you coming 🤣🤣🤣 ... I was convinced that you were going to ask me this question in comment: How do we change the image only on certain pages?
Yes! The global header uses the Global element functionality. This means that if you change the image of Header Hero on your contact page for example, it will change throughout your site! And yes, the green color indicates that these elements are synchronised together...
Here's how:
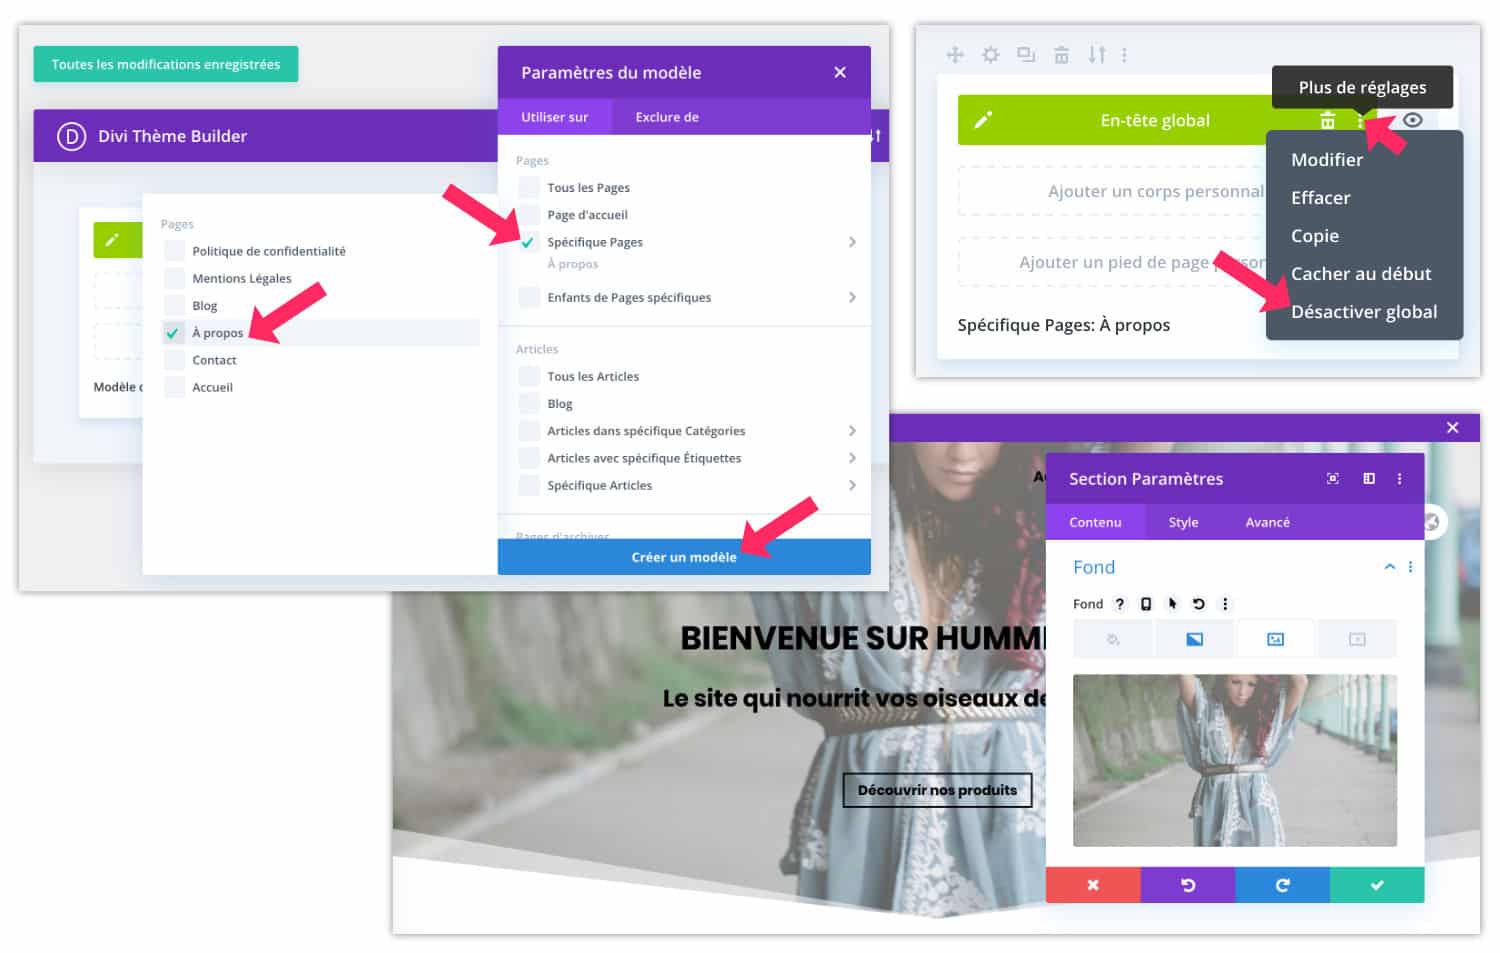
- In the Divi Theme Builder, add a new model.
- Assign it to a specific page, for example the About...
- When you click create a template, the overall header is immediately duplicated in this new model.
- Simply click on the additional options and select Disable Global. The header is now in grey color, which indicates that the headers are no longer synchronous.
- You can now make all your changes: text, button, image, separator, etc.
Here you go:
4 - To conclude: other resources...
Did you like this tutorial? There is nothing sorcerer in this but this article shows that everything is really possible with Divi! All the options are there, just use them to realize the designs we need...
Other related resources include:
- How to create a transparent vertical navigation that overlaps your Divi website
- How to create a floating and transparent menu bar with Theme Builder
- How to make your header transparent and ticky to the scroll
- The Divi Switch plugin also offers many options to create a transparent menu
And finally, here's a video of Joshhall that offers another way of Create a transparent menu with Divi :
Need more resources on Divi? Visit ElegantThemes blog full of ideas and tutos! Or learn how to effectively use this theme through my training Divi !

Bonjour,
j’ai suivi votre tutoriel avec attention et j’obtiens bien le même résultat. J’ai combiné le menu transparent avec un mega menu pour la gestion de mes sous-rubriques. Toutefois, l’arrière-plan de mon mega menu reste transparent.
Je ne parviens pas à le modifier via css personnalisée (malgré balise « !important »). Divi vient systématiquement « surcoucher » mes instructions css. Auriez-vous une solution ?
Merci d’avance.
Gadek, regarde bien dans les options du module Menu (onglet Style) et là tu peux définir la couleur de l’arrière-plan du menu déroulant. Elle est bien cachée mais tu devrais la trouver si tu cherches bien. J’en suis sûre puisqu’il y a 3 jours j’ai aidé en visio-formation un internaute qui avait le même problème que toi et nous avons trouvé l’option…
Bonjour Lycia,
Merci pour ce tuto qui ma bien aidé.
J’aimerais dans la barre de menu mettre l’icône facebook ?
Quand je fais fixer le menu selon votre tuto le menu disparait à moitié…
Bonne journée
Philippe
Ah il faut peut-être ajuster le code à vos besoins
Bonjour,
Je suis entrain de suivre votre formation ebook divi et pas encore à l’aise avec le code.
Il est important pour mon site de mettre le logo FB dans le menu.
Cordialement
Philippe
Bonjour Philippe. Il y a plusieurs solution. En utilisant le Thème Builder, vous pourrez mettre tous les icônes sans coder. Sinon, il y a une autre solution expliquée au chapitre 6 de cet article : https://astucesdivi.com/icones-menu-divi/ mais mon conseil serait de vous pencher sur ce détail vers la fin de la création de votre site. Bon courage 😉
Bonjour et merci,
J’ai fais avec le thème builder, j’ai du louper un truc… j’y retourne
Philippe
Bonjour Lycia,
je construit un nouveau site avec Divi, avec des header hero
J’ai une question au niveau référencement…
Sur l’image de fond du header hero, il n’y a pas la possibilité d’indiquer des attributs (comme sur le module image par exemple) et dans la bibliothèque media j’ai bien renseigné l’attribut ‘alt’ et le Title, mais ça n’apparait pas dans le code source de la page…c’est très embêtant pour un site de photographe…
Vous avez une idée pour résoudre ce problème ?
Merci d’avance !
Salut Alain, tu as regardé dans les options avancées du module ?