
The disordered lists, also called smart list - or bullet points in English - do not offer many customization options. In this article, we will see how customize the points of your smartlists in order to tune them with your branding, or just to make them more fun.
1 - Divi native options to customize smart list points
If you know Divi well, you know where the options to act on the appearance of your smart lists are hidden.
If you don't know where these options are, look at the next picture.
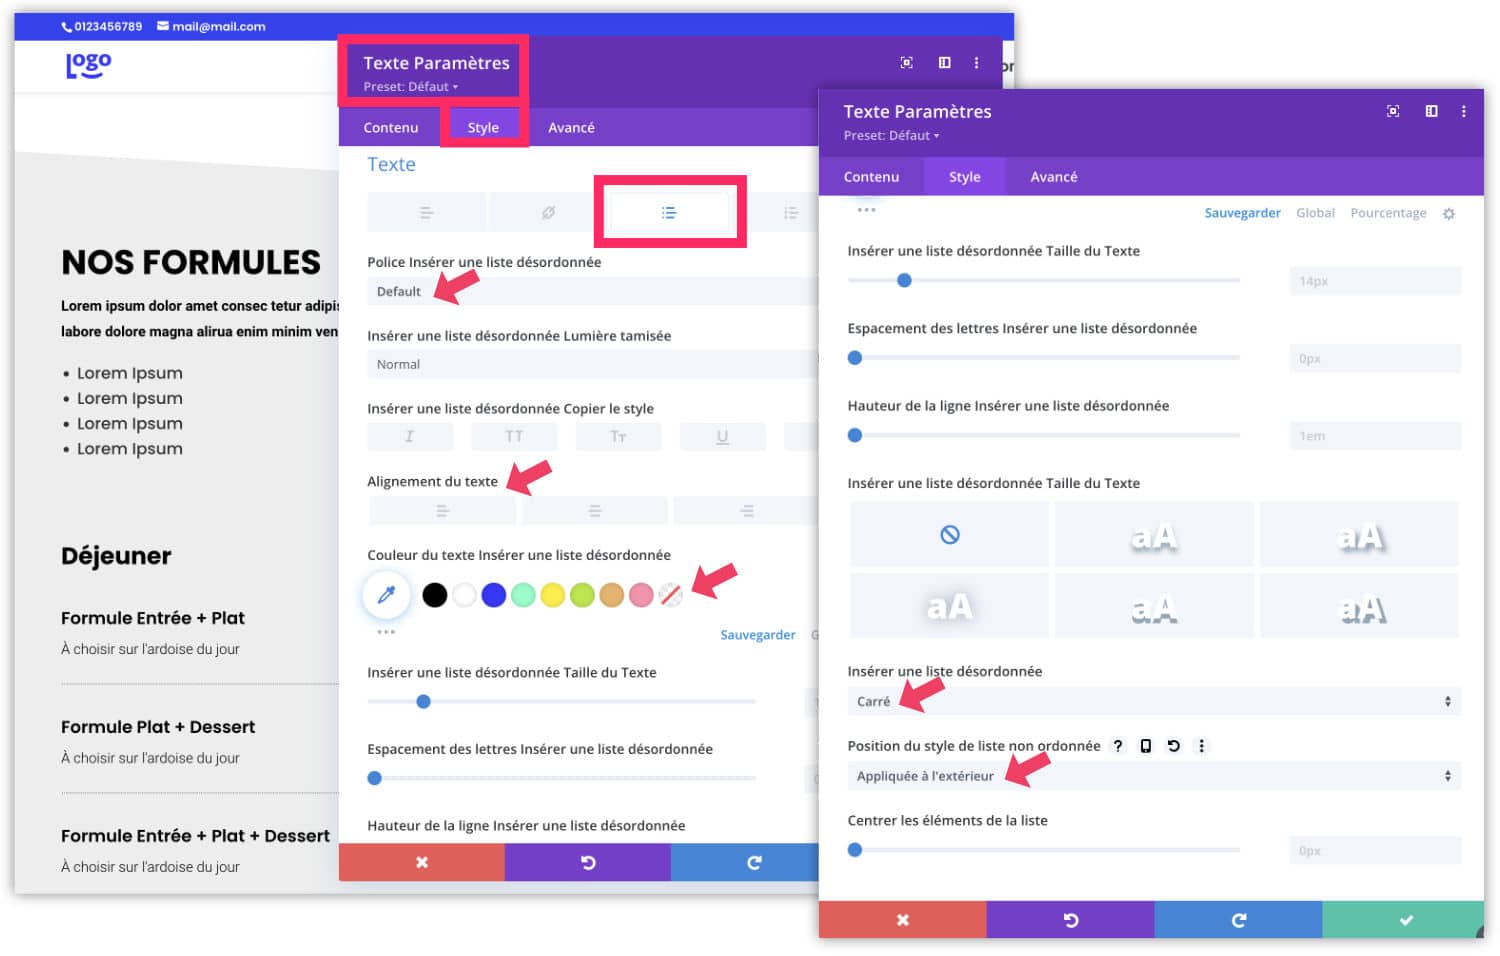
When you insert a text module, you can enter a smart list. Then go to the tab Style > Text, look at the small grey tabs, you will notice a messy list icon. Click on it, this is where you can customize their appearance:
- Text size
- Police
- Alignment
- etc.
But a little below, you can also define the shape of the chips:
- disc (round)
- square
- circle
- No chip
If you take the time to stuff the Visual Builder well, you realize that all the options exist!
2 - The limitations of the CSS
Only, there are no other options, it's all there... But it is not Divi that is involved, it is simply the limitations of the CSS (the property list-style-color does not exist - see here).
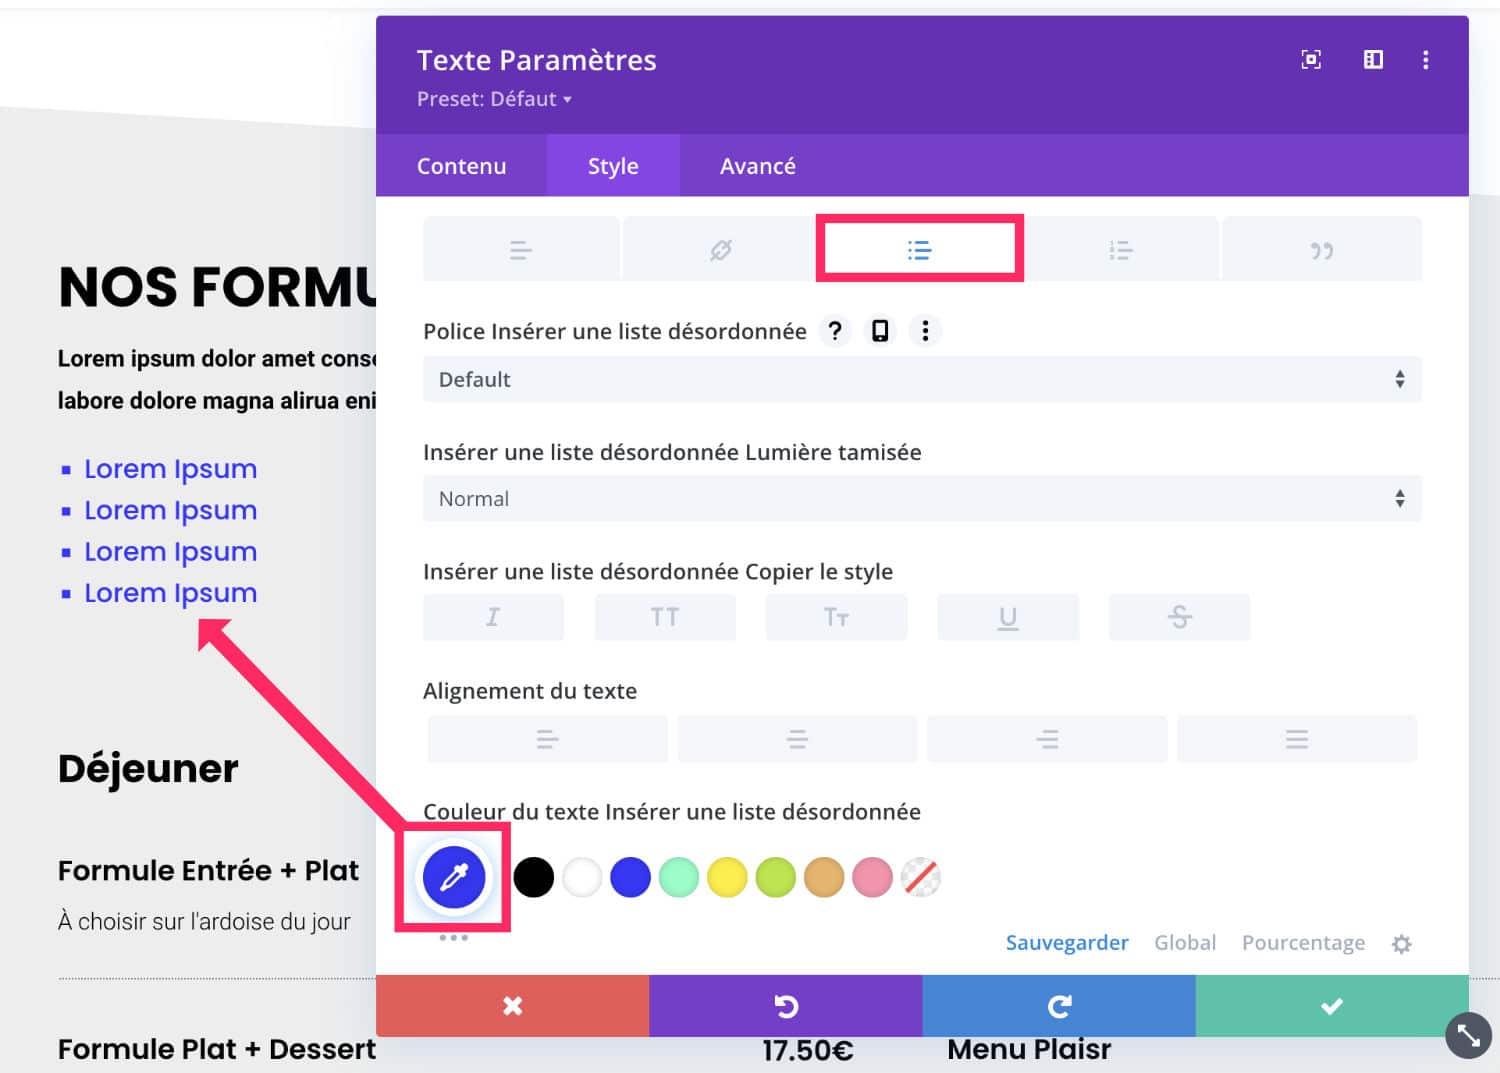
For example, if you change the color, it will affect the text and the chips. We can't differentiate them. That's how it is...
We're gonna have to find a Ninja tip to really customize this. Follow me...
3 - Change the color of list points only
Since the basic CSS does not allow us to give a color to the list dots different from the color of the text itself, we will have to tell it that we just don't want a chip and we will add them fictively...
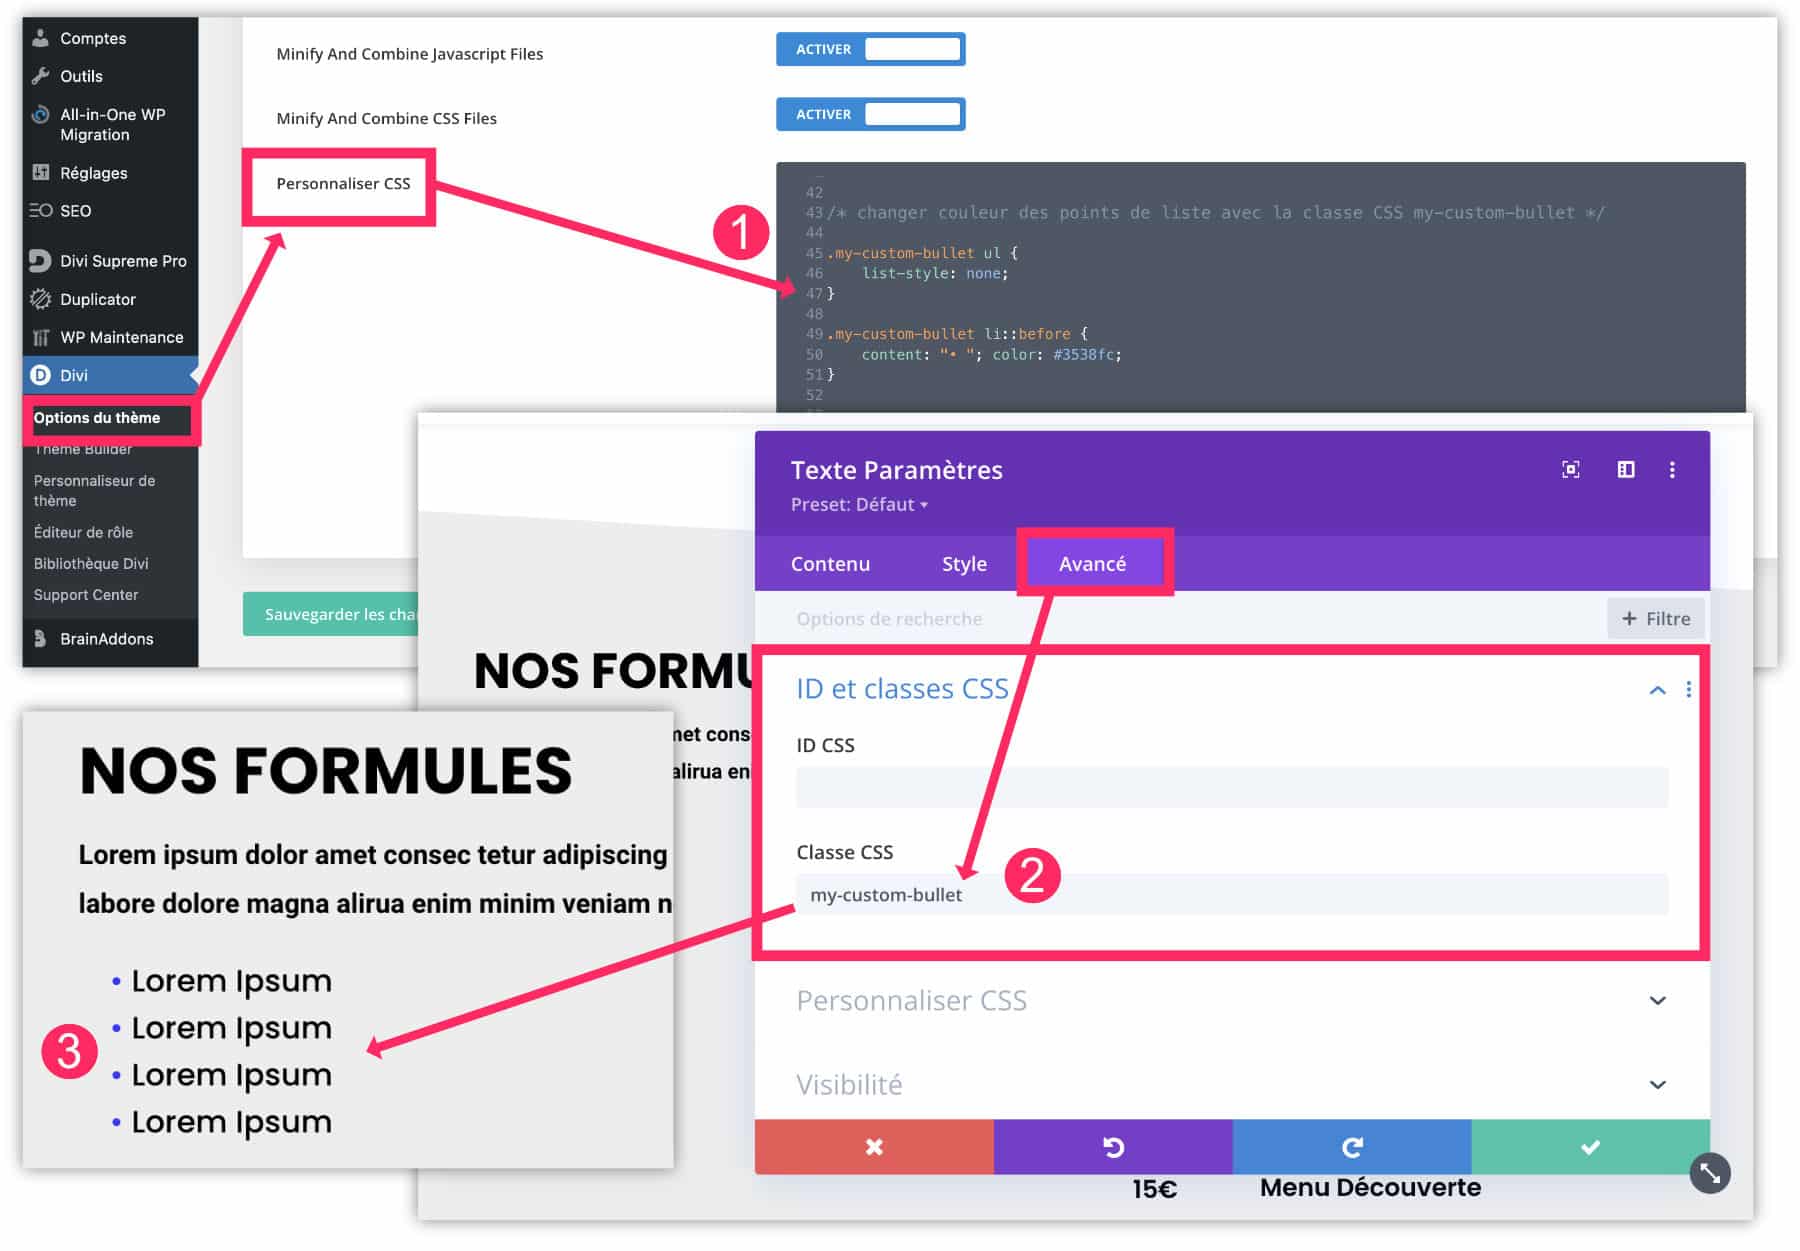
- Go to the tab Divi > Theme Options > Customize CSS and copy the code below. Then save your changes.
/* changer couleur des points de liste avec la classe CSS my-custom-bullet */

.my-custom-bullet ul {
	list-style: none;
}

.my-custom-bullet li::before {
	content: "• "; color: #3538fc;
}- Go to your layout, open the module settings Text where your smart list is, then go to the tab Advanced > CSS ID and Class. In the field CSS class, enter the class my-custom-bullet. Save.
- Save your layout then exit Visual Builder. Tadam! The chips on your list have a different color than the text.
I specify that the above CSS code uses a blue color #3538fc and that you can change it by your own color code...
But you could also change the point "•"by something else! Let's go on...
4 - Change the design of the list points
The previous CSS code reproduces a "disc" chip with a special character: the intermediate point "•" which can be easily added with its keyboard by doing "Option + Shift + . (item)( Mac keyboard shortcut).
But you can also display an emoji keyboard by doing a "Ctrl + Cmd + Space" This is a Mac keyboard shortcut.
On Windows, you can try to display it by clicking on "Windows logo key + . (point)"

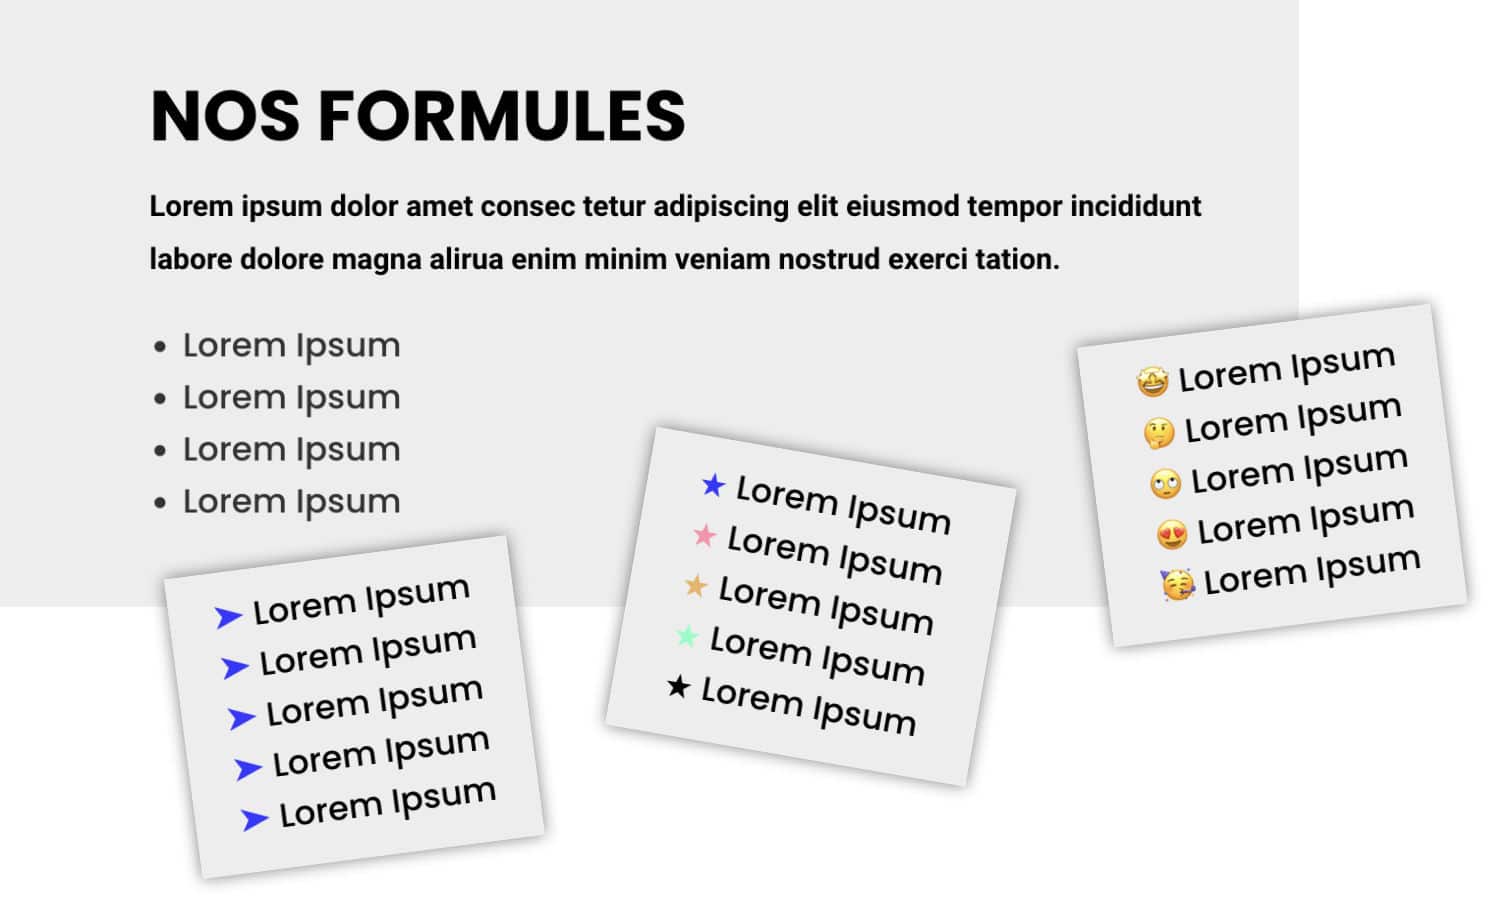
In short, thanks to this emoji keyboard, there are many opportunities! You can consider everything. For example, use an arrow ➤ or a star ★ (and many more things) instead of the point • Intermediate, look:
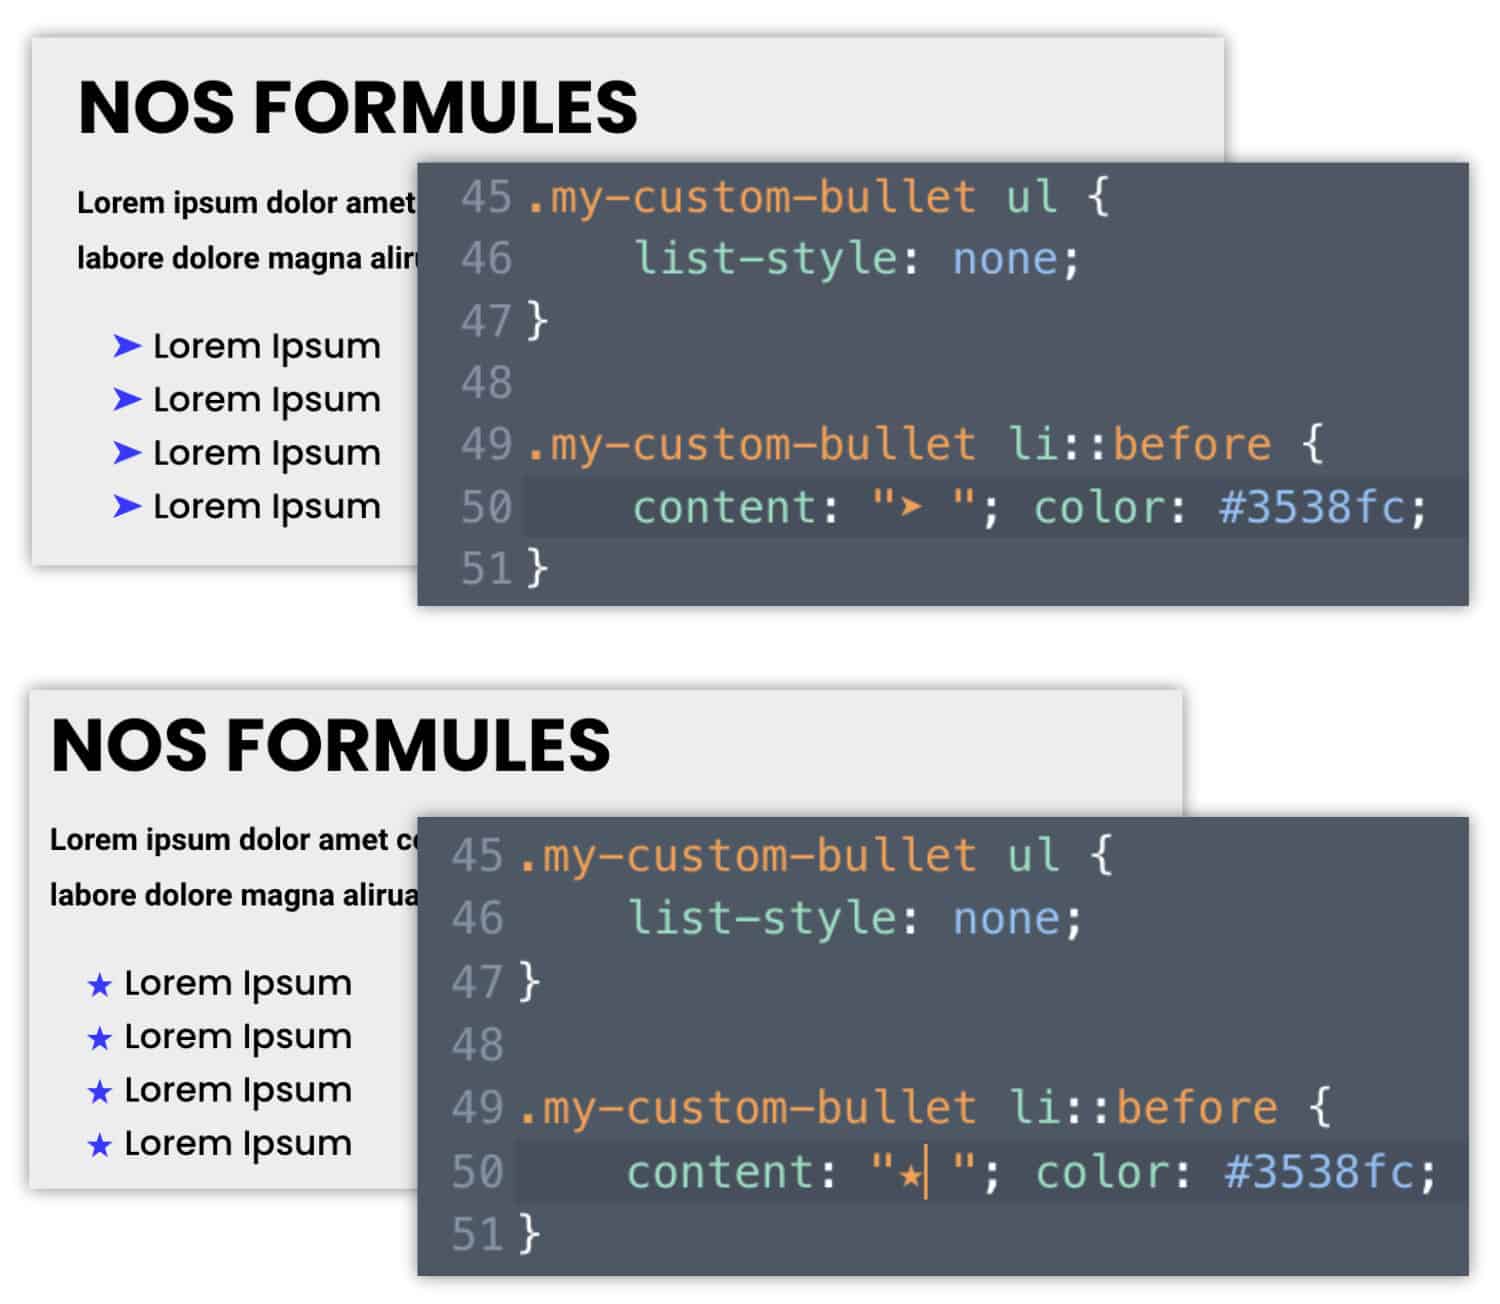
Then just change the character between the quotes, right after content:
💡 You will notice that I have voluntarily added a space after character to keep a harmonious spacing within my lists.
/* changer couleur et le design des points de liste avec la classe CSS my-custom-bullet-arrow */

.my-custom-bullet-arrow ul {
	list-style: none;
}

.my-custom-bullet-arrow li::before {
	content: "➤ "; color: #3538fc;
}
/* changer couleur et le design des points de liste avec la classe CSS my-custom-bullet-star */
.my-custom-bullet-star ul {
list-style: none;
}
.my-custom-bullet-star li::before {
content: "★ "; color: #3538fc;
}So you can play on the color, but also on the shape of the chips.
Did you know that? You can test Divi for free by visiting on this page and by clicking on "TRY IT FOR FREE"
5 - A different color for each list point
I see you coming. "and can we put a different color for each chip?" ...
Why not?
In this case, one color will have to be defined for each "child on the list". This implies that your CSS will need to know exactly how many points are listed in the list to customize.
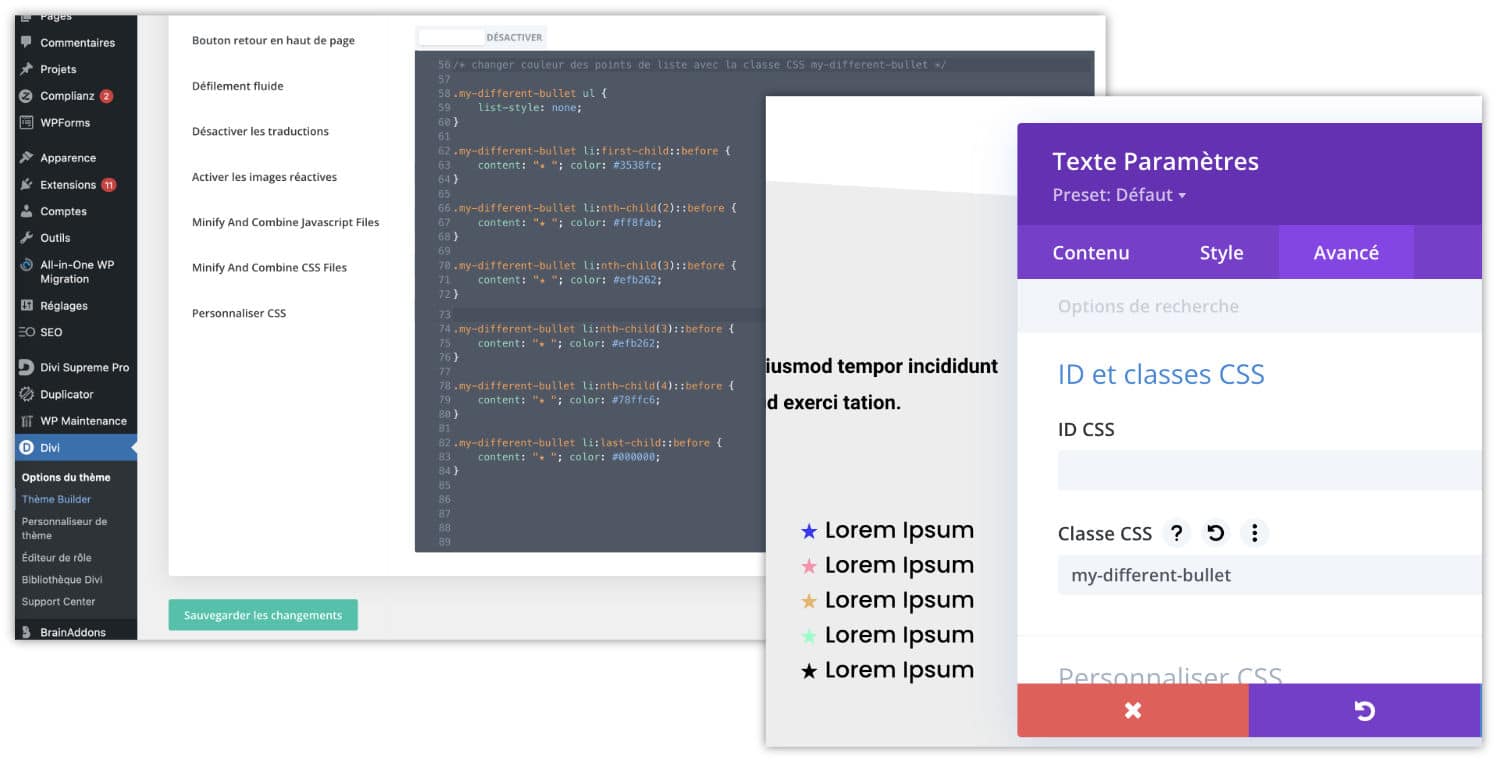
/* assigner une couleur différente aux points de liste avec la classe CSS my-different-bullet */

.my-different-bullet ul {
	list-style: none;
}

.my-different-bullet li:first-child::before {
	content: "★ "; color: #3538fc;
}

.my-different-bullet li:nth-child(2)::before {
	content: "★ "; color: #ff8fab;
}

.my-different-bullet li:nth-child(3)::before {
	content: "★ "; color: #efb262;
}

.my-different-bullet li:nth-child(4)::before {
	content: "★ "; color: #78ffc6;
}

.my-different-bullet li:last-child::before {
	content: "★ "; color: #000000;
}
The above code is provided for a list of 5 chips. The first is called with :first-child and the last with :last-child. For intermediate chips, we use :nth-child(s) - the x is to be replaced by the heading in the list. In this way, you understand how to modify this code according to your needs.
It sounds sorcerer, but it's not. It's just that explaining this in writing is a little laborious. 🤣.
6 - How about an emoji list?
Of course! In the same way as one can give a different color, one can define a different emoji for each chip. Always using the emoji keyboard. Here is an example:
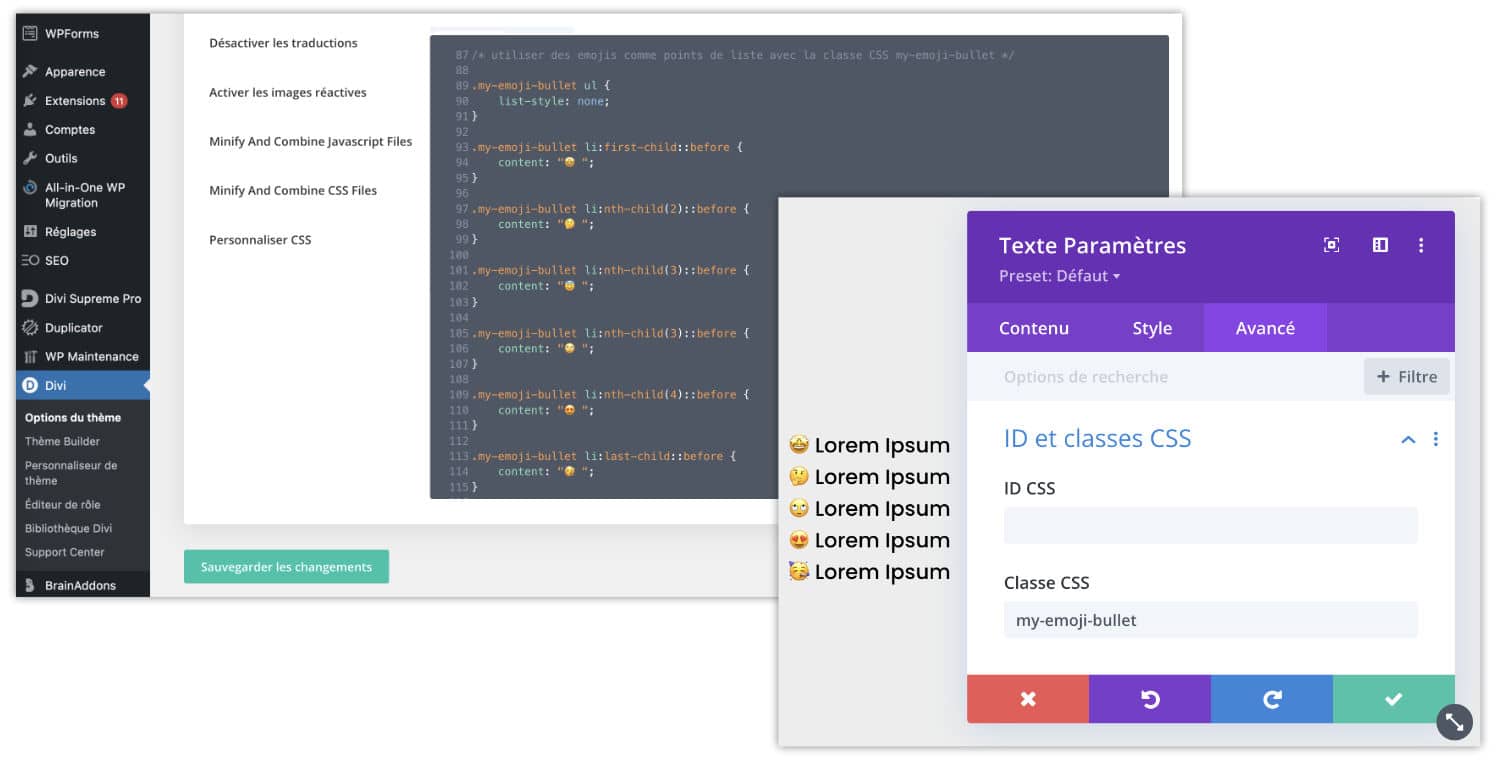
/* utiliser des emojis comme points de liste avec la classe CSS my-emoji-bullet */

.my-emoji-bullet ul {
	list-style: none;
}

.my-emoji-bullet li:first-child::before {
	content: "🤩 ";
}

.my-emoji-bullet li:nth-child(2)::before {
	content: "🤔 ";
}

.my-emoji-bullet li:nth-child(3)::before {
	content: "🙄 ";
}

.my-emoji-bullet li:nth-child(4)::before {
	content: "😍 ";
}

.my-emoji-bullet li:last-child::before {
	content: "🥳 ";
}
7 - To finish with custom chips in Divi...
I hope this mini-tuto has helped you, or has given you ideas to customize your sites (and your lists) 🤣).
Note, however, that the CSS codes I have proposed here allow you to modify a list only if you assign it a CSS class. This makes it possible to act that Timely When you want it.
If you prefer to act on all the smart lists on the site, you will not need to use CSS Class and adding the following code will act globally:
/* changer couleur des points de liste sur tout le site */

ul {
	list-style: none;
}

li::before {
	content: "• "; color: #3538fc;
}
And you? Do you have any other original ideas to suggest in comment?
Want to better sell your sites created with Divi? Master all his secrets with my training Divi Video Boost.

0 commentaire