
How to integrate the "Particles.js" Javascript library in Divi? Have you ever spotted this guy? interactive background in Divi or on any other type of site? Constellations which magnetize in the passage of your mouse, stars or even snow Who's falling? This guy. interactive background is possible thanks to the Javascript library of the Vincent Garreau : Articles.
Nothing more hypnotizing than this kind of background, right?
In this article, I will explain how to add an interactive background with Particles.js. You will see that in a few minutes, and without great knowledge (without coding), you can get this beautiful effect and use it on your Divi sites.
Here is the procedure:
- Install the plugin that will allow you to use the Particles.js library
- Define the type of particles you want to display
- Add the interactive background in a section of Divi
- What are the other possibilities?
Update of June 2, 2024: After many comments left by readers concerning errors encountered, I confirm that Particles.js is well compatible with the latest version of Divi or WordPress. I just checked with the version 4.25.1 of Divi and version 6.5.3 of WordPress. Everything works fine. If you encounter errors, check each step and make sure that there is no code error: a simple space or comma wrongly placed could result in a failure. I also advise you to Do your tests on a test site and not on a production site.
1. Install the plugin that will allow you to use the Particles.js library in Divi
Even if this plugin is not indispensable, it will make life easier for you and avoid putting your hands in your Divi child theme. Even if in many cases it is interesting not to add too many plugins, this one is really light and will make life easier for you, so why not?
So, for add an interactive background in Divi, the first step will be to download, install and activate the named extension ParticleJS-WP-Plugin. If you want to know more, here is the Github directory link.
This means that this is not an extension that is available directly from the official directory of WordPress plugins (via the menu Extensions > Install) but since Github, a repository dedicated to developers and in which you can trust.
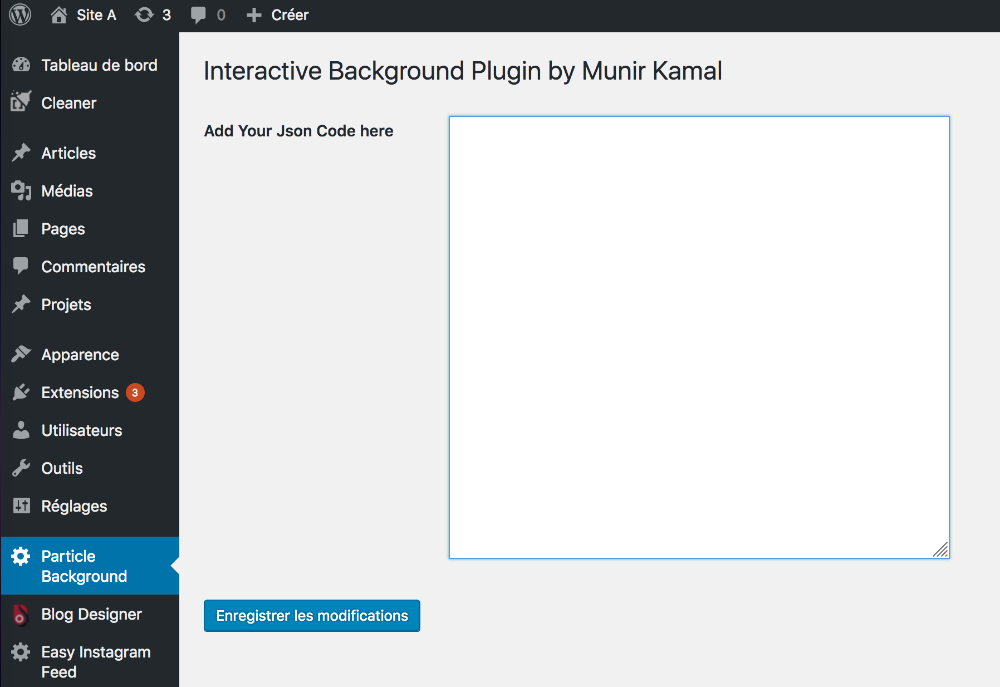
Once you have installed and enabled this extension, a new tab will appear: "Particle Background"
So far, nothing good leaves... That's what's gonna be interesting...
Do you know you can test Divi for free? See you on this page and click on "TRY IT FOR FREE"
2. Define the type of particles you want to display on your site
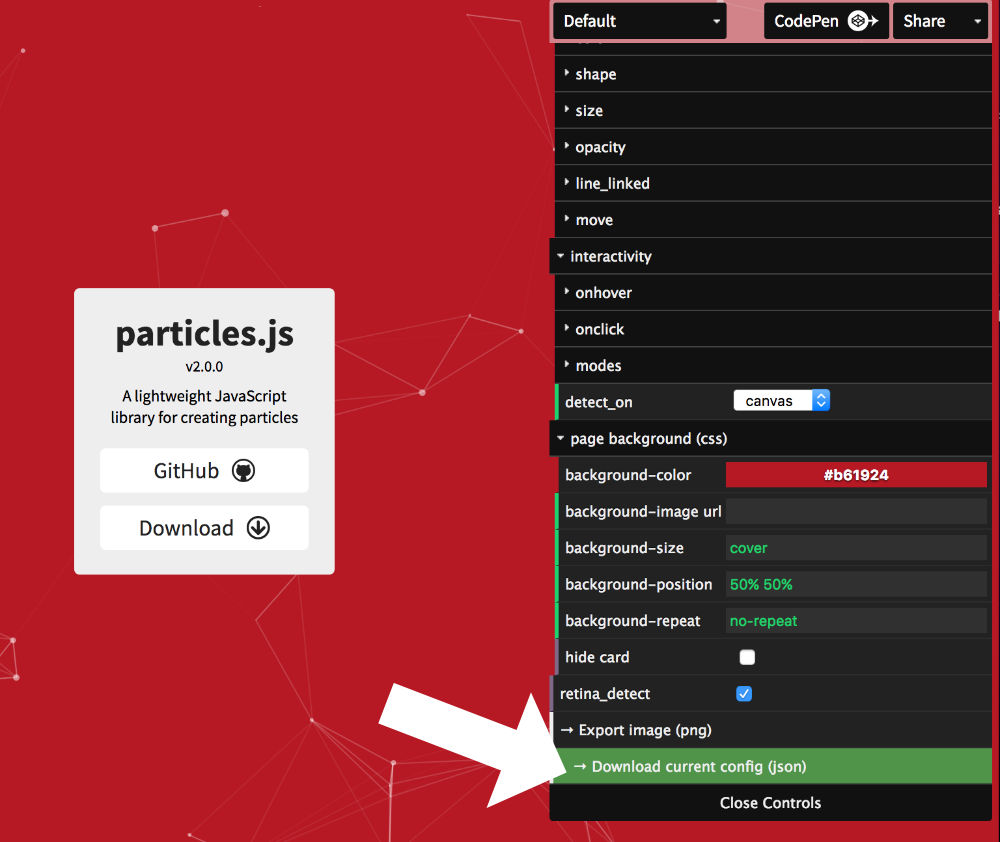
The second important step will be to set up the type of particles that you want to see appearing as as interactive background. For this, I give you an appointment on the official website of Particles.js.

This screen will allow you to create your particles and you can define:
- particle style: circles, polygons, stars, images etc...
- speed and number,
- Particulate bonding,
- the direction of movement,
- interactivity with the Internet user,
- the color of the particles / background color,
- etc...
Once you have set the ideal particles using the control panel (top, right), you will no longer be left only download the generated code. To do this, click on "Download current config (json)", the last element at the bottom of the particle control panel.
3. Add the interactive background in a section of Divi
Now you have the two essential elements to create your Beautiful interactive background in Divi :
- on Particle Background plugin
- and the particle code.
All you have to do is assemble it and integrate it into Divi. Here's what you need to do:
3.1. - Add the appropriate code in the Particle Background plugin
See you in the tab Particle Background and add this code:
particlesJS('my-particles',
ADD YOUR CODE HERE
);
In this example, the unique identifier (ID) is "my-particles". This can be changed by an ID of your choice. However, know that an ID (HTML ID) can only be used once in a page. This is important information you need to keep in mind.
The line where is noted "ADD YOUR CODE HERE." is the location where you must paste the code obtained after configuration of your particles. The one you got in step 2 of this tutorial.
So the code to paste in the field set to the tab Particle Background should look like this:
: {"number": {"value": 109,"density": {"enable": true,"value area": 800}},"color": {"value": "#ffffff"},"shape": {"type": "circle","stroke": {"width": 0,"color": {#000000"},"polygon": {"nb sides": 5},"image": {"src": "img/github.svg","width": 100,"height": 100},"opacity": {"value": 0.5,"ranm": {"anim": {"enable": {"src": {"img/github.","width": 100,"height": {"opic"},"opact": {"enable": {"anim": {"src"": {"t"t": {"enable": {"src
Since each ID must be unique, if you want to use various interactive backgrounds, you will have to change the identifier every time you repeat the code.
If you watched my video at the beginning of the article, you might have noticed that I added 3 backgrounds afterwards. This was possible because for each background, I used different IDs like "my-particles", "my-particles-2" or "my-particles3".
Update of 23 June 2019 : Here is the example of the code I used to be able to integrate 3 different background items within one page. The 3 pieces of code were glued in a row with 1 double jump to separate them =>
"JSe:('my-particles',{ "parts": { "number": { "value": 109, "density": { "enable": true, "value area": 800 } }, "color": { "value": "#ffffff"}, "shape": { "type": "circle", "stroke": { feight}, "opacity": {#000000"}, { "polygon": { "nb sides": 5}, "image": { "src": {img/github.s": 100, "height}, "opacity": { "value": 05, "58"": """: """": {"enable": "false": 1, "opicity min": 0, """
3.2. - Integrate your particles into a section of Divi
Now everything is ready for insert your particles into a section of Divi. Depending on whether you prefer to use the Divi Builder or Visual Builder, here is the method :
Method with the Divi Builder (back office):
When you Build your layout (page layout)you add sections, lines and modules.
The idea is that these particles cover the bottom of a section (standard section, full width section or even special section).
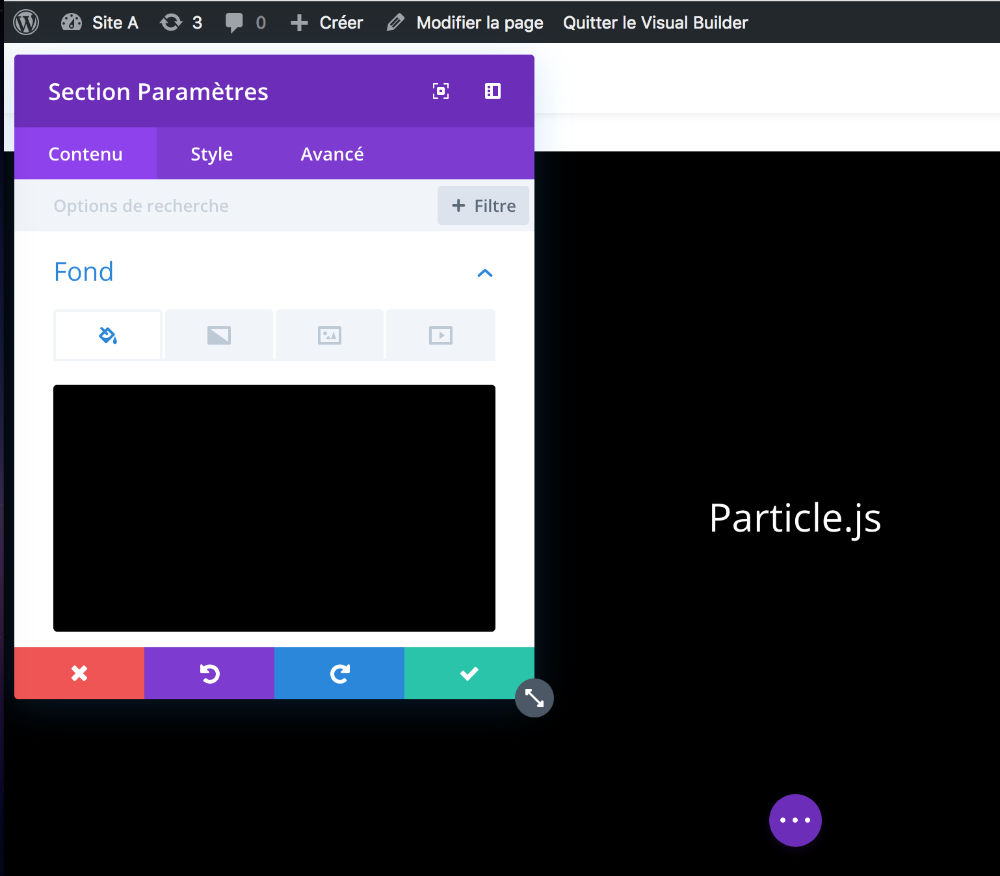
1 - You must add (or edit if already present) a section:
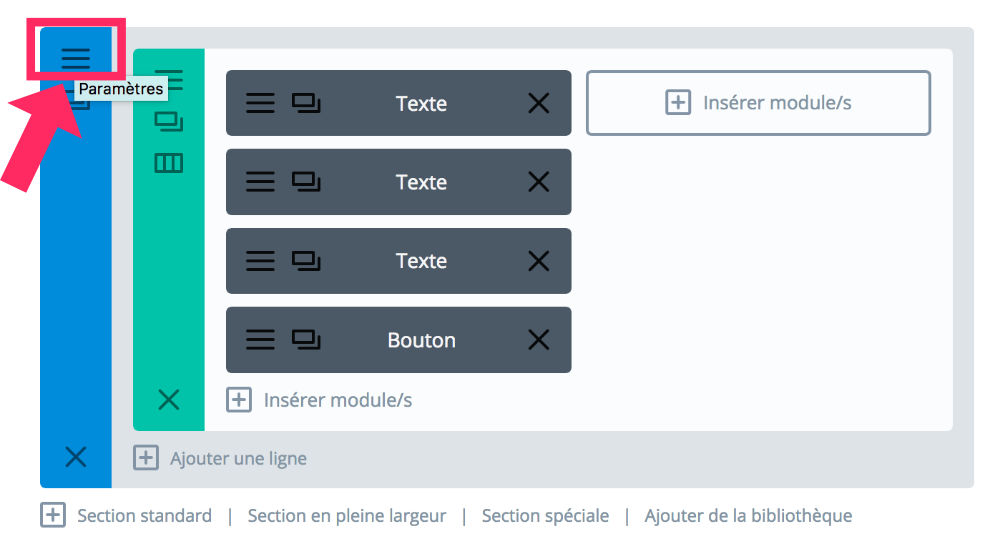
2 - Add a color background to your choice (especially if your particles are white) via the tab Content > Background :

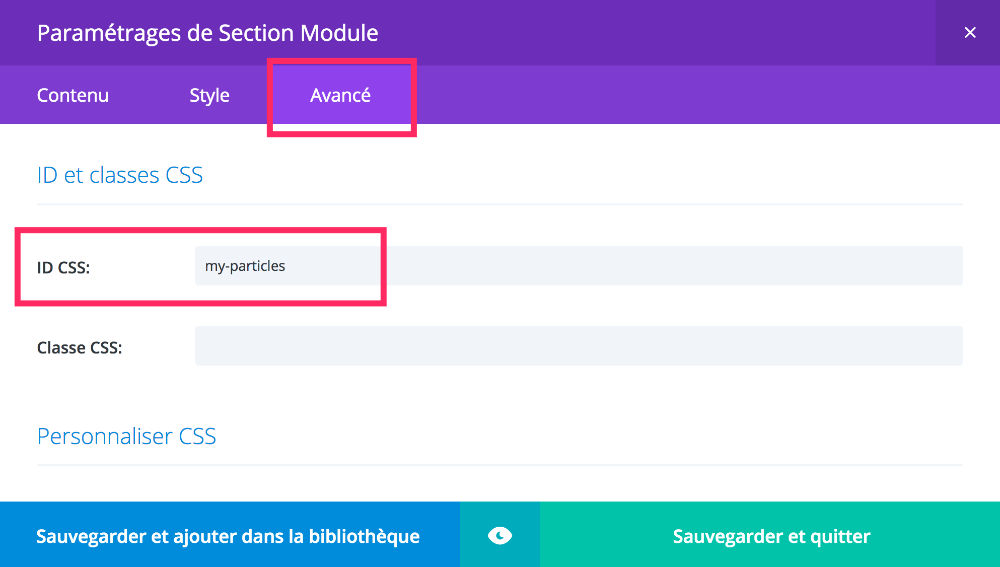
3 - Insert the ID (single identifier) that you used in the Particle Background plugin code (code previously seen, example "my-particle"). This ID is included in the tab Advanced > CSS ID and classes :
Want to move to higher speed? Get the Divi theme now!
4 - Save your changes, update your page and admire your starry sky!!! Note that you may need to add some internal margin to enlarge the section.
Method with Visual Builder (front-office):
If you prefer use Visual BuilderIt will be the same procedure.
IMPORTANT: Note you will not see your particles appear live when you use the Front End Builder. You will need to save and exit the visual builder to see your intercating background appear.

4. What are the other possibilities?
Finally, I wanted to inform you that there are other solutions to insert particles as an interactive background.
You could just download the Javascript library and add it to your child theme. This would require manual integration.
Otherwise, there is a free plugin on the official directory. This is Particle Backgroung WP. It is very simple to use. The only concern is that you will not be able to customize your particles, only the background color. A shortcode will allow you to add it easily but it is not ideal to integrate this into a section of Divi...
Before you leave: do you like designs that come out of the ordinary? Discover how to insert a background that changes color in Divi.
Need more resources on Divi? Visit ElegantTheme's blog full of ideas and tutos!
bonjour,
merci pour votre tuto,
j’ai un petit souci pour configurer plusieurs arrière plans(j’en ai un seul qui fonctionne ou aucun selon la syntaxe), quelle est la syntaxe exacte dans particles background pour pouvoir le faire?
Comment fait t’on pour charger des images (glaces dans le tuto)?
merci d ‘avance pour la réponse
Salut Damien, dans mon tuto, j’explique que si tu veux utiliser plusieurs arrières-plan tu dois utiliser des ID différents, c’est très important (voir section 3 => Ajouter le code adéquat dans le plugin Particle Background : l’exemple « my-particles » doit être changé pour chaque nouveau code).
Concernant l’image à insérer (comme la glace dans ma vidéo), tu dois la paramétrer lorsque tu définis tes particules sur le site https://vincentgarreau.com/particles.js/
Cette image doit déjà être déjà hébergée dans ton site. Tu vas dans ta bibliothèque de médias et tu récupères l’URL de l’image en question.
Ensuite, cette URL doit être insérée dans le paramétrage de tes particules au chemin suivant : PARTICLES > SHAPES > IMAGE > IMAGE.SRC
Tu me diras…
bonjour
je voulais ajouter un logo citroen sur le fond de ma page d’acceuil
j’indique le chemin dans PARTICLES > SHAPES > IMAGE > IMAGE.SRC et l’image sous forme jpg se trouve dans ma bibliotheque
pourtant il ne semble pas la reconnaitre et affiche des particules en mouvement
que faire?
C’est plutôt bizarre, ça devrait marcher. Avez-vous réessayé ? N’auriez-vous pas une erreur dans le lien de l’image ?
Bonjour, merci pour ce tuto.
J’ai malheureusement un problème aucune image ne fonctionne lorsque je rentre l’url d’une image cela me remet des particules de bases pourrais tu m’aider stp ?
Merci
Bonjour Sonny,
Dommage, il y a certainement une étape qui s’est mal passée. Par exemple : est-ce que l’URL de l’image est bonne ? As-tu essayé avec une autre URL pour voir si ça ne venait pas de l’image en elle-même ? Parfois, ça ne tient à pas grand chose !
Bonjour, comment puis-je utiliser plusieurs backgrounds différents pour différentes pages ?
Sur votre tuto je lis de les différencier d’un ID différent.
Je ne suis pas sûr de la syntaxe dans le code JSon, je ne sais pas comment ajouter un deuxième id.
J’ai essayé de les « raccorder » comme ça :
https://www.zupimages.net/up/19/19/rxdm.png
Et comme ça :
https://www.zupimages.net/up/19/19/dzai.png
J’ai ensuite préciser l’idée my-particles-2 dans les id css,
mais aucun des deux ne semble fonctionner.
Si vous pouviez me renseigner svp, ça m’aiderait beaucoup 🙂
Salut Desportj,
Tu as trouvé finalement ? Tes captures me semblent bonnes. Tu peux effectivement préfixer l’ID pour pouvoir dupliquer le code et qu’il n’y ait pas de conflits : my-particle, my-particle-2, my-particle-3
Peut-être que le souci vient d’ailleurs ?
As-tu copié-collé le code de mon article ? Si c’est le cas, regarde que les « apostrophes-droites » n’aient pas été remplacées par des « apostrophes-virgule » par exemple. C’est souvent le cas quand on copie-colle.
Bonjour j’ajoute les particules elles fonctionnent en haut de page mais j’aimerais uniquement l’insérer dans une section divi et rien ne fonctionne. pouvez vous m’aidez?
Quand j’inscris le code « json » il s’inscrit sur tout le site.
Comment puis-je faire?
Salut Morgane,
Je ne comprends pas trop ta question. Je crois que tout est bien expliqué dans le tuto. As-tu suivi les étapes scrupuleusement ?
pouvez vous indiquer comment vous faites pour mettre plusieurs particle background, au niveau du codage ? plusieurs personnes on ce probleme on dirait. une capture d’ecran par exemple ?
Bonjour,
Merci pour ce tuto, cependant fonctionne t-il avec la version 3.23.2 du thème divi ?
Cela ne fonctionne pas chez moi….. :/
Bonjour Laurent, ça devrait fonctionner normalement… je crois…
Salut Yoyo!
Je vois que certains n’arrivent pas à utiliser plusieurs backgrounds au sein de la même page. Pourtant, je ne peux pas être plus claire, c’est écrit dans le tutoriel :
« Étant donné que chaque ID doit être unique, si vous souhaitez utiliser divers arrières-plans interactifs, vous devrez changer l’identifiant à chaque fois que vous répétez le code.
Si vous avez regardé ma vidéo en début d’article, vous avez pu remarqué que j’ai ajouté 3 arrières-plans à la suite. Cela a été possible car pour chaque background, j’ai utilisé des ID différents comme « my-particles », « my-particles-2 » ou « my-particles3 ». »
Bonjour,
Je rencontre un petit problème avec ce plugin
J’ai suivi à la lettre les instructions d’installation et de paramétrage
Il fonctionne très bien avec Chrome, mais les particules sont invisibles avec Mozilla ou Safari
Merci d’avance pour votre aide
Cordialement
Salut Gilles,
Hummm… C’est très bizarre. Pour ma part, j’ai réalisé le tuto sur Firefox et ça marchait très bien… Je n’ai pas réessayé depuis mais je ne vois pas pourquoi ça ne marcherait pas ?
Bonjour, je ne comprend pas, dans l’onglet paramètre j’ai seulement « Personnaliser Css » et rien d’autre.
Je ne peux donc pas rentrer l’ID CSS.
Bonjour,
Après 150 essais je n’arrive toujours pas à mettre en oeuvre les particules !
Pourtant j’ai le sentiment de tout faire, j’ai peur qu’un élément de mon divi donne un contre ordre ou je ne sais quoi.
Pouvez vous m’aider ?
Bien à vous.
Salut Boby
Ça dépend de ce que tu cherches. Dans « personnaliser CSS », tu peux saisir l’ID et la Class normalement.
Salut Antoine,
Tu n’es apparemment pas le seul qui rencontre des problèmes d’intégration. Du coup, je viens de suivre mon tuto comme un internaute le ferait. Tout fonctionne. Je confirme donc que Particles.js est compatible avec la dernière version de Divi et de WordPress (soit 5.23 et 5.2).
Par contre, j’attire ton attention sur le fait que si tu insères l’ID depuis le Visual Builder (en front-end), c’est normal de ne pas les voir apparaître au moment de la confection de ta page. Ajoute bien l’ID, enregistre le module et la page puis quitte le Visual Builder : les particules apparaîtront.
Si rien ne fonctionne, tu as peut-être un conflit avec un autre plugin.
Salut Lycia,
Merci pour tous tes tuto.
Je rencontre non pas un souci d’intégration mais un souci au niveau des dimensions.
Dans l’impression d’écran ci dessous, la section fait 300px.
Du coup l’effets est totalement écrasé.
https://zupimages.net/up/19/26/chyv.png
Ça te parle ?
Ah oui, effectivement les particules sont écrasées. Lors de mes tests, moi aussi l’icône de mon logo (la glace) s’est affichée écrasée pendant un instant, mais après rechargement de la page, le logo est redevenu normal. Peut-être une histoire de cache ?
Aurais-tu mis une règle CSS pour donner une taille spécifique à ton BG ?
Genre [width:300px height:200px]. Si c’est le cas, il vaudrait mieux mettre un truc du genre [width:300px height:auto].
Sinon inspecte le code, ça pourrait venir de là.
Tu nous diras…
Bonne journée.
Lycia
Merci de ta rapidité.
Ce n’était pas un problème de cache et je n’avais rien de spécifié au niveau du BG.
Par contre le plugin ajoute un parametre de style « width: 100%; height: 100%; »
En ajoutant un parametre sur la class qui va bien, tout est OK 🙂 !
.particles-js-canvas-el {
height: auto!important;
}
Ah super !
J’en étais sûre que c’était une histoire de height:auto !!!
Pour ma part, je n’ai pas rencontré ce problème car mon icône est un .png carré. Genre 200px par 200px.
Ton image ne devait pas être carrée, d’où le problème rencontré je pense !
Ton cas pourras en aider d’autres…
Merci 😉
Très bien, merci pour vos commentaires, une requête, j’utilise un curseur et je veux mettre cet effet sur ce curseur, mais l’effet n’apparaît que lorsque la page est chargée et que la diapositive suivante est affichée, l’effet disparaît. ou cet effet ne fonctionne pas sur un curseur?
Je vous serais reconnaissant de bien vouloir m’aider, Lycia, merci beaucoup pour votre aide.
Rolando Segovia
Lima Pérou
Salut Rolando, en parlant de curseur, tu parles d’un diapo ? Effectivement, c’est possible que cela ne marche pas, à moins de trouver l’ID qui va bien mais je n’ai pas testé et je ne sais pas si cela est possible. Désolée de ne pas pouvoir plus t’aider…
Bonjour lycia je n’ai pas trouvé les autres vidéos pour la suite de ce démo, comment faire des particules en images dans ta chaine sur YouTube
Salut Skander. Ce tuto est pour Divi et WordPress. Je ne pense pas que tu puisses t’en servir pour ta chaine YT.
Bonjour, je souhaiterais utiliser mon logo (comme vous vous utilisez la glace) comment faire s’il vous plaît.
Bonjour Amandine,
Tout est expliqué dans le tuto. Tu devras héberger ton image sur ton site et récupérer le lien (adresse URL). Ensuite, tu paramètres les particules depuis le site officiel de ParticleJS avec l’adresse de ton image. Tu récupères le code et tu l’insères dans ton site. Elle doit être en .png (fond transparent).
Bonne journée
bonjour j’aimerai configurer des particules dans ma section mais le problème est que ma section à déjà un id qui me permet de faire reference à mon menu ancre comment je peux gérer ça?
Salut Levy, je vois ce que tu veux dire… Je ne sais pas, il faudrait regarder de plus près. Peut-être que tu pourrais utiliser une CLASSE CSS au lieu d’un ID ? Il faudrait voir si ça fonctionne… Je parle pour les particules, car pour ton ancre de lien, tu es obligé d’utiliser un ID…
J’ai un problème. J’ai bien installé les particules, ça fonctionne super, tant que je suis connecté. . .
Dès que je ne suis plus connecté, plus de particules.
Savez-vous d’où ça peut venir ?
C’est bizarre Charly.
Y’a peut-être un conflit quelque part ?
Possible, effectivement faudrait que je fasse des petits tests à ce niveau.
Bonjour,
Le tuto est parfait, merci. J’arrive à mettre des flocons de neiges ou même des images, le problème que je rencontre c’est que je ne peux pas faire les deux en même temps. Que ce soit sur une même page ou deux pages différentes, j’ai l’impression que dès que je change l’ID ça rentre en conflit.
Aurait tu une idées.
Bonjour,
Après un nouvel essais en utilisant ton code à toi, ça fonctionne parfaitement sur une même pages. Par contre lorsque je veux appeler les différents ID sur des pages différentes ça ne fonctionne pas, aurais tu une astuce pour contrer le bug ?
Salut Jonathan.
Je ne vois pas trop… Il te faut utiliser des ID bien distinct à chaque fois, comme expliqué dans ce tuto. As-tu fait attention à cela ?
Ah d’accord, j’avais pas vu ton second commentaire !
Euh, normalement ça dois marcher si c’est sur une autre page.
Hi, im just having some issue. 🙁 When i am logged in in DIVI it is working. But when i logged out it is not working.
I tried to inspect and it says Uncaught ReferenceError: particlesJS is not defined.
Hello Chris,
I don’t know what is wrong. Did you made the tutorial step by step ?
Bonjour
Je tente ma chance pour avoir de l’aide. J’ai suivi le tuto et rien à faire, impossible d’avoir la moindre animation alors que j’ai tout suivi sur 2 tutos différents. Mon code json est bon mais quand je mets mon ID CSS après avoir défini ou non une couleur de fond, rien. Pas de réaction…
Merci
Salut Sof.., ben je sais pas, il faut retenter jusqu’à trouver d’où vient le problème…
Bonjour.
Pendant plus de 4H sans mentir j’ai bien suivi le tutoriel et je n’ai toujours pas les particule qui s’affiche… aucune mise à jour depuis 2019 du coup je ne sais pas si le problème viens de moi qui comprend mal ou pas…
Hello Lux, pas besoin de mettre l’article à jour, car le code fonctionne toujours 😉 Mais si tu savais le nombre d’internautes qui me disent « j’ai suivi à la lettre » et qui reviennent ensuite me dire, « ah en effet, j’avais pas bien lu le point n°x »… Donc, je ne saurais quoi te dire, peut-être que j’explique mal…
Bonjour,
Ça fonctionne bien ! Par contre c’est limité à la taille de l’écran, si la section est plus petite que l’écran, les particules sont écrasées et si elle est plus grande, elles sont étirées…
J’ai remarqué ça car j’ai voulu le mettre sur toute la page (header et footer compris). J’ai réussi mais les particules ne vont que quelques centimètres dans le footer (j’ai essayé de changer « detect on : window ou canvas ou parent »)
Ou peut-être que j’ai fait quelque chose de faux ?
Je sais pas il faudrait faire plusieurs essais, merci du retour
Hello, déjà merci pour ce super tuto et cette superbe extension !
Alors par contre super bizarre, à partir du moment où j’ai installé l’extension, tout les séparateurs entre mes modules ont disparus…. et impossible à les remettre en place ! Sure mon builder il y est et quand je le quitte les séparation n’y sont plus…
Ah oui c’est bizarre
Bonjour,
J’ai le même soucis que Djin dans les commentaires le 25 Juin 2019
Seulement je n’ai pas compris sa solution …. Quel est la class qui va bien ? Je ne comprends pas sorry….
Pouvez-vous m’aider s’il vous plait ?
Merci beaucoup !
Salut Adrien, en fait Djin explique qu’une height est définie et que c’est cela qui « écrase les particules ». En forçant le « height: auto!important; » cela corrige le problème. Du coup, il faut effectivement inspecter le code dans ton navigateur pour trouver sur quelle classe positionner ces valeurs. Selon Djin, ce code règlerait le problème :
.particles-js-canvas-el {
height: auto!important;
}