
A page scroll effect in an iMac with Divi? I admit I don't really know what the term is but a reader of Astuces Divi sent me an email yesterday to ask me how I could realize this page effect that scrolls through an iMac on the scroll of my homepage.
It is true that this scroll effect is nice and I had to do several tests before I could do it. I am happy to share this with you today.
How to analyze a web design you like?
To be honest, this page scroll effect in an iMac, I didn't make it up because I've already seen it on a site made with Divi. I thought it was great and I thought it was just necessary. analyze design to try to do something similar, without copying of course!
If you look carefully, there's nothing sorcerer: no JS, just a little CSS, three times nothing! It's all in the pictures!
This is what I often say to my students or clients, the WebDesign depends a lot on the images. When I'm talking about images, I'm not talking about photos but rather about creations created from any room with specific software. In fact, everything on Astuces Divi was created: no photos, just vector elements...
For this tutorial I'll introduce you, you could imagine thousands of variations like:
- a window opened on a landscape that would scroll to the scroll of the page
- a submarine porthole that would allow marine wildlife to be seen in the scroll of the page
- a smartphone,
- An airplane window, etc.
Everything can be imagined when one considers a scrolling and when one possesses (or creates) the appropriate resources.
What you need to realize this page that "crols" in an iMac
You only need two things: a mockup and a background image. However, depending on the result you want, sizes will have to change. Choosing the right image sizes is the most complex thing in this tutorial.
Let us also remember that this tutorial is intended for users of the Theme Divi that you can provide here.
1. Choose a mockup
In my case, it's an iMac that I took care of cutting its interior and exported in format .png as it maintains transparency. For the record, I did these actions with Affinity Designer But you could do the same with Photoshop.
After several tests, the most suitable image was 847 x 704 pixels. I make it clear that this size fits the format of my Divi line, which is divided into 3 columns. I suppose if you want to achieve the same effect on a 1/1 line, you will certainly have to change the size.

2. Create a background image
In my case, I made a creation with the Divi Tips logo and the "glasses" I've multiplied and put in transparency. Always with Affinity Designer.
For this image too I had to perform several tests until find the ideal size of 1500 x 2500 px
This image must be "graphic" so that the effect of the scroll is successful. That is, if the background image is solid color, it won't work and it makes sense...
Realize the scroll effect in 4 simple steps
Once you've gathered appropriate images, you will be able to perform the few steps necessary to achieve this superb scroll effect in an iMac.
I advise you to arm yourself with patience if the sizes of the images are not suitable for the rendering you want to obtain and to modify until you find the ideal size.
Step 1: Add a section and a Divi line
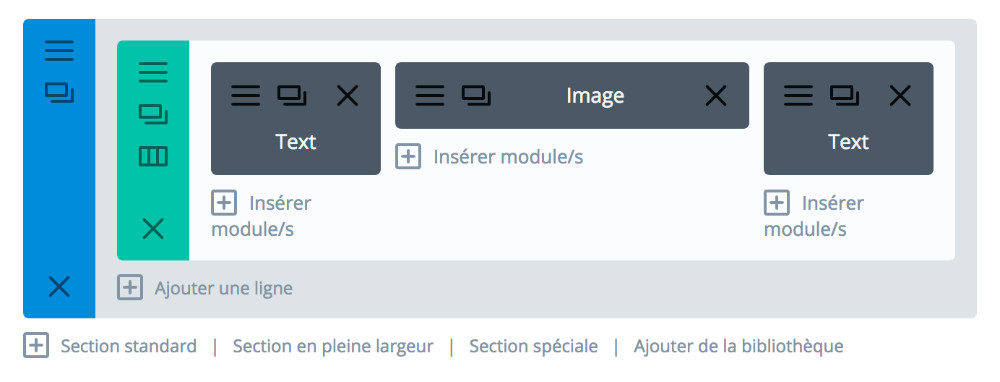
In this first step, you will need to:
- enable the Divi Builder
- add a standard section (blue colour)
- add a line (green colour) of type 1/4 + 1/2 + 1/4
You have nothing to change, you can leave the section and line with the default settings.
Step 2: Add and Set the Image Module
In column 1/2 of the line, i.e. in the middle column, you will add IMAGE MODULE that you have to set like this:
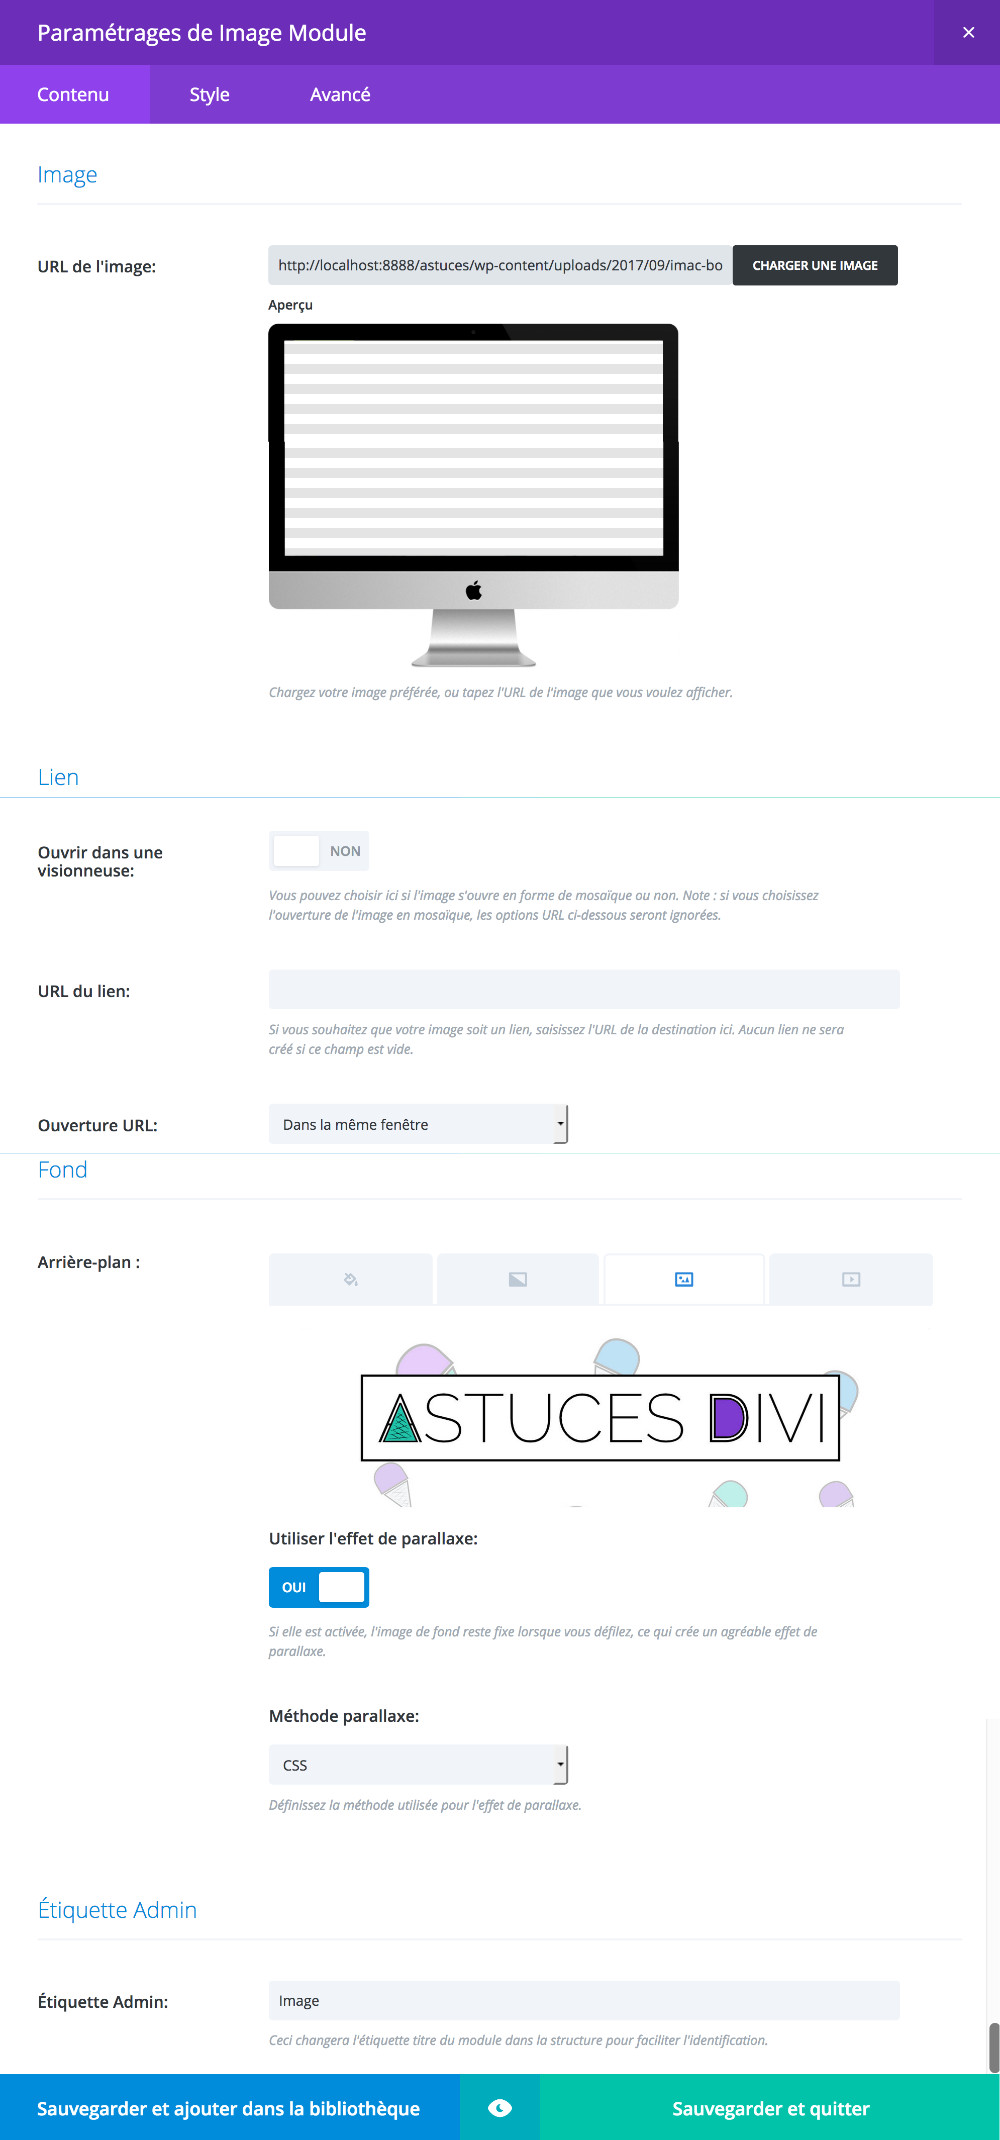
- Image URL: choose the image of your mockup. This image will therefore be the first image.
- Open in a viewer: NO
- Background: This is where you will insert the background image you previously created (1500 x 2500 px)
- Use parallax effect: YES
- Parallax method: CSS
- Still in the IMAGE MODULE, go to ADVANCED NUCLEAR, add a CSS class to the module: for my example, I gave the class "imac-bg"
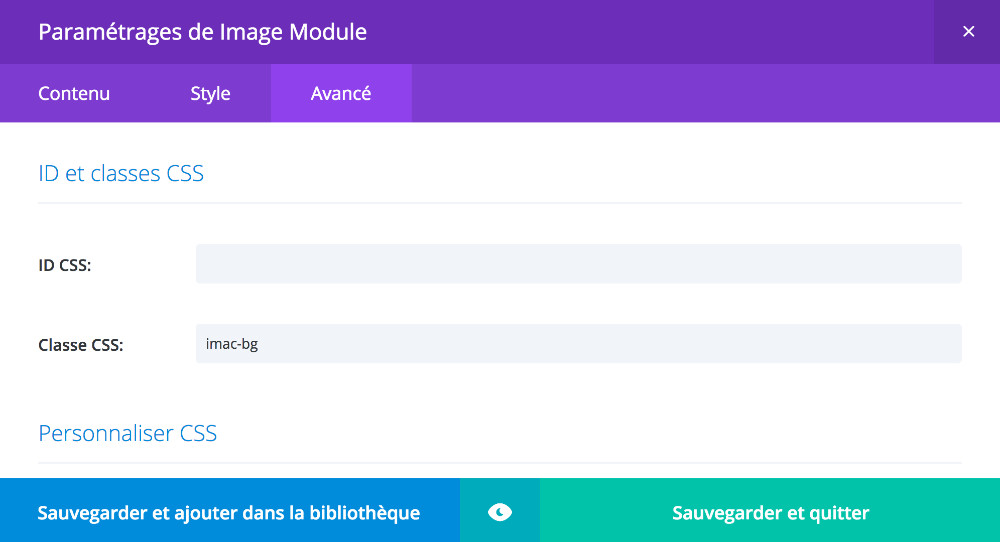
This will allow us to add a small piece of CSS that is indispensable for rendering the scroll.
Step 3: Add custom CSS
Once the CSS class has been added to the ADVANCED tab of the IMAGE MODULE, you will be able to go to the APPARENCE > PERSONNALIST > ADDITIONAL CSS tab to add a simple bit of code. This step is very important if you want Scroll effect works properly.

This piece of code is:
/* background imac homepage*/.imac-bg .et parallax bg {background-size: contains !important;}.et pb section parallax .et pb parallax css { -webkit-transform: none; }
Remember to save your changes.
Step 4: Check rendering
Finally, you must go to FRONT to check your page. Does she fit you? Perhaps you will have to adjust some details due to the size...
Video summary...
I hope I answered your dear Doll question. It was a pleasure and especially a good subject that could help many users of Divi. Finally, I let you discover the tutorial in video version...
Oh yes, I forgot one important thing: for the scroll effect to be successful, your page must be long enough, that is with enough content. In the video below you will see that I have added two lines of text in order to enjoy the effect of the scroll.
PS: Sorry about the slowness of the video...

Super, c’est ce dont je voulais haha ! Merci pour tes tutos, c’est super gentil de ta part de les partager avec nous 🙂
Bonne continuation !
Ce qui est fou, c’est qu’on se décarcasse à faire des tutos sympas et on voit que les lecteurs laissent une seule note : 1/5 !!! Mais c’est honteux ! Quand je pense qu’on prend du temps à soi pour partager des astuces sur Divi et qu’il y a toujours des gens qui sont là pour rabaisser le travail des autres. Que celui qui a mis 1 étoile sur 5 se manifeste afin que je puisse comprendre ce qui ne va pas dans ce blog ou cet article.
Trop top, l’astuce….
super tuto merci de votre temps pour partager vos tips…heureusement que des gens comme vous sont là pour nous aider ..car on commence tous un jour
encore merci
Patrick
Merci beaucoup Patrick 😉
Merci Lycia pour vos tutos et votre générosité
Merci Stan !
Bonsoir
Je suis interesser a utiliser le meme « formulaire » que celui sur lequel j’ecris ces lignes pour mon blog. Je ne trouve rien, pouvez-vous m’aiguiller svp ?
Hello Jean-Michel !
De quel formulaire parlez-vous ? Celui des commentaires ? Si oui, généralement il est activé par défaut sur les articles et désactivé par défaut sur les pages d’un site WordPress. Mais vous pouvez activer les commentaires soit dans les réglages de WordPress (onglet Discussion) soit page par page. Dans les réglages de la page ou de l’article. Quand vous êtes sur l’écran de la liste de vos pages ou articles, vous pouvez passer la souris sur le post et cliquer sur MODIFICATION RAPIDE. Vous verrez une option à cocher ou à décocher. J’espère avoir été claire.
Vous me direz 😉
Hello Lycia,
Merci pour le travail fournis et les astuces. Nouvel arrivant dans l’unniver Divi c’est appréciable ;).
J’ai une question concernant cet article : Est-il possible au lieu d’intégrer une image, d’intégrer un Iframe pour afficher une autre page web (avec une URl différente) ?
En gros j’ai une app web sur une url diférrente ei j’aimerai l’intégrer dans un mockup.
Merci par avance 🙂
Steeve
Salut Steeve,
Merci à toi 😉
Pour être honnête, tu me poses une colle… J’ai envie de te répondre « non, c’est pas possible » mais je n’en sais rien… Pourquoi ne prends-tu pas une capture d’écran de cette deuxième page web ? C’est plus simple, non ?
Merci pour ta réponse rapide.
Alors pour te répondre au « pourquoi pas de capture écran ? » : Car j’ai besoin que l’utilisateur puisse utiliser cette fameuse app web sur le site.
Mais j’ai (je pense) trouver la solution.
– intégrer une Iframe src url.
– mettre en fond un iPad ou MacBook en fond transparent (png)
-s’arracher les cheveux pour adapter les tailles et faire en sorte que le code iframe rentre parfaitement dans le « mockup »
Actuellement je bosse en local mais si tu es intéressée et que ma bidouille tient la route je t’enverrai le résultat.
Bon week-end 😉
Salut Steeve, oui je suis curieuse du résultat, tu me diras !
Pour que le code iframe s’adapte totalement à la taille du mockup, tu penses que c’est possible d’utiliser la propriété background-size en donnant des valeurs comme contain ou cover, ça peut peut-être fonctionner (à tester) ?
Je me suis servi de cette propriété pour les mockups suivants :
– https://demo.astucesdivi.com/scroll-mockup-1/
– https://demo.astucesdivi.com/scroll-mockup-n3/
– https://demo.astucesdivi.com/scroll-mockup-n4/
A bientôt 😉
Bonjour ! Merci infiniment pour vos nombreux tutos !
J’ai suivi celui-ci cependant l’image de fond n’apparait pas au milieu de mon Mock Up alors que j’ai repris les memes dimensions que vous (photo de fond a 1500×2500 px et mock up a 847×704).
Auriez-vous une solution a me proposer ?
Merci d’avance
Célia
Bonjour,
Je vous remercie pour l’ensemble de vos tutoriels, qui sont autant agréable à lire que pertinent.
J’ai bien réussi à suivre votre manipulation. Cependant, j’aimerais placer le mockup sur la gauche et n’utiliser que deux vignettes vertes. Dans ce cadre, je n’ai pas réussi à faire apparaitre l’image de fond qui se scrolle dans le mockup (l’image de fond semble rester au centre).
Sauriez-vous quelle est le démarche à réaliser pour palier ce problème ?
Merci à vous,
Pierre-Louis
Salut Célia, cela peut dépendre de nombreux facteurs. Par exemple, si tu n’utilises pas les mêmes marges que moi, tu peux obtenir un décalage. Tu dois faire plusieurs tests pour trouver la bonne taille.
Salut Pierre-Louis et merci.
J’imagine que cela complique la tâche. Peut-être que tu dois utiliser une image de fond qui soit placée sur le premier tiers (et conserver les deux autres tiers vide). Il faut tester.