
One image that scrolls over the mouse allows you to insert very long images that slide up when you pass the mouse over.
It is ideal to animate images much longer than wide. This makes it possible not to monopolize all the space of a page while allowing a user interaction.
Such animation is often found in webdesign sites. It is ideal to display the page layout home page layout and build an original portfolio...
To understand better, I have prepared a video that shows the final result.
In this article, I will explain how to achieve this with the Divi Visual Builder.
1 - Prepare the images of the portfolio
First, you will have to be in possession of the images. They must be in portrait format and much longer than wide. For my example, I used several image sizes to see if it was any concern with the scrolling effect on the flyover:
- Image 1 : 1244px * 3996px
- Image 2: 1244px * 3633px
- Image 3 : 800px * 2537px
I advise you to use images of at least 800px wide. As for the length, this may differ but you will have to take it into account in your CSS. We will see this later, in the chapter "understand how to change the code".
2 - Build the layout
Go to the tab Pages > All Pages and add a new page (or edit an existing page). Activate the Divi Visual Builder.
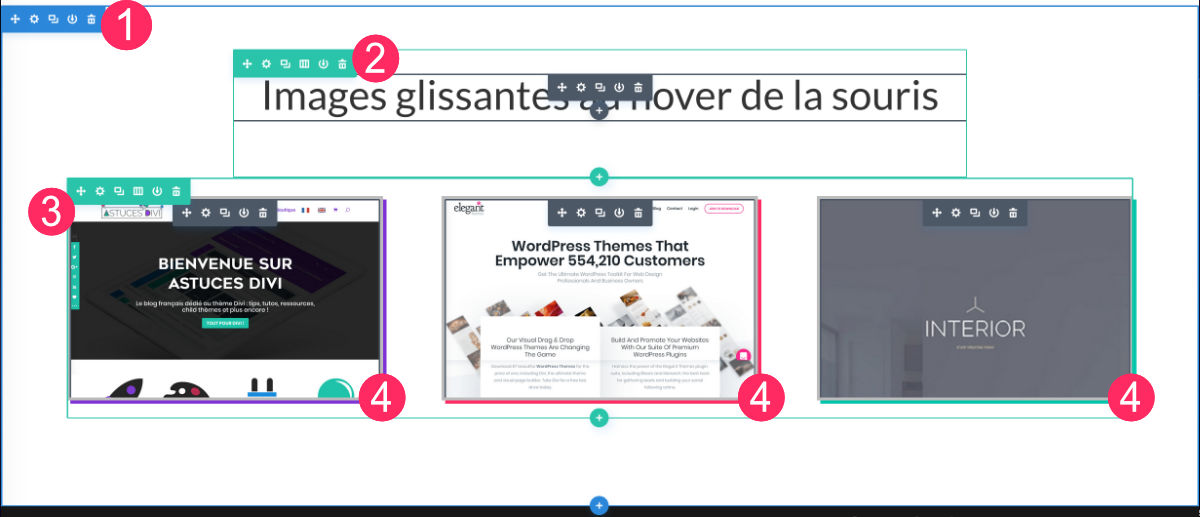
Next:
- Add a SECTION STANDARD (in blue)
- Add a LINE 1 column (1/1) (green). You can insert a text module. This will allow you to display a title.
- Add New LINE (green) whose colonization is divided into 3
- In each column, you will add a module IMAGE
Discover all official resources about the Scroll for Divi, here.
3 - Line settings and image modules
Before you go further, you have to make some adjustments so that the image effect that slides upwards works...
3.1. - Line settings
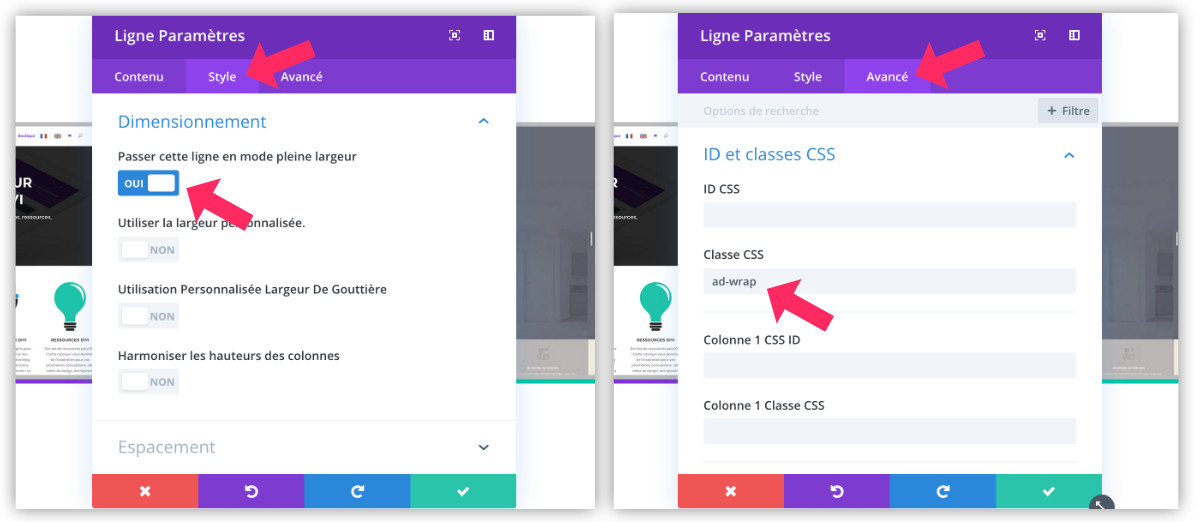
Open the settings of the green line that will host your images (tone wheel icon):
- on the tab STYLE > DIMENSION : "cross this line in full width" = YES
- on the tab ADVANCED > CSS ID and CLASSES : enter ad-wrap in the CSS CLASS field
Complete with saving your changes.
3.2. - Image module settings
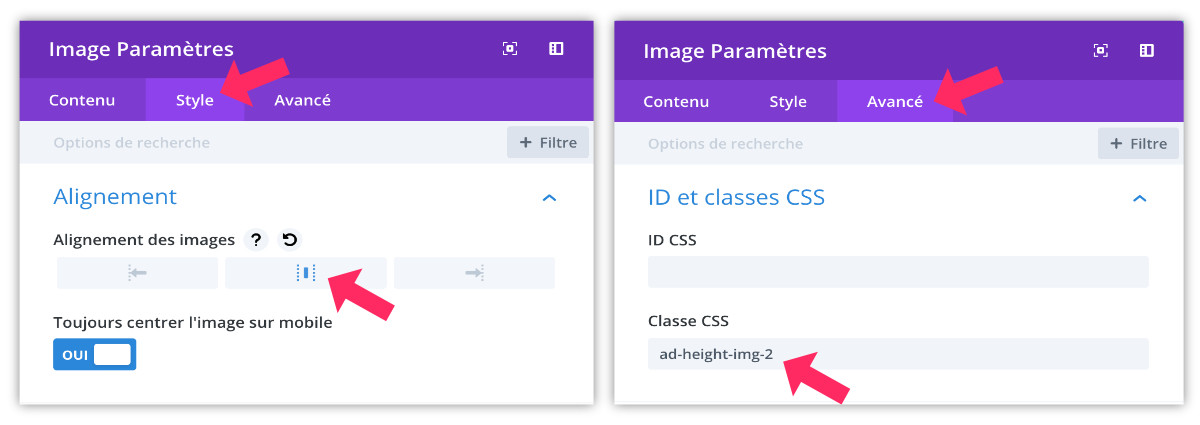
Open the settings of each IMAGE module (tone wheel icon):
- on the tab STYLE > ALIGNMENT : choose the centered alignment
- on the tab ADVANCED > CSS ID and CLASSES : enter ad-height-img-x in the CSS CLASS field. The "x" should be replaced by 1, 2 or 3 depending on your images (ad-height-img-1, ad-height-img-2, ad-height-img-3). Thus, you will need to assign a new nuemro for each image module.
Save your changes.
4 - Add CSS to get an image that scrolls over the mouse
Now that you have set your line and modules well, you will be able to copy and paste the following code into the tab Appearance > Custom > Additional CSS :
/* image scroll up - ligne 3 colonnes */

.ad-wrap .et_pb_column_1
{
overflow: hidden;
height: 300px;
border:5px solid #BBB;
box-shadow: 5px 5px #7F32D3;
}

.ad-wrap .et_pb_column_2
{
overflow: hidden;
height: 300px;
border:5px solid #BBB;
box-shadow: 5px 5px #FF2A62;
}

.ad-wrap .et_pb_column_3
{
overflow: hidden;
height: 300px;
border:5px solid #BBB;
box-shadow: 5px 5px #00C4AA;
}

.ad-height-img-1, .ad-height-img-2, .ad-height-img-3
{
position: absolute;
top: 0;
width: 100%;
height: auto;
transition: top 5s ease-out 0s;
}

.ad-height-img-1:hover
{
top: -850px;
}

.ad-height-img-2:hover
{
top: -750px;
}

.ad-height-img-3:hover
{
top: -800px;
}

@media screen and (max-width: 980px) {

.ad-wrap .et_pb_column_1 {
height: 500px;
}

.ad-wrap .et_pb_column_2 {
height: 500px;
}

.ad-wrap .et_pb_column_3 {
height: 500px;
}

.ad-height-img-1:hover {
top: -1200px;
}

.ad-height-img-2:hover {
top: -1050px;
}

.ad-height-img-3:hover {
top: -1100px;
}

}
This code is indicative because you will have to modify it according to your needs...
5 - Understand how to modify the code
5.1. - Be careful .et_pb_column_1
.ad-wrap .et_pb_column_1 => en fonction du nombre de colonnes et du nombre de sections dans votre page, la classe CSS .et_pb_column_1 peut changer. Vous devrez alors modifier le numéro pour .et_pb_column_2 - .et_pb_column_3 etc. N'hésitez pas à inspecter le code dans votre navigateur pour savoir sur quelle classe CSS agir.
{
overflow: hidden; => ne pas toucher
height: 300px; => vous pouvez modifier la hauteur de la boite de votre image si vous le souhaitez.
border:5px solid #BBB; => ceci n'est que du style, vous pouvez le supprimer ou le modifier.
box-shadow: 5px 5px #7F32D3; => ceci n'est que du style, vous pouvez le supprimer ou le modifier.
}
5.2. - Class .ad-height-img-x
.ad-height-img-1, .ad-height-img-2, .ad-height-img-3
{
position: absolute; => ne pas toucher
top: 0; => ne pas toucher
width: 100%; => ne pas toucher
height: auto; => ne pas toucher
transition: top 5s ease-out 0s; => vous pouvez changer la rapidité du scroll. Si vous trouvez que 5 secondes c'est trop rapide, augmentez cette valeur. Attention, au plus votre image est longue, au plus le temps de défilement sera rapide et inversement.
}
5.3. - Adapt to the length of the images
.ad-height-img-1:hover {
top: -850px; => modifier cette valeur en fonction de la longueur de votre image. Si l'image est très longue, augmentez cette valeur, si l'image est courte, réduisez cette valeur.
}

.ad-height-img-2:hover {
top: -750px;
}

.ad-height-img-3:hover {
top: -800px;
}
As you see in the above code, you will need to adjust the value of the "top" according to the length of your images. If you use images that have the same size and ratio, it's easier.
5.4 - Adapt the code for small screens (responsible):
The media queries allow you to act on the appearance of certain elements depending on the screen sizes. This is one of the ways to manage responsive.
@media screen and (max-width: 980px) {

.ad-wrap .et_pb_column_1 {
height: 500px; => en version mobile, je propose de passer la hauteur à 500px au lieu de 300px dans la version de bureau
}

.ad-wrap .et_pb_column_2 {
height: 500px;
}

.ad-wrap .et_pb_column_3 {
height: 500px;
}

.ad-height-img-1:hover {
top: -1200px; => augmentez la valeur du "top" pour les versions mobiles. Vous devrez adapter chaque valeur en fonction de votre image.
}

.ad-height-img-2:hover {
top: -1050px;
}

.ad-height-img-3:hover {
top: -1100px;
}

}
Need more resources on Divi? Visit ElegantThemes blog full of ideas and tutos!
An image that scrolls over the mouse: it is possible with Divi!
What do you think of this tip? Could he be part of your future project? It may seem complicated, but it's not. Just follow the steps carefully and adapt them to your page and needs.
Otherwise, I suggest you download .JSON files for free. The folder contains two files:
- the file of the SECTION in .JSON format: it must be imported into the library
- the complete layout in .JSON format: it can be imported into a new page as a layout.
To go further with the scroll effect, here are some additional resources:
- How to get a Sticky on Scroll menu?
- How to perform a scroll effect in a mockup?
- Create a footer that appears on the scroll with Divi
Bonjour,
Et merci pour ce tuto très très intéressant.
Je l’ai mis en œuvre pour test sur une de mes pages. Ça me donne des idées et j’aimerai avoir votre avis. Pensez-vous que je pourrais l’adapter dans ce qui existe déjà sur cette page ? Dans l’écran de l’ordinateur ?
Je vous donne le lien et vous le dites ce que vous en pensez :
https://www.valerie-mersier.fr/creation-webdesign-vignoble-domaine-burle/
Merci de votre retour…
Valérie
Bonsoir Valérie,
Merci 😉
J’ai regardé ton lien et effectivement ça pourrait être intéressant. Maintenant pour arriver à le mettre dans l’ordinateur ça risque d’être un peu costaud… à tester. Sinon, il y a aussi ce tuto qui pourrait faire l’affaire : Créer un effet de scroll dans un mockup
A bientôt !
Merci Lydia…
je vais faire un essai dès que j’en aurait le temps 🙂
et je ne manquerai pas de te tenir au courant.
Bien à toi,
Valérie
Bonjour, j’ai suivi le tuto et voilà le résultat :O
https://web-etcetera.fr/dev/
Pouvez-vous me dépanner ?
j’ai chargé le layout pardon, avec le tuto, le résultat était différent mais bizarre aussi
Salut Sonia,
Les paramétrages ont été faits en fonction de mon site de test. Si vous l’utilisez ailleurs, il faudra certainement faire des petites modifications. L’idée est de vous fournir une base, après il faut la customiser 😉
Désolée Sonia, j’arrive un peu trad, je ne vois rien sur la page.
Bonjour,
Je souhaiterais ajouter un hover sur des posts générés dynamiquement (articles, etc.), comme vous le faites pour vos articles avec cette image en transparence. Avez-vous un tuto qui explique comment procéder ?
Merci d’avance,
Priscille.
Salut Priscille, tu trouveras la réponse dans ce tuto : https://astucesdivi.com/template-article-divi/
salut c’est super cool l’effet ça fait 2 mois que je cherche àle faire . Du coup le gros soucis est que je veux pas le faire sur divi mais surr systeme.io , je ne sais pas s’il y a un code complet à copier coller pour avoir l’effet .
Merci de me repondre !
Salut Martial, non je ne sais pas comment faire ça avec Système io
Bonjour Lycia,
Merci pour tous tes tips ! mais sur celui-ci j’ai bien tout suivi (j’ai même essayé les étapes puis les fichiers à télécharger) mais mes images ne se mettent pas dans une boite, elles s’affichent en entier et défilent vers le haut sur mon texte….comment je peux les figer dans une boite et qu’elles défilent dans cette boite comme dans la vidéo du début de l’article ? Merci beaucoup
Coucou Aurélie, désolée du retard de réponse. Mais je crois que c’était OK au final ?