
It's so simple to Customize the search results page of your Divi site Hey! Indeed, this tutorial will only take you 5 minutes but will allow you to propose a more "pro" site.
If you don't know what it is search results page, it's very simple : these are the results presented when an Internet user uses the "wolf" icon to search your site. The displayed page then presents the research results for request given. It is therefore a matter of dynamic page whose results will vary depending on the user.
To do a test on this blog Tips Divi, do not hesitate to enter a keyword using the magnifying glass on the main menu (top, right)... You will then see that my search page is customized and does not look like the basic page proposed by the theme Divi, as you can see on the following image:
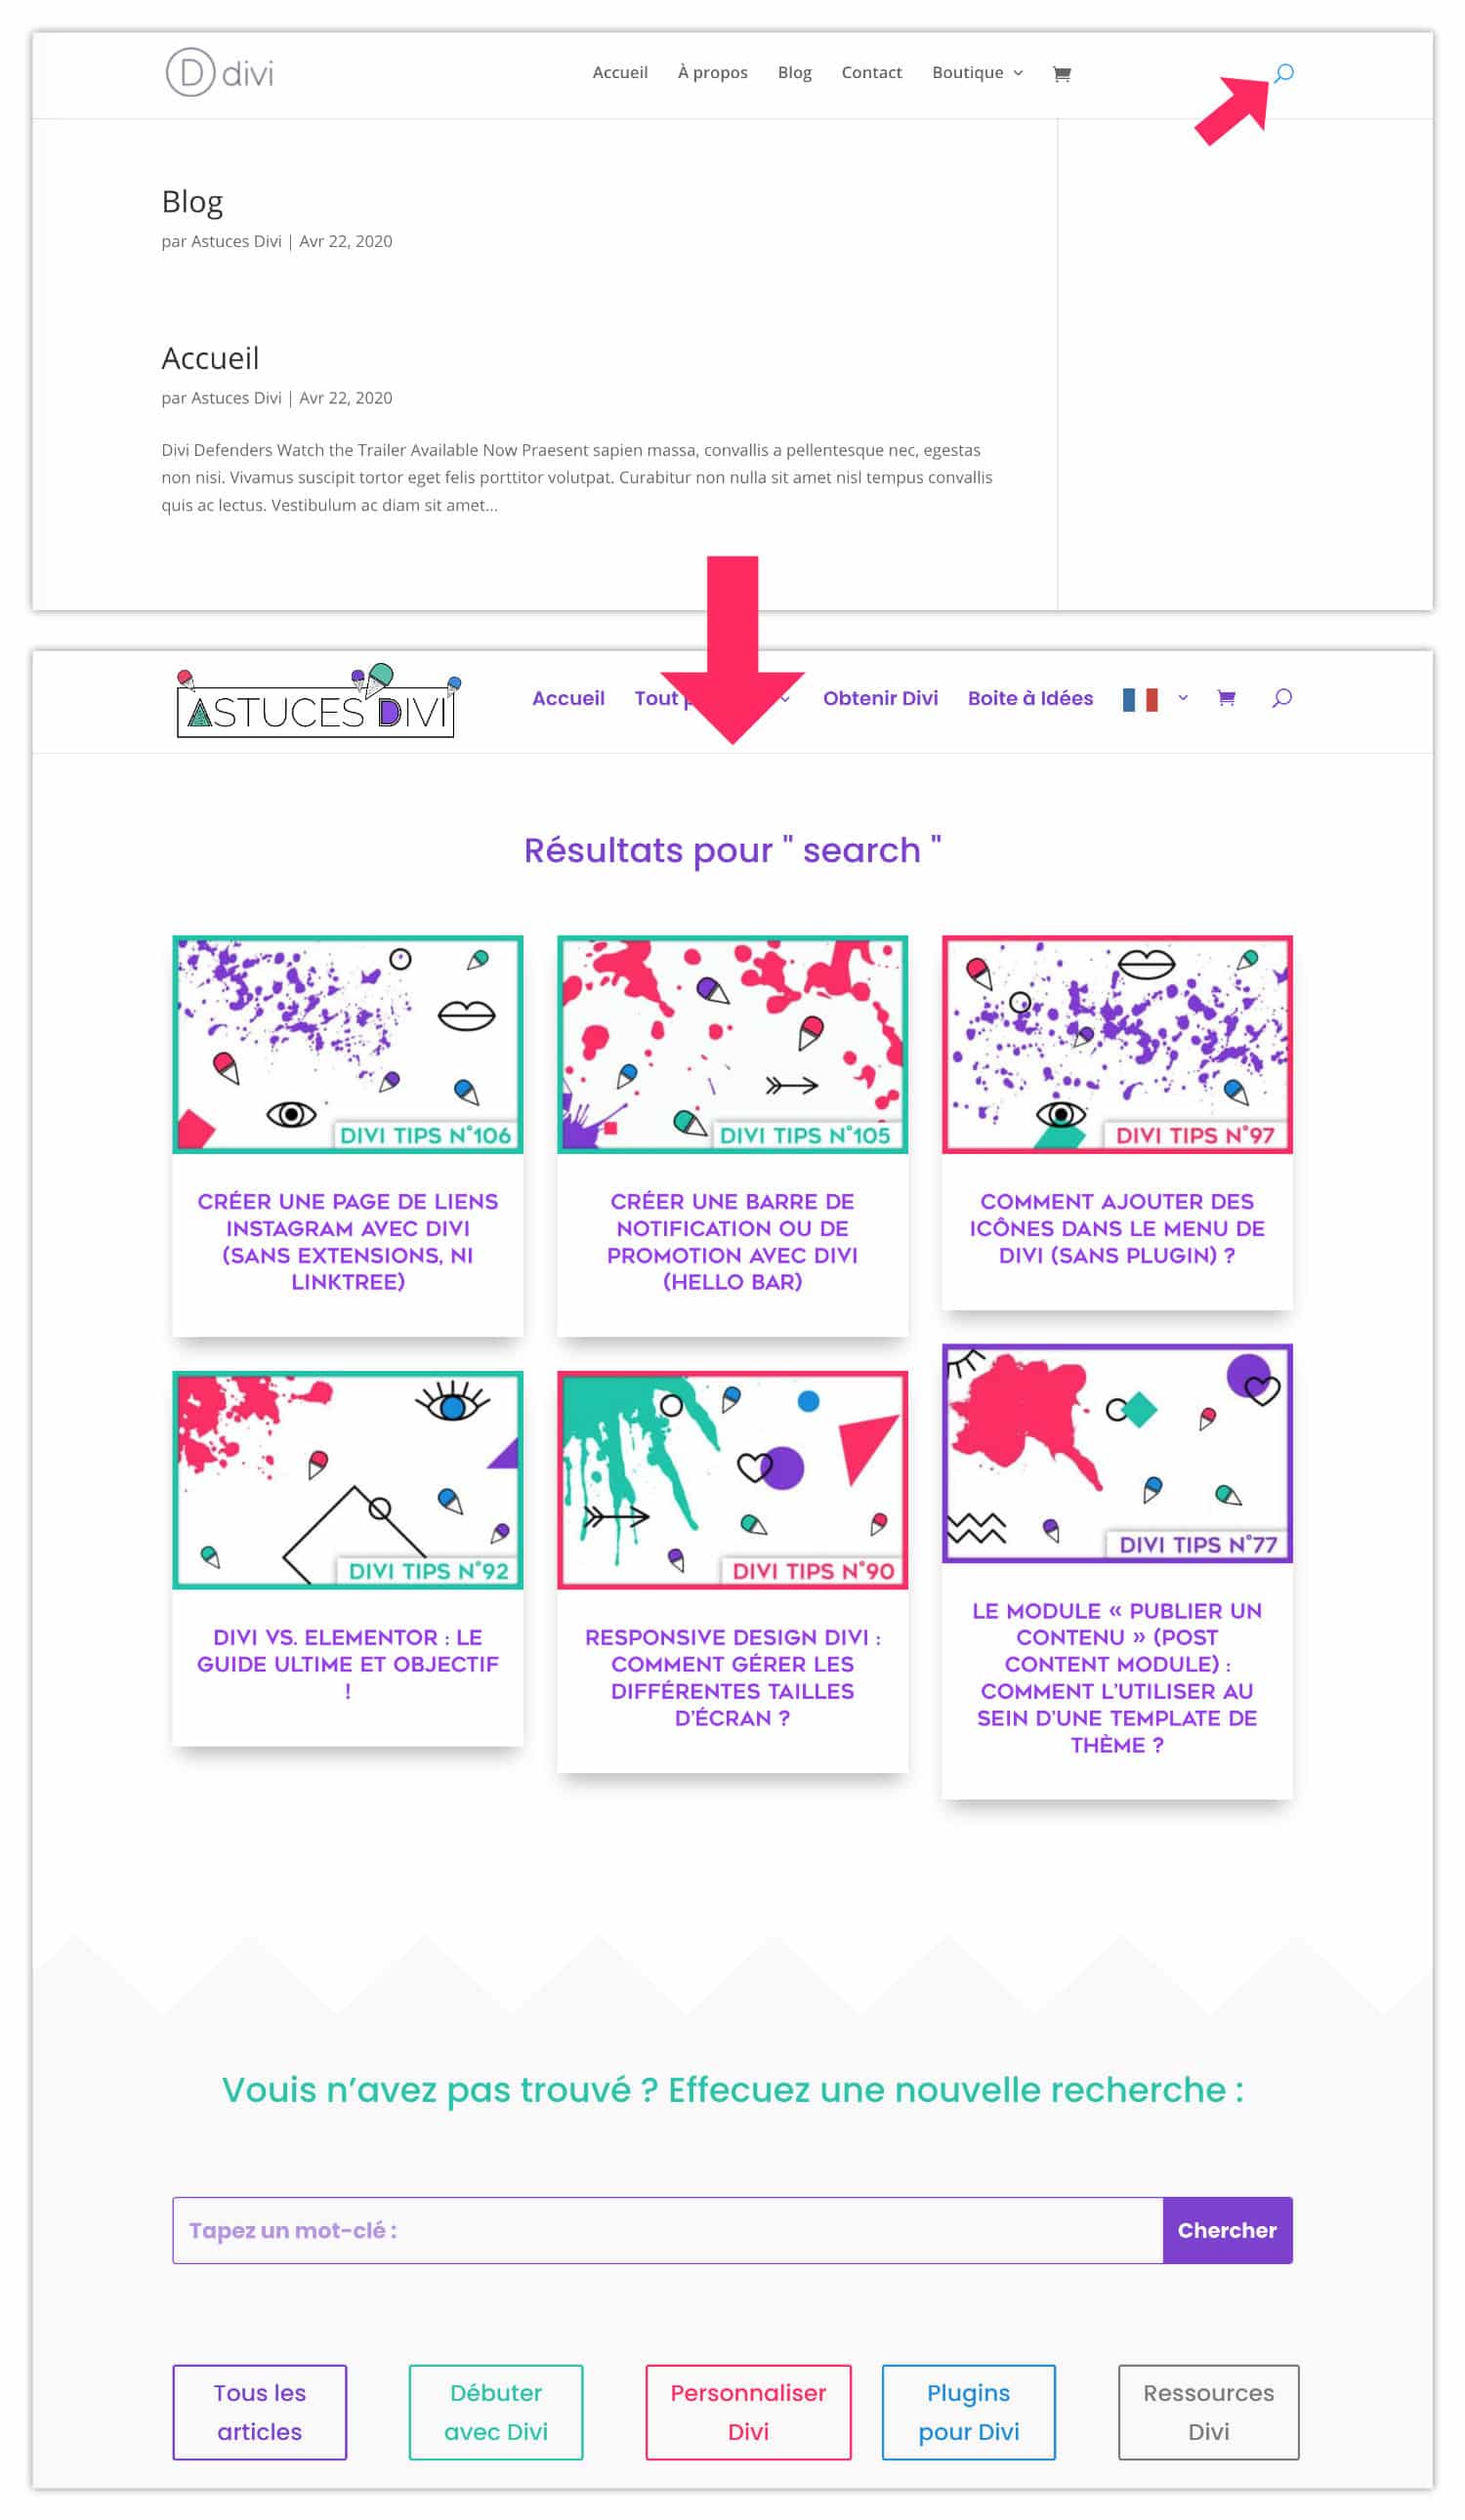
In the above picture, you can see that Basic search results page (top) is much less pretty and much less optimized than the custom search results page (bottom).
In this tutorial, I explain how to do it but I also give you 2 other tips... You won't regret being there. 😉 Hey!
1 - Why customize the search results page of your site?
If you look at the picture below, you can see that a little over 1% of the visitors to Divi Tips blog do a search via the magnifier icon...
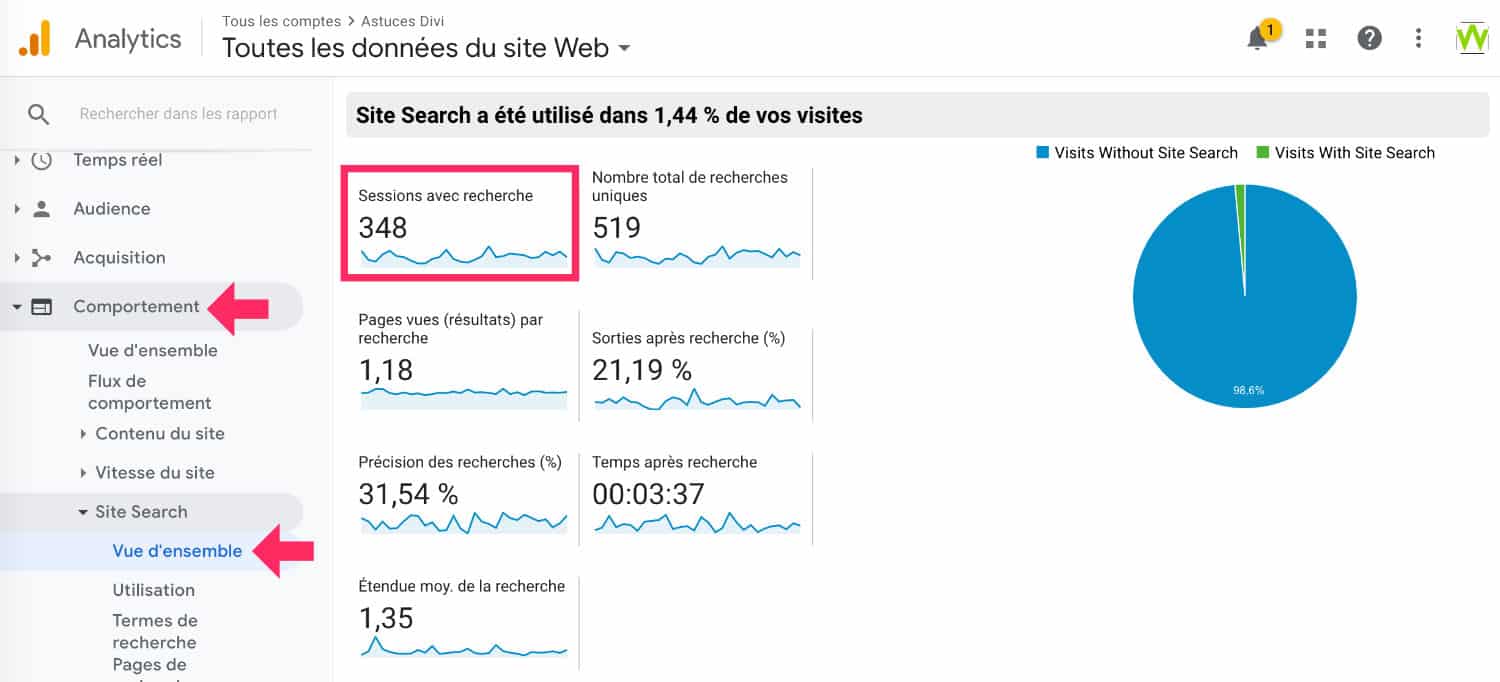
During the last 30 days, 348 people have been searching my blog to find answers to their questions...
1% of visits is very few but if I hadn't customized this search results page, 348 people would have visited a non-optimized page and not branded. This does not reflect the image I would like my blog reference.
This is a good reason to customize this search results page: it will match your brand image and will not show other pages....
Also read: How to add a real-time Ajax search to your Divi site
2 - Composition of the layout of the search results page
If you look at my search results pageIt consists of 5 elements:
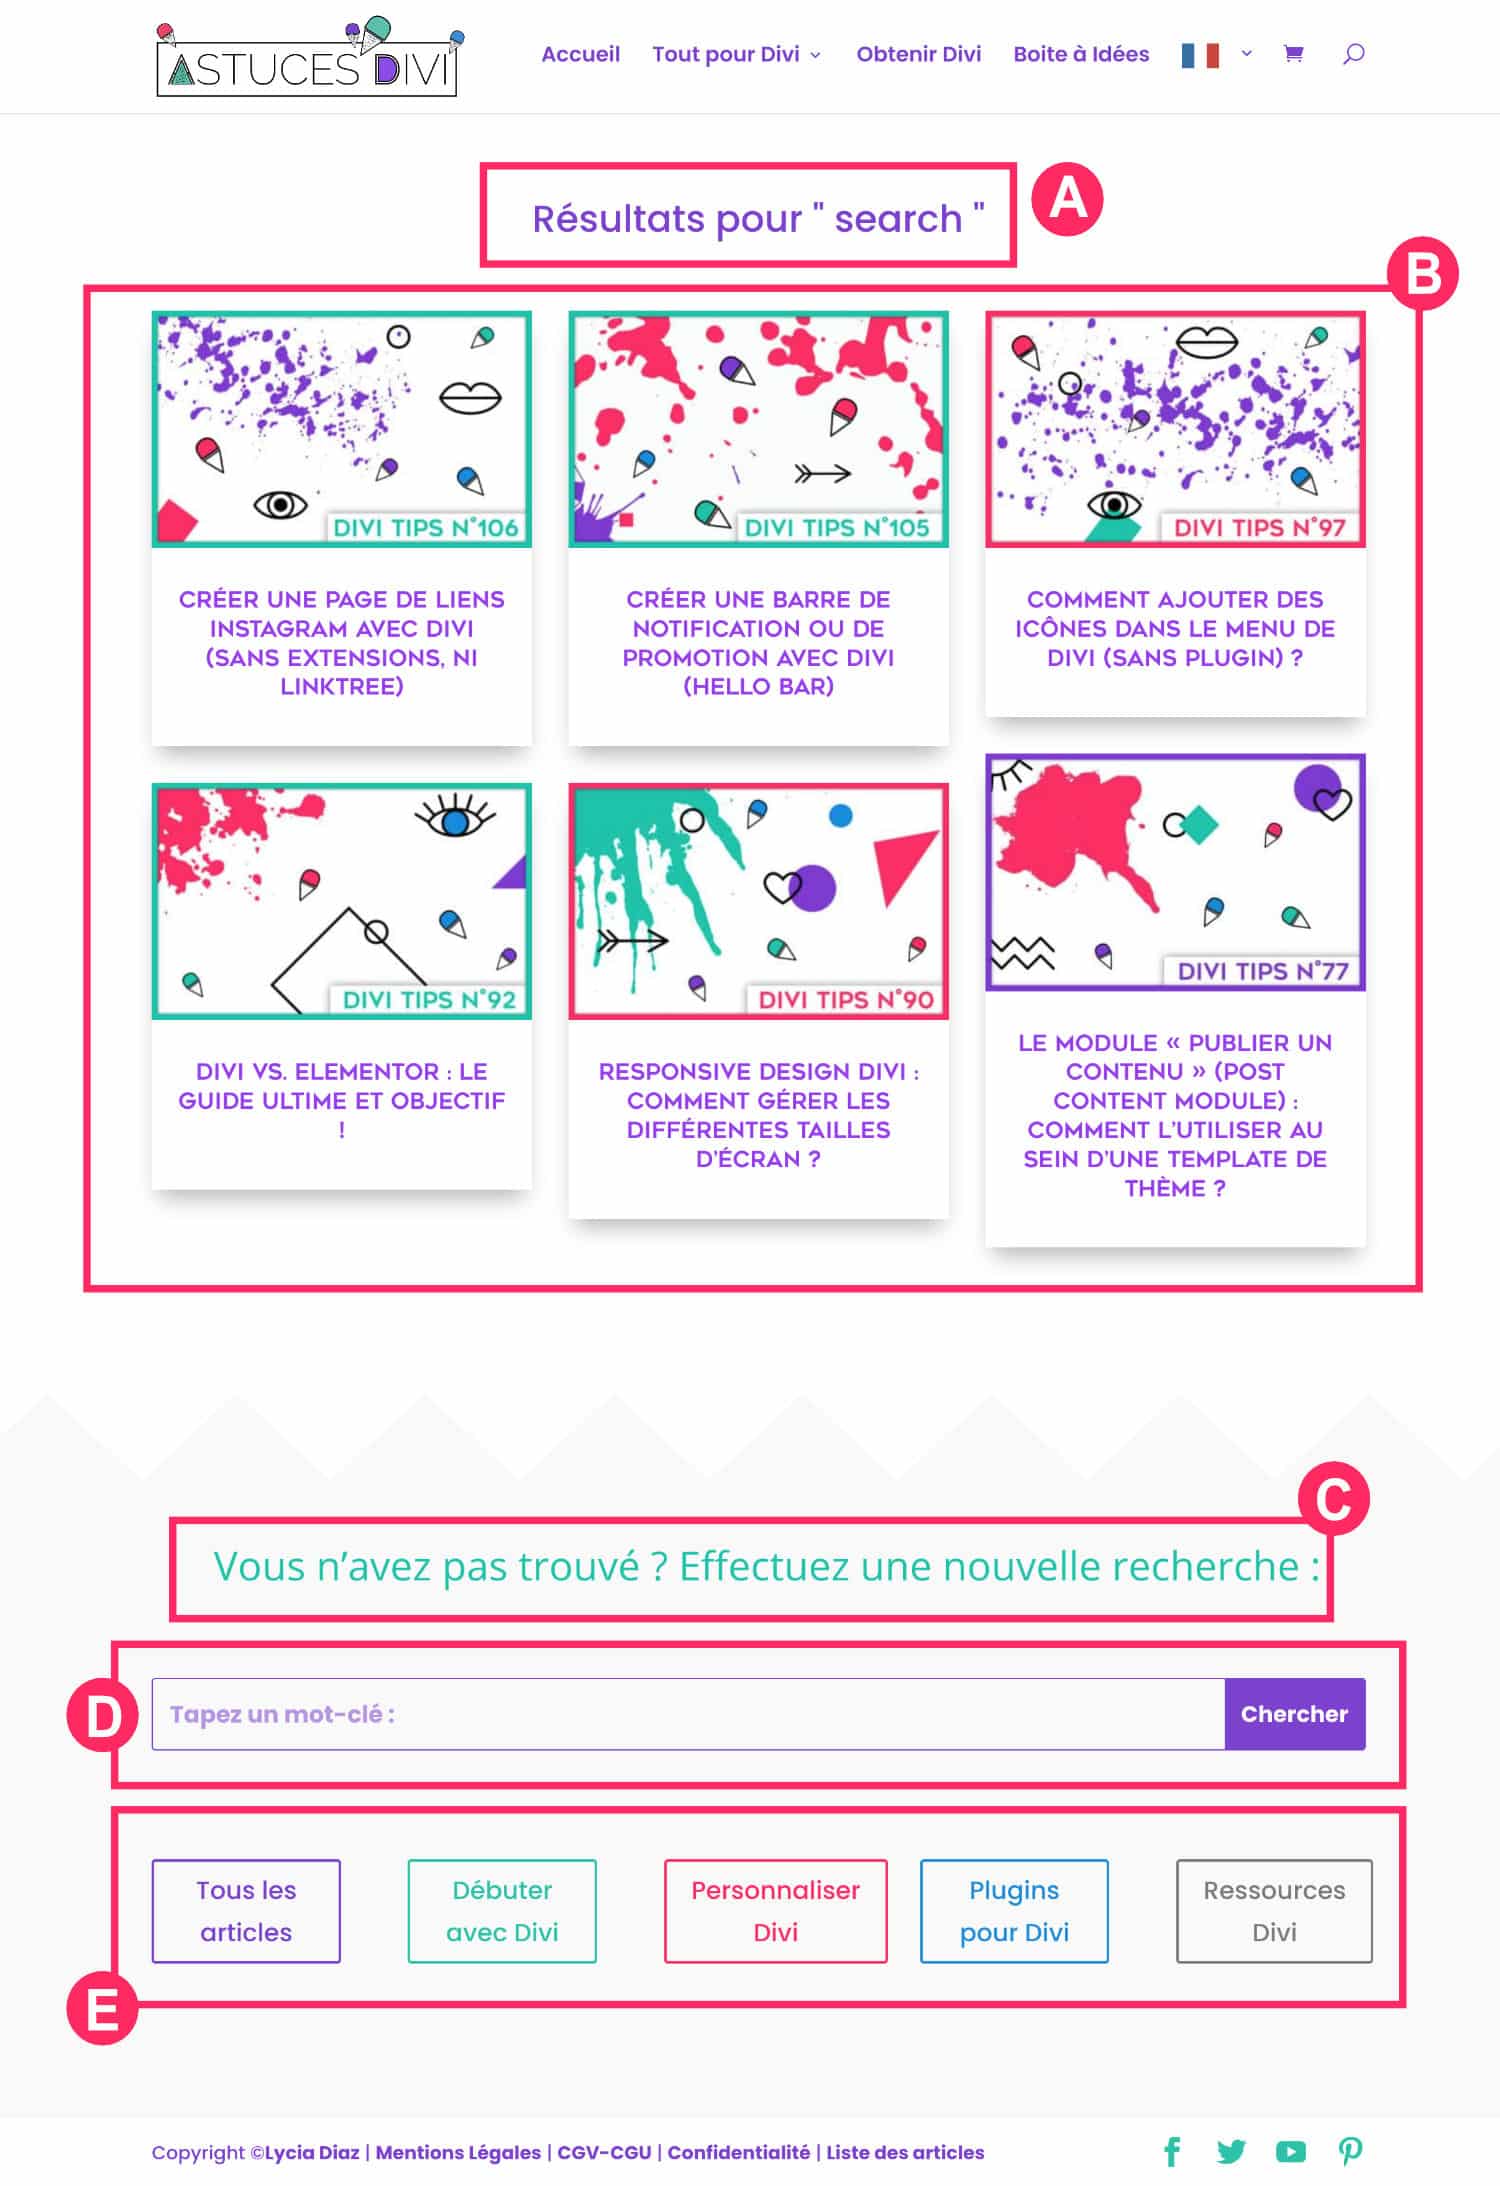
- A - Dynamic title of the page
- B - Search results of the Internet user in the form of thumbnails
- C - New section with a title
- D - A possibility to repeat the search if the first one was unsuccessful
- E - Other items or calls to action, either content you would like to highlight on this page...
And if we look at this layout (page layout) in a grid version, these elements could be implemented using these modules:
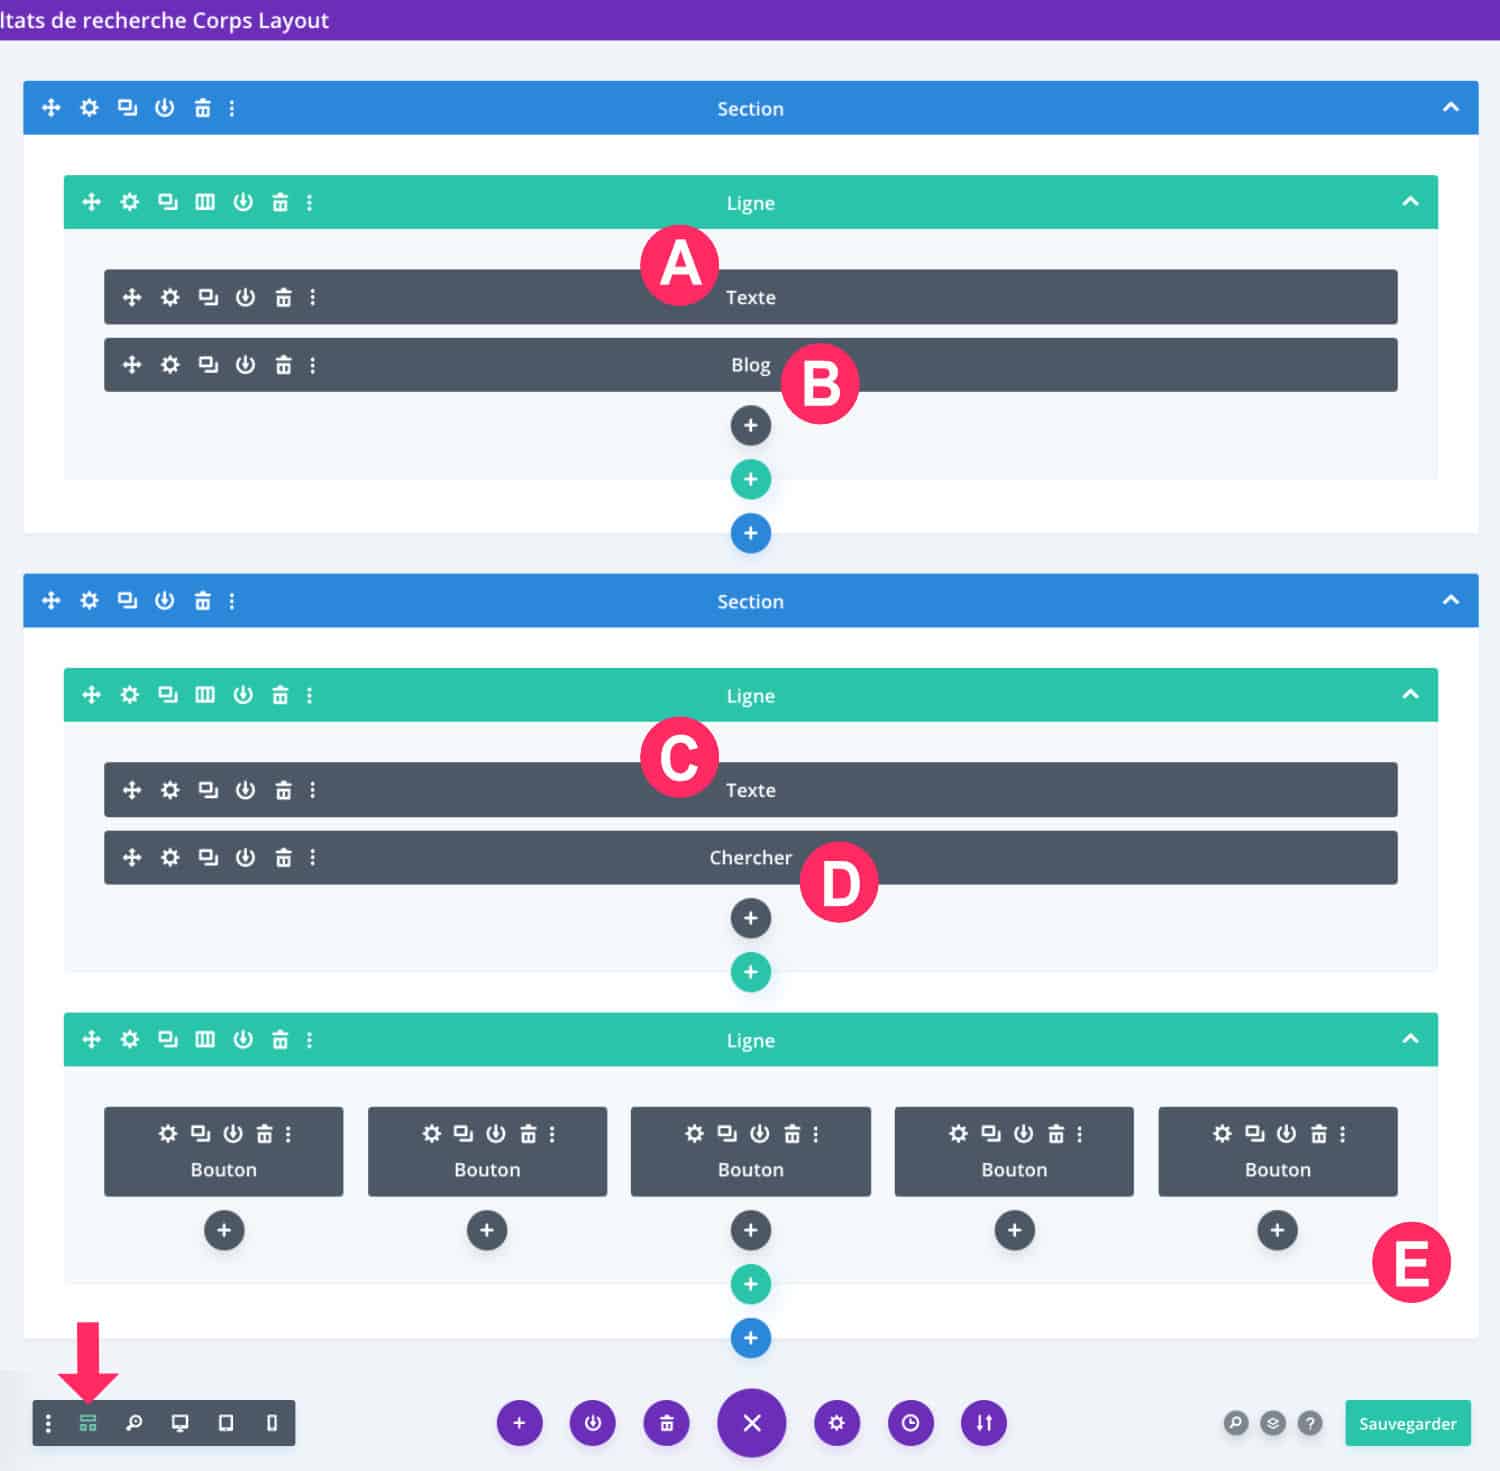
- A - Dynamic title of page = Text module
- B - Search results of the Internet user in the form of thumbnails = Blog module
- C - A new section with a title = Text module (again)
- D - A possibility to repeat the search if the first one was unsuccessful = Search module
- E - Other elements or calls to action, either content you would like to highlight on this page... = Any modules you want!
Do you know you can test Divi for free? See you on this page and click on "TRY IT FOR FREE"
3 - Creating the search page template with the Builder Theme
To customize this dynamic page, there is only one way: use the Divi Theme Builder Hey! Here's how:

- Go to the tab Divi > Theme Builder
- Click "Add a new model"
- Assign him the model "Research results"
- Validate by clicking "Create a model"
- Click "Building a Personalized Body"
3.1. - Build the layout of the search result page
Once the model has been created, you just have to make the design of this page without forgetting the necessary modules:
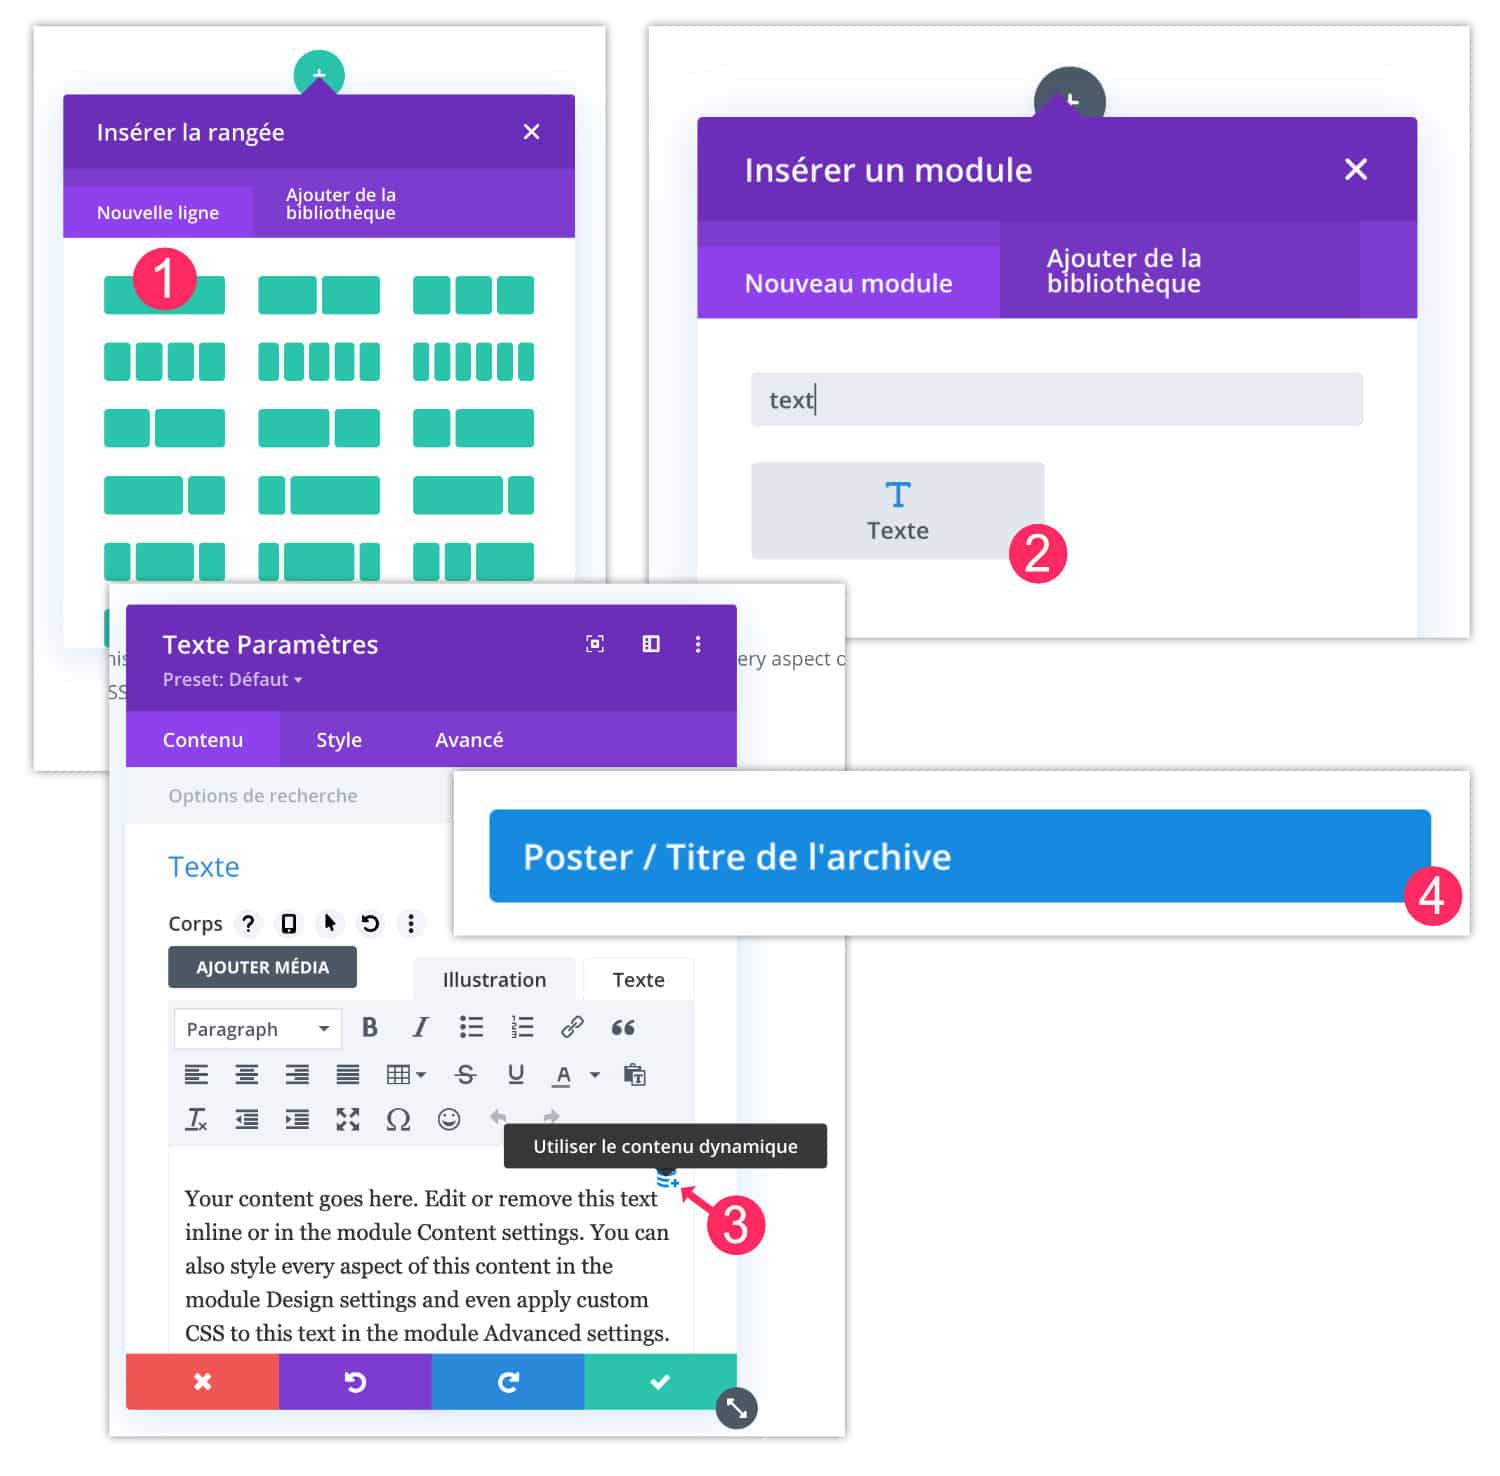
- Within the layout insert a new line (also called "range")
- Then insert a Text module
- In the tab Content of the Text module, click on the database icon for use dynamic content proposed by Divi
- Choose "Poster / Archive Title"
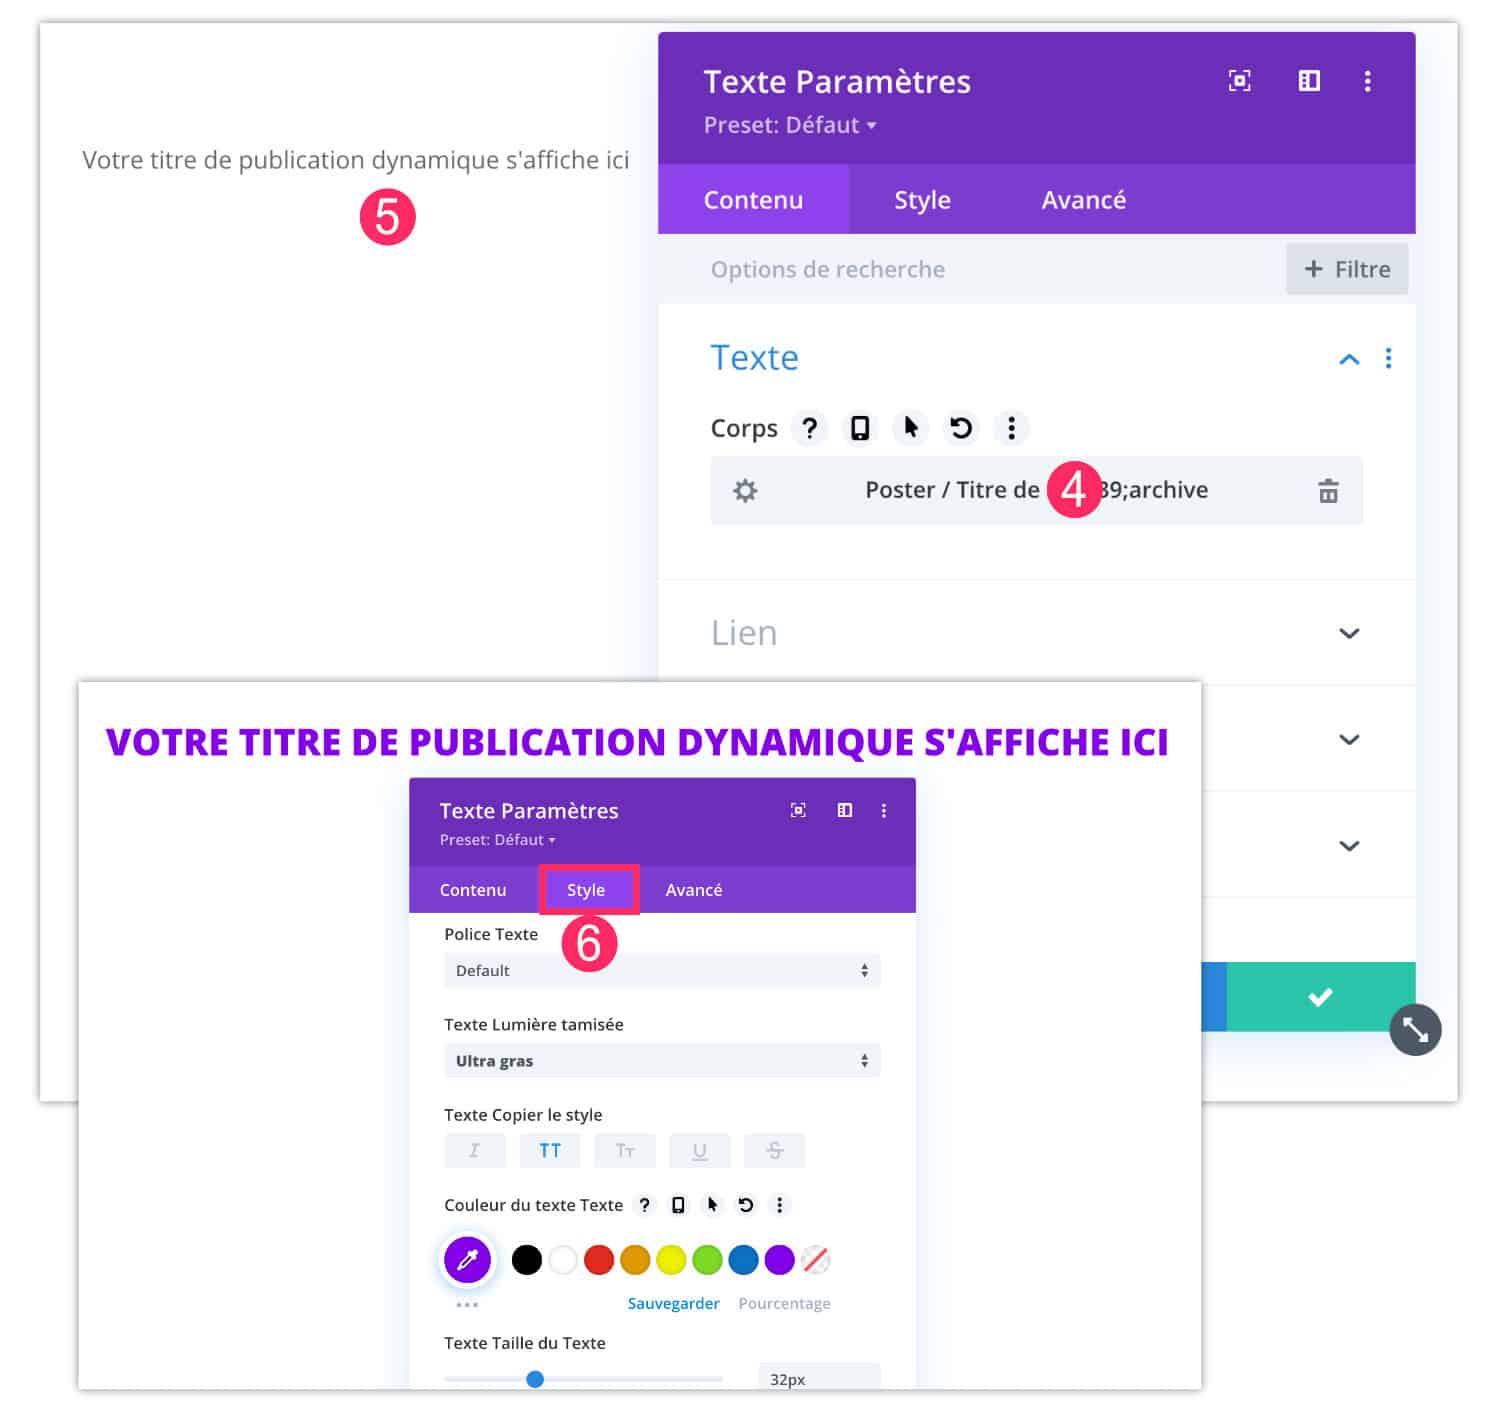
- This dynamic title will show: "Your dynamic publication title appears here". Do not attempt to modify its text.
- However, you can change its appearance from the tab Style. Do not hesitate to change its size, colour, font, etc. so that it is to your liking.
3.2. - Displaying search results
When the user enters a keyword using the magnifying glass, the native WordPress system will find it results. Here's how to make them appear on your search results page:
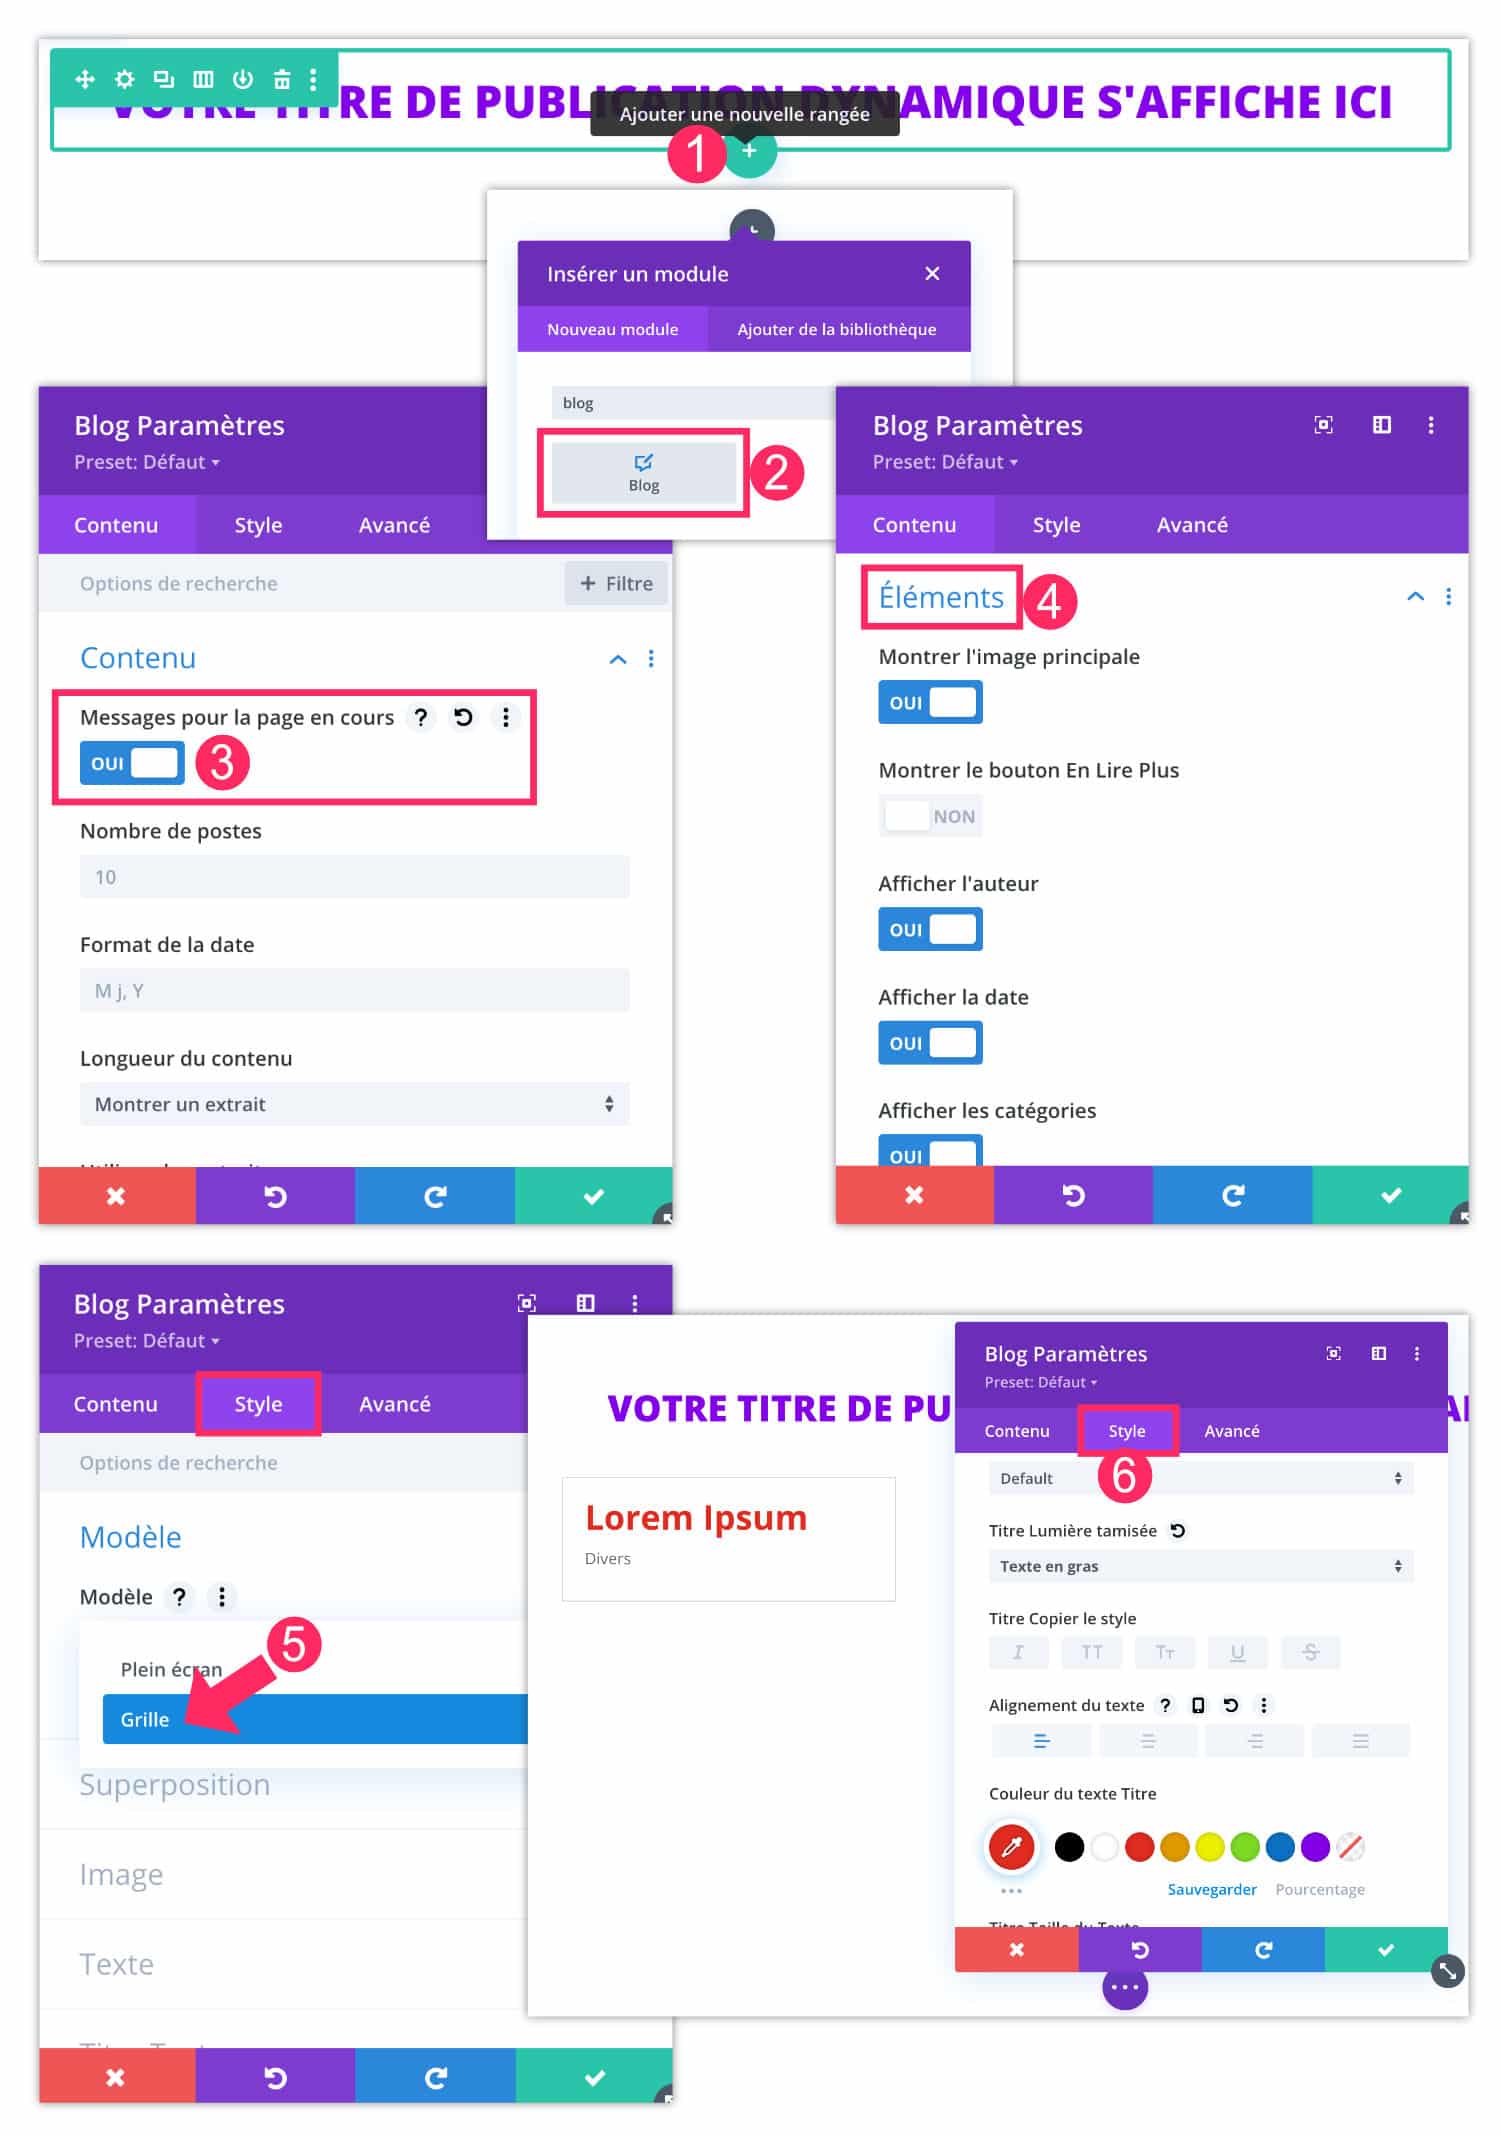
- Add a new row
- Add it Blog module
- In the settings of this module, on the tab Content, select YES for the option Message for the current page.
- In the tab Content > Elements, you can define what you want to display.
- Then, on the tab Style > Model, you can choose the Grid model which is much nicer than the Fullscreen model...
- I mean, ever since Style tab, You can use all the options at your disposal to design the appearance of this module (color, size, shadow, animation, etc.).
3.3 - Propose to renew the research (optional)
Imagine that your reader did not find his happiness in his first search, you can improve his experience by offering him to renew this action without having to go again through the icon of the magnifying glass. This part is optional but if you wish, here is how to do it:
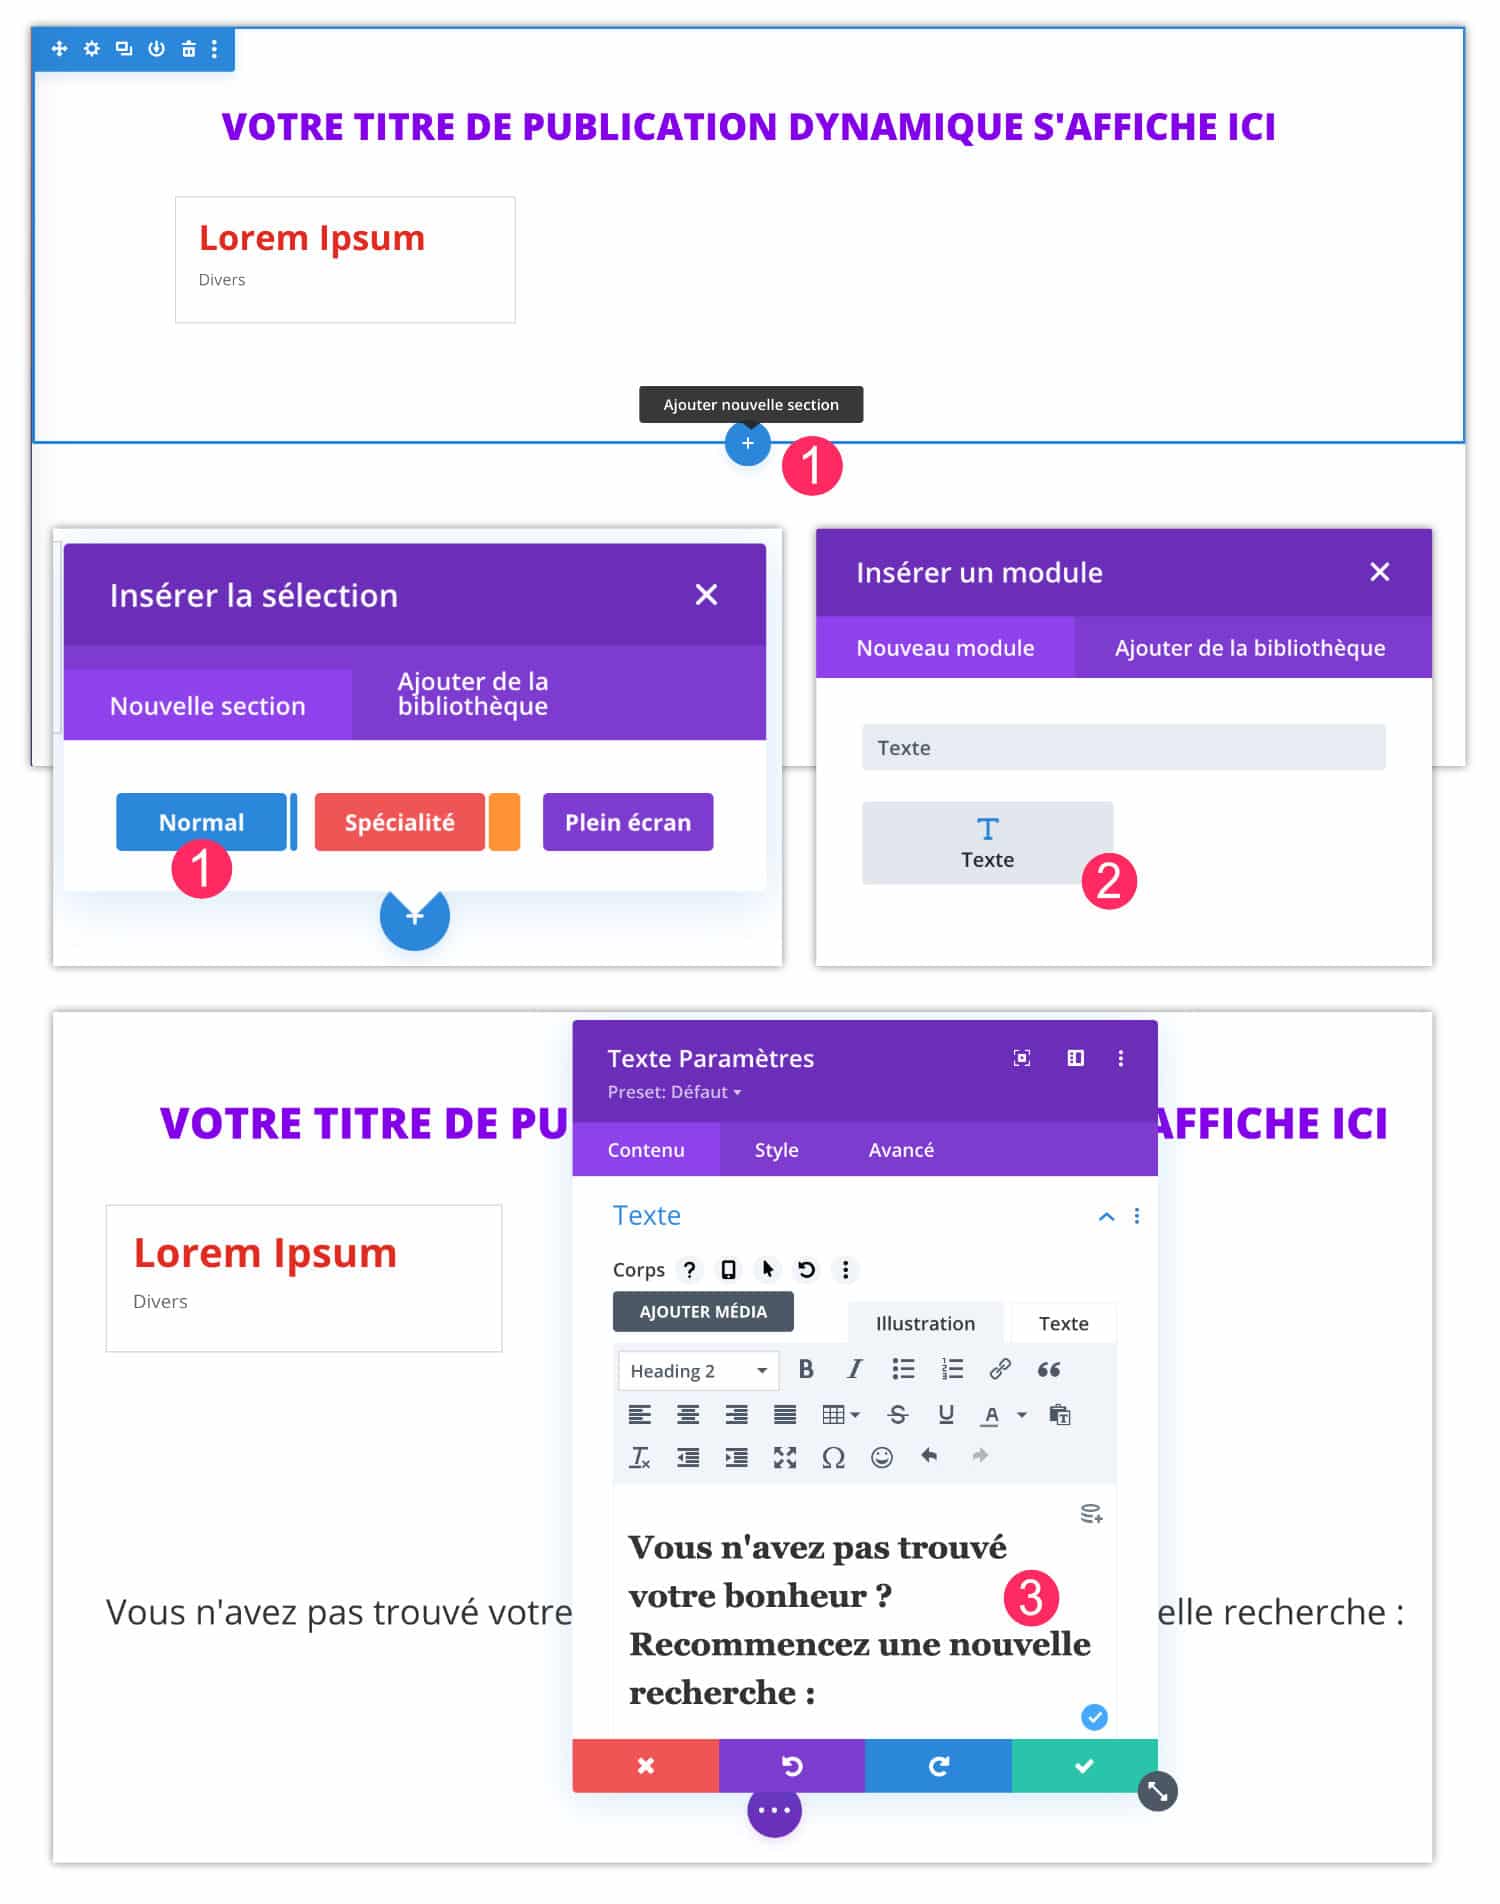
- Add a new section
- Insert a Text module to explain to the Internet user that he can renew his research.
- For example "Start a new search".

- Below, add a Search module
- In the settings of this module, from the tab Content, you can enter the text of the placeholder (i.e. the default text in the search bar). For example: What are you looking for?
- Since Contents > Exceptions tab, this module allows you to exclude certain content from the results, for example pages, articles or certain categories of articles. Unfortunately, we cannot exclude certain specific URLs, we will see later in this article how to achieve this...
- Then, in Style tab, you can set the look of the search bar (color, etc.)
- There, your search bar is ready.
3.4. - Add calls to action (optional)
Your search results page is now functional but nothing prevents you from adding various calls to action to encourage users to visit other pages or discover the flagship products of your shop!
After all, this page belongs to you and you can do whatever you want!

- Add for example a row with buttons, or your last 3 blog posts, or a contact form...
- Save your model.
- Leave the model and make sure to save again within the builder theme...
4 - Configure Google Analytics "Search Site"
At the beginning of the article, I told you that 348 people visited my search results page Last month... If I know this number, it's because I activated a small option in my account upstream. Google Analytics.
If you too want to collect this type of statistics, you need to activate it...
In addition to knowing the number of visitors who use your internal search engine, you will also know the keywords that have been entered in this search bar... This is an important information that can tell you the needs of your visitors.
Here is how to activate this feature:
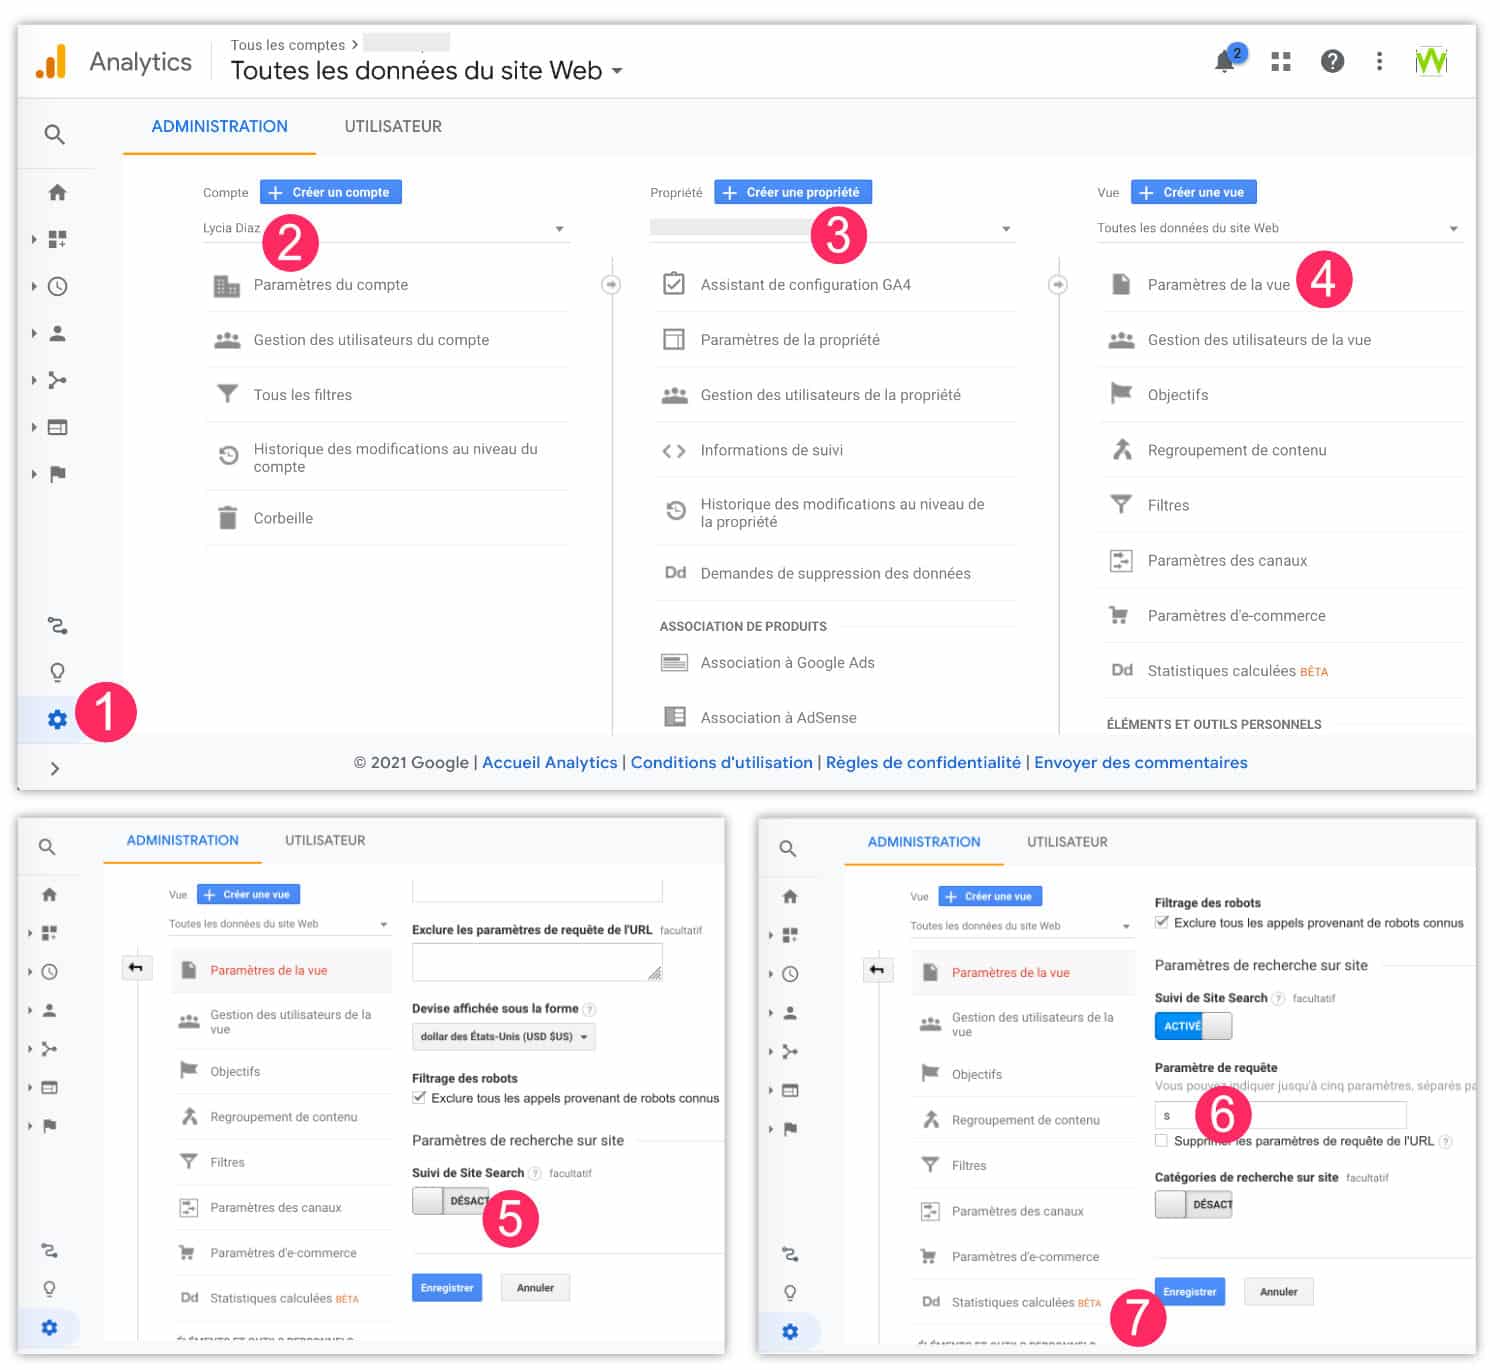
- See you in the tab Administration your Google Analytics account
- Select your account
- Select your property
- Click View Settings
- At the bottom of the page, activate the option Site Search Tracking
- In the field Parameter request, enter "s" This is the parameter used in the URL by WordPress sites when users search.
- Record.
Here, from now on, your Google Analytics account records visits and requests from this page (see the official documentation for configure Site Search).
5 - Exclude certain pages from the search
Finally, to complete this page, you can exclude certain search results on a case by case basis. For example, if your site holds private pages or pages that have no interest in the user (page cart, page my account, etc.) you may decide to exclude them from the results.
For this, you can use the free extension Search Exclude.
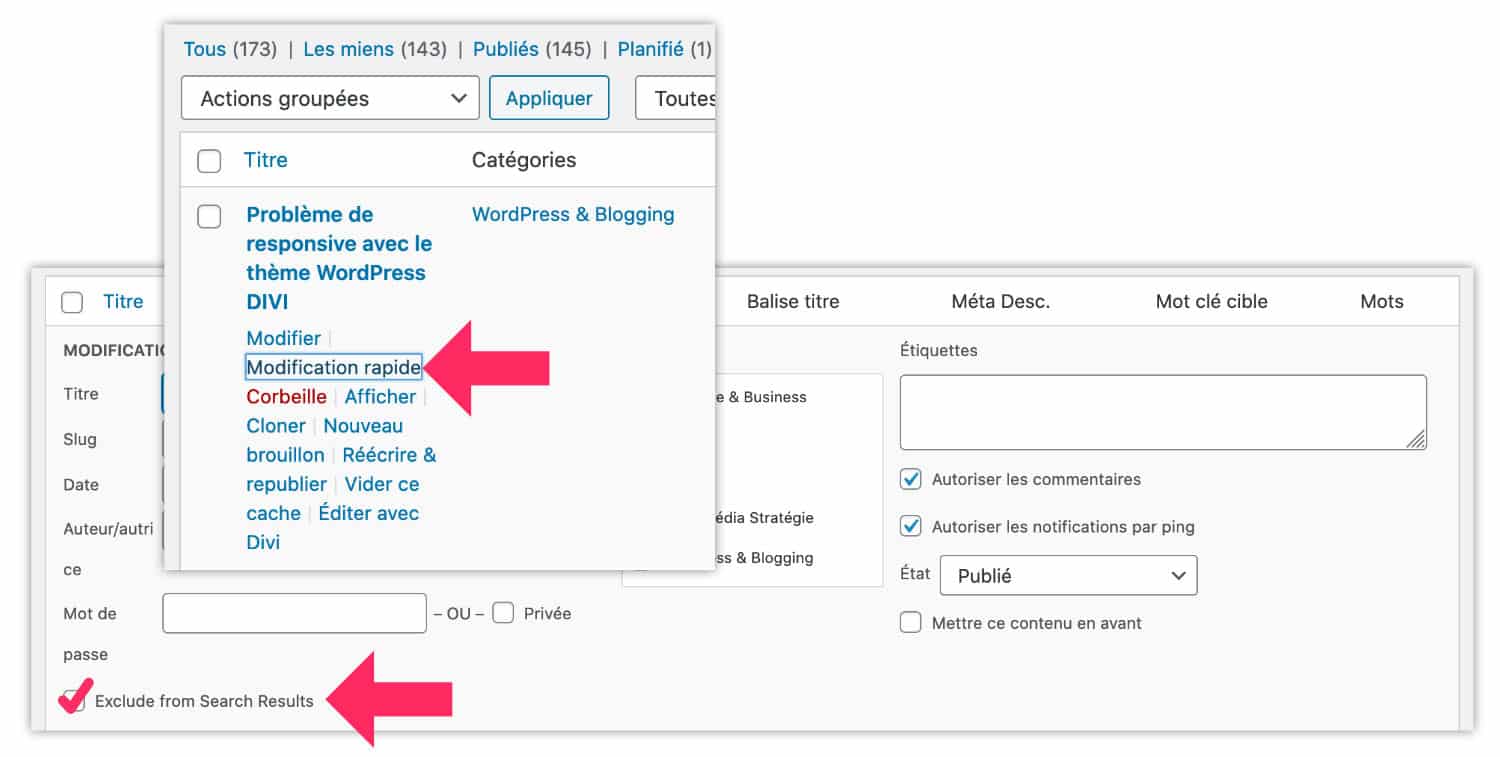
This extension is ultra easy to use:
- Just install it and then activate it...
- See the list of your pages or articles
- Click Quick change
- Select option "Exclude from Search Results" if you wish this publication not to appear in the search results page of your site.
If you want to exclude certain pages without using plugins, only by adding a few lines of code, Read this article.
6 - In conclusion...
Now you are the happy owner of a beautiful search results page And it only took you a few minutes!
You can also download a pre-built model for free create your search result page faster (available on the official blog).
Have you ever customized him? Do you have any other idea to improve this page? Say it in comment.


Want to customize Divi as a pro? Discover all the tutorials!


Bonjour,
Merci pour ce tutos ma page recherche est bien plus belle ! Par contre je rencontre un soucis avec le module « chercher », mon site est un site de vente en ligne, j’ai configurer le bouton recherche dans le menu pour avoir uniquement la liste de mes produits avec les termes rechercher mais quand j’utilise le module « chercher » cela ne me retourne aucun résultat. Y aurait-il quelque chose que j’ai oublié de faire ?
Merci d’avance
Salut Jess. Il faut regarder au niveau des paramètres du module peut-être ?
Bonjour,
Merci pour le tuto,
Comment afficher le prix de mes produit sur la page de recherche ?
Hum Lucquin c’est une bonne question…
Bonjour,
Merci pour ce tuto ! Cependant après avoir suivi les étapes du tutoriel, je me rends compte que lorsque j’effectue une recherche sur mon blog divi, l’apparence n’a pas changé. C’est-à-dire que l’apparence de la recherche de mon blog se décrit de la façon suivante : une colonne à droite et une colonne à gauche contenant les articles de ma recherche les un à la suite des autres. Il s’agit de la recherche de base de divi. Or, en suivant votre tuto, j’ai bien créé un module de recherche avec un modèle de blog en grille mais ce dernier ne figure pas comme vous.
Y-a-t-il un moyen d’éviter d’obtenir la colonne à droite et avoir le même affichage que vous ? J’imagine qu’il y a une configuration à effectuer pour modifier l’apparence de la recherche en amont.
Je ne sais pas si vous voyez ce dont je parle. En espérant que vous puissiez m’aider 🙂
Bonjour, je souhaite n’afficher les résultats de recherche que d’une seule page.
J’ai listé des documents PDF à télécharger et je souhaite que les internautes puissent rechercher rapidement le document sur cette même page. Comment faire ? Merci !!
Salut BK, je ne sais pas. Si tu utilises le plugin d’exclusion ça devrait marcher mais du coup, ça va marcher pour tout ton site et non que pour la page que tu désires.
Salut Lucas, heu tu as peut-être mal paramétré ton modèle dans le Thème Builder. Il faut l’attribuer à la bonne page et tu dois aussi sauvegarder 2 fois pour que ça fonctionne.
Hello, j’ai le même problème que Lucas, et j’ai vérifié le paramétrage qui pointe sur la pages « Résultats de recherche ». Donc ok, enregistré deux fois, mais rien à faire : la recherche tombe toujours sur la page WordPress…
Merci de ton retour !
Rebonjour,
Cela fonctionne maintenant, il fallait que je me log une nouvelle fois 😉
Merci pour cette page !
Ah super
Bonjour,
Je ne parviens pas à vous écrire un email alors j’écris ici.
Je souhaite intervenir sur mon précédent commentaire. L’affichage de la recherche s’est finalement mise à jour.
Il a fallu que je me déconnecte de WordPress, je ne sais pas pourquoi mais en tout cas je confirme que votre tuto a bien fonctionné.
Veuillez m’excuser pour ce double commentaire.
Cordialement.
Super Lucas, merci du retour !
Bonjour Licia, j’ai un souci j’ai bien la barre de recherche sur mon site mais lorsque je fais une recherche il n’y a aucun résultat. Je ne comprends pas pkoi. Pouvez vous m’aider ?
Salut Cindy. As-tu essayé plusieurs requêtes pour voir si rien ne marche, car ça me parait bizarre, le moteur de recherche natif de WordPress a toujours bien fonctionné.
Hi, helpful blog, thanks. How do I edit the existing search results page? I can’t see the page in the Pages section of WordPress. And do I need to create a new page for ‘no results’? Currently, if there are no results, my users get a blank page. Cheers
Hello Mike ! No, you just have to create a Search Result Page like that… if there is no result, you might have a page with « no result found »… you should don’t have a blank page, it seems to be wrong, I think…
Bonjour Lycia,
Je découvre ton tuto qui m’a drôlement aidé à personnaliser ma page de résultat de recherche.
Y a-t-il un moyen d’intervenir sur le format de l’image?
Dans les résultats de recherche les photos sont horizontales alors que sur mon site elles sont toutes verticales…
Encore merci !
Ah aucune idée ! Dans les options du module tu as regardé ?
Bonjour Lycia, et bravo pour votre travail.
Pour info, je suis sur votre tuto relatif à la page recherche. Il propose de cliquer sur la loupe de votre site pour ce faire une idée de la configuration, mais voilà, je ne trouve pas votre loupe en haut à droite. Une évolution récente sans doute 🙂
Ah bizarre. Il faut que je regarde…
Bonsoir à vous . Je travaille sur un projet de site web et j ai besoin de votre aide. j’ai crée une rangé avec divi dans laquelle j’ai mis un module texte pour mettre un titre , puis un module recherche. Ensuite j’ai crée trois rangés dans lesquelles j’ai mis des modules bascules avec des fichiers pdf à l’intérieur téléchargeable. Lorsqu’on fait la recherche rien ne s’affiche . Svp comment lier le module recherche au module bascule qui contient les pdf téléchargebles pour qu’il soit affiché et téléchargé par celui qui visite la page . Merci
Je ne sais pas si c’est possible
Hello Lycia, Merci pour ce tuto ! Une question : comment faire apparaitre le résultats de recherche (cf 3.2) quand la recherche s’effectue dans une boutique woocommerce et non dans un blog ? En gros, il faudrait que ça soit des produits qui apparaissent et non des articles de blog. Merci d’avance.
Salut Marie Noëlle. Alors, as-tu essayé avec ce plugin gratuit https://fr.wordpress.org/plugins/search-exclude/ – il permet d’exclure des types de post lors des recherches (à tester) – sinon, il y a ça : https://wpzone.co/wordpress-and-divi-code-snippets/search-woocommerce-products-and-tags-with-divis-search-module/
Merci Lycia, je vais tester. Bonne journée,
MN
Bonjour
sympa mais le seul problème est que le contenu Google Analytics est obsolète, la version UA cessera de traiter des données à compter du 1er juillet 2023 et remplacée par le G4… étant déjà sur G4, je ne sais pas continuer.
Merci
bonjour
lorsque vous appuyez sur l’icone de la, loupe dans le menu, le mot rechercher est en mauve comme le reste de la police du menu, comment avez-vous fait?
merci
Jean, il y a plein d’option, j’ai juste paramétré cela.
Bonjour Lycia et merci pour ce tuto. J’ai pu l’adapter pour renvoyer uniquement mes produits Woocomerce en choisissant ‘woo produits » au lieu de « blog » mais par contre j’ai un souci de taille. Ma recherche à fonctionné la première fois mais ne se réactualise pas. Je me suis déconnectée, j’ai essayé en navigation privée, avec un autre navigateur. Quoi que je saisisse j’obtiens toujours les memes résultats. Si quelqu’un à une idée?? merci!
Ah oui c’est bizarre. Là comme ça je vois pas…
Merci Lycia,
Pour ceux que ça intéresse, pour faire la même chose avec woocommerce et afficher des produits dans les résultats de recherche, on remplace le module ‘blog’ par ‘produits woo paramètres’ ; attention à bien cocher la case ‘utiliser la page actuelle’.
Super ! Merci pour l’astuce Elise !