
If you activate the Mega Divi Menu, you can there insert images to get a very nice effect. That's what I suggest you do, and I'll explain all this in this tutorial: how to insert images in the Divi Mega Menu.
No need to know how to code...
The header of a site is an essential design element. Divi offers different types of headers you can customize according to your needs.
Do you know you can test Divi for free? See you on this page and click on "TRY IT FOR FREE"
Here is the program of this tutorial:
What is a Mega Menu?
One mega menu is a drop-down menu that consists of many elements and who displays horizontally under the main menu.
Its purpose is to help the Internet user find what he is looking for and saves him a lot of time.
Generally, mega menus are widely used in e-commerce to improve conversion. This is what explains this definition of the Mega Menu.
Step 1 - Creating your main menu
First of all, create a mega menu with images, you will need to create pages as well as a main menu...
Here are the steps:
1 - Creating your pages
First of all, you will create the different pages that will constitute the tree of your site.
I advise you to think carefully about the structure of this one, it is very important for the experience of your users but also for on Natural SEO on your site.
2 - Structure of your main menu
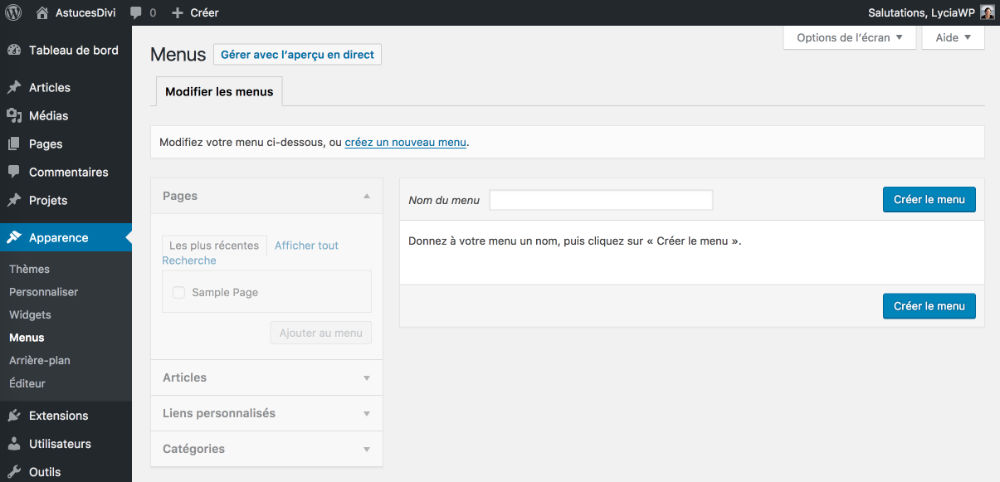
Once these pages have been created, you can create your menu structure Main. For this, I give you an appointment in the backoffice of your site, on the tab Appearance > Menu.
If you have no existing menu yet, you will have to fill in the field "Menu name" (name it as you wish, for example "Main menu") then you will click on "Create menu".
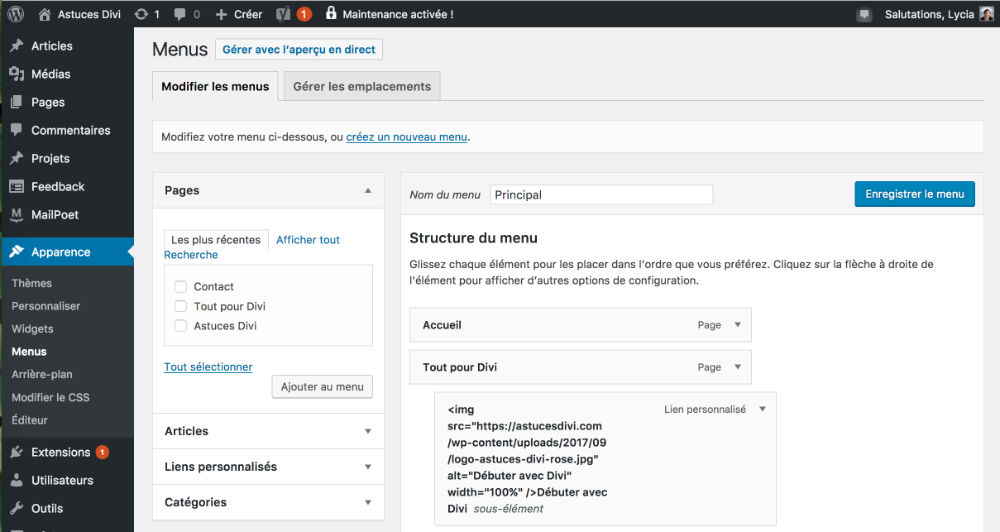
Then you'll just have to check the pages in the left box and click on "add to menu".
They will go to the right, it will be the structure of your menu: the highest element being the most left-hand element of your navigation - the lowest element will be the rightmost element.
You will drag these different items from top to bottom or from bottom to top to organize your menu as you wish.
Finally, you assign a location for the menu you just created, as it is your Main navigation, you will check the box "Main menu" which is at the bottom of the menu creation page. Don't forget to save.

=> Be careful if you shift elements to the right, these elements will become sub-elements of a main element. You can then add as many sub-elements as necessary.
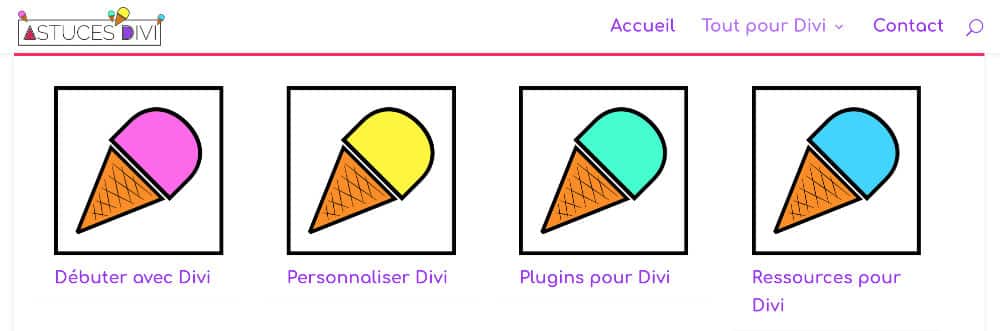
For example, in the blog Astuces Divithe element "All for Divi" has 4 sub-elements.
Discover all you can do with the theme Divi
Step 2 - Convert your classic menu to Mega Menu
There you go. your main menu is created. You will be able to convert a main element to "mega menu" But for this, it will have to be owns several sub-elements (very important!), otherwise, it has no interest...
As a reminder, mega menu displays elements of a navigation horizontally rather than vertically. This will be perfect to insert images into the navigation, but how to do it?
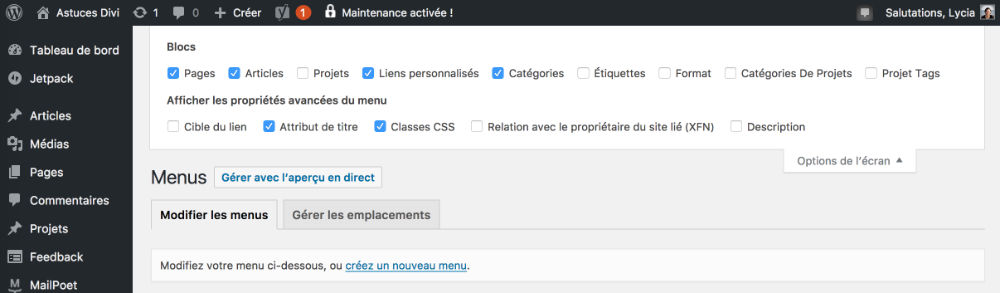
- Always in the backoffice and always in the tab Appearance > Menu, find the tab "screen option" located at the top of your page, on the right.
- Develop this menu and check the box CSS classes
Then open the item of your menu you want convert to Mega Menu and assign it the CSS class "mega-menu"
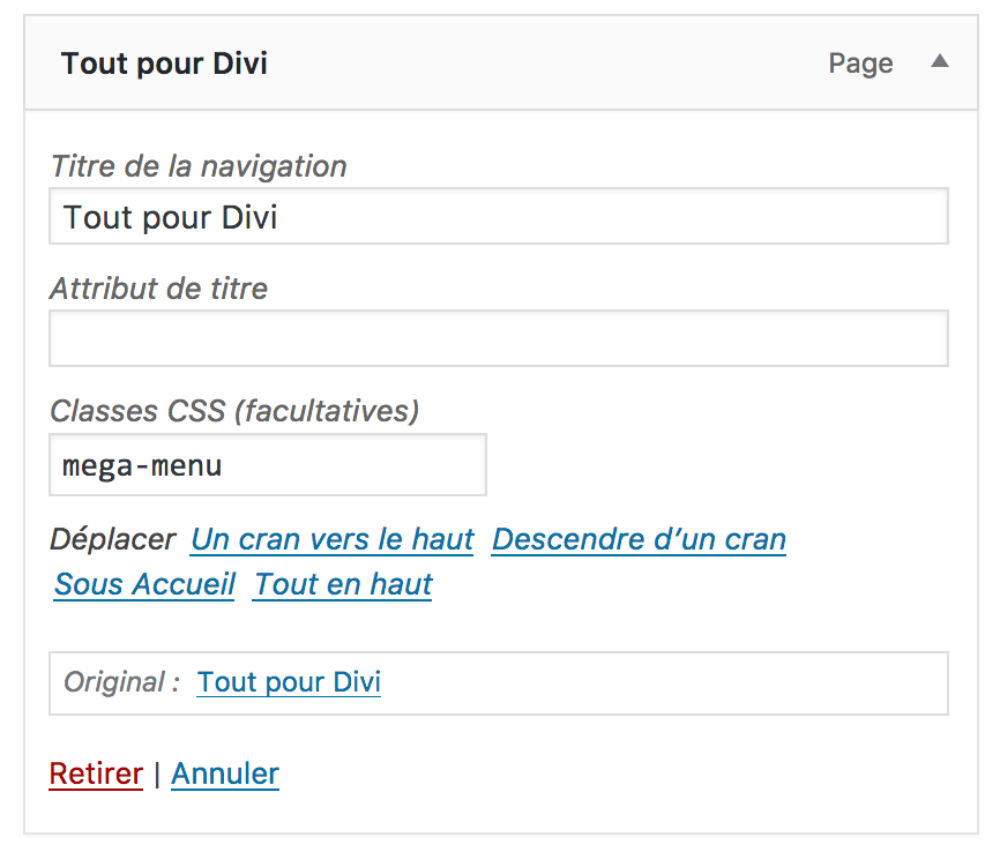
Save your changes
To consult the official documentation on the creating a mega menu, click here.
Step 3 - Insert images in the Mega Divi Menu
These images will be visible from your main navigation...
1 - Uploads of your images
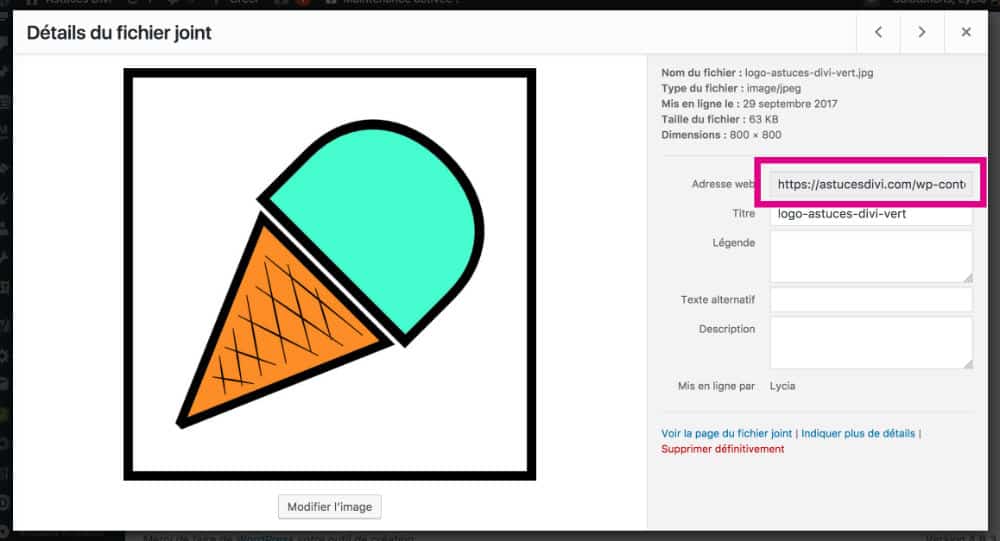
The first thing you will have to do is to download images, which will illustrate your menu, in the media library of your site on the tab Media > Add.
Once done, you can recover the URL of each image to be used in your menu.
For this, you can go to Media > Library, you will click on the image in question and you will select its URL (ctrl+A then ctrl+C or cmd+A then cmd+C).
Read also this article that explains how to insert icons next to or instead of text in the menu.
2 - Create custom links
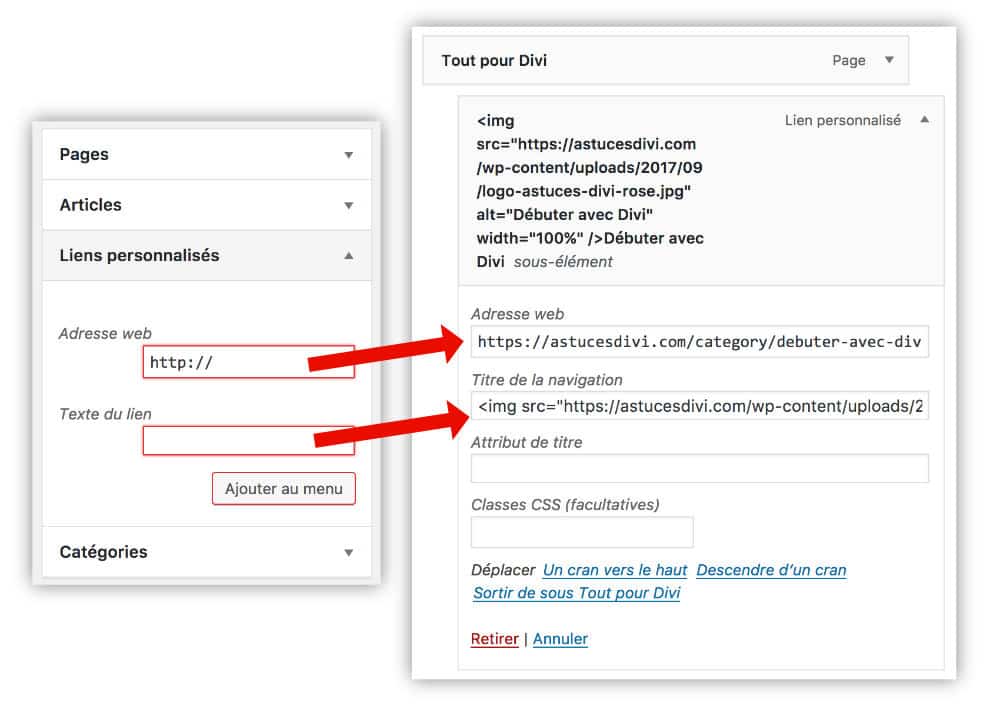
You will go back to the tab Appearance > Menu to insert these images in the Mega Menu of Divi. You will choose to insert a "Customized Link" to your menu.
=> In the field Web address, you insert the link of the page to which the menu item should lead. For example, if I want to send my visitors to a category on my site, I will enter the following address:
http://tip-divi-2024.local/category/debuter-with-divi/
The best thing is to go to the page in question and copy/paste its URL, it will avoid errors.
=> In the field "Link text" you insert the link below taking care to modify the elements in bold Depending on your site:
<img src="text-alt-de-votre-image" src="url-de-l'image-récupérée-à-l'étape-1" width="100%"/>your navigation text
Here's what it looks like:
=> Repeat these steps as many times as necessary and remember to save your changes...
Step 4: Check the final rendering of your Mega Menu in image
Finally, you can go back to the "Front" side of your site (visitor side), reload the page: the images should appear in your Mega Menu and by clicking on it, you should join the pages you have set up.
Here's the result:
Also read: How to make the Divi settings?
To conclude...
So it's not that complicated to Customize DIVI !
In addition, this tutorial does not use complex code, everything is available from your administration! So, at work 😉
Need more resources on Divi? Visit ElegantThemes blog full of ideas and tutos! Or learn how to effectively use this theme through my training Divi !
bonjour
merci pour ce tuto . une question avez vous un conseil sur la taille des images ?
Bonsoir Ludovic, pour répondre à ta question, j’ai utilisé des images 800px par 800px pour ce tutoriel (format carré de type 1:1). Pour être honnête, je pense que la moitié suffirait (400x400px) étant donné que c’est un menu et que les images n’ont pas besoin d’être grandes. Il faudrait tester avec des formats paysages (3:2) mais je pense que ça marchera également. N’hésite pas à donner un retour si tu testes, ça pourrait aider d’autre personnes. Bonne continuation et bonnes fêtes à toi !
Merci pour l’infos 😉
Bonjour,
Merci pour votre article, j’avais appliqué cette astuce il y a 1an pour un site et cela avait parfaitement fonctionné.
Ceci dit récemment j’ai souhaité a nouveau l’utiliser et là plus moyen. Une fois le menu enregistré la balise s’efface tout simplement du champ et impossible de forcer l’effet.
J’ai vérifié et revérifié si ma balise, mes liens, mes classes étaient justes et rien n’y fait cette astuce au départ si utile n’arrive plus à s’intégrer.
Comble de l’histoire, je suis retourné sur mon ancien site et cela était toujours opérationnel, sans rien changer des mes balises en cliquant sur « enregistrer le menu » l’affichage des images à également disparu..
Suis je le seul à avoir ce constat ?!
Bonsoir, Guillaume,
C’est étrange car mon tuto je l’ai testé au début sur Astuces Divi et mon blog n’a que 6 mois. Je ne pense pas qu’une mise à jour de Divi ait pu casser le code à ce point ? Du coup, je ne peux pas te confirmer cela, car ce code n’est plus actif, ni ici, ni sur d’autres sites que je maintient. Il faudrait voir alors si cette mésaventure est arrivée à d’autres lecteurs… Bonne continuation.
Comment faire pour que le mega-menu se referme plus lentement en s’enroulant ?
Merci
Bonjour Lycia.
Merci pour toute la bonne information que vous partagez. Cela m’a déjà beaucoup aidé.
Je viens de réaliser votre tuto sur la création du mega menu sur divi avec l’ajout d’images dans celui-ci et ça marche plutôt bien.
Le seul problème est que je n’arrive pas à aligner le texte des images et les images entre elles.
Auriez vous une solution ? J’ai déjà pas mal cherché sur la toile mais je n’ai pas encore trouvé jusqu’à présent.
Salut Kévin et merci !
L’alignement doit certainement pouvoir se régler avec un peu de CSS. Comme chaque site est différent, cela peut changer. As-tu regardé sur des sites avec des tutos CSS ? Regarde peut-être du côté de la FLEXBOX, généralement ça marche bien pour aligner. J’espère que tu vas trouver…
Salut ! Je ne sais pas comment tu pourrais faire ça… Et il n’y a pas d’options en natif. Désolée.
Merci beaucoup ! J’ai déjà réussi à améliorer la situation grâce à une vidéo YouTube, mais je vais chercher et je suis sur que je vais finir par trouver. Bonne continuation !
Bonjour et merci pour ce super tuto que je garde précieusement en signet 🙂 .
J’aimerais avoir l’image de mon slider plein écran qui englobe le menu sans que celui ci disparaisse et je ne trouve pas comment faire . Comme par exemple sur ce thème https://themeisle.com/demo/?theme=ShopIsle%20Pro
une idée ?
Merci d’avance
Salut Vincent.
Tu devrais construire ton Header avec le thème Builder, tu pourras faire ce que tu veux avec. Tu dois mettre une section avec une image en arrière-plan et dans cette section tu ajoutes une module menu.
Bonjour et merci pour votre tutoriel.
Savez-vous comment je dois faire pour avoir 6 colonnes dans mon mega menu ? J’ai déjà trouvé des solutions qui ne fonctionnent malheureusement pas pour moi.
Merci d’avance,
Non Bruno.. je ne sais pas…. désolée
Bonjour,
Comment faire pour que le mega menu soit responsive ?
en ce qui me concerne lorsque je passe en mode portable, le mega menu n’existe plus, mais laisse place au menu classique.
Je crois que c’est natif. Un mega menu bascule en menu normal en smartphone. C’est justement le responsive qui fait ça
Bonjour et bravo pour votre apport à la communauté Divi.
Sur votre exemple, serait-il possible que les titres des pages soient placés sur les images, (avec quelques lignes de CSS peut-être ?).
Merci par avance si vous savez comment faire.
Bonjour,
J’ai bien crée mon mega-menu comme vous l’avez expliqué. Cependant mon menu principal composé de 4 éléments apparaît en décalé maintenant sur mon site. Savez vous comment on peu gérer la disposition de l’affichage du menu ?
Merci pour l’aide,
Paul
Salut Paul, c’est peut-être une histoire de taille d’image. As-tu essayé avec des images plus petites ?
Salut Patricia.
Oui effectivement, il faudrait faire une développement spécifique en CSS pour réaliser ce que tu souhaites.
Hello Lycia !
Merci pour ce tuto ! ^^
Pour aller un petit peu plus loin, comment est-il possible de mettre l’image en dessous du titre de navigation ?
Bonne continuation !
Elodie, avec du CSS, c’est peut-être possible… Il faudrait bidouiller et chercher.
Super tuto , très utile , comme toujours ! 🙂
Merci Pat
Hello.
Je me pose quelques questions sur ce que ça donne sur smartphone.
Il ne faudrait pas que les images soient cachées ?
J’ai un peu personnalisé le tout et au final j’ai tous mes sous menus qui sont « expanded » par défaut sur smartphone ?
Si vous avez une idée, d’avance merci !