To obtain a « sticky on scroll menu » you won't need theme child or special knowledge of code. You will be able to achieve this effect directly with the help of Native features of Divi or using a third-party plugin.
In this article, I propose that create a nice menu/header that will change the classic provisions proposed by the theme Divi.
You will then get a original layout In a few minutes.
Here is the program of this article:
- What is a "sticky on scroll menu"?
- How to get a sticky menu in 3 simple steps without plugin?
- Get a stickery menu on the scroll using a plugin (ideal beginner)
- Another nice menu idea...
1 – What is a "sticky on scroll menu"?
One menu sticky on scroll is a menu that becomes fixed when you go down below within a web page. This action of scrolling the page down calls the "Scroll".
In French, this could be translated into: a menu that becomes fixed to scrolling the page.
Basic, this feature already exists for the Divi's classic menu.
I advise you to read this article that deals with features offered by Divi to modify the header of its site.
But what if we use the Divi Full Screen Menu module ?
Indeed, if you insert this module into your layout, you will see that the menu slides over and disappears beyond the window when you arrive at the bottom of the page. As this video shows:
This is not good for "user experience" of your visitors. They must have the possibility to navigate within the different pages of your site, no matter where they are (so even when they arrive at the bottom of your page, the menu must be visible).
Do you know you can test Divi for free? See you on this page and click on "TRY IT FOR FREE"
2 - How to get a sticky menu in 3 simple steps?
Here is a video of what we will do in a few simple steps:
Step 1: Remove the classic Divi menu
If you use the Full Screen Menu module within a layout, it is highly likely that you need remove the display from the main menu of your siteon the same page.
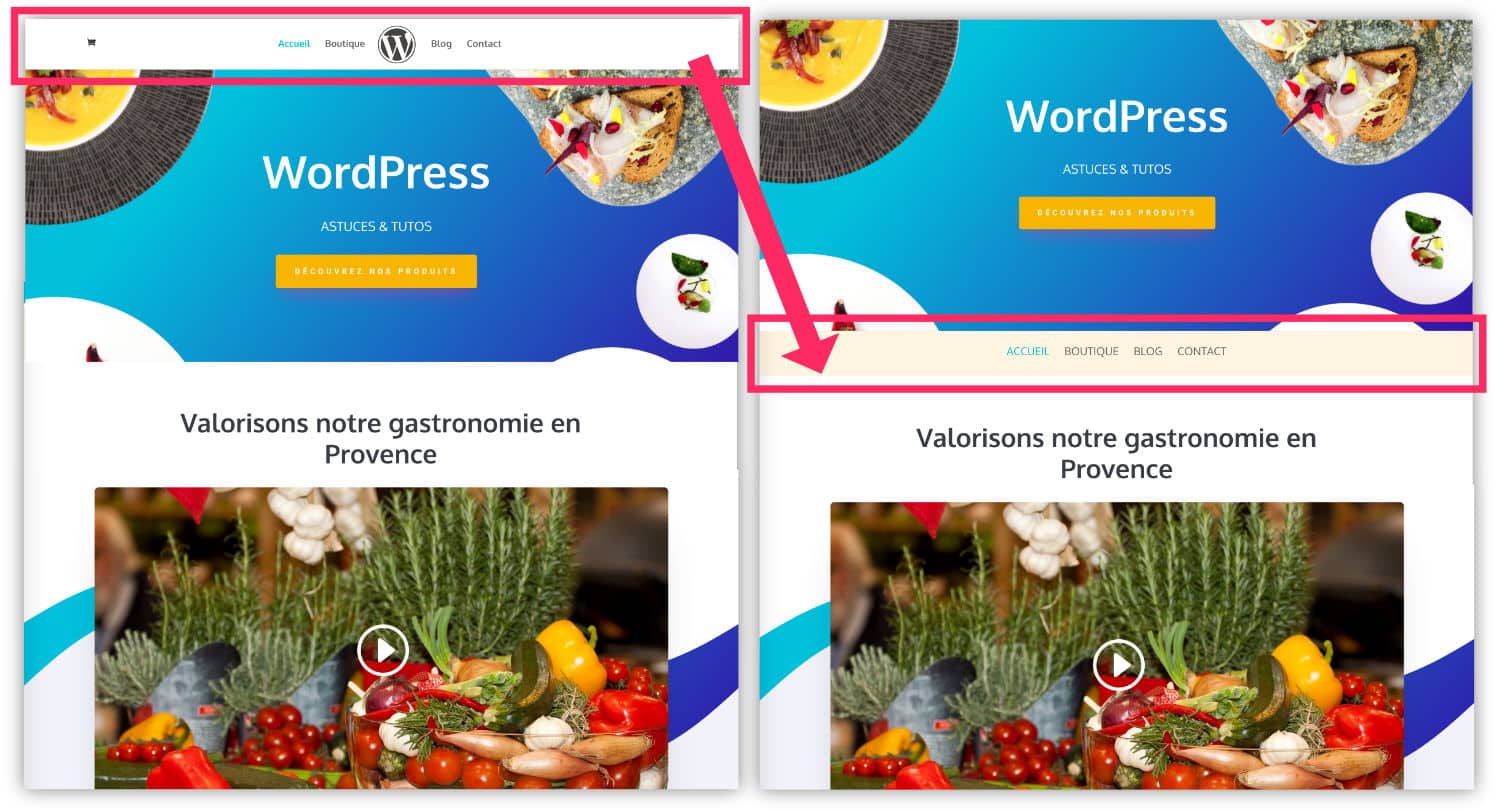
This is done in one click: discover the tuto to remove Divi menuThen come back here to continue.
Step 2: Add a Full Screen Divi Menu Module
Once your page n, you can insert Full Screen Menu. Here's how:
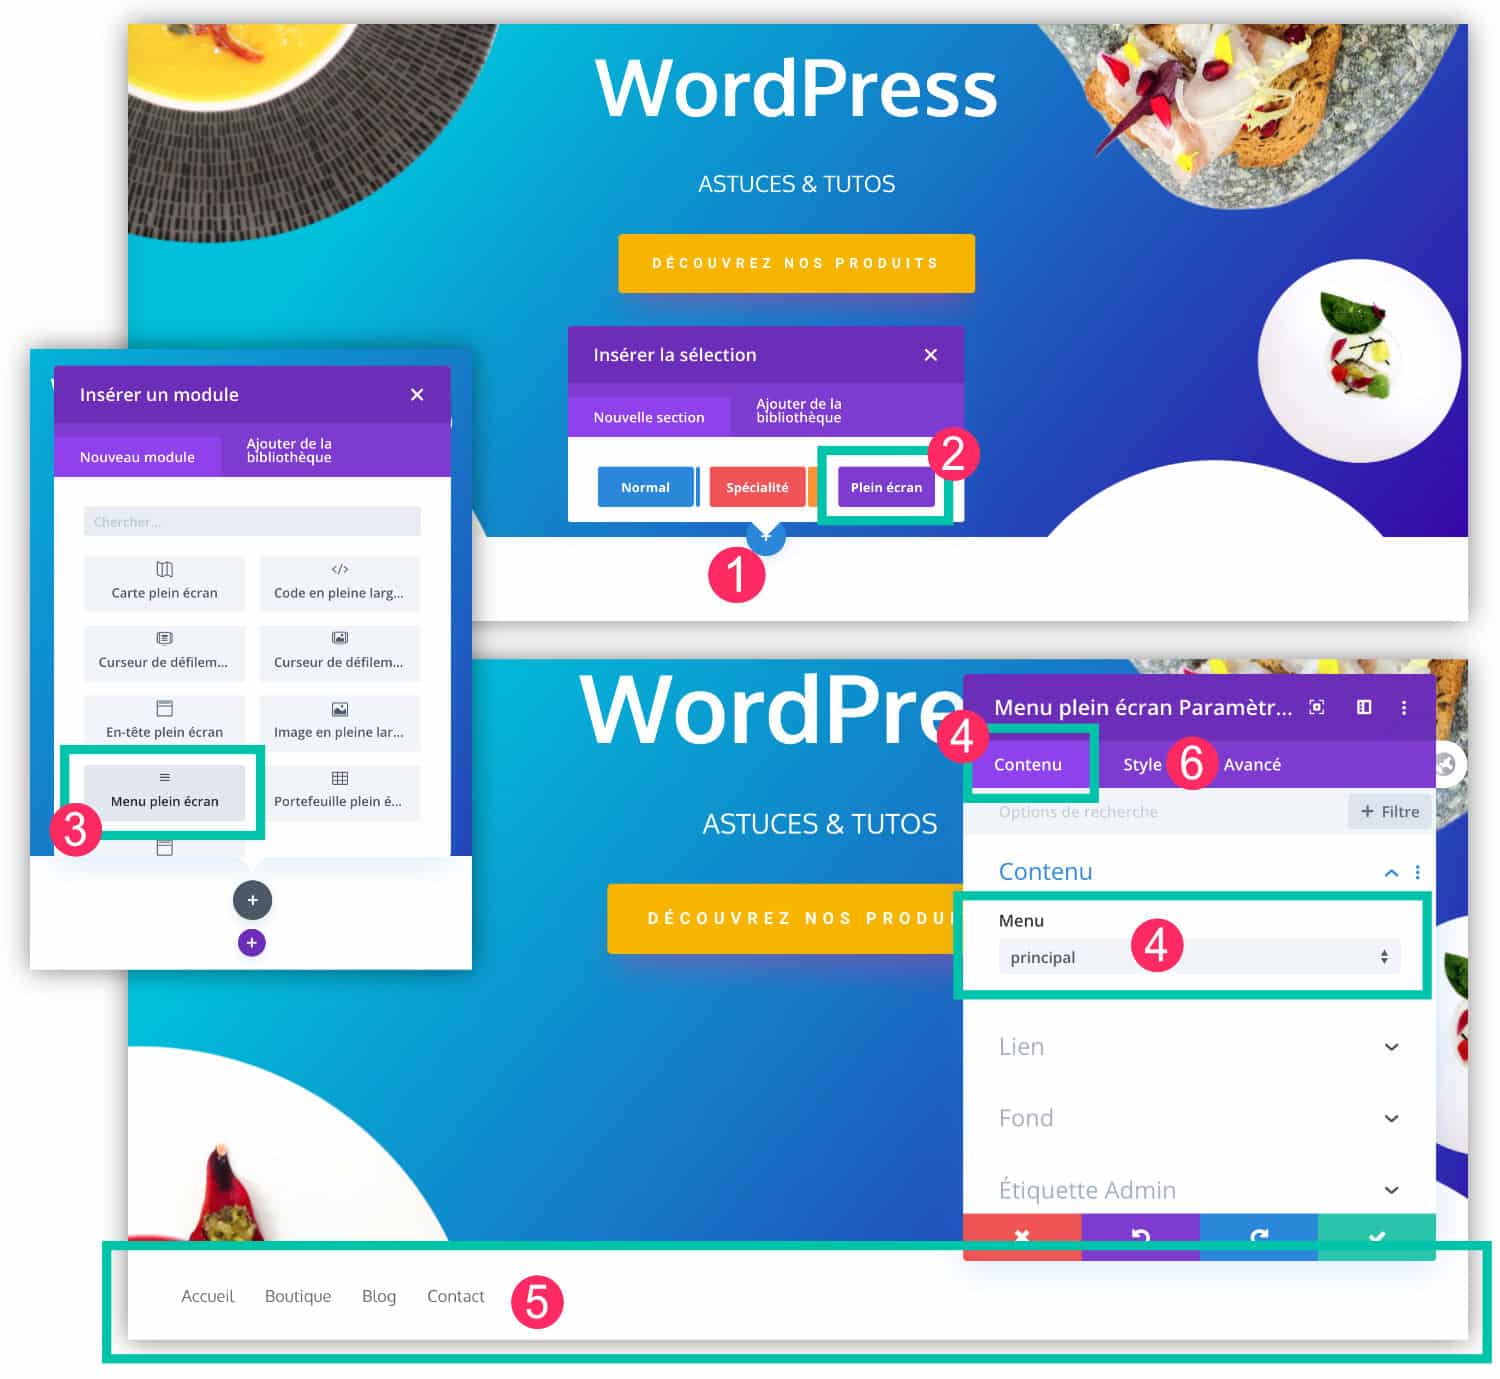
- Add a new section by clicking on the icon « + »At the desired place.
- You must choose a section « Full Screen » (purple).
- Within this section, insert a Full Screen Menu module
- In module settings, go to the tab "Content" and select the menu to display. Note that this menu must already exist. You need to create it upstream to the tab « Appearance > Menu » from your WordPress site.
- You will see this menu appear in your Full Screen section.
- Finally, using tabs Style and "Advanced", you can customize your menu: change color, alignment, font size etc.
Don't forget to save your changes.
Step 3: Set the menu at the top of the screen when scrolling the page
For now, you should be in possession of a page whose classic menu has been hidden and whose module « Full Screen Menu » scroll with the content of the page.
Now we'll add a few lines of code so that the menu is fixed at the top of the screen when you go down to the bottom of the page.
For this, you will need insert two "Full width code" modules within your full screen section.
If you do not yet know how to use this module a little special, I invite you to read this article dedicated to use of the Divi Code module.
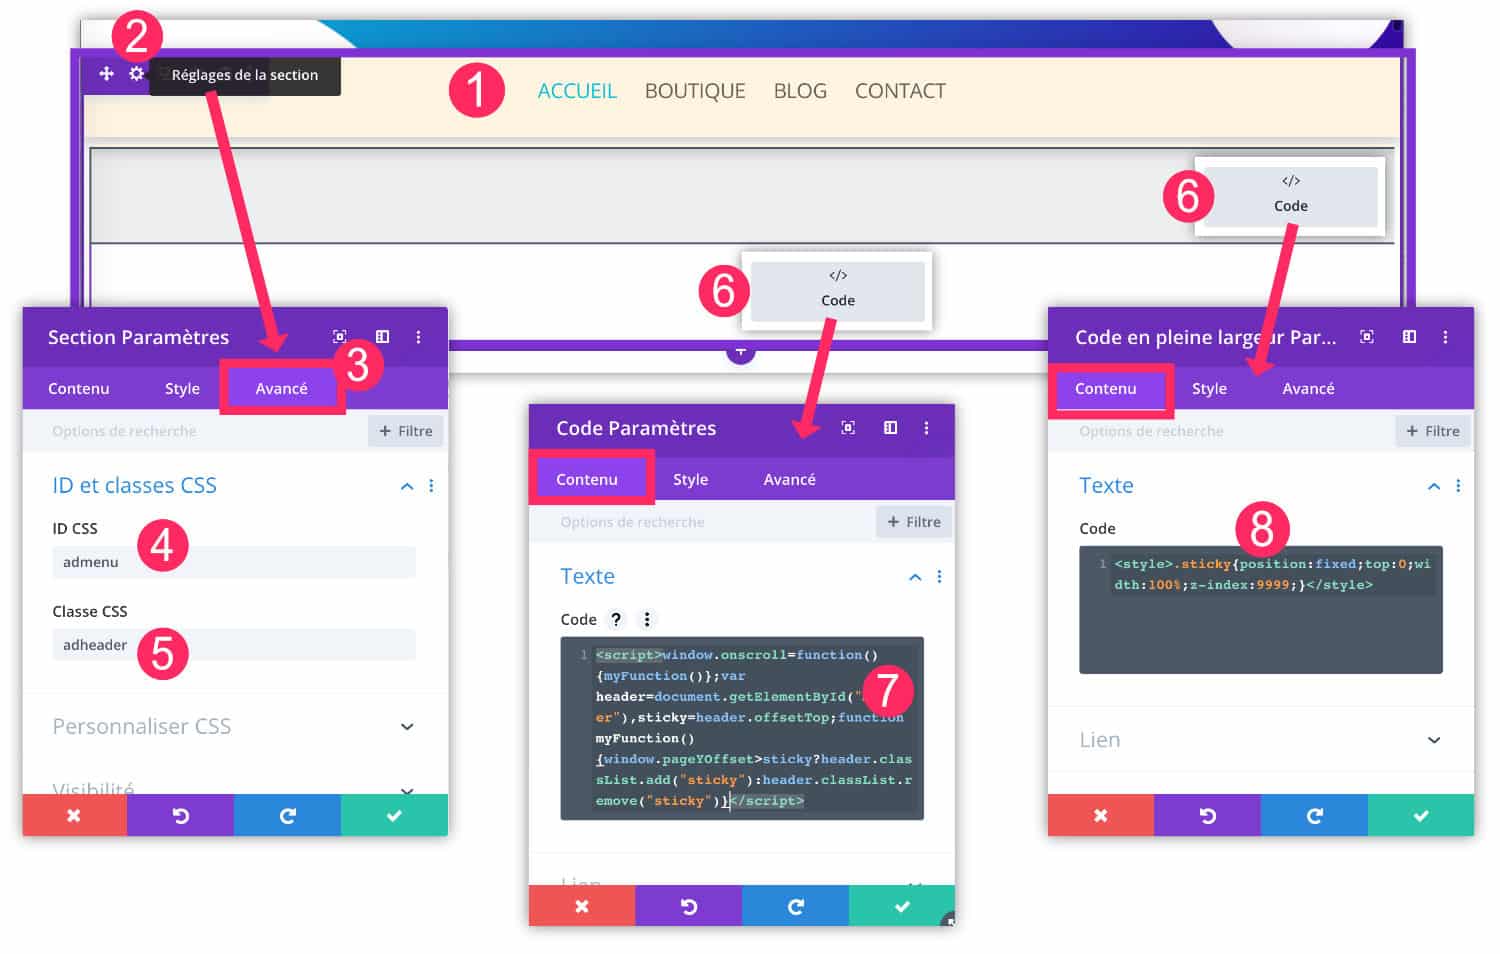
- Within the « Full Screen Section » where you have previously inserted the module « Full Screen Menu »,
- Click on the wheel icon to open the section settings
- Go to the tab "Advanced"
- In the field CSS ID, enter the identifier "admenu"
- In the field CSS class, enter the class "adheader"
- Insert 2 modules Code in full width within this full screen section.
- In the first, insert Javascript between two tags
<script>and</script>. - In the second, insert CSS between two tags
<style>and</style>.
Step 3 – Option 1: JS code and CSS video tutorial
This code is the one used for my tutorial video. However, some users encounter problems with this one, as you can see in the comments. If this is your case, go to Option 2.
Here is the JavaScript code to use:
window.onscroll=function(){myFunction()};var adheader=document.getElementById("admenu"),sticky=adheader.offsetTop;function myFunction(){window.pageYOffset>sticky?adheader.classList.add("sticky"):adheader.classList.remove("sticky")}Note that to create this code, I helped myself with the original code available here.
Here is the CSS code to use:
.sticky {
position:fixed;
top:0;
width:100%;
z-index:9990;
}
Step 3 – Option 2: JS and CSS code with OffSet value defined
The previous JavaScript code did not give a value (distance) for The appearance of the menu at the scroll.
That's why some users said "do not see the menu appear at front-end while it exists in back-end".
As the menu sticky can be inserted anywhere within your layout, its location can make the final lens modified.
Depending on your project, the length of your layout and where you want to insert the menu, the previous JS and CSS code must be modified by the following:
var stickyEl=document.querySelector('#admenu')
 var stickyPosition=stickyEl.getBoundingClientRect().top;var offset=500
 window.addEventListener('scroll',function(){if(window.pageYOffset>=stickyPosition+offset){stickyEl.style.position='fixed';stickyEl.style.top='0px'}else{stickyEl.style.position='static';stickyEl.style.top=''}})
I was inspired by original code here.
Remember to insert this code into a module "full width code" and surround it with beacons <script> and </script>.
Note also that depending on the length of the layout that you use, you will have to "Play" with offset value. For this example code, the offset is 500. If you encounter problems, change this value to a more appropriate positive or negative value. For example: 250, 120, 380 or even -50, -20 etc.).
The offset allows to define the value of a distance from a parent element. More info here.
This JS code must be accompanied by the following CSS code (in a different code module):
.adheader {
width:100%;
z-index:9990;
}
This code should be surrounded by tags <style> and </style>
Step 3 – Option 3: JS and CSS code for embossed layout
If your site uses a page layout (boxed layout), the code to be used will have to be slightly changed.
Here is the JS to use:
var stickyEl=document.querySelector('#admenu')
 var stickyPosition=stickyEl.getBoundingClientRect().top;var offset=200
 window.addEventListener('scroll',function(){if(window.pageYOffset>=stickyPosition+offset){stickyEl.style.position='fixed';stickyEl.style.top='0px';stickyEl.style.width='90%'}else{stickyEl.style.position='static';stickyEl.style.width='100%';stickyEl.style.top=''}})
For this code too, you will need to "Play with offset values" so that he will agree to your layout.
Here is the CSS to use:
.adheader {
width:100%;
z-index:9990;
}
Sometimes copying and pasting a code online may not work... Therefore, I suggest you download the complete section, ready to use. Simply unzip the folder and import the file(s) .json of your choice, within your Divi Library. You will find the various options within the folder. Then you will be able to insert this section wherever you wish in your site. Simply choose your menu to display and customize this menu to your liking. Note that this download is free and without consideration.
Download full screen section with Sticky on Scroll Menu sticky-menu-on-scroll-ok-17092019.zip – Téléchargé 10550 fois – 7,57 Ko3 – Get a stickery menu on the scroll using a plugin (ideal beginner)
The steps seen in the previous chapter of this article may not suit you, for X or Y reasons.
Besides, if you read the comments, some users encounter problems with the proposed JS codes. However, these codes work well: I checked and optimized them a few days ago on my test sites.
So, to meet the need of all types of users, I tested another solution for you: using a plugin that offers this feature.
Good news, I found 2 completely functional and easy to use.
Then I suggest you discover them:
Whether you choose one or the other, you will need:
- From remove the main menu from your page as explained to Step 1 of Chapter 2 of this Article.
- Add a full screen section (Divi violet section) in which you will place a module "Full screen menu" as explained to Step 2 of Chapter 2 of this Article.
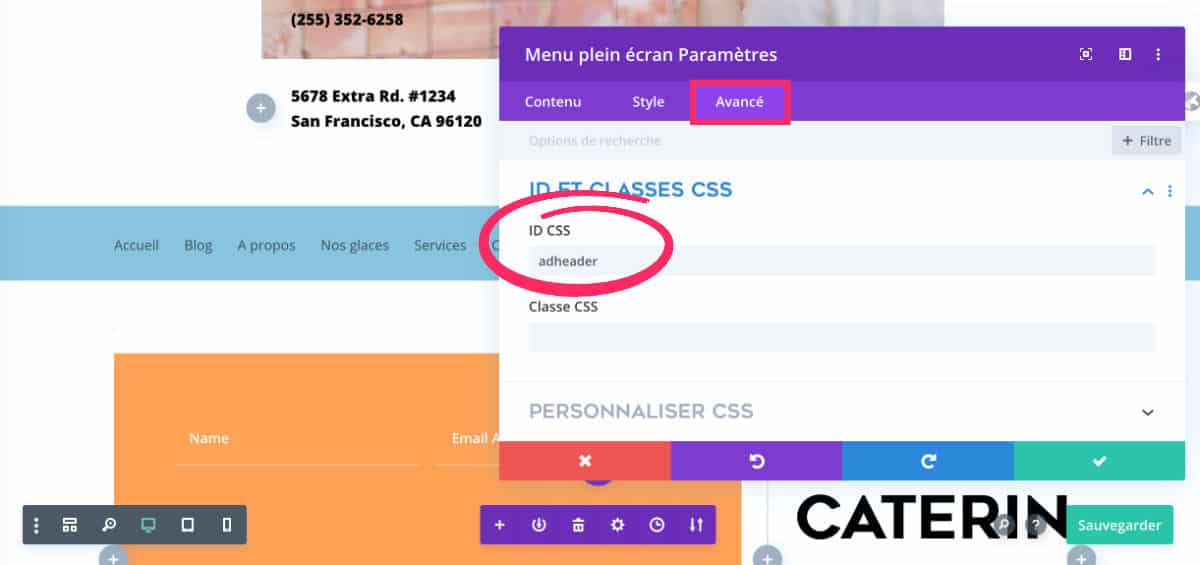
- Add CSS ID to your full screen menu module from the advanced parameters of the module. For my example, I use "adheader", as you can see on the capture below.
Then, depending on the plugin you choose, here is what you can do:
3.1 – Sticky Menu (gold Anything!) on scroll
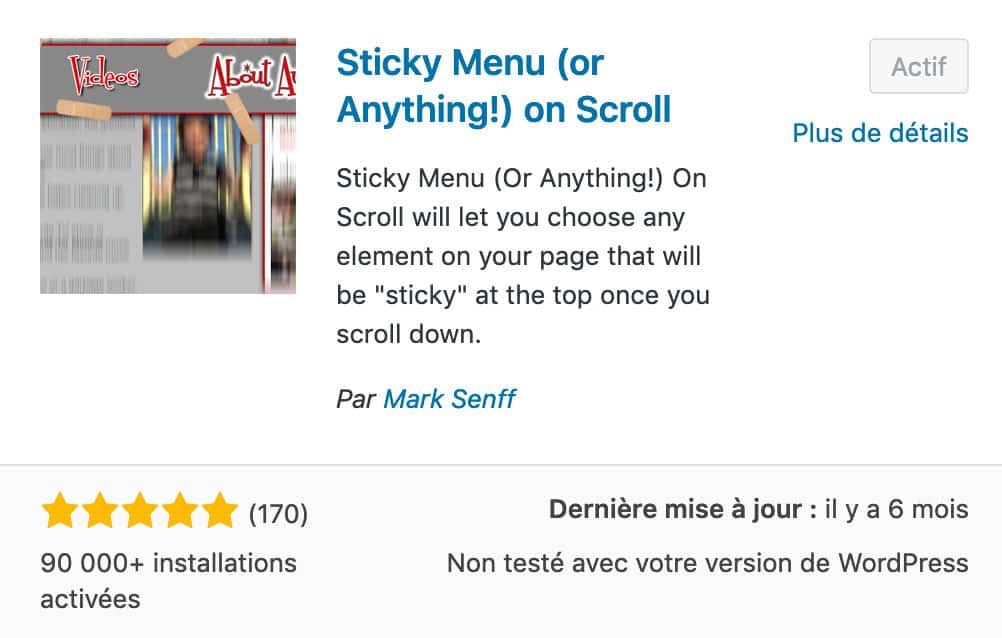
Install and activate the plugin as usual. You will find its settings on the tab Settings > Sticky Menu (gold Anything!)
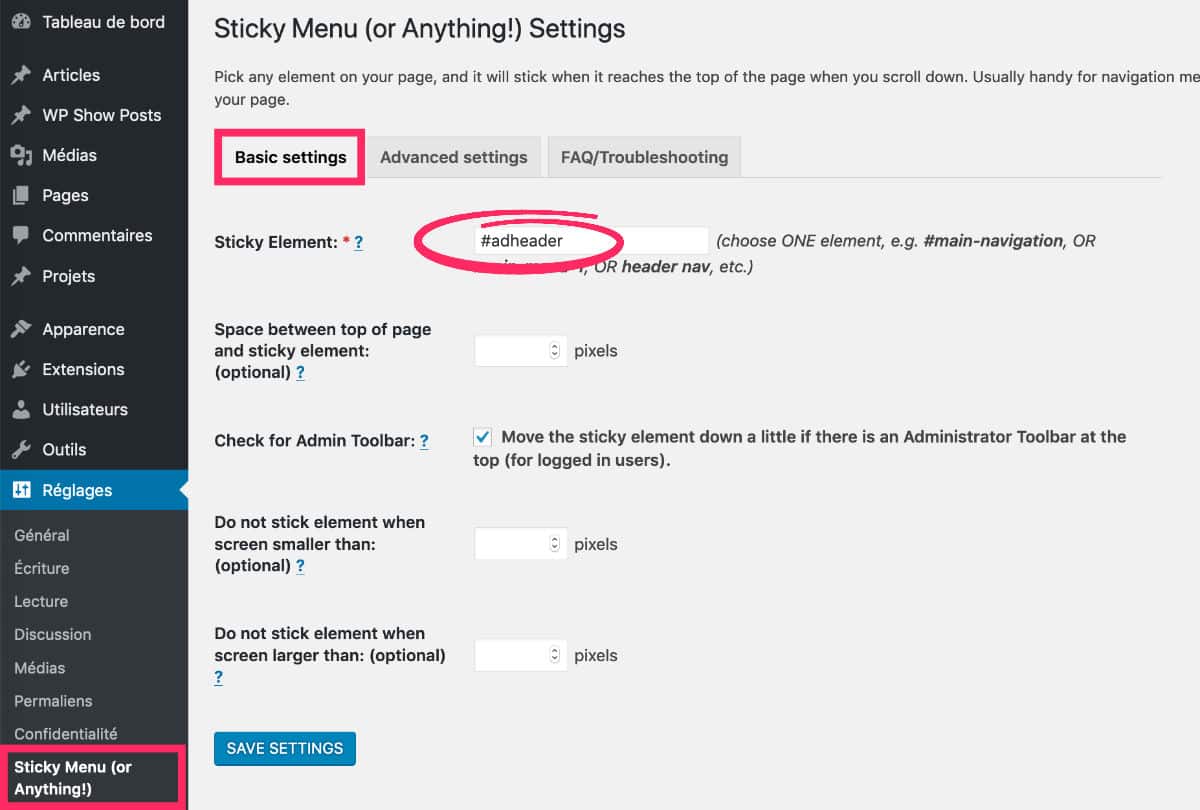
In the "Basic Settings" tab, just enter the CSS ID of your menu. In my case, it's #adheader.
Other options are also present, don't hesitate to browse them and test them according to your needs.
For my test, I only added my CSS ID.
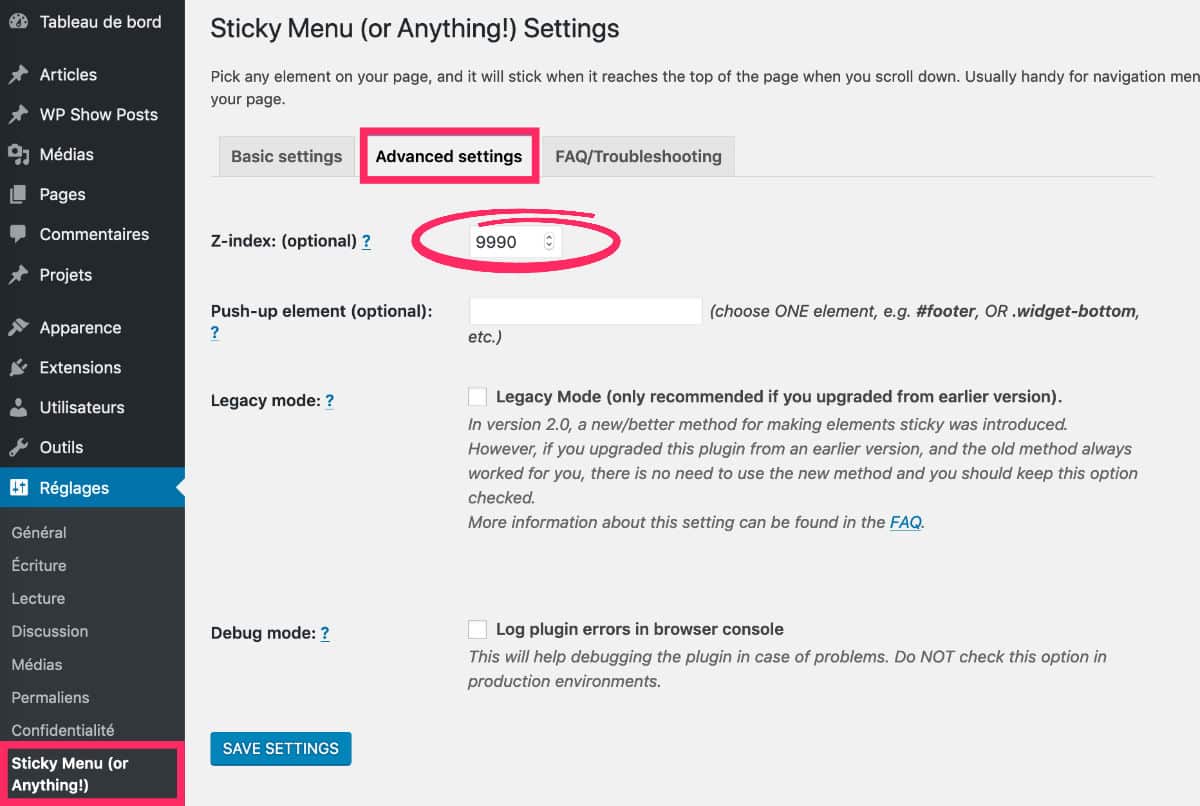
Then go to the tab Advanced settings and simply enter a value for Z-Index.
The Z-Index allows the elements of your layout to overlap. Z-index 1 will be placed all below and the Z-index 9999 will be placed all above. You must imagine your layout as a layer overlay.
I recommend: a z-index of 9990 9999 is used by other elements, especially when the Visual Builder is active.
There! With these two very small settings, you easily get a menu that is fixed when one scrols down and then gets back to its place when one scrols up!
3.2 – My Sticky Menu
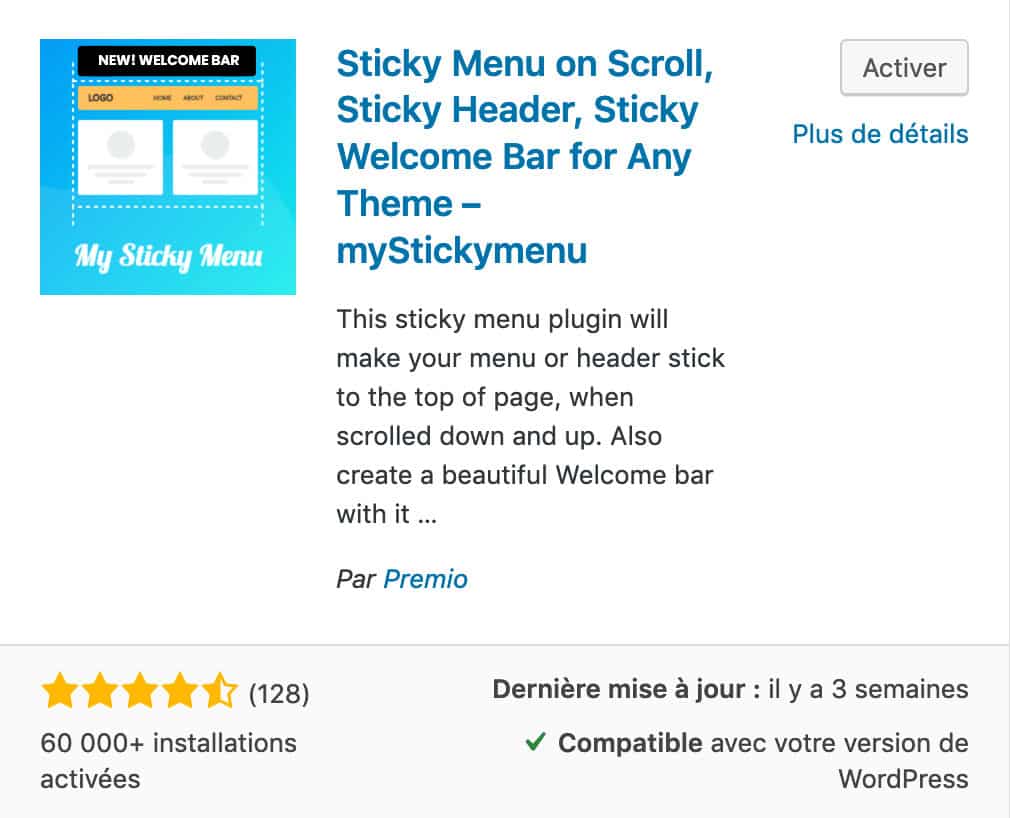
I have a small preference for the previous plugin (Sticky Menu or Anything!) which offers more options all available in the free version.
But this one works well too. Once activated, go to the tab Settings > myStickyMenu.
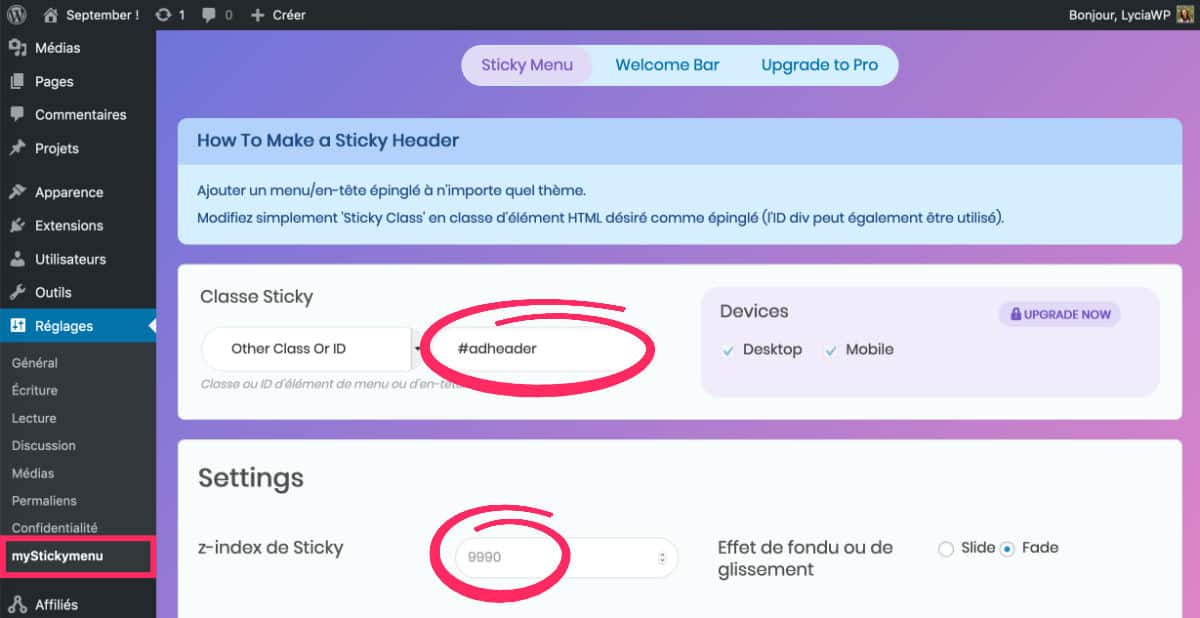
- Select Sticky Menu Upstairs.
- Sticky class: select Other Class or ID then enter your CSS ID. For my example, #adheader.
- Settings: Enter a z-index of 9990
- Save your changes.
That's it! Your sticky menu with scroll must be functional.
In both cases, whether you're using one or the other, you'll need to add this CSS ID to any element of your layout in the future to make it sticky to the scroll. On the other hand, if you need to fix several items within a single page, you will then have to use a CSS CLASS instead of d-ID (because an ID must always be unique within a page).
4 - Other ideas for nice menus...
How about this? menu fixed at the top of the screen when user goes down the page?
This type of menu is not new, you must have seen sites that use it.
In the same spirit, I propose that you realize a « fixed footer menu » or create a transparent menu in a Hero section.
Need more resources on Divi? Visit ElegantThemes blog full of ideas and tutos!

Hello !
un grand Merci pour ce tuto ! c’est exactement ce que je cherchais à réaliser !
J’ai codé sans soucis, et même télécharger le menu pour vérifier que tout est bon … mon menu est visible dans mon builder, mais n’apparaît pas en visuel sur ma page.
As-tu un conseil ?
Dans l’attente de ta réponse.
Merci
Bonjour,
Merci pour ce tutoriel.
Sur une page complète aucun soucis
Mais si j’éssaie sur une page emboitée
là.. j’ai un gros bug.
Au scroll mon menu pleine largeur sors sur la droite.
Je farfouille google mais je ne trouve rien là-dessus.
Aurais-tu une idée?
Salut Kaellyana. Effectivement, sur une mise en page emboitée, tu dois certainement modifier légèrement les classes CSS (je suppose, je n’ai pas testé). Il faut que tu inspectes le code dans ton navigateur et que tu fasses des essais pour trouver le CSS adéquat.
Salut Leslie,
C’est bizarre, tu as toujours le problème ?
Bonjour,
un grand Merci pour ces tutos et ce site en général il me permet de découvrir et d’utiliser plus facilement Divi !
J’ai exactement le même problème que Leslie.
As-tu un conseil ?
Dans l’attente de ta réponse.
Merci
Hello Hervé !
Je ne comptais pas allumer l’ordinateur ce soir (LOL) mais ça m’intrigue votre histoire avec Leslie… Alors, je viens de jeter un œil.
J’ai téléchargé le module que j’ai mis à disposition dans l’article et je l’ai ajouté au sein d’un layout. Je le vois bien avec le Visual Builder actif mais je ne le vois plus lorsque je quitte le Visual Builder : comme Leslie.
Par contre, si je désactive la navigation principale, là tout fonctionne bien.
Donc « l’Étape 1 : supprimer le menu classique de Divi » du chapitre 2 de cet article est indispensable pour que cela fonctionne. Vous devez donc absolument supprimer le menu principal sur la page où vous souhaitez que le menu « sticky » apparaisse comme expliqué ici.
Merci de me dire si le souci venait de là…
Salut Kaellyana.
Je viens de vérifier si le code fonctionnait bien avec une mise en page emboitée et oui, tout marche bien, il n’y a pas de soucis. Au début, je pensais qu’il aurait pu y avoir des soucis de CSS mais ce n’est pas le cas. Mon tuto et la section disponible en téléchargement fonctionne aussi bien pour une mise en page large que pour une mise en page emboitée. Es-tu réessayé depuis ?
Salut Lycia ,
Je suis parti d’une page blanche et j’ai bien suivi la procédure décrite.
Blank Page + ajout du module.
J’ai toujours le même soucis pour ma part, je vais creusé le problème y a pas de raison.
Ma config : WordPress 5.2.3-fr, Divi 3.29.1 + thème enfant
Salut Hervé,
Je vais regarder à nouveau dans la semaine, pour voir si je ne serais pas passée à côté de quelque chose…
Bonjour, quand je rajoute « adheader » dans ID Classe CSS mon menu disparaît, que faire ? Merci !
Salut Nathan, Hervé, Kaellyana et Leslie.
Je me suis un peu creusé les méninges ce matin… J’ai pris en compte tous vos commentaires et j’ai suivi mon tuto sur un site de test « tout neuf »… Et vous aviez raison, dans certains cas, le Menu Sticky disparait.
Cela est dû à la longueur du layout et du scroll. Donc le premier code Javascript fonctionnait bien dans le cas où la page ne dépassait pas une certaine longueur.
J’ai donc mis à jour mon tuto qui propose des alternatives à ce code Javascript (option 1, 2 et 3). Vous devrez cependant modifier la valeur du offset selon vos besoins, comme expliqué dans l’article.
J’ai aussi rajouté une version pour ceux qui utilisent une mise en page « emboitée » (boxed layout).
Bref, tout est à jour et les fichiers en téléchargement ont, eux aussi, été modifiés.
Merci de me faire part de vos retours : ça devrait marcher maintenant 😉
Coucou Lycia, merci.
Je test tout cela sous peu.
Depuis l’autre fois je n’ai pas rouvert mon site test avec divi je suis en cours d’en fabriquer un pour une amie avec elementor.
Et oui j’aime tout le monde.
Mais dès que je test je reviens ici vous le dire.
Et moi mon soucis c’est en mise en page emboité
dès que je scroll le menu sort sur la droite et ne reste pas dans la mise en page
et j’ai pas mal farfouiller et tester je ne trouvais pas de solutions.
Alors je suis passé a autre chose en attendant de m’y remettre.
Bonjour Lycia,
Je suis donc parti sur l’option 2 mais je n’arrive pas à définir mon offset !
Mon bloc avant fait 500 de hauteur max.
Je loupe quelque chose.
Hervé
hello, alors j’ai testé
Je crois que j’avais répondu mais je ne sais plus ce que j’ai dit.
Alors même avec ton code j’ai mon menu qui sortais toujours du côté droit
Je vous joint une image pour montrer.
https://i73.servimg.com/u/f73/11/03/13/46/menuem10.png
et du coup j’ai modifié le code js
https://i73.servimg.com/u/f73/11/03/13/46/menuem11.png
au lieu de
{stickyEl.style.position=’fixed’;stickyEl.style.top=’0px’;stickyEl.style.width=’90%’}else
j’ai mis
{stickyEl.style.position=’fixed’;stickyEl.style.top=’0px’;stickyEl.style.width=’71.8%’}else
j’ai tatonner en testant la taille et avec ce 71.8 cela ne sors plus de la page.
Après est-ce bien bon, je ne suis pas une pro du code alors je ne sais pas mais sur mon site de test cela fonctionne.
Salut Kaellyana.
C’est bizarre. Bon ben tant que ça marche… Il faudra quand même vérifier le rendu en version mobile.
Bonjour Lycia,
J’ai lu à nouveau ton tuto mais je n’arrive toujours pas a comprendre comment calculer la valeur de l’offset.
Comment fait-on concrètement.
Merci.
Salut Hervé… Bon, j’ai fait encore plein d’essais. Ça marche mais j’ai aussi trouvé une alternative à l’aide de plugin facile à utiliser. Je viens de mettre l’article à jour (chapitre 3). Avec ces plugins, ça marche et en plus c’est ultra facile ! Alors, je préconiserais cette méthode qui pourra être réutiliser plusieurs fois facilement.
Bonjour Lycia,
Merci pour les plugins.
J’ai installé « Sticky Menu (or Anything !) on scroll » et la’ai inactif sous chrome mais fonctionnel sous firefox ????
Du coup j’ai Réinitialisé chrome et là magie ça marche, je réactive mes extensions et patatra plus rien !!!!
Au final c’est l’extension « uBlock Origin » qui fou le boxon…..
Du coup je reprendrai le tuto du début avec toutes les options proposées sans plugin dés que je peux et sans l’extension.
De plus le fait d’être obligé de mettre ma page en « Blank-Page » m’ennuyait un peu du coup je suis passé par mon CSS du thème enfant en ajoutant
« .page-id-60 #main-header {
display: none;
}
#page-container {
padding-top: 0px !important;
} » bout de code adapté d’une de tes astuces qui me permet de supprimer le menu principal de la page « 60 » concernée par mon menu scroll en ayant une page « Modèle par défaut » et toujours ma barre infèrieure.
Et tout marche.
Merci pour tout.
Merci Hervé.
Effectivement chaque environnement de site est différent et quelquefois des plugins peuvent entrer en conflit. Je te conseille quand même de faire tes essais sur un site de dev et non sur ton vrai site. On ne sait jamais 😉 !
Bonjour Lycia,
Merci de partager vos connaissance par le biais de ce site qui détail parfaitement la démarche à suivre ceci dit, peu importe la méthode choisie (1 ou 2), la page affiche 2 fois le menu avant le scroll.. auriez vous une idée pour solutionner cela ? Hormis ce petit défaut, tout se passe correctement..
Merci d’avance
Antoine
Salut Picron,
Merci à toi…
As-tu bien choisi « blank page » ? À part cela, je ne vois pas d’où ça pourrait venir…
oui, j’ai bien mis blank dans le template de page, après je ne sais pas si c’est normal mais lorsque je rajoute la class css adheader, mon menu disparait..
J’ai installé le plugin sticky menu, et ça fonctionne.. merci 🙂
Normalement, il disparait lorsque le Visual Builder est actif. Une fois enregistré, tu devrais le voir en front (je dis bien : normalement) 😉
Super ! 😉
Bonjour
merci pour cet article, c’ est exactement ce que je souhaitais faire, par contre j’ai souci je souhaiterais intégrer le logo dans le menu pleine page que j’ai crée , je n’arrive pas à trouver la solution?
Merci pour votre aide
Salut Mssiote. Dans un « menu pleine page » je ne suis pas sûre qu’on puisse ajouter un logo. Du moins avec les options… Il faudrait alors faire du codage, je pense…
Bonjour,
Merci beaucoup pour votre tuto.
Mais je ne comprend pas pourquoi tout fonctionne correctement sur FireFox PC, sur Explorer PC, sur Chrome Mobile, mais rien ne fonctionne sur Chrome PC. Quand je dis rien, peut importe les 3 solutions que vous proposez et idem avec l’extension » Sticky Menu (or Anything!) ». Je n’ai pas essayé l’autre.
Savez pourquoi ?
Merci d’avance pour votre aide. A bientôt. Et bon confinement à toutes et tous.
Salut Lionel ! Non je sais pas… il manque peut-être un bout de code pour Chrome ? Sinon, il te suffit de créer un header avec le thème Builder et d’utiliser la nouvelle fonctionnalité de position « fixed » de Divi : https://youtu.be/SEWmgTC83Hc
Bonjour Lycia, et merci de ta réponse.
Cette solution « fixed » est intéressante pour faire un header. Ce qui fonctionne très bien pour mes pages classiques. Mais j’ai besoin de faire un menu (et le même qui fonctionne sur toutes mes pages si possible) qui a une position différente sur ma home. Le menu apparaît après avoir scrollé une image plein pot. Puis il vient se coller en haut, quand tu continus à scroller.
Par pur hasard, j’ai réussi a faire fonctionner ton code. Lorsque j’enlève « adheader » dans la case classCSS ca fonctionne parfaitement. Dès que je le remet, ca fait sauter la ligne sur Chrome.
>> Qu’elle est l’incidence alors de ne pas mettre ce bout de code ?
Et votre code fonctionne très bien sur les autres type de section (pas obligatoire les pleines écran). Ca offre pas mal de latitude.
J’ai compris ! C’est à cause de AdBlock. Dès que je l’active le menu saute.
J’ai donc renommé « admenu » « adheader » et la bingo, ca fonctionne à nouveau. Je pense que AdBlock n’aime pas les lettres A et D l’une à coté de l’autre, pensant a « advertising ».
Votre solution est mieux, puisque cela s’applique a n’importe qu’elle type de section et à n’importe qu’elle position dans la page. La fonction « Fixed » est utile un menu positionné en header.
Ah super !
Bonjour, Lycia et tout d’abord merci pour ce super site. En ma qualité de novice du web j’apprécie fortement !
Pour ceux qui rencontrent des problèmes avec l’affichage du menu, j’ai le même soucis, et en fait il semblerait que ce soit à cause de adblock plus… Lorsqu’il est désactivé le menu est bien visible. Alors je ne sais pas si ca peut aider mais bon, en tous cas voilà une autre piste. Bonne journée.
Merci Nicolas,
Oui, je crois que c’est à cause de ma class AD (AstucesDivi), il faut la changer apparemment. Moi je n’ai pas de AdBLock, donc je ne sais pas… Mais merci à toi pour ce retour.
Bonjour Lycia,
J’adore votre site, merci pour ce que vous faites 🙂
Ma situation est la suivante : j’ai choisi une navigation verticale pour mon site et malheureusement le menu secondaire ne reste pas activé en scrollant comme pour les autres mises en forme des menus. Est-il possible de faire votre méthode pour le menu secondaire en haut de page ? Et si oui, n’y a t-il pas des modifications de code à effectuer (ex : main-header…) ?
Merci pour votre aide.
Salut Annabelle et merci. Effectivement, il faudrait tester en modifiant le code ce doit être possible. Il faudrait que je trouve le temps de le faire et de mettre l’article à jour. Tu parles du menu secondaire avec numéro de téléphone, icônes sociaux, etc ?
Bonjour,
Merci pour ta réponse. Oui exactement, je parle bien de ce menu là.
Si tu trouves la solution, ça serait super ! Merci beaucoup. Bonne journée.
Bonjour !
Merci pour vos tutos, cela me sauve souvent la vie !
J’ai un petit souci, j’ai tenté le sticky menu en mettant du code, et pour une raison obscure ça ne fonctionnait pas. J’ai donc utilisé les pluggins proposés (j’ai testé les deux), le menu s’accroche bien en haut mais tout mon contenu passe par dessus en scrollant ! Pourtant j’ai bien mis le z-index à 9999.. donc je ne penses pas que ce soit ça.
Vous auriez une idée ? 🙂
Salut Astrid. Je ne sais pas trop d’où ça pourrait venir. Il faudrait inspecter le code pour voir. Sinon tu peux faire un menu Sticky avec le Thème Builder, facilement et sans ajout de code. Il faudrait que je mette à jour le tutoriel
Bonjour, un petit bug sur mozilla avec Adblocker, et autre si vous nommez la id css : admenu et la class css adheader, les bloqueurs de pub vont bloquer votre menu(invisible). (ad c’est pub en anglais). donc nommez plutôt vos class et css en Mymenu et Myheader. N’oubliez pas de changer aussi dans le code javascript :
window.onscroll=function(){myFunction()};var Myheader=document.getElementById(« Mymenu »),sticky=Myheader.offsetTop;function myFunction(){window.pageYOffset>sticky?Myheader.classList.add(« sticky »):Myheader.classList.remove(« sticky »)}
Ça marche pour même avec adblock active
Oui merci Alchimachine, tu n’e pas le seul à l’avoir remarqué. Il faut que je mette à jour cela
Bonjour Lycia, et merci pour tout ce travail. Connais-tu la solution la plus pratique pour faire en sorte que la barre de menu disparaisse quand on scrolle vers le bas et réapparaisse quand on scrolle vers le haut ? Bonne journée
Hello Boromiz, cette option est native dans Apparence > Personnaliser.
Bonjour Lydia,
Le menu flottant ne se voit pas sur du côté de mon client (sur plusieurs supports)…est-ce que quelqu’un à déjà eu ce cas de figure, avec une piste pour débloquer svp ?
Hello Bout. Essaye de changer la valeur en pixels, ça vient peut-être de là
Bonjour et merci beaucoup pour ce tuto. Je dirais que chez moi ca fonction à 95% 🙂
Petit soucis, j’ai un petit « jump » du menu lorsque je scroll vers le bas. Ca manque de fluidité et je trouve que ca perturbe un peu l’expérience du site.
Est-ce que tu sais ce que je pourrais faire?
Merci d’avance.
Je vais bientôt mettre à jour cet article avec une autre façon de le faire…
Bonjour
J’ai un petit souci. Lorsque la page ce charge et que je clique sur le menu burger, les liens de pages du menu ne s’affichent pas.
Il s’affiche uniquement lorsque je scroll et que je clique une nouvelle fois sur le menu.
Puis lorsque je reviens dans la position d’origine soit en haut de page, les liens de page du menu burger disparaissent de nouveau ..
Quand j’inspecte la page, les liens du menu sont bien présents dans le code mais invisible sur le site.
D’où peut provenir le problème ?
Merci d’avance
Je vous transmets le lien du site en question qui est encore en production : https://www.taxisofast.com
Salut Traoré ! Dans les réglages de ton menu tu as dû paramétrer la même couleur de police que celle de ton arrière plan. Regarde bien les réglages, il y a deux niveaux de menu, un en haut et un au scroll, c’est le premier où tu dois changer la couleur de police.
Bonjour,
Merci pour ta réponse! Alors j’ai mis en application ce que tu m’as dit mais le problème persiste. Quand je scroll et que je reviens en haut de page le menu déroulant disparaît.
Par contre lorsque je retire le logo du Menu il n’y a plus de problème. Tu peux t’en rendre compte sur ces 2 pas :
Page sans logo :
https://www.taxisofast.com/business
Page avec logo :
https://www.taxisofast.com/privatisation
Salut Traoré, bon ben on dirait que tu as supprimé totalement le logo. Ça a l’air de marcher ?
bonjour à tous,
Cela à fonctionne pour moi, merci pour le tuto.
Juste un petit soucis quand je suis en mode builder ma section menu n’apparait pas.
Y-a t-il une solution pour palier à cela ?
Bonsoir,
Alors oui finalement j’ai utilisé le sticky on scroll de Divi, car le problème persistait lorsqu’il y avait le logo.
Merci !
OK Traore
Bonjour Lycia,
Je me permets un autre commentaire (j’ai déjà posé une question concernant les ancres).
Mon soucis ici (qui ne semble pas avoir été rencontré par d’autres) c’est qu’après avoir un peu tripatouillé pour installer la meilleure solution (dans mon cas installation du plugin « Sticky Menu (or anything!) on scroll »), ça marche très bien « en partie haute » mais arrivé au footer, celui-ci passe par dessus le header…
Une idée du cafouillage qui pourrait provoquer ça?
Merci pour ta réponse!
Il faut que je mette l’article à jour, mais tu peux faire cela nativement et simplement avec Divi (sans aucun plugin). Il suffit de créer un Header Global depuis le Theme Builder et de le rendre Sticky avec des options qui sont offertes par Divi. Tiens, c’est d’ailleurs l’une de mes leçons en vidéo que je propose dans ma formation Divi, où je donne encore plein d’autres astuces de ce type…
Oh, merci Lycia, c’était tout bête en fait! Je me suis prise la tête pour rien.
Bonjour, j’ai créer un bouton-sticky dans le ccs de divi. Tout fonctionne bien sauf sur les téléphones.
Merci de votre éclairage.
Alain
Alain, c’est possible que le sticky ne fonctionne pas sur mobile. Mais bizarre quand même