
I know you're upset. It is a question that I often ask in comment, by email or during training: Why does Divi display taped images (redacted images)?
It's true, sometimes the images you use are Retailed, trimmed, squared... This is often the case with highlighted images (the thumbnails on the front page).
For example, if you're running a blog on Pinterest, you'd like to have your images on the front page in portrait format and not in landscape...
You will see in this article how Stop cropping images in Blog, Portfolio and Gallery modules.
1 - Images in Divi, image size, ratio...
The developers of Elegantthemes encoded Divi with different image sizes. Depending on the modules you use, images are displayed with a certain predefined size.
You can change the various sizes following this full guide on images of Divi. You will understand that everything is a story of size and ratio.
But if:
=> You do not want to set a specific size for your images.
=> You just want to display the images with their original size and ratio, as you imported them into your library.
So the explanations that follow are a good alternative...
Discover how to stop spinning images in Divi...
2 - A few lines of code to stop cropping Divi images
If you want to apply the tutorial tips, you will need to add a few lines of code to change the original Divi code, for this there are two solutions:
- You use a child theme: just add the code to the file functions.php your child theme. If you don't have one, you can download the Child theme for Divi here.
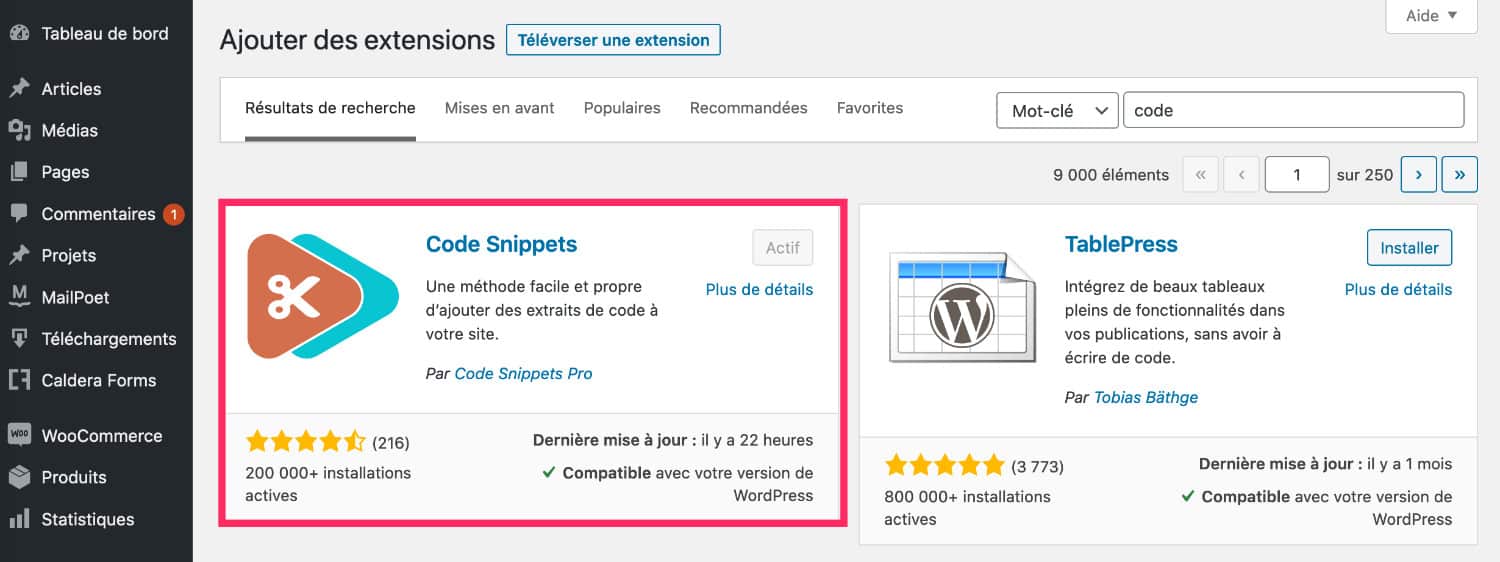
- You do not use a child theme: No worries! If you do not use a child theme and it seems too complicated, there is a much simpler alternative. Install and activate the Snippet Code extension. It is free and will allow you to add your PHP code safely.
And in any case, never change your Parent Divi Theme. Go through any of the above solutions.
3 - Images in the Blog module
The Divi Blog module is a useful module for show the latest blog articles. You will need it to create the blog page.
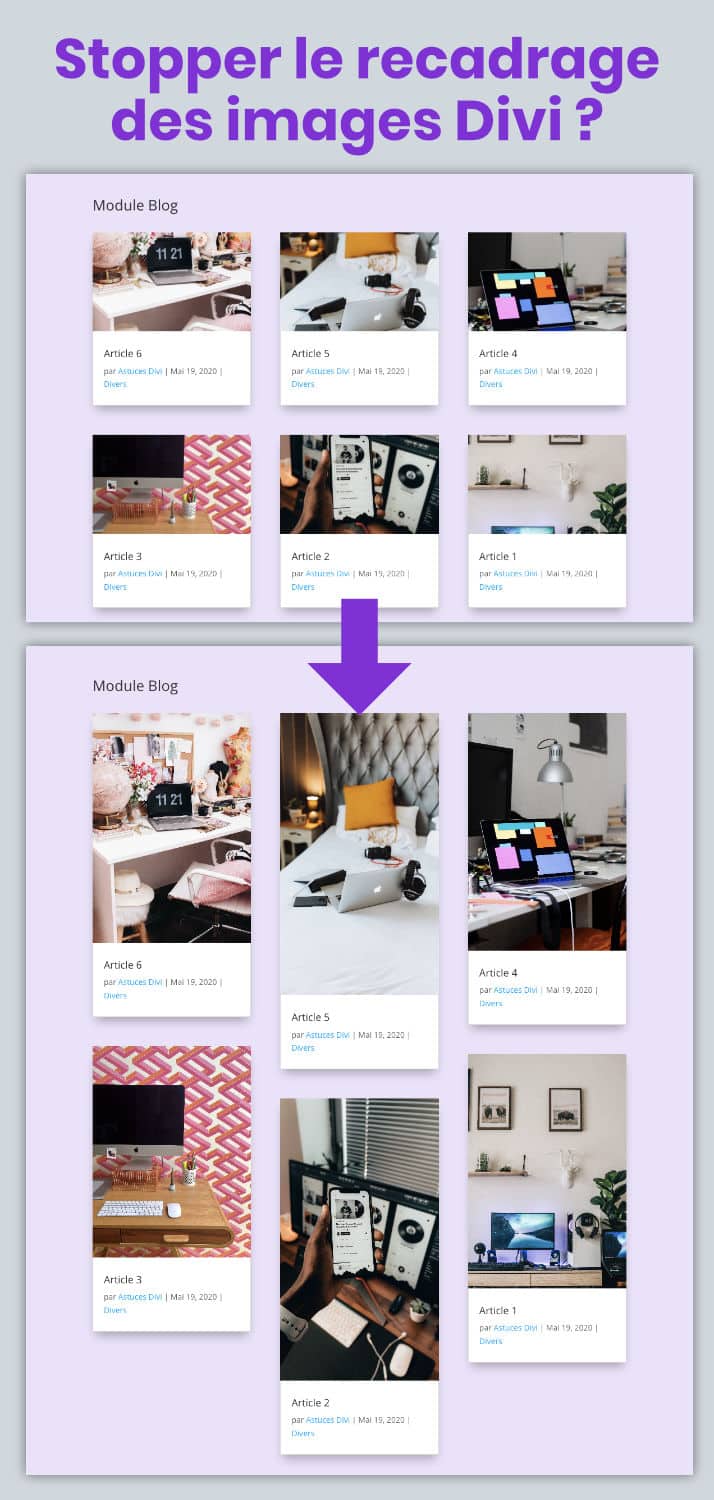
But you must have noticed that the "Advanced images" (the thumbnails) are trimmed. Rrrrrr!
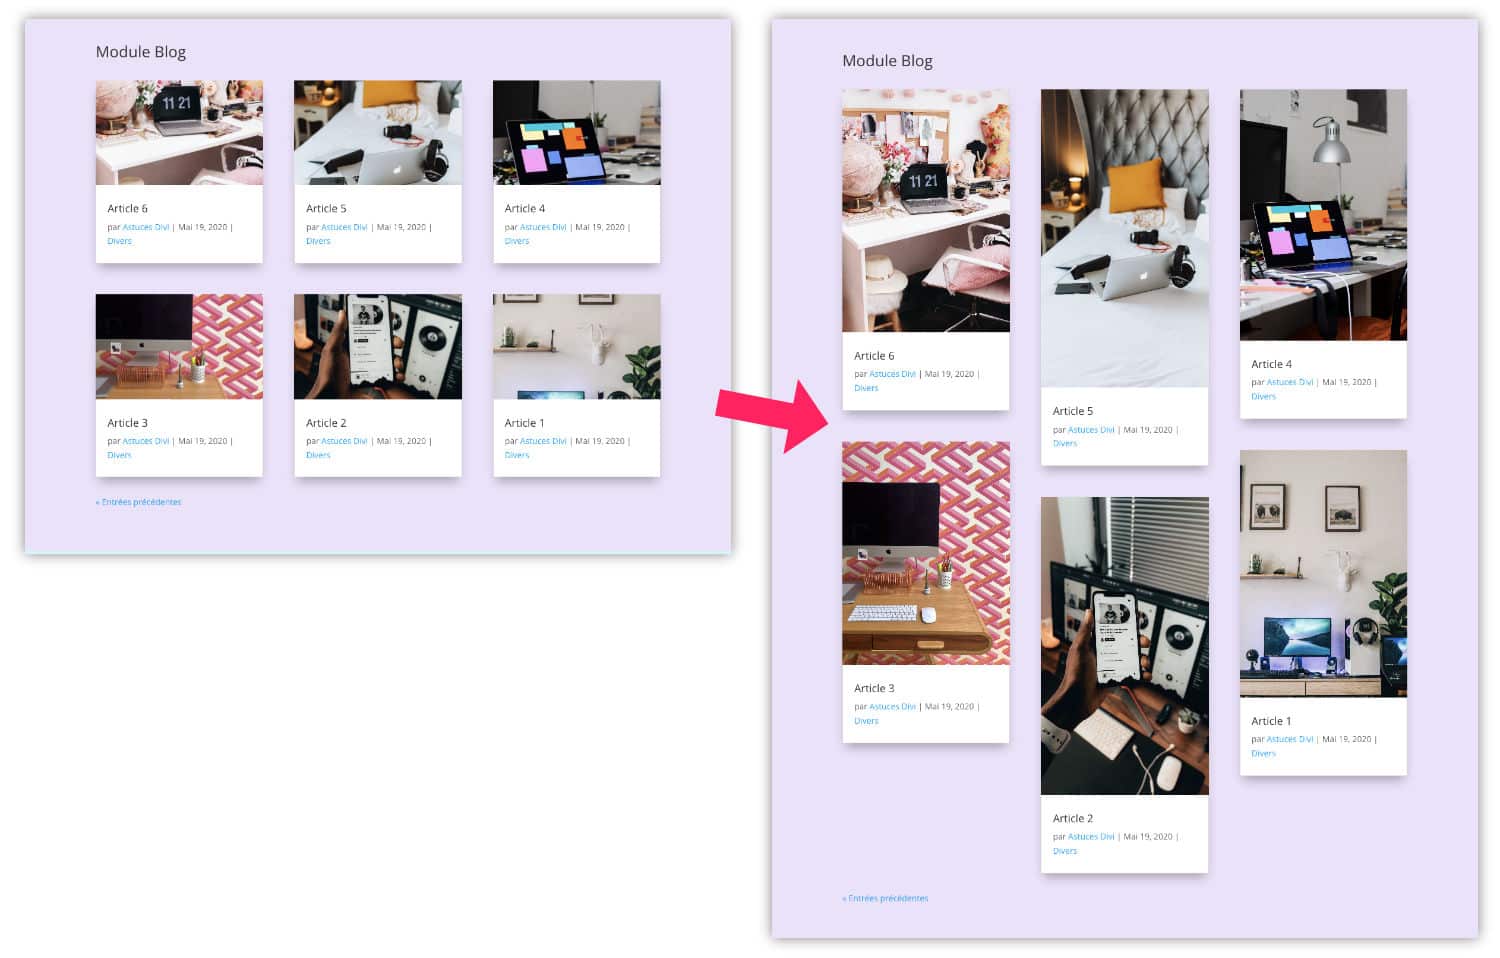
On the above screenshot, you can see, on the left, that the Blog module displays split images. However, the images put forward that were used are very pictures in portrait format.
The thumbnails of the Blog module (Grille mode or "Diapo" mode) use a portrait format 400px * 250px – or one ratio of 16:10.
This is why all the larger images than 400px and more 250px high are automatically re-set.
And that's why your portrait or square images are detailed.
So that your images are no longer re-set and that they keep their ratio and original size, just increase the thumbnail size values.
By placing the size at 9999px, you are sure that your images will never be redone (unless you import an image of 10,000px... but it is impossible!).
// Begin stop cropping featured image in Divi Blog Module

function ld_blog_crop_image_width($width) {
	return 9999;
}
function ld_blog_crop_image_height($height) {
	return 9999;
}
add_filter( 'et_pb_blog_image_width', 'ld_blog_crop_image_width' );
add_filter( 'et_pb_blog_image_height', 'ld_blog_crop_image_height' );

// End stop cropping featured image in Divi Blog Module
Here, copy and paste the above code into the file functions.php of your child theme or in a new snippet extension Snippet code.
Then just refresh the page and thumbnails of your blog module will show the original size, without cropping.
In addition, if you use different image heights, your blog module will display a Masonry effect (masonry) very nice...
Do you know you can test Divi for free? See you on this page and click on "TRY IT FOR FREE"
3 - Images in the Portfolio module
For the Portfolio moduleYou can do the same. So, the thumbnails of your Divi projects will no longer be redone.
The Portfolio module in Grid mode uses the dimensions of 400px * 284px. As with the blog module, these values must be increased so that thumbnails are not "cut".
Here is the code to add:
// Begin stop cropping featured image in Divi Portfolio and Filterable Portfolio

function ld_portfolio_crop_image_width($width) {
	return 9999;
}
function ld_portfolio_crop_image_height($height) {
	return 9999;
}
add_filter( 'et_pb_portfolio_image_width', 'ld_portfolio_crop_image_width' );
add_filter( 'et_pb_portfolio_image_height', 'ld_portfolio_crop_image_height' );

// End stop cropping featured image in Divi Portfolio and Filterable Portfolio
Here's the result:

After adding this code, just refresh your page.
Note that this code also works for the portfolio module Filterable.
4 - Images in the gallery module
The Divi Gallery module uses the same display sizes as the Portfolio module: 400px * 284px.
As with the other 2 modules, you need to increase these values so that the images of your gallery display the actual size...
Here is the code to add to the file functions.php of your child theme or in a new snippet extension Snippet code :
// Begin stop cropping featured image in Divi Gallery Module

function ld_gallery_crop_image_width($size) {
	return 9999;
}
function ld_gallery_crop_image_height($size) {
	return 9999;
}
add_filter( 'et_pb_gallery_image_width', 'ld_gallery_crop_image_width' );
add_filter( 'et_pb_gallery_image_height', 'ld_gallery_crop_image_height' );

// End stop cropping featured image in Divi Gallery Module
And here's the result:
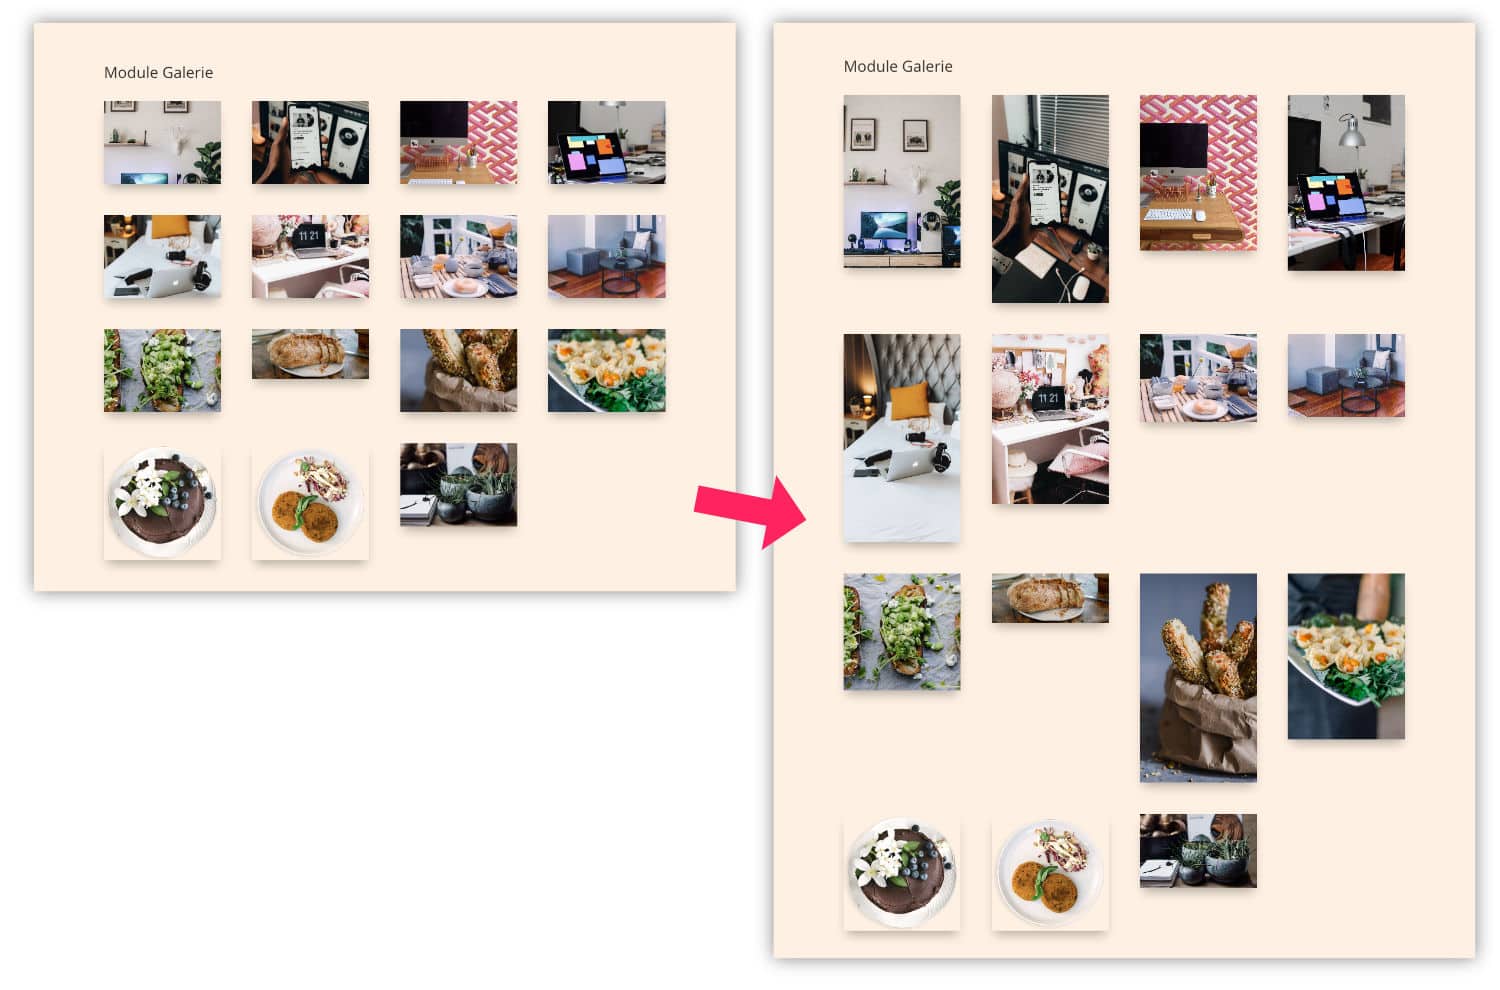
As you can see on this screenshot, the images are no longer redone and display their Original ratio.
Don't delay! Discover the theme Divi here !
5 - Recap: no image scratched in Divi
The last 3 chapters offer you the individual code for each module (Blog, Gallery, Portfolio). This is ideal if you need to change the size of the images only on one of the 3 modules.
However, if your wish is to Remove cropping of images On these 3 modules, you can then use the code below:
// Begin stop cropping featured image in Divi Portfolio + Blog + Gallery

function ld_stop_crop_image_width($width) {
	return 9999;
}

add_filter( 'et_pb_portfolio_image_width','ld_stop_crop_image_width' );
add_filter( 'et_pb_gallery_image_width','ld_stop_crop_image_width' );
add_filter( 'et_pb_blog_image_width', 'ld_stop_crop_image_width' );

function ld_stop_crop_image_height($height) {
	return 9999;
}

add_filter( 'et_pb_portfolio_image_height','ld_stop_crop_image_height' );
add_filter( 'et_pb_gallery_image_height','ld_stop_crop_image_height' );
add_filter( 'et_pb_blog_image_height', 'ld_stop_crop_image_height' );

// End stop cropping featured image in Divi Portfolio + Blog + Gallery
For example, if you use the extension Snippet code to add your code, this will allow you to add only one snippet.
Finally, if you wish get thumbnails in square format, read this article.

Bonjour,
J’ai bien collé le code dans le fichier functions.php de mon thème enfant, mais les images à la une restent toujours rognées… y a t il d’autres reglages a effectuer dans le backoffice?
MErci par aavance
E
Salut Zazvi, tu dois peut-être régénérer les miniatures (regenerate thumbnails) ou bien tu n’as pas agit sur le bon code, à savoir celui destiné à modifier les images de mise en avant. Il faut revérifier. Courage !
Bonjour,
Et merci pour ce snippet dont je rêvais depuis longtemps. J’ai modifié le fichier functions php du thème enfant et ça fonctionne : je l’ai appliqué à un module galerie et l’effet est tellement plus beau pour montrer des gravures de formats différents !
Mais pour que ce soit encore plus beau, y a t-il un moyen pour que l’espace séparant les vignettes en hauteur soit constant ? Actuellement, les espaces en hauteur sont réglés sur la plus haute image de chaque rangée et cela crée des blancs inesthétiques ou alors il faut ranger les images par taille, ce qui ne sera pas toujours possible. Je travaille en local, je peux vous faire une copie d’écran éventuellement. Mille merci pour vos astuces !
Salut Sandrine. Je serai en face du problème je pourrais peut-être t’aider mais là c’est un peu à tâton. Du coup il faut voir si des options existent pour ça ou s’il faut ajouter quelques lignes de CSS
Thank you so much! I had inserted or scripted directly into. function.php but every time I updated Divi the images obviously came back cropped! Finally a definitive solution thanks to this post and the Code Snippets plugin!
Testé pour les modules blogs et marche parfaitement, merci !
Super !
Thanks!! a lot!!
Bonjour,
Merci pour ce tuto
Dans votre exemple, pour le module blog, les elements se mettent les uns en dessous des autres proprement un en effet comme une galerie masonry…
Tandis que pour les galeries normales et les portefeuilles, l’affichage n’est pas tout à fait le même… car ils semblent tous dans la même ligne… je trouve ça horriblement horrible, n’avez-vous pas une solution pour les afficher en masonry comme pour le module blog ?
Salut Maxime, non je n’ai pas de solutions, il faudrait chercher comment faire…
Cool !
Hola! Solución para este problema pero con los módulos de Tienda? (WooCommerce)
No quiero usar las miniaturas, ya que pierden calidad, quiero usar las imagenes originales.
Hola Marcelo !
¿Ha indicado los tamaños de sus imágenes para los productos en la pestaña Apariencia > Personalizar > WooCommerce?
Perfect exactly what I was looking for.
Great !
Excellent article, worked great using the Code Snippet plugin thank you! Much faster and easier than creating a child theme.
Cool !
Cela fonctionne parfaitement dans le module blog. Merci ! Par contre comment faire pour que dans la page de l’article l’image à la une qui figure en tête de l’article ne soit pas rognée ?
Merci Lycia !
Bonjour Lycia,
merci pour ces informations précieuses et claires!
J’ai un problème qui me semble basique mais sur lequel je bloque depuis de nombreuses heure:
Sitôt que j’empêche le cropping, cetraines images de mon portfolio deviennent floues (pas dans le visual builder, seulement sur le site)mes images ont toutes une taille similaires(environ 400×600) As tu une piste qui pourrait m’aider? j’ai déja regeneré mes thumnails. C’est peut-être un problème classique …
Ah … tu as essayé d’importer des images de 800×1200 plutôt ?
Bonjour,
Merci pour cette astuce !!
Ici le code fonctionne très bien également, mais je viens de me rendre compte que sur Chrome, l’aperçu des image est étiré, comme si on avait déformé les images manuellement.
Avez-vous une solution à ce souci ?
(J’ai intégré le code relatif aux portefeuilles dans l’extension Code Snippets).
Merci d’avance 🙏
Laura
Merci Laura, non je n’ai pas d’idée. Avez-vous vidé le cache ?