
I propose a manual, step by step, to define the design of your Divi article template. Here is what you will get by following this tutorial:
Thanks to feature of Theme Builder, Divi allows you to customize all templates of your site (all models of the Divi Theme).
We had previously seen how customize shop page and how Create a Product Sheet Template... It is time to tackle the design your blog articles !
1 - What is an article template?
One "template" is simply a "model".
This means that creating a new model - whether for articles, pages, products etc. - apply to all content using this template.
So by creating a Divi article template, all your blog articles (those already published and the next) will use the same design. You create the model only once and all your articles will have the same composition, it is the purpose of a "template".
This is only possible by using the Theme Builder Since the latter allows to modify the model files of the theme.
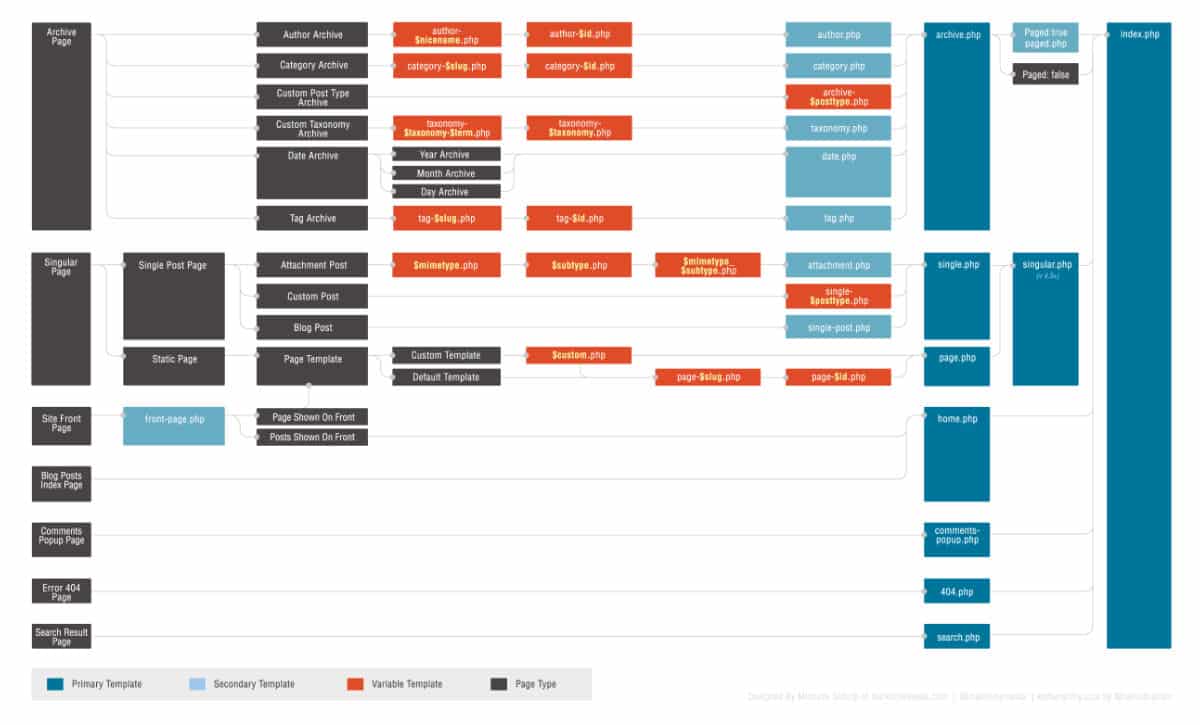
For information, articles generally use the file of the theme named "single.php". So this one will be modified by the builder theme... No more need theme child I don't know how to code!
👉 Découvrez aussi how to create a search page template (search page)
Need to master Divi? Discover my training that accompanies you step by step in the understanding and use of Divi! Learn more about Divi training.
2 - What does a classic Divi article template look like?
If you use the Divi theme "base" (if you can say it like that) and you haven't created it yet model with the Divi Theme Builder, your blog posts should look more or less like this:

On this screenshot, you can see a classic article, written with the WordPress editor (Gutenberg), so an article that does not use the Divi Builder, nor Theme Builder (note that it is still possible to use Divi modules in Gutengerg, without enabling the Visual Builder).
Also read: do not confuse the theme Divi with the Divi Builder.
It's not very glamorous. And I'm nice!
The article consists of the following elements:
- The Header (at the top of the screen) including the main menu and logo (we will not intervene on this part),
- The title of the article,
- Article metadata,
- The Focus Image,
- The content of the article (the text),
- The comments section,
- Sidebar (on the right side),
- The Footer (at the bottom of the screen) including credits and social media icons (we will not intervene on this part either).
Hey!Want to try the Divi theme for free?. Click on "TRY IT FOR FREE"
In the continuation of this tutorial, we will try to revitalize the whole so that the article is more "attractive" and more "design" to finally get a rendering as you could see in the video at the beginning of the article.
3 - Create a Divi article template with Builder Theme
Let's discover the few easy steps to achieve a template for all your items...
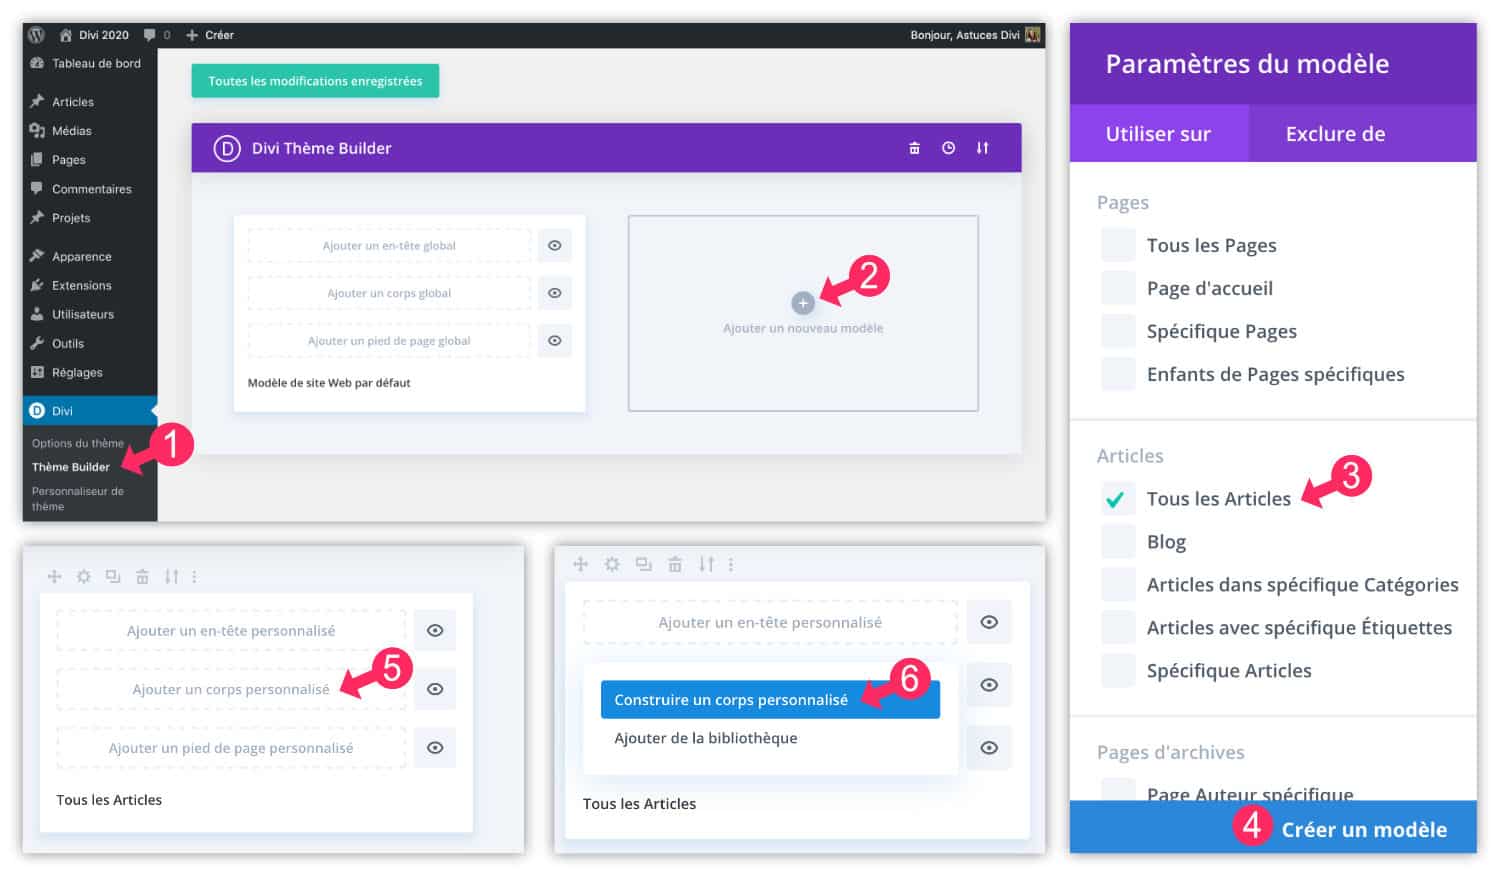
- Go to the tab Divi > Theme Builder
- Click "Add a new model"
- Check the box "All the articles". If you create an article template on an existing site that has many articles, you can also assign this new template to a specific article (an article with few visits, for example). So you can fine-tune the design of this one before assign it to all your articles.
- Validate by clicking "Create a model"
- Click "Add a personalized body"
- Then on "Building a Personalized Body"
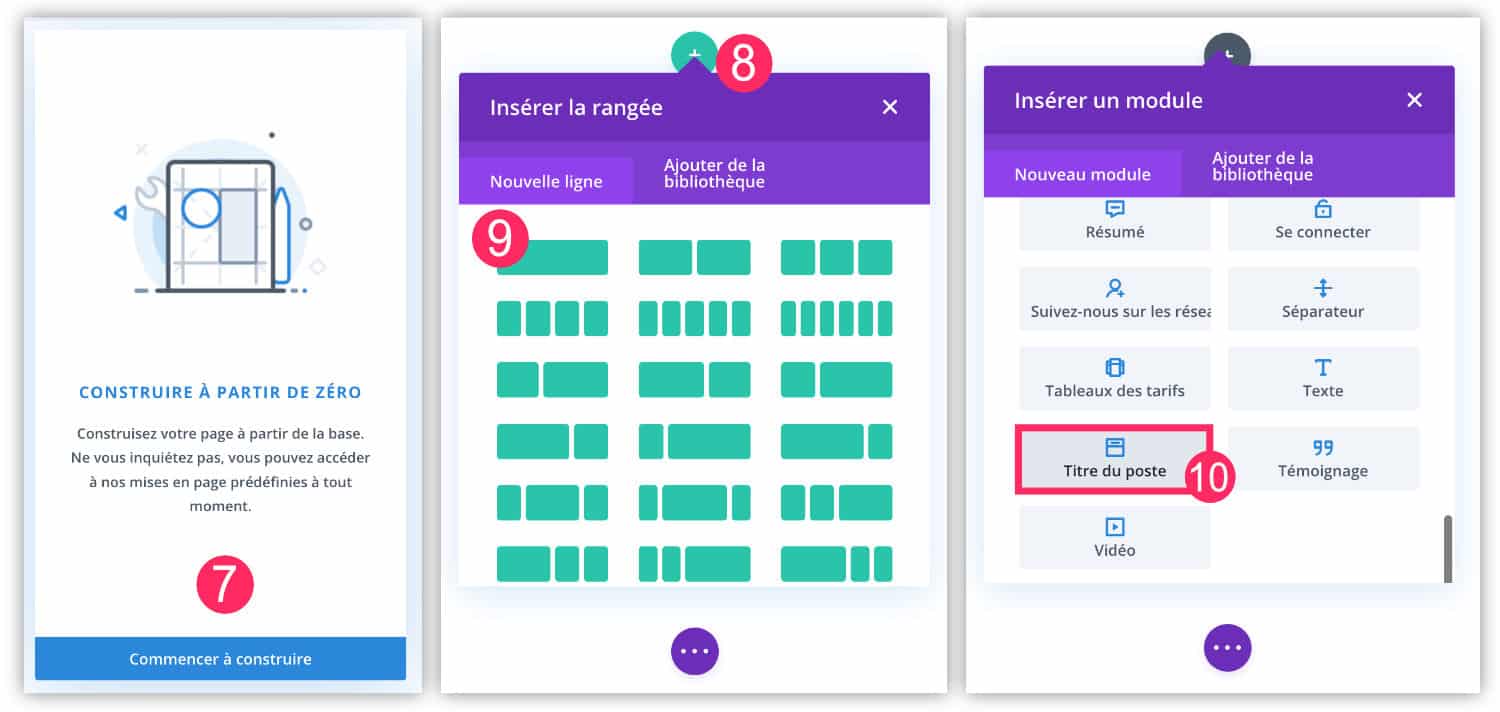
- Choose "Build from scratch"
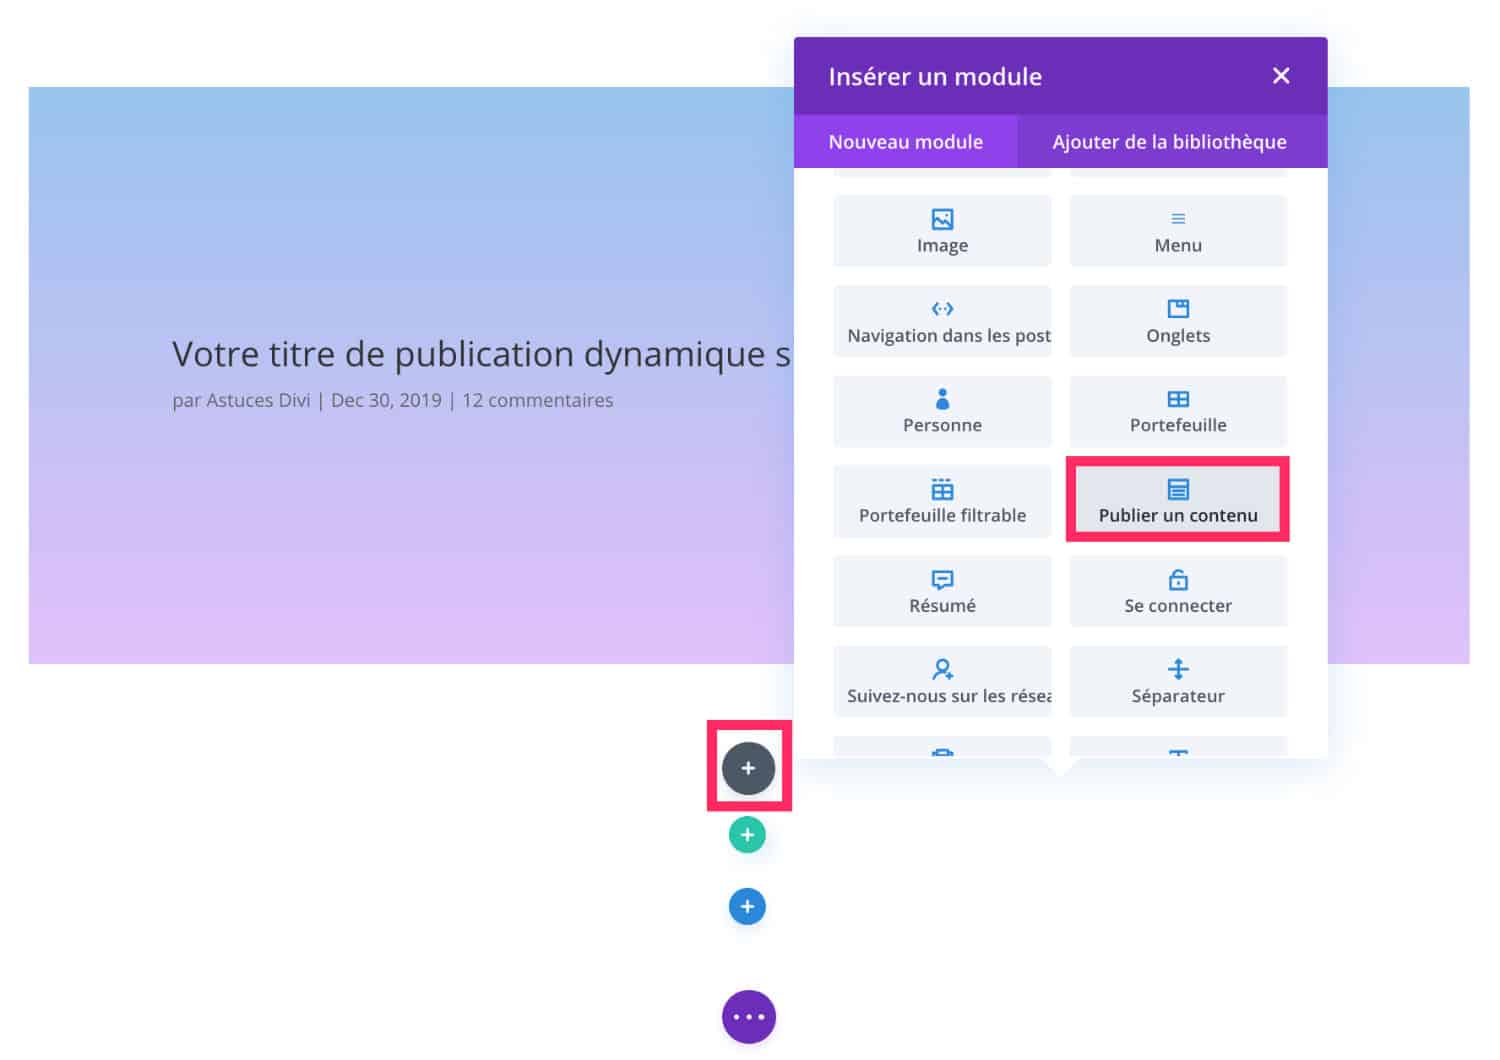
- Click "+"
- Choose a line 1/1
- And start by inserting the module Post Title
We will see this module in detail...
3.1. - Insert the module "Post title"
The Module "Post Title" allows you to add the title of your article to your template. This one is indispensable!
When you insert it, the title is named "Your dynamic publication title appears here". Don't try to change it. As indicated, this is a "dynamic title", this means that each item will use this location to display its title. It doesn't matter if you wrote the article with Gutenberg or with the Divi Builder (from the tab Article > Add). Learn more about dynamic content here.
From tab "Content", the module Post Title offers various display options:

- The title of the article.
- Article metadata.
- The name of the author.
- Date of publication. This will also work if you use the date of updating of the Article.
- The category(s): they do not appear yet but will be clearly visible on the front-end side.
- The number of comments.
- The main image (forward image).
- Associated image position: this option offers 3 different positions for the forward image Your article. You will have a choice between "Title underneath" (image first then title then), "Title above" (title first and then image then) and "Background image of the title". I suggest that you use this last option that offers a much nicer visual than the other two. Thus, by choosing "Background image of the title", the forward image of your article will position itself in the background of the article title.
- Remember to validate and save your changes.
Always in the module settings Post Title and always in the tab "Content", you can go to the section "Fund" to add a color gradient that will position above the forward image.

This semi-transparent color that stands above your image (overlay) will only be visible if you enable the option "background image of the title".
Otherwise, you can activate parallax effect so that the forward image is fixed in the background. It gives a very nice effect!
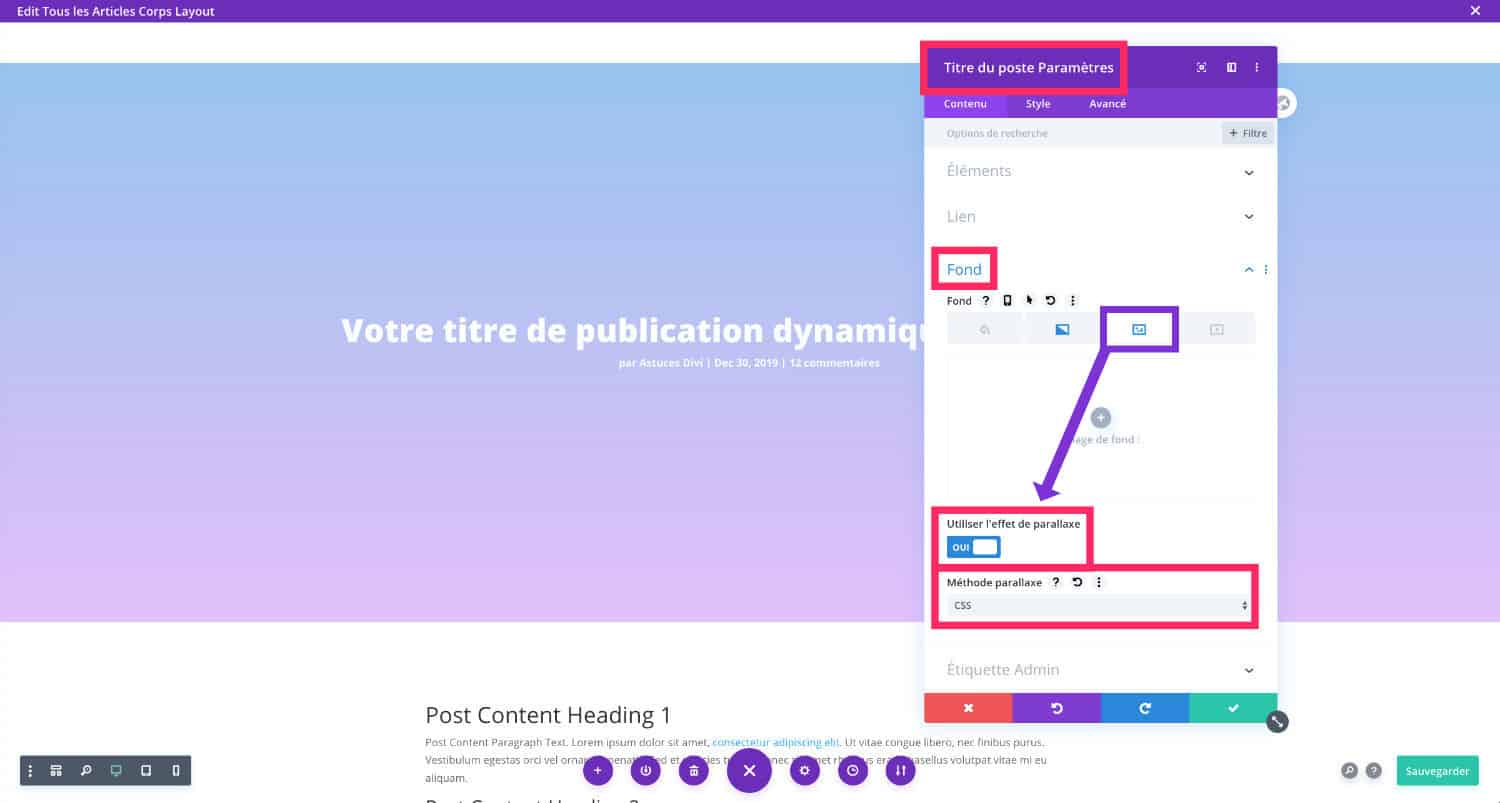
Be careful, if you activate this option, please consider these 2 important things:
- The "parallax" effect and the "overlay" effect are not compatible together (in Divi). You will have to make a choice: either parallax or overlay...
- The parallax effect is not compatible with mobile versions unless you follow this tutorial.
3.2. - Insert the module "Published Content"
The title being set, you need to insert the Module "Publish Content" so that your articles display their content (texts, images, etc.).
This module is very complete and is essential: it must be included in your Divi article template.
For setting, I give you an appointment to the article dedicated to the module "Published Content".
3.3 - Insert the module "Comments"
What would a blog article be without comment form?
However, this module is not indispensable, unlike the module Post Title and "Published Content".
It is up to you to decide whether you want to accept comments in your articles.
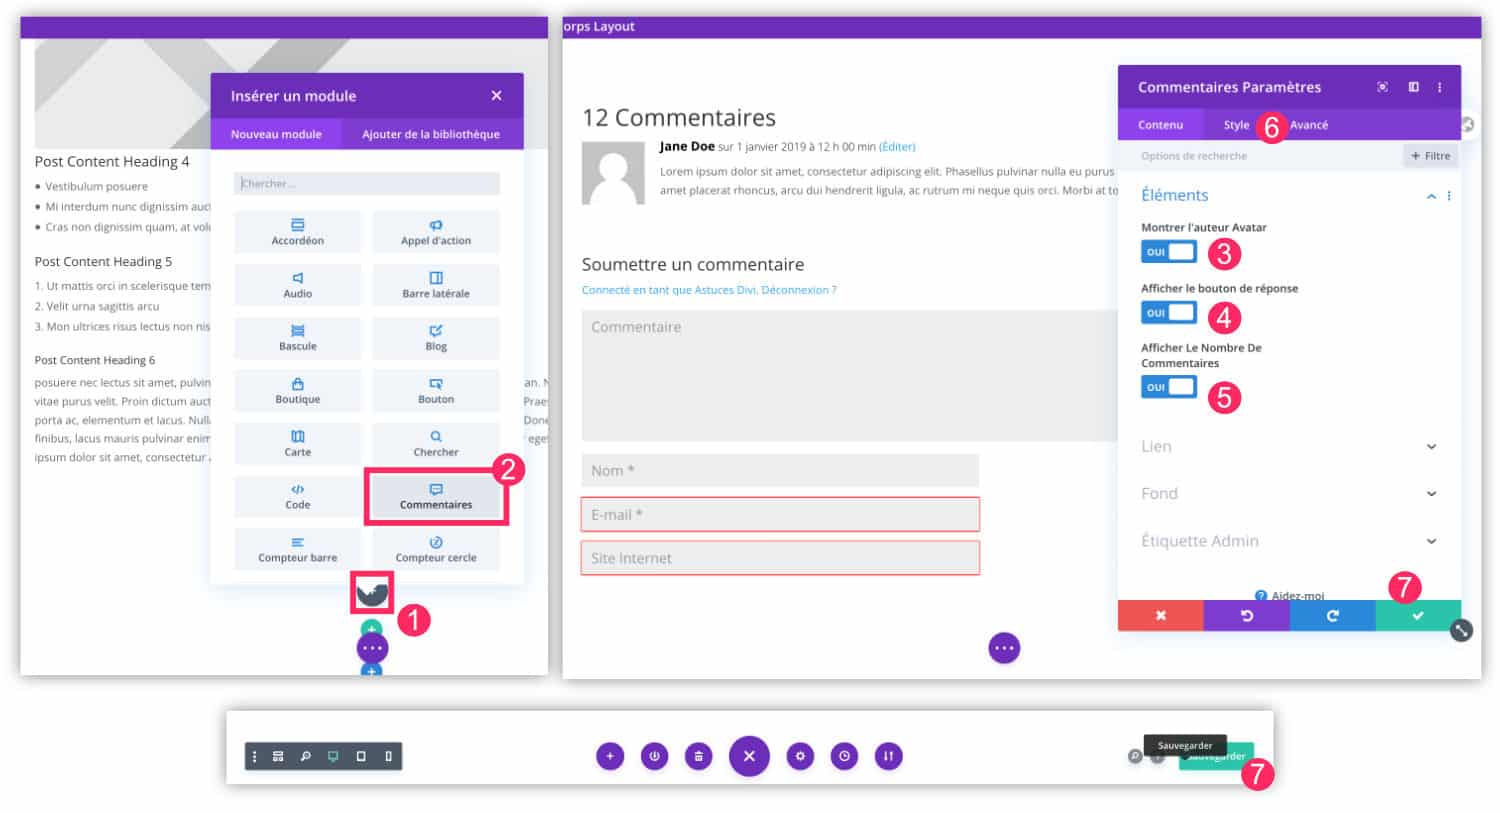
- At the bottom of the article template, click the Grey "+". The latter allows to add a new module within the same "range".
- Insert it module "Comments".
- You can view or not the photo of the author of the comment.
- You can display or hide the "answer" button.
- Display or hide the number of comments.
- Paint the design (police, size, color, etc.) of the "comments" section from the "Style" and/or "Advanced" tab.
- Save your changes.
Also discover how create an error page template 404 !
4 - Paint the design of the article template
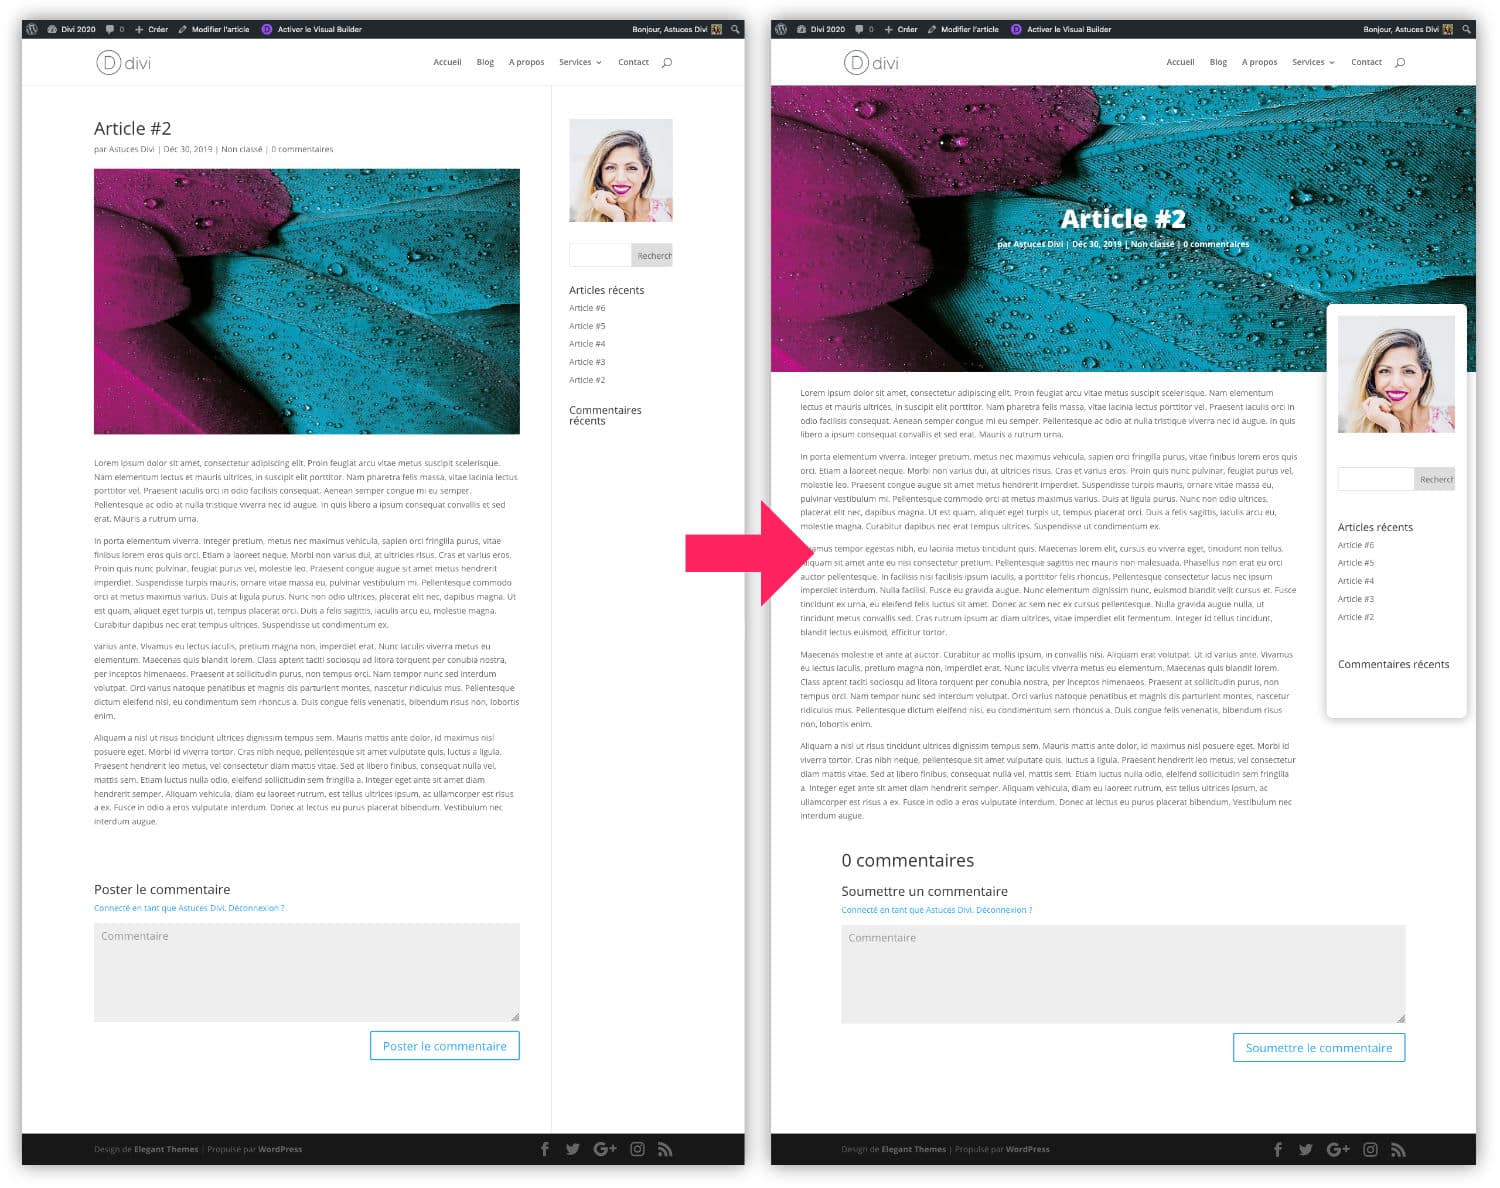
At this stage of the tutorial, your Divi article template should look like this:
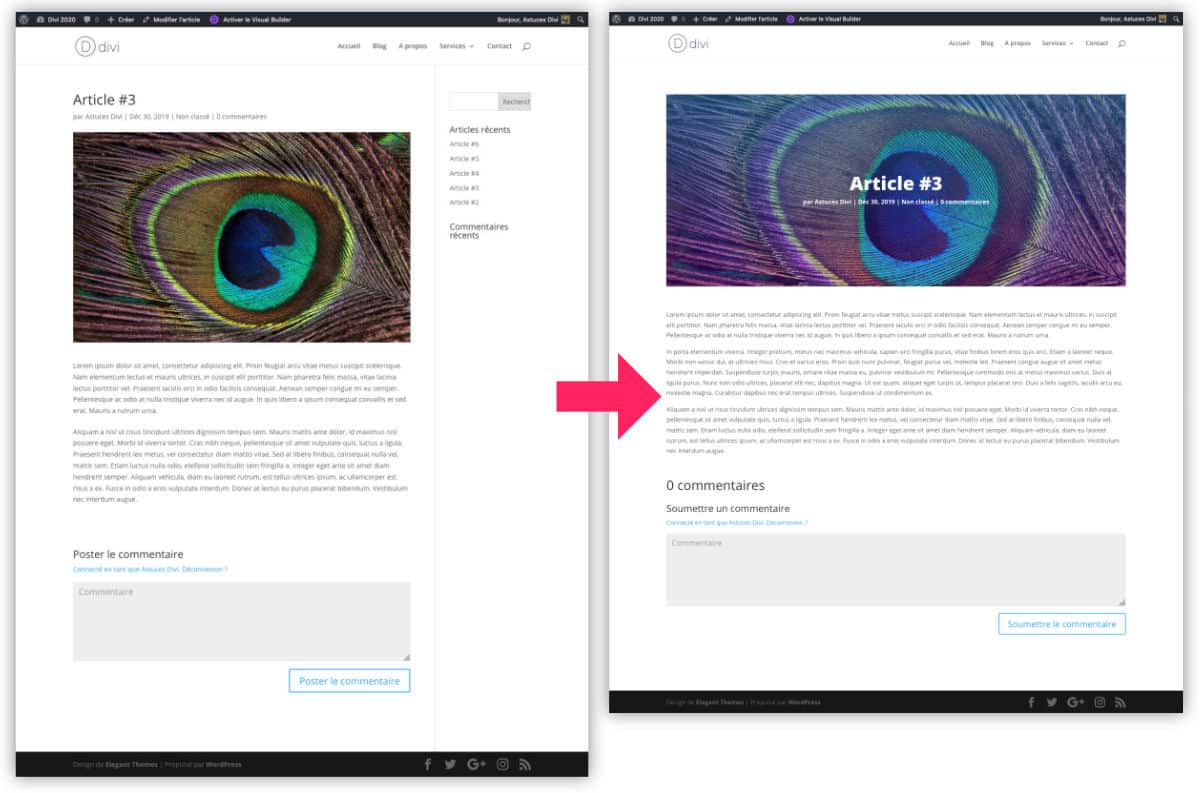
For now:
- Sidebar's gone.
- The content width has expanded.
- The title of the article and metadata appear at the centre of the highlight image.
- A color gradient was applied to the forward image.
- The comment form has been slightly modified.
4.1 - Pass image and title in full width
For an article design a little more "in the air of time", we could enlarge the focus image so that it has a width of 100%.
To do this, we will have to enlarge the "box" in which this image is located: we will act on the "range" (green box).
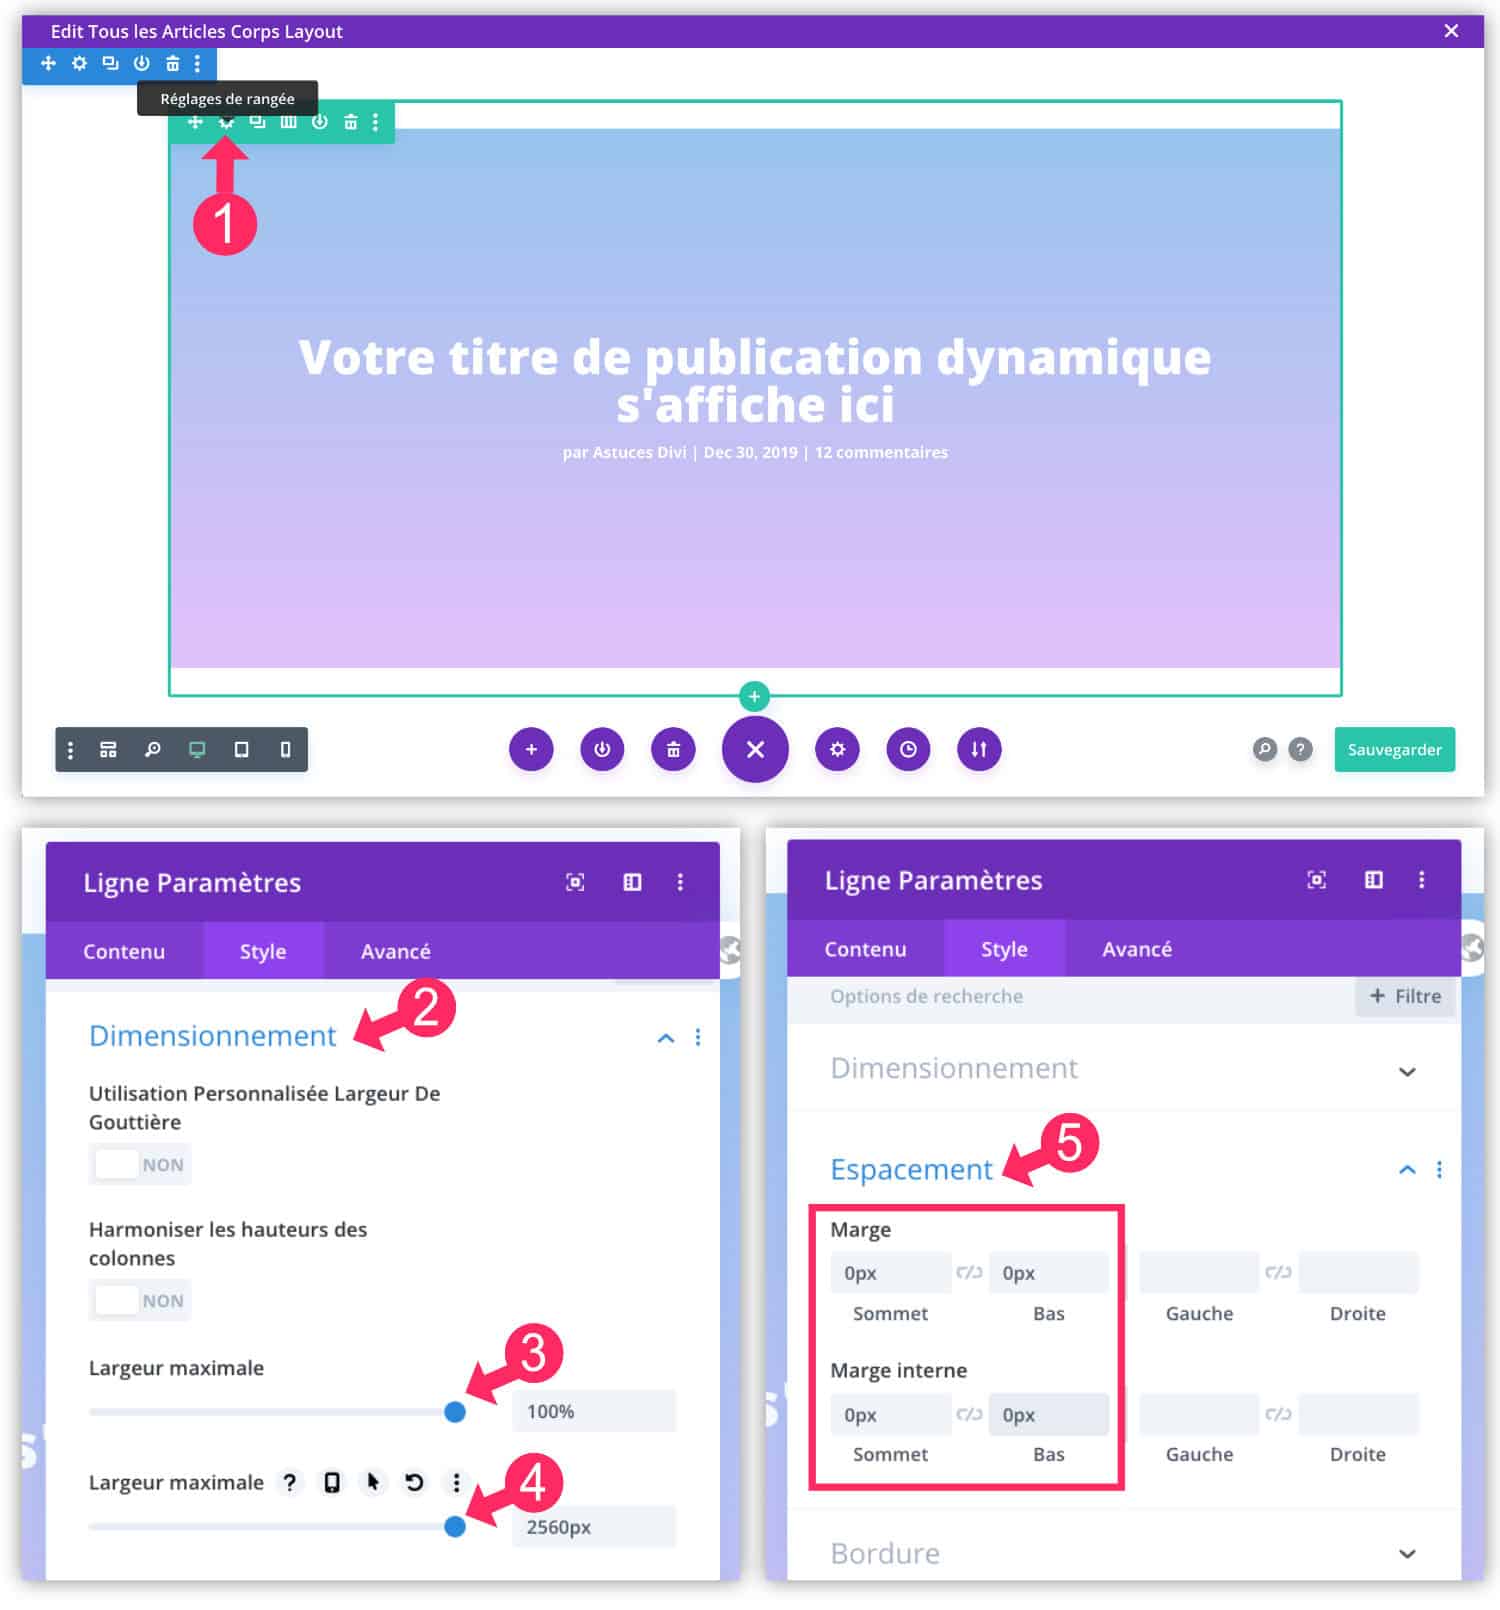
- Click on the toothed wheel to open the "Settings of the row".
- Go to the tab Style > Dimensioning
- Place maximum width 100%
- Same for the second value: push the cursor to the maximum.
- Go to the tab Style > Spacing to place internal margins and margins at 0px.
At this point, the forward image must be 100% and it must touch the right and left edges of your screen.
However, a margin may persist at the top of the forward image (between the image and the main menu). If so, you can correct this using the following CSS code tip:
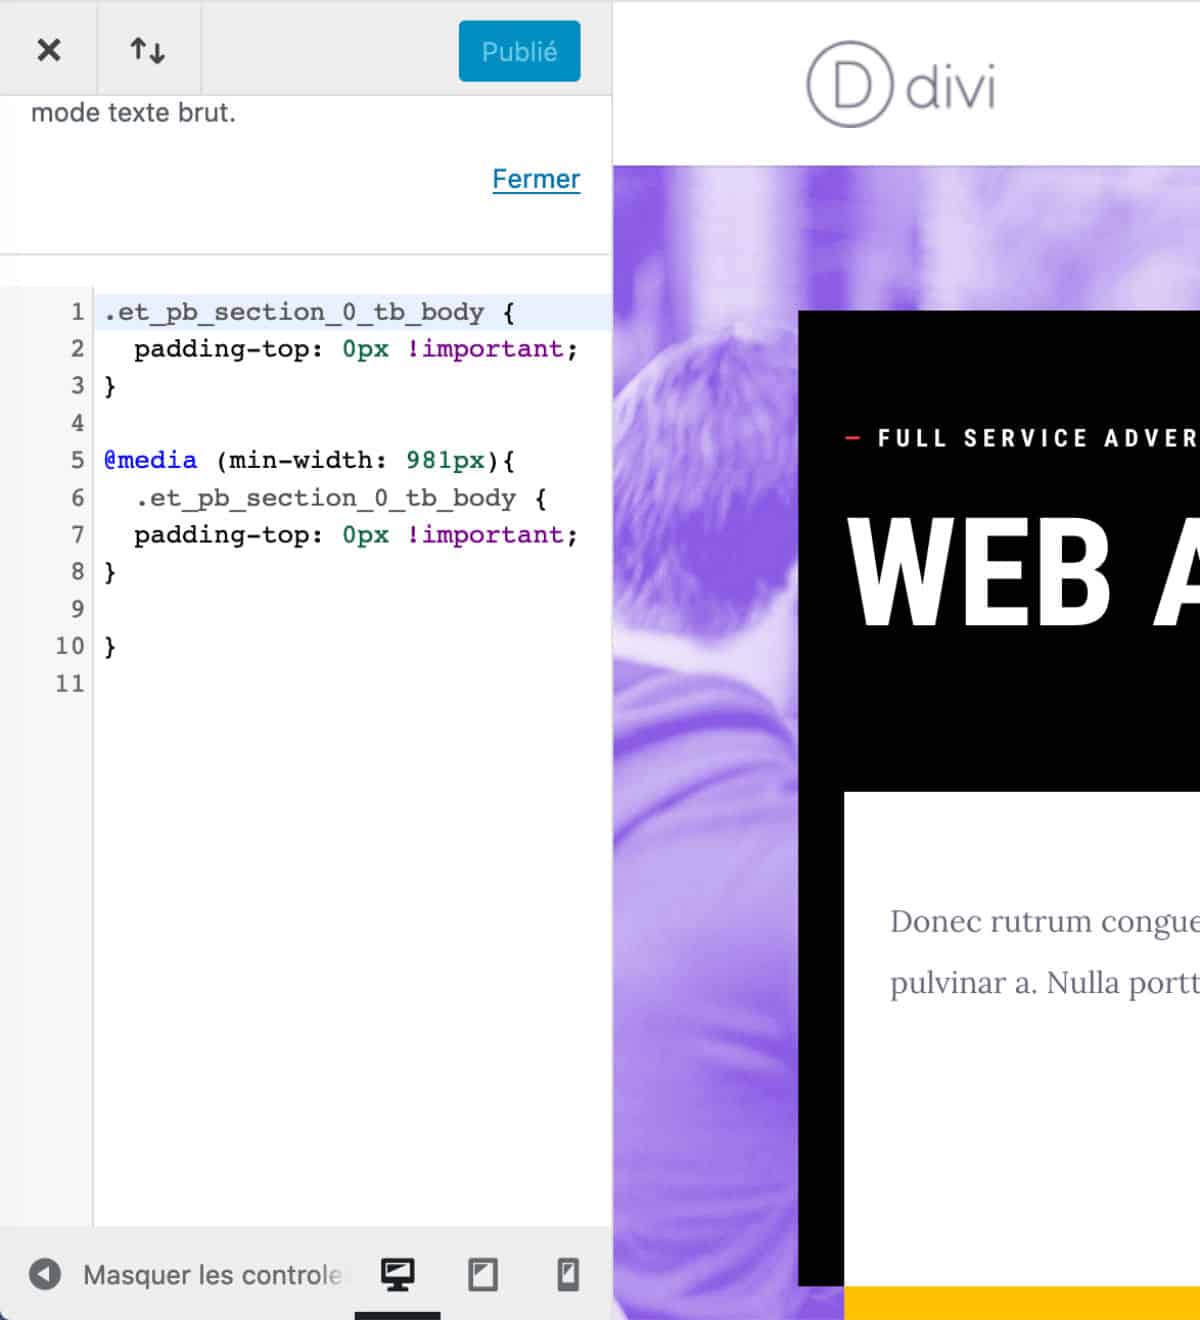
Go to the tab Appearance > Customize > Additional CSS and paste the code below:
.et_pb_section_0_tb_body {
	padding-top: 0px !important;
}

@media (min-width: 981px){
	.et_pb_section_0_tb_body {
	padding-top: 0px !important;
}
}
This should correct this "resistant" margin and the highlight image of your article should touch the header of your site.
Discover how to add custom code in Divi...
4.2 - Adjust the width of the article content
Same for the width of the content of your site. You could expand the container so that the text of your articles has a smaller lateral margin.
This is optional but if you want to act on these margins, here is the procedure:
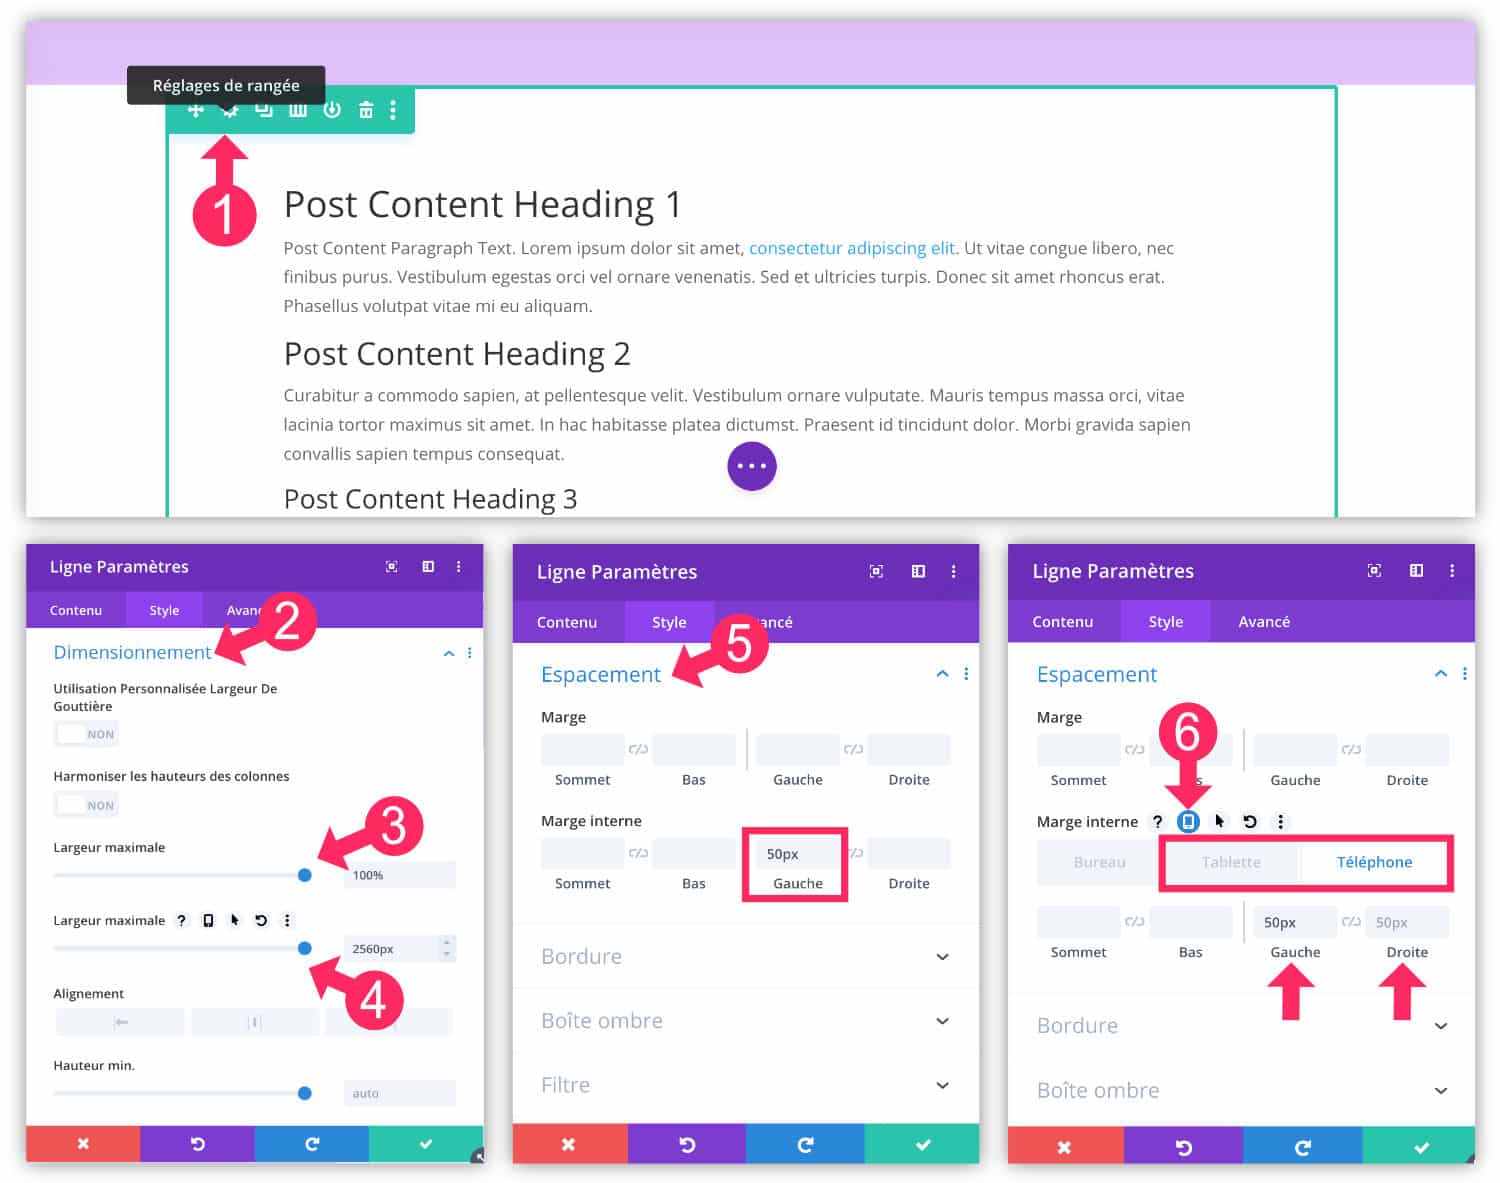
- Open the "Settings of the row" which contains the module "Published Content".
- Go to the tab Style > Dimensioning
- Place the maximum width cursor on 100%
- Drag the second cursor to the maximum
- Go to the tab Style > Spacing to add an internal left margin of 50px. This will prevent the text of your article from being completely "pasted" to the left of your screen.
- Do not forget to set the mobile and tablet versions by adding, this time, the internal margin to the left AND right.
- Save your changes.
4.3 - Add a sidebar Divi
Another fairly common element could be added within your Divi article template: a sidebar or sidebar.
We find this very often on blogs, even if the tendency tends to make it disappear completely...
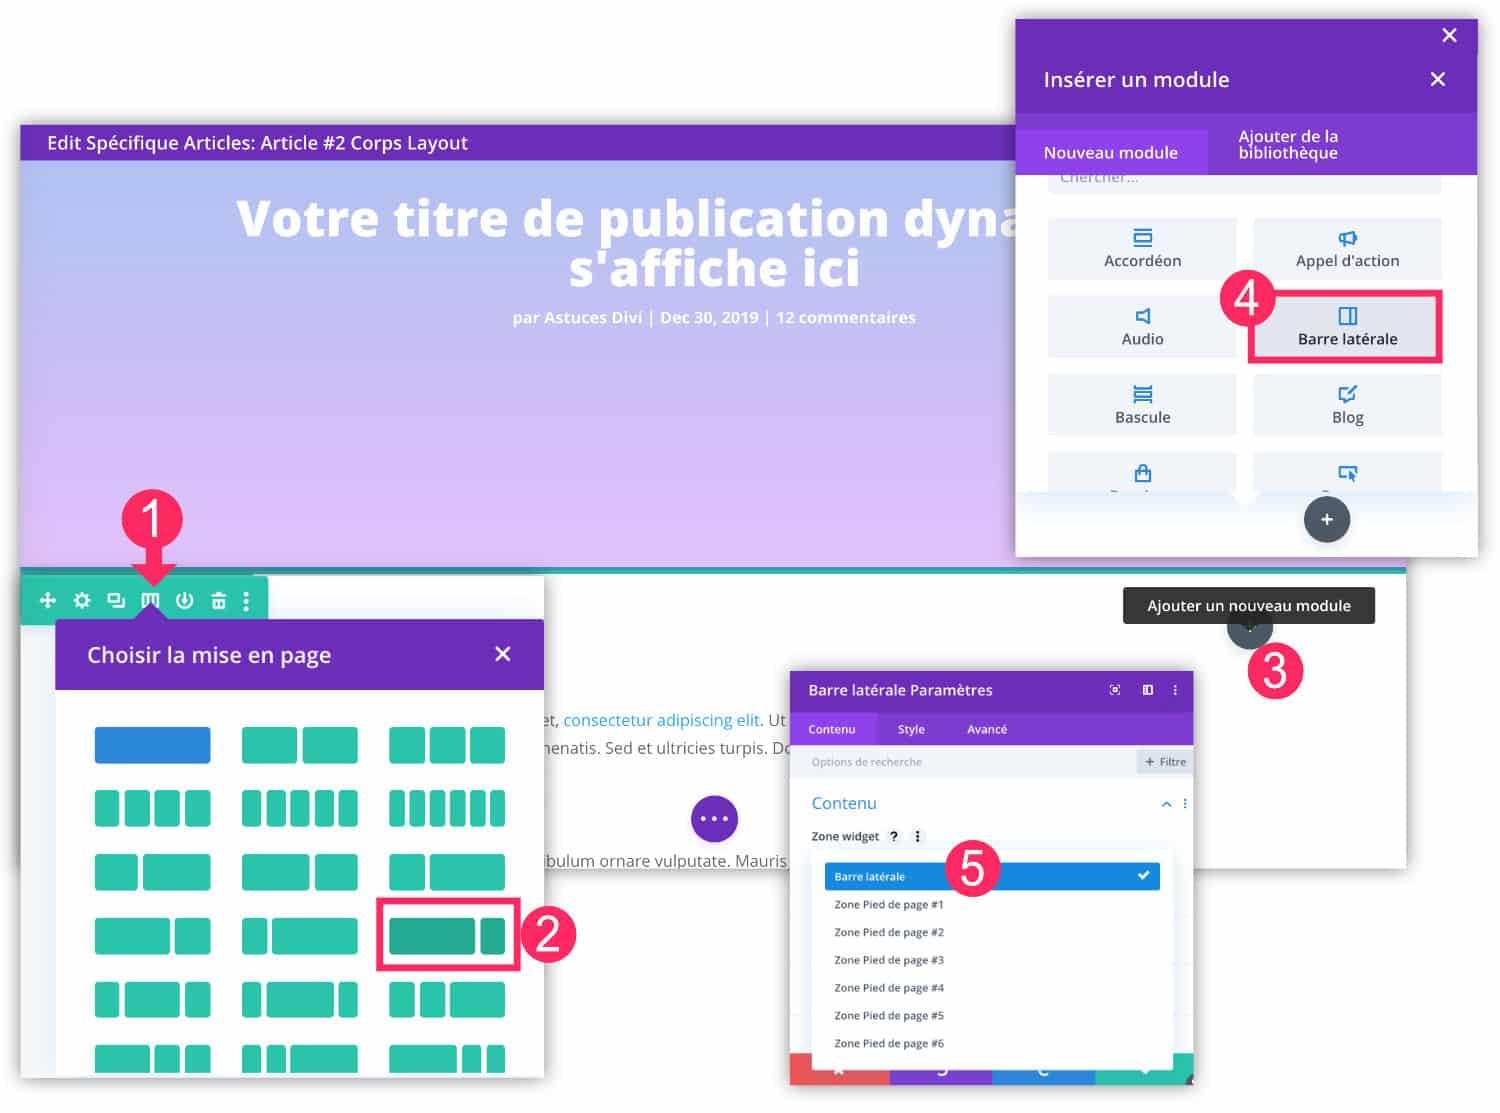
- Edit the row that contains the "Published Content" module.
- Instead of using a 1/1 row, I propose to choose a composition of [2/3 + 1/3] or [3/4 + 1/4].
- In this new "quart", a button Grey "+" appears and allows you to add a new module.
- Insert a Sidebar module.
- In the settings of the module, you can choose which sidebar to make appear. This implies that your sidebars must be ready. You manage them on the tab Appearance > Widgets WordPress.
Then you just have to stylize the appearance of the sidebar at your convenience thanks to the options of the module:

- On the tab Content > Background, choose a background color. I chose white.
- On the tab Style > Spacingadd a little internal margin. I added 20px from all sides.
- On the tab Style > Shadow box, add a shadow to the sidebar to give a little relief.
- On the tab Style > Border, I made the choice to round the corners of my sidebar. But you can leave the right angles or add a color border if you want.
- On the tab Style > Transform > Slider Tool, you can move slightly the position of your sidebar. This tab is interesting to put one element on two sections. I moved my sidebar from -140px up and from -15px to the left.
- Be careful with this transformation option, make sure to set the values to 0px for mobile and tablet versions. Read also this article for optimize your sidebars for mobile versions.
- Save your changes.
5 - Final design of the Divi article template
Tadaaa! Here is the final design of the model that will apply to all my blog articles.
To do well, the comment form would still have to be stylized, which is still a little too classic to my liking.
Idea: You could assign this Divi article template to only one category of your blog and create slightly different versions for other categories. For example, you could assign a different sidebar for each category template in your blog. Or different colors etc.
Here are also other tutorials for your article templates:
- UX-Friendly Article Template
- How to create an article template
- 5 original graphics to customize your article templates.
With Divi, the possibilities are endless!

Bonjour,
Bonne année Lycia.
J’aime beaucoup la sidebar qui déborde dans l’image et qui est arrondis, cela change totalement de la sidebar de base de divi.
Je garde l’idée de personnalisation sous le coude.
Tu crois que l’on peut faire la même chose avec l’image mise en avant qui apparaîtrais?
Salut Kaellyana !
Bonne année à toi aussi…
Oui, c’est possible en bidouillant un peu. J’ai essayé de le faire aussi pour le tuto. En fait tu dois utiliser le module « Titre du poste » et supprimer tous les autres éléments (le titre, les métas etc.) ainsi tu ne gardes que l’image de mise en avant. Ensuite tu la customises et tu la mets où tu veux. Par contre, il te faudra rajouter un deuxième module « Titre du poste » que tu afficheras cette fois-ci sans son image. Tu vois l’idée ?
À bientôt 😉
Coucou,
oui ce que tu me dis c’est ce que j’avais en tête pour faire un essais.
En tout cas merci de ta réponse et de tous les articles que tu proposes.
Mon soucis moi avec divi c’est leurs partie blog.
C’est moche
soit en grille soit en méga grand.
Avec le thème builder on commence de pouvoir faire quelques trucs plus sympa c’est déjà mieux.
Oui, tu peux tout faire, quasiment 😉 ou du moins tu peux améliorer ce qui ce faisait jusqu’à présent !
Bonjour,
Je voulais tester cette présentation d’article mais l’option « activer l’effet parallaxe » ne s’affiche pas ?
Quelle erreur ai-je commis ?
Merci.
Salut Decoster.
En effet, mon image n’était pas explicite et comme c’est compliqué de l’expliquer par écrit, j’ai mis à jour l’image qui montre comment activer l’effet parallaxe sur l’image de mise en avant.
Tu verras sur la dernière image du chapitre 3.1, une capture d’écran qui montre comment faire. Si tu n’as pas trouvé cette option, c’est parce que j’avais omis d’entourer un détail qui a son importance. Tu verras sur cette capture une annotation en violet (au lieu de rose). La réponse à ta question est là.
😉
Bonjour,
Comment peut-on changer l’image du haut pour CHAQUE article ?
Merci,
Bonjour Lycia, merci pour les précisions, j’ai vu.
Une autre question : est-il possible d’utiliser cette méthode pour tout nouvel article ou ne peut-elle s’appliquer qu’à des articles déjà rédigés ?
Merci.
Salut Decoster, la template s’appliquera à tous tes articles déjà publiés et ceux à venir…
Bonjour Lycia, merci pour l’info. Ça ne m’arrange pas mais tant pis ! Belle journée à vous.
Salut Decoster. Si ça ne t’arrange pas, tu peux tout simplement appliquer ce template à certains articles ou certains catégories seulement. Lors de la création du template, au lieu de cocher « tous les articles » tu peux faire d’autres choix 😉
Bonsoir Lycia,
Je suis subjugué par la qualité de tes articles. Merci.
Quand le modèle est enregistré, comment faire pour l’utiliser sur un article ?
Je clique sur « Créer/Article » mais pas de vue sur les modèles crées.
Salut Jean-Luc et merci 😉
Normalement, tu n’as rien à faire. Si tu as bien paramétré ton template, tous tes articles auront le même design. Tu as juste à créer ton article, avec Gutenberg ou le Divi Builder, et le contenu apparaîtra avec le design que tu as prédéfini avec le Thème Builder. Si ça ne marche pas : désolée de te le dire, mais tu as dû rater une étape. Vérifies le tuto, tu as peut-être omis de cocher quelque chose 😉
Salut James,
L’image insérée dans cette template est « dynamique ». Cela signifie que l’emplacement affichera l’image principale que vous insérez dans chaque article (dans le backoffice de l’article – pas dans Divi) : changez donc votre « image de mise en avant » à chaque article et votre image sera personnalisée à chaque publication.
Lycia,
Peut-on créer une Template à partir d’une page/article existante ?
Bizarre ! J’ai bien créé un modèle avec Thème Builder. J’ai coché « Tous les articles », mais je ne le retrouve pas dans Divi Builder « Télécharger le modèle ».
Bonjour Lycia,
J’espère que tu as passé un bon week-end bien mérité…
Excuse-moi d’insister, mais j’ai repris toutes les étapes de ton tutoriel.
Rien à faire, ma template Article ne modifie pas mes articles existant et je ne la retrouve pas dans « Choisir la mise en page » ni dans « Cloner une mise en page existante ». Qu’ai-je bien pu oublier ?
Salut Jean Luc. Oui, bon WE et toi ? Concernant ta demande, je crains qu’il y ait une erreur de compréhension. Quand je lis ton commentaire, je crois comprendre que tu n’as pas assimilé ce qu’est une template de thème. Tu ne la trouves en aucun cas dans tes mises en pages du Divi Builder. C’est un design qui va s’appliquer d’office à tous tes articles, si tu as bien paramétré ta template. Si tu défini un design pour tes articles, toutes ces publications seront affectées. Tu n’as à le définir qu’une seule fois depuis le thème Builder. Il ne faut pas confondre un template de thème et un layout, qui lui s’applique au corps de ton article. Si tu as besoin d’un accompagnement personnalisé c’est faisable (je le fais à discrétion : https://astucesdivi.com/produit/support-premium-divi/) J’espère que mes explications t’auront aider et t’aideront encore 😉
Merci bcp pour ta réponse Lycia,
Je vais rassembler mes besoins et reviendrai vers toi en mode discret 😉
Coucou Lycia
J’ai testé ton article
ça marche c’est cool.
Bon par contre il faut avoir des images mises en avant au format horizontal. Car sinon avec une image au format vertical c’est moche.
Ce qui fait que niveau chroniques littéraires avec la couverture d’un livre cela ne rend pas tip top.
Je garde l’idée de la présentation de ces articles pour d’autres projets.
Merci Kaellyana pour ton retour… Je pense que tu peux adapter avec des images au format portrait ? Mais je n’ai pas testé… À voir… À bientôt 😉
Hello Lycia,
Super blog et contenu au top ! Je t’écris ce message car quand je publie mon article je ne retrouve que le dégradé et non pas mon image de fond avec le dégradé. Ai-je oublié quelque chose ?
Merci pour ton retour 🙂
Hello Florent.
Je ne sais pas trop ce que tu as fait 😉 mais peut-être que cet article va répondre à ta question : https://astucesdivi.com/degrade-image-parallaxe/
À bientôt
Ah mais j’y pense, je t’ai donné le tuto du parallaxe mais toi tu veux simplement le dégradé qui recouvre ton image ? Il y a une petite case à cocher pour ça : « image de fond du titre » (très mauvaise traduction, je te l’accorde). Coche-la. Le tuto du parallaxe l’explique aussi.
Lycia, merci pour ton retour.
Malheureusement j’ai déjà cliqué sur cette case et cela affiche le dégradé de couleur au lieu de l’image avec le dégradé.
Pour faire simple lorsque je la décoche, je vois mon image sans dégradé et lorsque je la coche uniquement le dégradé..
Dans ce cas, décoche l’option « parallaxe », c’est à cause de ça. Lis mon tuto à ce sujet, tu vas comprendre
Désolé, je dois surement oublier quelque chose mais cette option est décochée également..
Ah … je vois pas, désolée . Essaye une autre image juste pour voir. Ou recommence depuis le début, y’a peut-être un truc que tu as oublié ?
Bonjour Lycia, je me retrouve face à un petit soucis, lorsque je personnalise ma mise en page, mon menu de thème disparait. Sais-tu comment gérer ce problème ?
Salut Thuret. Pourrais-tu être plus précis ? Car je ne crois pas que ce soit un souci mais plutôt le comportement normal, tout dépend de ce que tu as fait et de ce que tu entend par « mon menu de thème disparaît » ?
Bonjour Lycia,
J’ai démarré avec DIVI il y a 15 jours, j’ai créé plusieurs pages et je viens de découvrir ton article et le fonctionnement du thèmes Divi Builder.
Quand je veux créer une nouvelle page avec un modèle de thème, j’ai ce message qui s’affiche et e ne comprend pas pourquoi.
Message:Un modèle a été attribué à cet article à l’aide du Générateur de thèmes. Toutefois, le modèle utilisé ne contient pas de module Publier le contenu.
Un module de publication de contenu est requis pour ajouter un contenu unique dans le modèle de générateur de thèmes. Une fois qu’un module de contenu de publication a été ajouté au modèle, vous pourrez ajouter un contenu de publication unique dans cette zone pour chaque publication à l’aide du modèle.
Merci pour ta réponse et la qualité de tes articles.
Cordialement
Salut Bruno. Du a du créer un modèle avec le thème Builder mais tu as du oublié d’y placer le module indispensable : le module Publier un contenu. Une fois que tu l’auras ajouté dans ton modèle (theme Builder) tu pourras continuer à créer ton contenu avec le visual Builder depuis ta page ou ton article ! Voir cet article : https://astucesdivi.com/module-post-content/
Merci pour ce tuto ! Efficace et clair 🙂
Bonjour Lycia,
Merci pour ce tuto ! J’ai le même problème que Thuret mais je n’arrive à voir ou le régler :(.
J’ai suivi ton tuto mais mon header et mon footer n’apparaît pas dans mon article. Je pense qu’il doit y avoir une checkbox que je n’ai pas vu… Je suis preneur de ton aide si tu vois à quoi cela peut être dû !
Merci 🙂
EDIT mon commentaire précédant… je viens de comprendre. L’erreur c’est d’avoir utilisé le bloc « Ajouter un en-tête » pour mettre le titre et « ajouter un pied de page » pour mettre un bloc d’inscription newsletter. Tout doit être dans le corps personnalisé. Ça va résoudre le problème de Thuret également 😉
Salut Jeremy ! Je crois que tu viens de comprendre le fonctionnement du thème Builder… sans que j’ai eu besoin de t’aider 😉
Bonjour Lycia,
Il me semble que le module ‘publier un contenu’ ne s’affichait pas car j’avais déjà créé des pages sans les référencer au niveau du thème builder.
Je les ait toutes supprimé, je suis repartis a zéro et là le module est apparu.
Cordialement
Super ! Merci pour ton retour
Bonjour Lycia,
Super article merci,
Une fois que c’est fait comment éditer le textes des articles ? je me retrouve avec l’éditeur de base de WordPress.
Merci
Je crois que vous avez la réponse maintenant Pierre Gérard 😉
Franchement top les explications, étape par étape, le tout en images !!!. Quel beauté. Bravo Lucya, merci.
Seul bémol, peut-être plus qu’un simple détail, l’usage du « français, » dont la traduction est franchement ambiguë. L’usage de la traduction française n’aide pas toujours à comprendre de quel module ou quel réglage parle-t-on. De sorte qu’il faut basculer en version original (anglais) pour bien comprendre.
Ici, il ne suffit pas de cliquer sur le drapeau anglais. Car la version proposée et alors du très mauvais franglais: c’est à dire de l’anglais mal traduit en français retraduit en soit disant anglais.
Bien sûr, je comprends que « éditer » le franglais est un travail qui prendrais un temps fou. Je me contente d’aller regarder la version original pour savoir de quoi on parle.
Tout ceci pour dire que c’est le meilleur blog français sur DIVI que je connaisse à ce jour.
Merci infiniment José !!!
Oui, mon site est initialement en FR et utilise les termes « mal traduits » de Divi afin que tout le monde puisse s’y retrouver, disons, les francophones qui utilisent Divi en FR.
Concernant mes traductions ENG, elles sont automatiques avec Weglot. Du coup, Weglot traduit un français mal traduit provenant de l’anglais, hi hi hi. Il faudrait que je corrige manuellement les versions anglaises de mes articles mais comme tu l’as dit, il me faudrait du temps… Donc, oui, ce n’est pas encore parfait 😉
En tout cas, merci pour ton compliment !
Bonjour Lycia ! Merci infiniment pour cet article très instructif, j’en découvre toujours plus grâce à toi.
J’ai suivi à la lettre ta méthode, et mon thème Builder est bien adapté, j’ai crée mon « modèle » d’article de blog dans le Theme Builder, designé comme je le souhaite. Toutefois, rien à faire, ce modèle s’intègre dans un autre article ! Comme un effet poupée russe, comme un emboitement d’articles. … incroyable, j’ai 2 entetes et 2 sidebars !! As-tu une explication? je cherche la solution depuis des heures, en vain. J’espère que ma description est claire…
Merci d’avance !
Bonjour, merci pour cette article. J’ai une petite question, pourriez-vous me dire comment supprimer le « sur » qui apparait dans les métadonnées et qui donne qqch de pas très français : « Jane Doe sur 1er janvier 2019 à 12h00… » Merci beaucoup.
Salut Gwendoline, j’ai jamais fait gaffe. Il faut que je regarde.
Salut Sophie, tu es sûre d’avoir suivi à la lettre le tuto ? Car comme tu le vois sur mon blog, rien ne s’emboite et pourtant j’utilise exactement (ou à quelques choses près) le design que je propose dans ce tutoriel. Donc, je me demande si tu as bien utilisé le module Publier un Contenu ? Et si tu n’aurais pas saisi du texte en « dur » au sein de ta template. Ta template doit être utilisable à l’infini et donc, tu ne dois placer que des modules « dynamiques » comme le module Publier un contenu. Est-ce plus clair ? J’espère que tu vas rapidement trouver d’où ça vient, au quel cas, n’hésite pas à faire un retour ici, cela pourrait aider d’autres personnes 🙂
Bonjour Lycia et merci beaucoup pour cet article qui m’a bien aidé !
J’ai réalisé un modèle pour mes articles, et j’ai mi une section commentaire.
Toutefois, je n’arrive pas à modifier les textes « soumettre un commentaire » et le bouton « submit comment ».
Sais tu comment y arriver ?
Merci pour tous tes conseils !
Salut Rine ! Non, l’option n’existe pas… il faudrait le coder
Un grand merci pour ce tuto, j’étais vraiment en galère avec le design des articles 🙂
Bonjour Lycia,
Navrée pour le retour tardif ! J’ai fait plusieurs essais car j’avais réellement suivi ton tuto à la lettre.Après maintes recherches, il s’avère que le plugin DIVI Section Enhancer générait cet affichage délirant (emboitement des sections). En le désactivant, le modèle de page blog que j’avais configuré dans Divi Builder est apparu normalement, j’ai pu mettre en forme mes articles tout simplement!
Super Sophie !
Bonjour, je viens de mettre à DIVI est mon Dieu c’est pas de la tarte, rien de compliqué en soit mais sans mode d’emploi… Du coup j’ai acheté votre pack Work book + wp. J’ai hâte d’avoir un peu de temps pour me plonger dedans. J’ai 2 soucis le premier est que j’ai une barre (le fond gris) sous ma photo en fond de titre. Votre bout de code à solutionné le haut mais pas le bas. Et je ne vous pas du tout le contenu de publication une fois sur l’article alors qu’il est visible sur le layout ? Merci de votre aide
Salut Sarah et merci pour ta confiance. J’arrive pas trop à comprendre ton souci. Tu as trouvé depuis ?
Bonjour,
je viens à l’instant de me créer un template d’article via le thème builder. À partir de là comment faire pour utiliser ce template dans wordpress ? Ou plutôt quelle est la façon la plus simple d’utiliser ce template. Je passe par articles > ajouter et ensuite ? Il me propose d’utiliser le Divi Builder mais du coup il me redemande si je souhaite construire à partir de zéro, choisir la mise en page ou cloner la page existante. Je pensais que le fait de créer un template dans le thème builder aurait permis d’obtenir la mise en page du thème builder au moment de créer un nouvel article… Là je ne parviens pas à ce résultat… Et votre billet est super clair mais s’arrête à la fin de la création du template, on ne voit donc pas comme l’utliser à la création d’un nouvel article…
Merci d’avance de votre aide,
Belle journée
Salut Laure.
Une fois que tu as créé ton modèle (template) il te suffit de créer un nouvel Article (Article > Ajouter) et d’utiliser l’éditeur que tu préfères : soit tu utilises Gutenberg soit tu actives le Divi Builder. Le contenu que tu auras créé avec l’éditeur de ton choix prendra la place du module « Publier un contenu » que tu as placé dans ton modèle (étape 3.2 de ce tuto).
Bonjour,
j’avais suivi ce tuto pour faire mes templates d’articles mais depuis hier, cela ne fonctionne plus.
tout modele qui contient le module « publier un contenu » ne fonctionne plus.
Avez vous une idée d’ou vient le problème ? Merci.
Bonjour Thomas, c’est bizarre. Avez-vous fait des mises à jour ? Le problème est-il résolu ?
Bonjour, non cela ne fonctionne plus du tout.
Visiblement depuis que mon hebergeur a fait une mise a jour wordpress. Plus aucun nouvel article ni page n’accepte mes templates du visual builder et ce, meme si je force le template en créant l’article. Et si j’ai le malheur de modifier une page existante tout est foutu en l’air.
Je ne sais plus trop quoi faire , surtout que ce module publier un contenu m’est indispensable.
Salut Thomas, tu as essayé de désactiver tous les plugins pour voir si ça marche sans aucun plugin activé ? Si oui c’est qu’il y a un conflit et il faut trouver le quel. Tu nous tiens au jus ?
Malheureusement rien ne change :/
Je ne sais pas trop quoi faire, j’ai vidé les caches mais cela ne résous rien
Tu as tout désactiver et ça ne marche pas quand même ? As-tu contacté ton hébergeur suite aux MAJ qu’ils ont faites ?
Bonjour, tout d’abord merci pour ce tuto. Je rejoins Laure sur l’après construction du thème. En effet une fois que le thème est créé, je vais dans ajouter un article et là il me demande si je veux utiliser divi builder ou l’autre option.
Quand je choisis Divi Builder il me demande de choisir entre construire à partir de zéro, choisir la mise en page ou cloner la page existante.
Si je fais commencer de 0, il met bien le dégradé du haut, mais en dessous je n’ai rien …
Il me demande en revanche d’insérer la rangée.
Honnêtement je suis complètement perdu.
Merci d’avance pour votre réponse.
Bonjour Lycia,
Tout d’abord, un grand merci pour ce tuto hyper clair et facile à suivre ! Cela est super utile et accessible pour les personnes qui débute avec Divi.
Je souhaitais savoir si sur la page de blog, il était possible de créer des boutons pour chaque catégorie qui reverrait vers une page contenant tous les articles de la même catégorie? Ou vaut-il mieux ajouter une rubrique « Curseur de défilement des posts » sur la page de blog ?
Je ne sais pas si c’est très clair 🙂 Mon but étant que le visiteur s’y retrouve facilement et puisse chercher les articles par articles directement.
Merci pour ton aide !
Salut Frank, tu as trouvé finalement ?
En créant une template d’article, tu définis un design pour l’ensemble de tes articles. Ensuite, lorsque tu crées un article, et comme indiqué dans mon tuto, tu as le choix d’utiliser Gutenberg ou Divi. C’est à ce moment-là que tu crées le contenu de l’article, peu importe avec quoi. Relis le tutoriel attentivement, tout y est bien expliqué 😉
Salut Alexandra,
Il te suffit de créer la page du blog avec le thème Builder. Tu pourras ainsi ajouter tous les boutons que tu veux 😉
Bonjour Lycia et encore merci pour ce tuto très sympa.
J’aurais une petite question à te faire, comment pourrais-je faire pour que ma barre latérale ne soit pas fixe et reste visible en faisant défiler la page ?
Doit-on faire cela avec du CSS ? Pourrais-tu m’orienter stp ?
Salut Patrick. Ce tuto pourrait t’aider : https://astucesdivi.com/fixer-la-sidebar-de-divi/
Mais je dois le remettre à jour prochainement car une fonctionnalité native de Divi existe « Sticky Divi Option », regarde cette vidéo : https://www.youtube.com/watch?v=lGYgADZxUf0&t=52s
Cela devrait répondre à ton besoin 😉
Merci pour cet article
Bonjour Lycia, merci beaucoup pour tout ce contenu, c’est génial de proposer tout ça.
Grâce à vous j’avance tous les jour sur mon futur blog de voyage et le résultat est bluffant. Encore merci.
Cependant, j’ai un petit souci au niveau du template des articles que j’ai créé au niveau de thème Builder.
Je finalise le style des articles en passant par publier un contenu, je customise les H1, H2 , H3… les citations les liens Bref tout, je customise aussi la partie mobile.
Quand je pars sur un ancien article ou bien en créant un nouveau, tous les styles sont correctement repris sauf les titres H1 – H2 ….. H6, et le module commentaire n’affiche que la zone commentaire sans les champs Nom Email et site internet.
Avez vous une idée d’où est ce que ce bug provient. Je vous serai vraiment reconnaissant.
PS : mon H1 s’affiche avec une ancienne police que j’ai utiliser au tout début.
Bonsoir !
Merci pour vos nombreux articles.
Comment peut-on changer l’image du haut pour chaque article ?
Merci beaucoup.
Salut Khalil,
Aurais-tu utilisé des règles CSS spécifiques dans un thème enfant ? Le problème pourrait venir de là. Sinon, peux-tu être plus précis ?
Salut Célia, tu dois renseigner une image de mise en avant différente pour chaque article.
Bonjour,
Un grand merci pour ce tuto, je désespérais de trouver comment mettre en page mes articles
Super tuto !
J’aurai une question à propos de la barre latérale.
Sur ordi parfait elle est à droite du contenu, mais j’aimerai que sur smartphone au lieu de se retrouver après le contenu elle apparaisse avant…
D’avance merci si vous avez des tuyaux!
Salut Pat, tu pourrais ajouter une barre latérale en haut de ton contenu et ne la rendre visible que pour les mobiles, mais j’aime pas trop faire ce genre de trucs… Sinon, il faudrait modifier le CSS avec des Medias Queries : https://astucesdivi.com/responsive-design-divi/#lwptoc13
Merci beaucoup pour la réponse Lycia.
Et pour ceux que ça intéresse j’ai trouvé une solution ici.
https://www.elegantthemes.com/blog/divi-resources/how-to-change-divis-column-stacking-order-on-mobile-devices
Ah merci Pat, en effet, il y avait aussi cette solution 😉
Bonjour Lycia !
Merci pour ce tuto ! Me concernant j’ai un bug que je n’arrive pas à résoudre, peut-être pourras-tu m’aider ? Thème Divi tout juste installé, tout est à jour, pas de code additionnel, le bug persiste avec les extensions désactivées. Je suis en local pour le développement du site.
J’ai fait mon modèle d’article en suivant les étapes, et il s’applique mais mal. Seulement certains paramètres du modèles s’appliquent et ces paramètres sont différents selon les articles : certains auront la hiérarchie correctes (taille, couleurs, etc), d’autres non, mais certains auront la bonne mise en forme du H1 et d’autres non, pareil pour les marges du contenu.
Les articles ont tous été mis en forme sans Builder ou avec Guntenberg. J’ai aussi vidé le cache, mais rien à faire. Je désespère un peu.
J’ai l’impression que mon souci rejoint celui d’un autre commentaire plus haut.
Merci beaucoup pour tes pistes si tu en as !
Salut Chrys,
Pourrais-tu vérifier si tu as assigné ce modèle à tous tes articles ou seulement aux articles classés dans une certaine catégorie par exemple ?
Ton souci pourrait venir de là…
Bonjour,
merci pour ce tutoriel bien expliqué. Malheureusement j’ai le même problème que « Chrys », Divi me propose de créer à partir de zero, utiliser un template ou cloner une page existante. Alors que tout est correctement paramétré (d’ailleurs c’était simple à faire).
Dommage, en espérant que le bug se résolve naturellement.
Bonjour Lycia.
Je me joins a tous pour te remercier de cet article.
Je rencontre également le problème de James :
« Bonjour,
Comment peut-on changer l’image du haut pour CHAQUE article ?
Merci, »
J’ai bien compris que l’image se changeait sur chaque article et pas sur le divi builder, cependant, après trois heures de recherche et de veille internet, je ne trouve absolument l’emplacement pour insérer cette image de présentation sur ma page d’article.
As tu une suggestion ? Merci infiniment.
Salut Antonin, c’est certainement indiqué dans mon article… mais sinon, cette image s’insère directement dans chaque article : dans les réglages de la barre latérale quand tu es dans l’administration de l’article (back office). Un onglet te permet de télécharger l’image de mise en avant
Salut Claire, tu peux préciser ton problème ? C’est à quel niveau : au niveau de la page ou du thème builder ? Je précise que si vous suivez à la lettre mon tutoriel, vous devriez obtenir le même résultat, s’il y a un souci c’est qu’une étape est manquante ou mal comprise et dans ce cas, il faudrait que je sache à quel niveau exactement pour que je vous apporte mon aide.
Hello Lycia,
j’ai posté 2 commentaires sur 2 articles différents qui ne sont pas visible à ce jours. Peut etre que vous avez un planning chargé ce que je comprends. Espérons que celui-ci aura une réponse 🙂
Je veux faire la même chose pour les pages catégories de produits, quel est la procédure svp ?
Belle journée à vous
Youssef
Salut Youssef il me semble t’avoir répondu hier ? Et oui tu peux faire la même procédure pour les autres modèles. Pour les pages tu fais pareil, avec le module Publier un contenu, pour d’autres modèles un peu spécifiques tu trouveras mes articles sur le blog 😉
Oui Lycia, j’ai vu la réponse juste après avoir publié le commentaire ci-dessus, désolé, je suis confus !
Merci pour tes 2 réponses en tout cas 😀
petite anecdote du jour :
Je suis resté 4 à 5 h avec le support chat de divi, j’étais incompris. Du coup le dernier technicien qui a pris le relai m’a demandé l’accès à mon site (back office) et lorsqu’il s’y est rendu, il m’a dit qu’il était impossible de customiser les catégories produits, càd créer un vrai éditeur de texte pour mettre des balise hn, title, etc… comme sur les pages produits, du coup il m’a refilé une longue liste de code à intégrer dans la function.php.
C’est ce que j’ai fait et là j’attends sa réponse, car avec le fuseau horaire, il doit etre en train de roupiller le pauvre, bref j’attend demain.
Je vais tester ta solution 😉
Bien à toi
Youssef
Salut Youssef… 4h/5h avec le support ? Wahou ! Quelle patience 😉 par contre tu parles de « customiser les catégories de produit » mais le thème builder le permet pourtant ? Ou bien j’ai pas compris .?…
Hello Lycia,
justement j’ai 2 mains gauches, je n’arrive pas à créer avec le theme builder.
1 – je fais « ajouter un nouveau modèle
2 – je coche dans page d’archive « toutes les catégories de produit »
3 – ajouter un corp personnalisé
4 – commencer à construire à partir de 0
5 – je choisi le module texte, je supprime le contenu dans le corp du texte et je clique sur « utiliser le contenu dynamique
6 – je sélectionne « catégorie description »
7 – je valide
8 – je quitte la page en cliquant sur la croix située dans la barre du haut violet, une petite fenetre s’ouvre et je clique sur « sauvegarder et quitter ».
9 – je me rend dans le back office des catégorie de produit et là rien n’a changé, aucun éditeur de texte ne s’est ajouté pour mettre un titre et des balise h1,h2, etc… pour créer un vrai contenu de catégorie bien structurée avec des titre, balise et paragraphe.
Je pense que je m’y prends mal, t’en penses quoi Lycia ?
Salut Youssef,
1/ je crois que tu fais fausse route dans le point 2 : je choisirai plutôt un modèle par catégorie de produit (catégorie spécifique)
2/ idem pour le point 5 et 6. Tu devrais plutôt mettre un module boutique et y affecter que les produit de la catégorie en cours
3/ il est important de savoir que quand tu crées un nouveau modèle pour la première fois, tu dois sauvegarder, comme tu l’indique dans le point 8 mais tu dois sauvegarder à nouveau dans le thème builder une seconde fois (là où se trouvent tous tes modèles) sinon, ce nouveau modèle n’est pas pris en compte.
Voilà, je pense qu’avec ça tu devrais y arriver 😉
Top comme inspiration ! Par contre petite question: je me suis rendue compte que la page archive de blog est ultra moche et en plus elle affiche les articles en entier, pas seulement un extrait…Saurais tu comment y remédier ? Merci beaucoup !
deuxième grand merci pour vos explications claires et efficaces!
Super Ivan !
bonjour et désolé de vous déranger! dans mon dernier post, tout était clair jusqu’à ce que je cherche à utiliser ce template. impossible de faire un article avec! votre maquette a été enregistré à trois niveaux. lorsque je l’ai fait suivant votre tuto puis enregistrer dans ma bibliothèque ( le type est layout plutôt que module??) puis dans la gestion de divi. Ce qui est étrange aussi, c’est le module poster du contenu n’apparait pas dans la hiérarchie de la section. Je sais que j’ai oublié quelque chose!!! mais quoi? si vous aviez une petite idée!
Cordialement
Ivan
Salut Ivan. Je crois que le mieux est de tout jeter et de tout recommencer car tu as dû zapper un truc. Désolée, je ne vois que ça.
Bonjour,
Tout d’abord, merci pour cet article qui m’éclaire bien sur la façon de gérer le theme builder : j’ai installé Divi il y a moins de 48h 🙂
J’ai un petit souci, j’ai voulu essayer de mettre l’image avec le dégradé overlay, mais rien à faire, ça ne m’affiche plus l’image mais uniquement le dégradé sur mes articles… Si je ne remplis pas le dégradé, ça m’affiche bien l’image par contre… Une idée d’où ça pourrait venir, quelque chose que j’aurais mal fait ?
Merci !
Salut Marjorie, il te suffit de créer un nouveau modèle depuis l’onglet Divi > Thème Builder et d’assigner « le blog » à ce modèle. Après, tu la personnalises comme tu le souhaites. Il ne faut pas oublier d’inclure le module Blog dans ce modèle.
Salut Marie, tu as essayé de mettre des couleurs en transparence (pas des couleurs avec 100% d’opacité) ?
Bonjour,
j’ai essayé plusieurs fois par diverses manières mais je n’y arrive pas….
J’ai fait tout votre démarche, j’ai crée un article, tout va bien mais dès que je publie un 2ème c’est le probleme, il s’emboite sur le module du premier, et se cale au dessus du premier comme si ils ne faisaient qu’un, je ne comprends pas et n’arrive pas à résoudre le problème… si vous pourriez m’aider.
merci beaucoup
ALEXANDRA
Dans ton modèle il faut seulement mettre le module Publier un contenu et il ne faut rien écrire dedans
Merci de ces conseils, je suis très content du rendu m^me si j’ai retravaillé certaines parties
https://digitandco.fr/les-avantages-dune-page-facebook par exemple
Salut Bornet ! Super ! Oui, c’est l’idée, tu peux t’inspirer et retravailler la mise en page à ta sauce 😉
Hello, merci pour ton article très complet. J’ai créé mon modèle bien sauvergardé mais quand je créé un article il ne me le propose pas, comment puis-je faire ?
Normalement, si tu rédiges ton article, il aura la mise en forme que tu lui as donné dans le modèle
Hello ! Je suis tombé par hasard sur cette article en cherchant à modifier la mise en page par défaut de mes articles publiés.
Selon moi il manque une étape dans ce tutoriel, à savoir le fait qu’il ne faut pas ajouter le contenu et les commentaires dans la rangée du titre, mais bien dans une nouvelle rangée afin de pouvoir paramétrer ces deux éléments également. Est-ce exact ? 😉 La copie d’écran du point 3.2 et 3.3 me semble donc incorrect.
NB : J’ai bien suivi le tutoriel à la lettre, mais j’ai toujours un soucis du fait que mon image de titre ne touche pas les bords gauche et droite). Est-ce que cela pourrait se régler par un autre paramètre défini quelque part ?
Bonjour Lycia, merci beaucoup, j’ai mis le temps à me repencher dessus, mais la transparence était bien le problème, je rigole toute seule de ma bêtise ! 🙈
Bon ben super !
Salut Greg, il faut que tu supprimes les marges internes de la section et/ou rangée dans laquelle se trouve ton image.
Bonjour Lydia,
J’ai deux questions :
– J’ai voulu mettre des flèches de navigation en bas de mon article pour pouvoir accéder à l’article précédant et au suivant, mais ça renvoie vers mes pages statiques (contact et accueil) serais-tu comment faire ?
– J’aimerai que dans ma mise en forme d’article, il y ai 2 colones par moment (pour insérer des images soit à droite soit à gauche qui serait bien sûr pour chaque article la même disposition. Est-ce possible ? SI oui comment ?
Merci d’avance
Salut Myrtille. Pour tes flèches, il y a sûrement une option à activer dans les réglages du module. Regarde si tu aurai pas oublié un truc. Pour les colonnes j’ai pas tout compris 😉
Bonjour,
D’abord mille mercis pour vos super tutos 🙂
J’ai un souci au niveau de l’alignement du module Contenu. Il me reste des marges à gauche et à droite alors que dans les réglages, il n’y en a aucune …
En gros, les modules Titre et Commentaires sont bien alignés à 100 %, mais le module Contenu est moins large même après vérification des réglages … Merci d’avance pour votre aide 🙂
Maë, effectivement, il faut vérifier les marges. En fait chaque module / ligne / section de Divi a une marge interne par défaut. Il faut mettre 0 si tu n’en veux pas… et il faut vérifier chaque boîte (module, ligne, section)
Bonjour Lycia,
Merci pour cet articles qui comme tous les autres est génial en tout point.
Je n’ai rencontré aucun soucis jusqu’à la rédaction d’un article…
En effet, lorsque j’utilise l’éditeur standard, la mise en page de « publier un contenu » que j’ai préalablement stylisée (marges, polices etc…) ne s’applique pas. C’est a dire que j’ai juste ma boîte ombre avec mes bordures arrondies mais le corps du module n’a pas les réglages.
La solution est que j’utilise le Builder de Divi pour écrire l’article car pour le coup il prend bien en compte la mise en page que j’ai faite dans le thème builder. Seulement je préfèrerai écrire l’article avec l’éditeur standard, est-ce possible ?
Merci 🙂
Julien
Salut Julien, pour ma part j’ai aussi créé un modèle d’article avec le thème Builder comme expliqué dans cet article… et j’écris tous mes articles avec l’éditeur de WordPress (Gutenberg), pas avec le Divi Builder. Donc si ça ne marche pas, il y a peut-être une étape que tu aurais oublié ? Il faudrait vérifier pas à pas les étapes.
Bonjour Lycia,
super article et super blog
J’ai un petit souci sur l’affichage du module commentaire.
je l’ai bien ajouté dans mon template je le vois bien en édition de mon template mais invisible sur le front
Je vois juste affiché 0 commentaires et aucun champ pour poster un commentaire.
Bonjour Lycia,
super article, très précis et bien expliqué.
cependant je rencontre un petit problème et je ne comprend pas d’où cela vient.
J’ai bien créé le template d’article et tout fonctionne sauf l’affichage du module commentaires.
impossible de l’afficher
quand j’édit mon template avec theme builder il est visible seulement une fois publié sur le front je n’ai que le texte 0 commentaires et aucun champ pour poster un commentaires
avez vous une idée d’où cela pourrait il venir ?
Salut Jan, c’est bizarre. Il faut que tu vérifies si tu as bien autorisé les commentaires dans les réglages de WordPress et aussi que tu visites ton site sans être connecté (par exemple depuis un autre navigateur) pour voir si le formulaire apparaît bien.
Bonjour Lycia,
Effectivement cela venait du faite que les commentaires n’était pas activé.
J’ai cherché pendant des heures alors que c’était si simple, parfois on est tellement focus sur le problème qu’on en oubli la base.
Encore merci à toi et je te souhaite une bonne journée.
Et bonne continuation pour ton super blog. !!!
Super !
Hello Lycia,
encore merci pour tes tutos.
Il y a surement quelque chose qui m’échappe mais j’ai un problème après avoir créé un gabarit pour les articles dans le thème builder et créé une mise en forme qui me convient.
Cette même mise en forme s’applique dans l’éditeur Gutenberg. Ainsi dans le thème Builder j’ai mis tu texte en blanc pour le titre de l’article par exemple, dans l’éditeur le texte du titre de l’article est aussi en blanc. Et donc je ne peux rien faire car le fond de l’éditeur Gutenberg est blanc aussi.
En gros la mise en page de l’article (H1, p, etc.) s’applique quand je crée un article via Gutenberg.
Cela ne doit pas être grand chose, et j’ai du manquer une étape, mais c’est très handicapant.
Merci beaucoup et encore bravo pour tou
Hello Jérémy, normalement tu ne tiens pas compte de ce que tu vois dans l’éditeur Gutenberg, ce qui importe c’est l’article publié. As-tu testé une prévisualisation dans Gutenberg ? Ton article devrait apparaître correctement ? Tiens moi au courant
Merci Lycia de ta réponse rapide.
Oui j’ai bien assimilé tout cela et c’est super pratique, mais en fait j’ai un problème d’affichage dans Gutenberg.
Si par exemple dans mon thème builder j’ai stylisé le titre de l’article avec une couleur de police blanche, quand j’édite un article via Gutenberg le titre est aussi en blanc, ce qui fait que je ne vois rien.
Mais il faudrait que je puisse t’envoyer une image pour que tu t’en aperçoives.
Merci encore de ton aide
Oui je comprends mais c’est normal, Gutenberg récupère les styles même en mode édition. Je me répète mais l’important est que le côté Front soit fidèle à ce que tu veux. Moi aussi mon titre d’article est blanc mais comme j’y ai mis une ombre j’arrive à le voir en backoffice. J’imagine en effet que si mon titre n’avait pas d’ombre, j’aurais du mal à le voir.
Déjà ça me rassure que ça ne soit pas moi qui ait manqué une étape.
C’est quand même super pénalisant pour ceux qui ont des polices blanches sans ombres etc.
Tu ne connaîtrais pas un plugin ou quelque chose qui permette de passer au-delà de ça? Parce que c’est quand même compliqué de pouvoir écrire un article ou le modifier sans voir ce qui se passe dans l’éditeur (même si cela réplique sans aucun soucis dans le frontend).
Merci encore
Je pense qu’on pourrait le faire en CSS
Bonjour Lycia,
Tout d’abord un grand merci pour tes articles !
Je rencontre le même problème que Maë (commentaire du 17 mai 2021)
J’ai un souci au niveau de l’alignement du module Publier un contenu. J’ai des marges à gauche et à droite alors que dans les réglages du module, j’ai mis à 0 les marges droite et gauche.
Le module Titre du poste est bien aligné à gauche mais le module Publier un contenu n’est pas aligné au titre il est décalé sur la droite.
La seule solution pour qu’il soit aligné c’est de mettre une marge à gauche en négatif. Ce qui n’est pas normal…
Salut Sandra, regarde les marges, non pas du module Publier un contenu, mais plutôt de la ligne (vert) et de la section (bleu) dans laquelle ton module Publier un contenu est placé. Ce sont celles-la que tu dois mettre à 0.
Merci Lycia pour ta réponse. J’ai essayé de mettre à 0 sur le bloc vert mais rien ne change. J’ai toujours cette marge dans l’élément Publier un contenu.
Et sur la section bleue tu as essayé ?
Oui, j’ai essayé aussi sur le bloc bleu. En fait mon module Publier un contenu est sur fond grisé et il y a une grosse marge tout autour du contenu.
Ok ça vient certainement de l’onglet « dimensionnement » et non « espacement ». Mets à 100%. Ça règle le problème je pense
J’ai mis à 100% le bloc vert mais rien ne change
Il faut chercher, ça vient bien de quelque part 😉
Bonjour Lycia,
Super article. J’aimerai ajouter un slider ou des images en dynamique depuis mon article ou projet. Est-ce possible ? Comment faire ?
Merci beaucoup.
Marine
Bonjour 🙂 Merci pour cet article très complet et bien expliqué ! Par contre j’ai un petit souci niveau affichage… j’avais déjà écrit tous mes articles, et ils étaient donc édités avec le modèle par défaut de wordpress. Et en créant ce nouveau modèle, rien ne change lorsque je le sauvegarde à la fin, comme indiqué dans votre article. J’ai bien tenté de désactiver l’autre modèle par défaut présent dans le Theme builder, mais rien ne change non plus et ma mise en page d’article reste comme celle par défaut… Je ne sais plus quoi essayer pour que cela prenne en compte le template et me mette mes articles au bon format :'(
Salut Marie Alix. J’ai pas tout compris 😉 … Tu peux activer le Thème Builder, même si tes articles ont été écrits avec Gutenberg, l’éditeur par défaut de WordPress. D’ailleurs, sur ce blog, et sur mes autres, j’écris tous mes articles avec WordPress mais le modèle des articles a été stylisé avec le Thème Builder. Comme expliqué ici. As-tu bien mis le module Publier un Contenu ? As-tu bien coché le bon modèle ? Car c’est souvent là le HIC. As-tu bien sauvegardé deux fois, comme indiqué ?
Bonjour Lycia,
Merci beaucoup pour la réponse apportée ! Désolée, je n’ai pas du être très claire dans mes explications… J’ai bien mis tous les modules, dont celui « publier un contenu » et le bon modèle est coché et sauvegardé, c’est pour ça je ne comprends pas pourquoi il ne s’affiche pas… J’ai tenté de vider le cache mais en vain… Il y a forcément quelque chose qui ne doit pas être coché j’imagine ou qui interfère avec le nouveau modèle du thème builder. Je vais chercher ^^ merci pour ton aide !
Bonjour Lycia et merci beaucoup pour la réponse ! Désolée pour l’explication je n’ai pas du être très claire… 🙂 J’ai bien mis tous les modules comme indiqué dans l’article, dont le Publier un contenu. J’ai également coché le nouveau modèle dans le Thème Builder, enregistré plusieurs fois, et j’ai également vidé le cache en pensant que c’était peut-être cela qui bloquait, mais en vain… Je vais essayer de trouver la solution, il doit bien y avoir quelque chose qui cloche 😉 En fait, lorsque j’ai bien tout activé et que mon modèle est donc créé, mes articles écrits avant la création du modèle dans le Thème Builder ne change pas de forme et restent tel quel… Mais merci pour la réponse rapide en tout cas et pour cet article ! 🙂
Salut Marie Alix, ce n’est pas normal, en effet, tes anciens articles doivent hériter du nouveau design en provenance du thème builder. Est-ce que ça pourrait venir d’un conflit avec un plugin ?
Salut Marine, oui c’est possible pour 1 image (avec l’image mise en avant). Si tu l’affiches dans ton modèle, chaque article affichera son image mise en avant. Pour un slider, il faudrait utiliser ACF je crois, mais c’est un peu plus compliqué.
Bonjour,
désolé de vous déranger,
voilà, j’ai rédigé des articles sur mon site il y a un an,
je n’avais pas fait attention, j’y retourne aujourd’hui et j’ai de gros problème de mise en page.
Quand je suis sur le visuel bulder tout est correct, quand je le visualise tous se décale, c’est l’anarchie avez-vous une explication ?
merci,
Bonjour,
Merci pour cette article très intéressant ! Je suis novice dans DIVI et j’apprend beaucoup avec vous !
J’aimerais savoir si il est possible de créer des modèles de page d’article différent. Par exemple j’aimerais faire une page article avec une recette de cuisine (comme le modele recette proposé dans DIVI template) et une page avec un pas à pas genre tutoriel pour des loisirs créatif et une page normale d’article.
Je vous remercie pour votre réponse, Merci et à bientôt
Salut Susan. Tu peux le faire oui. Le mieux est de classer tes articles dans des catégories différentes et puis tu crées un modèle différent pour chaque catégorie. Au lieu d’appliquer le modèle à l’ensemble de tes articles, tu l’applique par catégorie.
Bonjour Lycia,
Je vous remercie pour votre rapide réponse. J’ai bien suivis votre Tuto super sympa ! Mais j’ai un petit soucis avec le template article : il se duplique automatiquement dans la partie publié mais quand on est dans le back office il n’est pas dupliqué. Est-ce que cela vous est déjà arrivé ?
Merci pour votre réponse.
Bon week-end
Il faut chercher. Peut-être as-tu mis 2 fois le module « publier un contenu » ?
Merci pour ta réponse, finalement j’ai tout recommencé et cela à l’air de fonctionner. Il y a eu un petit bug peut-être…
Bonjour est merci Lidia,
une question ; peut on créé un module ou le TEXTE se met a jour dans tous le site, c’est à dire si j’écris une nouvelle ligne de contenu texte dans un ‘module modèle’, partout ou se trouve se module la mise a jour se fait automatiquement ?
merci
Philippe
Salut oui c’est possible ! Il faut que tu enregistres le module en tant qu’élément global
Bonjour Lycia, j’ai une petite question et je ne trouve la réponse nulle part.
J’ai créé une page en Utilisant Divi et en sélectionnant « Construire à partir de zéro ». Pour l’instant je n’ai aucun contenu sur cette page. J’aimerais finalement utiliser un modèle de page existant. Comment faire pour revenir en arrière ? Impossible ? Je dois recréer la page ?
Merci de votre réponse
Non tu ouvres le bouton violet en bas et tu cliques sur l’icône + cela t’ouvre la bibliothèque de layout
Bonjour lycia, merci pour cette article.
J’ai une question, j’aimerai savoir si avec Divi je peux autoriser les utilisateurs à poster un article directement depuis le front end du site sans devoir se connecter ?
Hello Tran. Non tu dois utiliser un plugin pour ça
Bizarre, il faudrait voir, il y a surement un explication
J’ai un problème. LE contenu de ma barre latérale est completement vide ?
JE ne comprend pas pourquoi
Bonjour Lycia,
Super article ! Par contre je rencontre un problème avec l’image de mise en avant du module « titre du poste ». Ca ne s’affiche pas, j’ai uniquement le dégradé de couleurs. Elle s’affiche uniquement si je choisis « titre en haut » ou « titre en bas ».
A la base dans mes articles, je n’ai pas mi de module titre de poste. Je me suis dis que c’était ça le problème. Du coup j’ai rajouté ce module en plus dans mes articles déja faits sauf que ça me fais 2 modules « titre du poste ». Celui du thème builder et celui de l’article.
Je suis un peu perdue et ne sait plus quoi faire… A
avez-vous une solution ? Merci
Salut Lucie. J’ai pas tout compris, mais ce qui est sûr est que si tu crées un modèle avec le thème builder qui inclus le titre de l’article, tu ne dois pas le mettre dans l’article lui-même. C’est pour ça que tu l’as deux fois.
Bonjour Lycia,
Je n’avais pas de titre de poste à la base dans mes articles. Mais l’image de mise en avant ne s’affichait pas. Dans ton tuto tu montres le avant et après de la mise en page : il y a déja un titre de poste avec l’image dans l’article avant de créer le template dans theme builder. C’est à ce moment que je me suis dis que c’était peut etre ça le problème. Je n’avais pas de titre de poste dans mon article !
Tu viens de me confirmer que le problème ne vient pas de là. Ok… je retire le titre du poste dans mon article mais j’ai toujours le même problème : l’image de mise en avant ne s’affiche pas en fond du titre du poste (et j’ai pourtant sélectionné ce qu’il fallait).
J’ai tout créé dans le theme builder, j’ai créé le dégradé du titre du poste et quand je vais sur mes articles, il n’y a que le dégradé qui apparait avec le titre du poste et les métadonnées. L’image de mise en avant que j’ai sélectionné dans la barre latérale droite de chaque article (la page qui s’affiche avant de modifier avec divi donc) n’apparait pas.
Comment faire pour que l’image de mise en avant de chaque article soit bien présente dans le module « titre du poste » ?
Merci à toi.
Ton dégradé doit avoir de la transparence sinon tu peux pas voir ton image de mise en avant qui se trouve en arrière plan. Essaye de refaire le tutoriel, il y a peut-être un truc que tu as loupé ? Une petite option, ça arrive…
Hello Lycia, merci pour ton retour.
Je suis désolée mais je ne vois pas où on coche du transparent.
J’ai suivi à la lettre ce que tu décris dans le 3.1 titre du poste.
Dans l’onglet Fond > dégradé de fond, je n’ai pas la même chose que dans ta capture d’écran certainement du aux mises à jour depuis. J’ai : arrêts de dégradé pour choisir les deux couleurs / type de dégradé / direction du dégradé / répéter le dégradé / unité de dégradé et image de fond de titre (celui-ci je l’ai coché comme dans le tuto).
Dans l’onglet style du module titre du poste, je viens de tester filtre et opacité. Mais ça ne change rien. Le dégradé est semi transparent mais le titre aussi et il n’y a toujours pas d’image qui s’affiche…
Je ne sais plus quoi faire.
Hello Lycia,
J’ai trouvé ! Il fallait c liquer sur pourcentage au-dessus des couleurs de dégradé pour pouvoir régler la transaprence.
Bonne journée.
Parfait
Bonjour ! Merci pour cet article qui m’a bien servi 🙂
J’ai besoin de créer des pages avec une partie modèle et une partie qui sera différente dans chaque page. Est-ce possible ? Quand je rajoute une section dans ma page, ça me l’ajoute aussi dans mon modèle… je ne sais pas comment la différencier. Pour être plus précise, ce sont des fiches produits.
En vous remerciant pour votre éclairage.
Bon week end
Dans ton modèle, tu dois utiliser le module « Publier un contenu » afin d’afficher le module dynamique au sein du modèle : https://astucesdivi.com/module-post-content/
Bonjour ,
Merci beaucoup pour tout les conseils et toutes ces explications .
Je rencontre une difficulté :
J’ai publié sur mon site trois articles .
Le contenu du texte se duplique sur les trois articles .
Cependant les titres sont bien attribués un titre de texte = un article
Mais dès que je modifie un texte celui ce duplique automatiquement sur les autres textes de blog.
Je vous remercie pour votre aide .
Bon Week ENd
Bonjour,
J’utilise généralement Divi, mais pour un blog, j’ai opté pour Extra qui convient mieux. Et je voudrais créer un ou plusieurs modèles pour les articles. Ce tutoriel est-il transposable à Extra ? Merci pour votre site, très utile.
Bonne semaine.
Bonne question. Je n’utilise jamais Extra, donc bonne question, si quelqu’un passe par là…
Bonjour
Comment peut on faire comme toi sur cet article la section :
» Au programme de cet article : »
Avec les petits liens vers chaque sous titres ?
Peux ton le faire en automatique ? (j’imagine que oui, mais comment ?)
Merci beaucoup à toi
Hello, pour mes blogs j’utilise Lucky Table of Content mais comme il n’est plus mis à jour depuis quelques temps, je te conseille d’en trouver un autre ici https://wordpress.org/plugins/search/table+of+content/ et oui, tu peux insérer le sommaire en automatique.
Salut Jessica, tu as dû faire une erreur dans ton modèle. Vérifie la construction de celui-ci, pas à pas avec mon tuto 😉
Bonjour, j’ai essayé de créer un nouvel article aujourd’hui, je ne sais pas pourquoi, la mise en page ne s’applique pas. J’ai supprimé la page, puis je l’ai recréé, même problème. Pourtant il s’agit bien d’un article, et tous mes autres articles ont bien la mise en forme du thème builder… une idée d’où pourrait venir le problème ?
Merci par avance !
Heu c’est bizarre