
Add a Contents - also called contents - at the beginning of your blog articles may prove to be a "real plus", both at the level of optimization of the SEO of your blog that improvement of user experience (UX) of your readers.
In the past, we had to have some HTML knowledge to be able to insert a table of contents into your articles.
Here you will see that there are several solutions and we will review them all...
- 1 - Why insert a summary at the beginning of the blog article?
- 2 - Insert a table of contents with a free extension
- 3 - Insert a summary manually with Gutenberg
- 4 - Insert a table of contents manually with the Divi Builder
- 5 - Insert a summary manually with the classic WordPress editor
- 6 - In conclusion: manual or automated table of contents?
1 - Why insert a summary at the beginning of the blog article?
Add a summary at the beginning of your blog articles You may seem insignificant, but it is the opposite!
When I started blogging, I didn't insert a table of contents That if it was worth it. In other words, if the article was really very long or a bit complex.
Over time, I realized that this "little plus" was actually indispensable for many reasons:
- Since my articles are becoming less and less succinct and more and more developed, a summary makes content more digested.
- This helps Divi Tips Readers to better navigate and understand the chapters of my articles. Thus, they can quickly go to the part that interests them most.
- Read the article summary can also sharpen readers' curiosity who would not have bothered to go further than the introduction.
- This is indispensable for Google who also needs quickly know the content of your article and to better understand it through adequate HTML semantics.
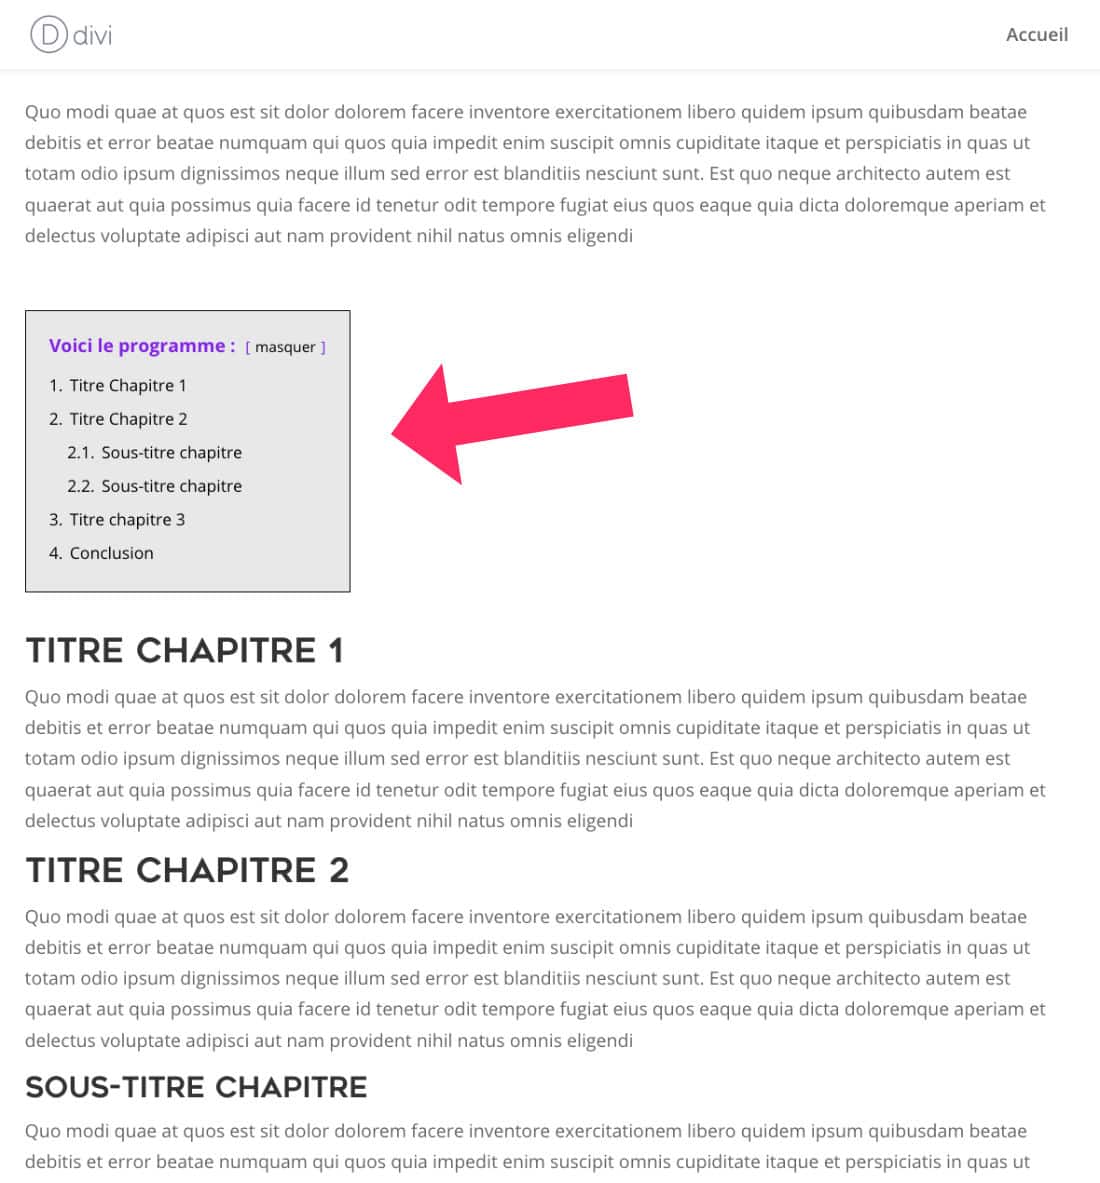
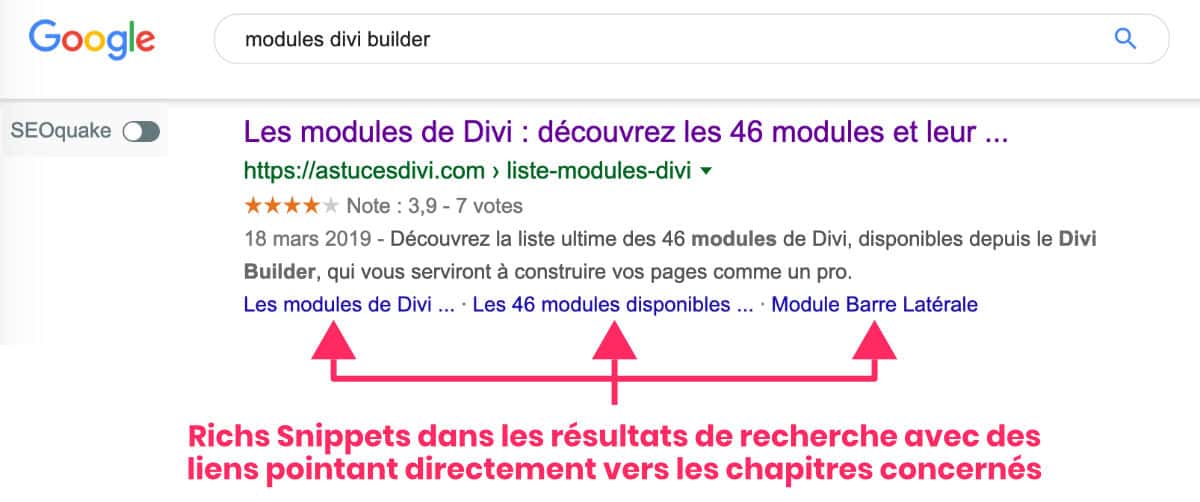
- The table of contents allows indexing robots to propose enriched results (Richs Snippets) directly in its search results, with links that point to some of your chapters.
Adding a summary to your articles is an optimization not to be underestimated and can allow you improve your positions in search results as explained in this article full of tips for quickly reach the first page of Google.
So, with a table of contents at the beginning of your articlesYou make a stone, two strokes!
Besides, when I have a little time, I try to update my old articles for optimize and update content And I always take advantage of it. add a summaryIf not already... It's a big project, but it's worth it!
2 - Insert a table of contents with a free extension
If you are planning to do this, you too, I suggest that you discover a simple way to achieve this.
The free extension named LuckyWP Table of Contents is very easy to configure and gives a more than satisfactory result, let's see how to do...
2.1. - Installation of "LuckyWP Table of Contents"
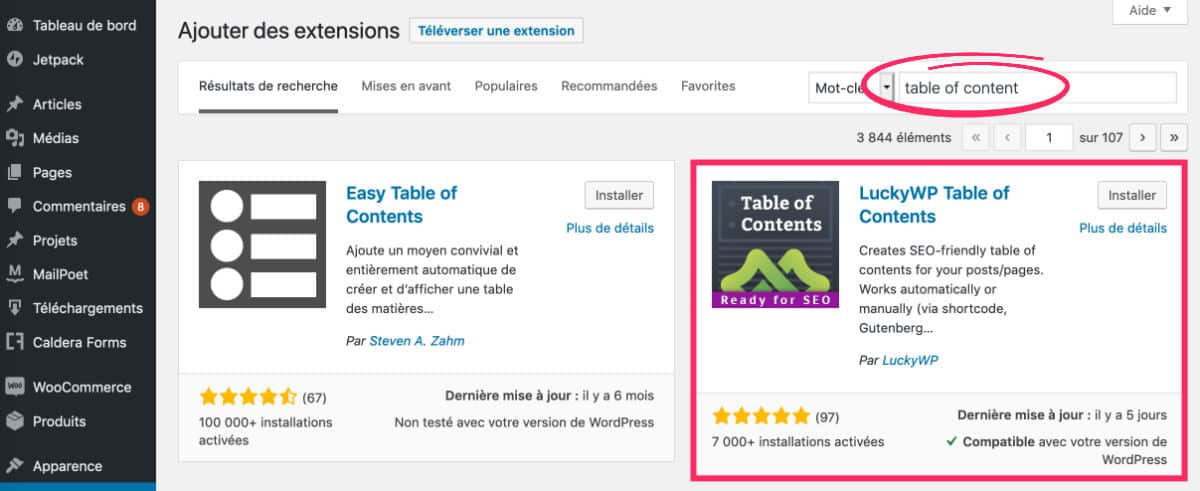
Simply go to the tab Extensions > Add, available directly from the administration part of your site.
Search "table of content" : Install and activate the plugin LuckyWP.
You will find the plugin settings under the tab Settings > Table of Contents.
2.2. - LuckyWP Configuration
Setting this plugin is very easy and its options are available in ENG/FR. Simply navigate through the various tabs to check/uncheck the options available to you.
2.2.1. - General tab
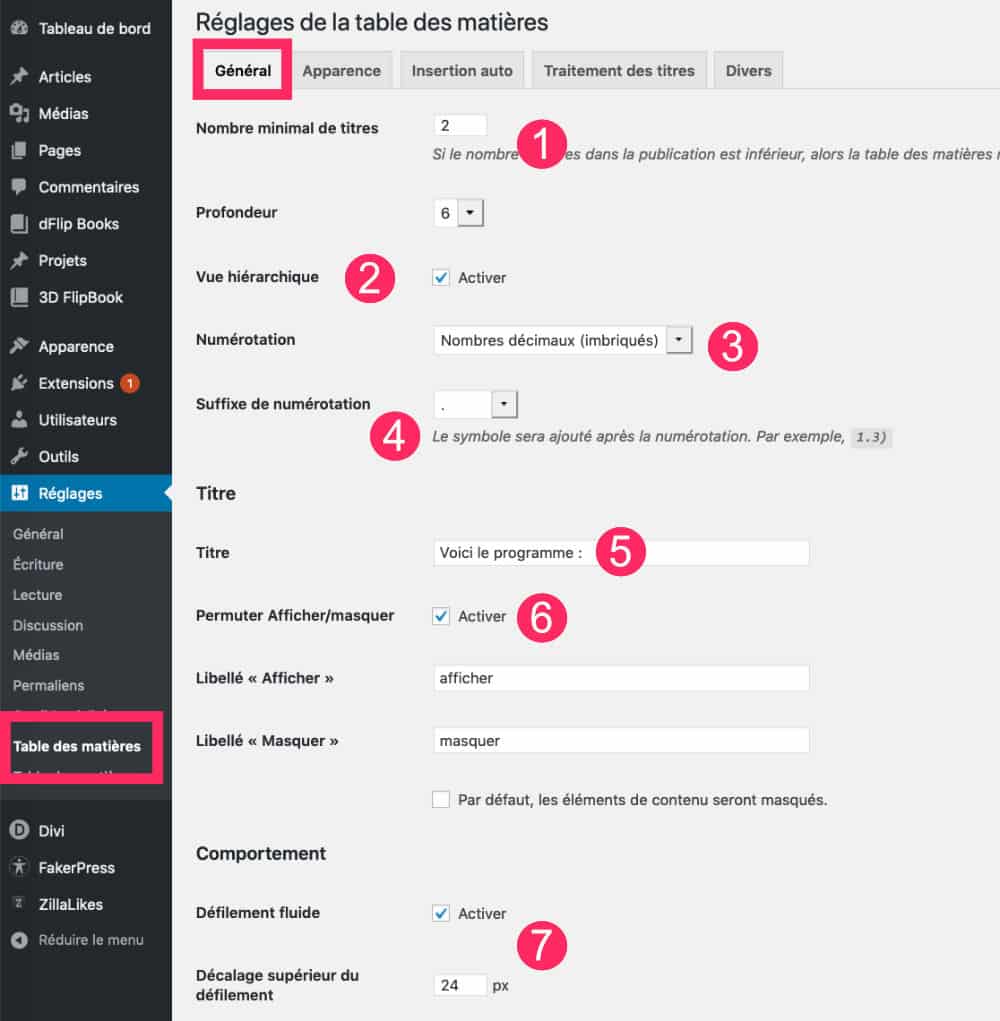
It is from this tab that you can make the main settings such as:
- The minimum number of titles that triggers the creation of a table of contents.
- The ability to display the summary according to the hierarchy of your titles (H1 - H2 - H3 etc.).
- The type of numbering to be used: numbers, Roman numerals, no numbering etc.
- The numbering suffix: none, a parenthesis or a point.
- The title to be displayed above the table of contents.
- Enable the user filter to display or hide the summary. You can even change the labels.
- Add an automatic margin before the anchor point and activate the fluid scrolling.
Once your settings are done, remember to save your changes.
2.2.2. - Tab Appearance
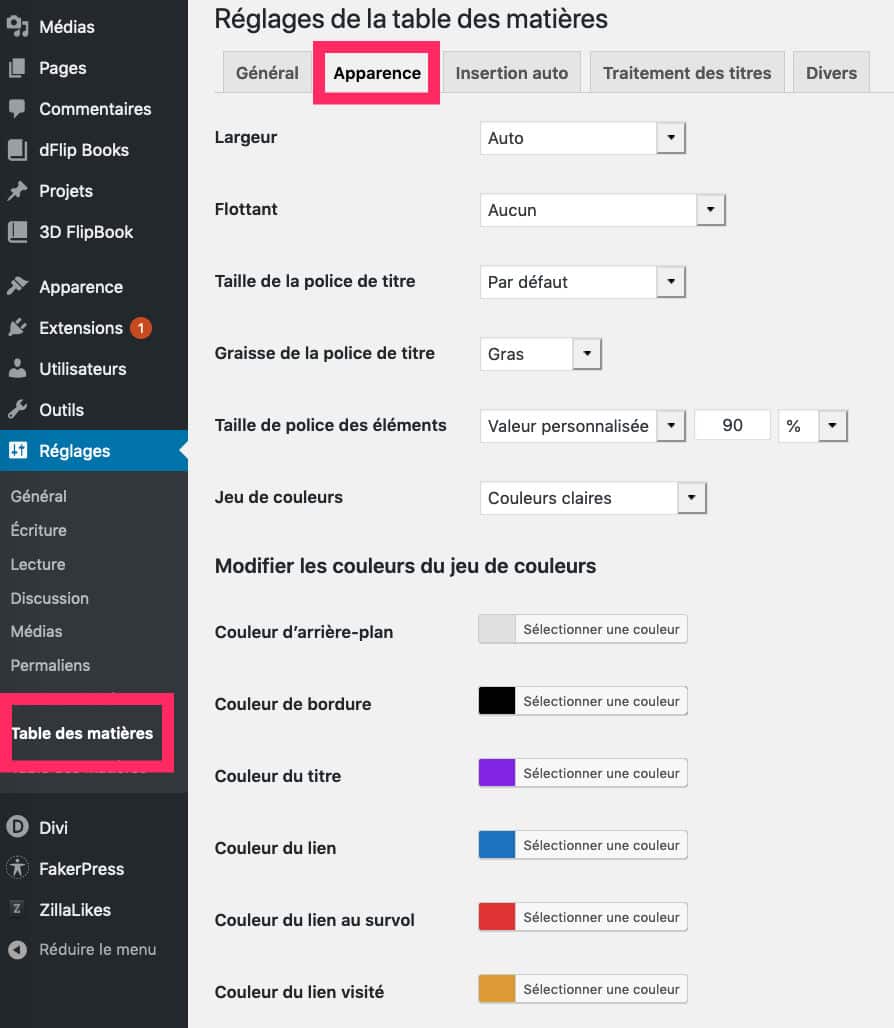
The Appearance tab allows you to customize the display of your summary.
You can specify the font, the fat and especially the colors to use.
The options are rather complete and allow you to fully customize your table of contents deciding on the color of the background, the color of the links, the links to the fly-over and the links visited.
In short, everything is done to ensure that your summary is based on the graphic charter of your site/blog!
2.2.3. Auto Insert Tab

The LuckyWP plugin allows automatic insertion of a table of contents within your publications.
It's a good option that could save you some crazy time, but fortunately it's only one option.
If you do not check it, the summary will not be added automatically and it will leave you more freedom on where you want to insert it (manual method).
2.2.4 - Tab Adjustments of the table of contents
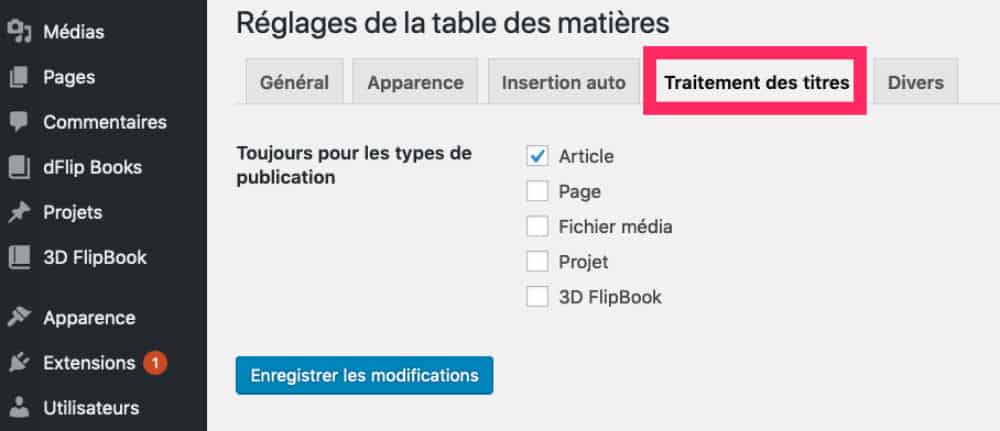
From this tab, you will simply decide what types of publication can host a table of contents.
2.2.5 - Miscellaneous tab

The Miscellaneous tab offers interesting options, especially at SEO level...
- Select the titles to exclude from your summary. For example, you might decide that only titles H1 - H2 and H3 are included and the others must be hidden.
- Decide the format of your URLs. A link is created automatically internally: an anchor is placed at the end of the URL of your articles. With this option, you can decide how it looks.
- With regard to these anchors added to the URL, you can convert your titles to lower case and replace the underscores (the bottom dashes ) with dashes.
- Two SEO options are also possible:
"noindex"(it tells Google not to index these URLs) and add a"nofollow"to your summary links (it tells Google not to follow these URLs). It's up to you to choose what you think is best... - Other settings are also possible such as deciding on the HTML tag where your table of contents (UL or DIV) will appear.
2.3 - Inserting LuckyWP in your blog articles
Here, with the settings made, you can enjoy this new feature.
If you have decided automatically insert the summary, normally, everything is already in place. You'll have nothing more to do than check appearance in your articles.
If, however, you have decided manually insert LuckyWP's table of contents into your articlesHere's what you'll have to do:
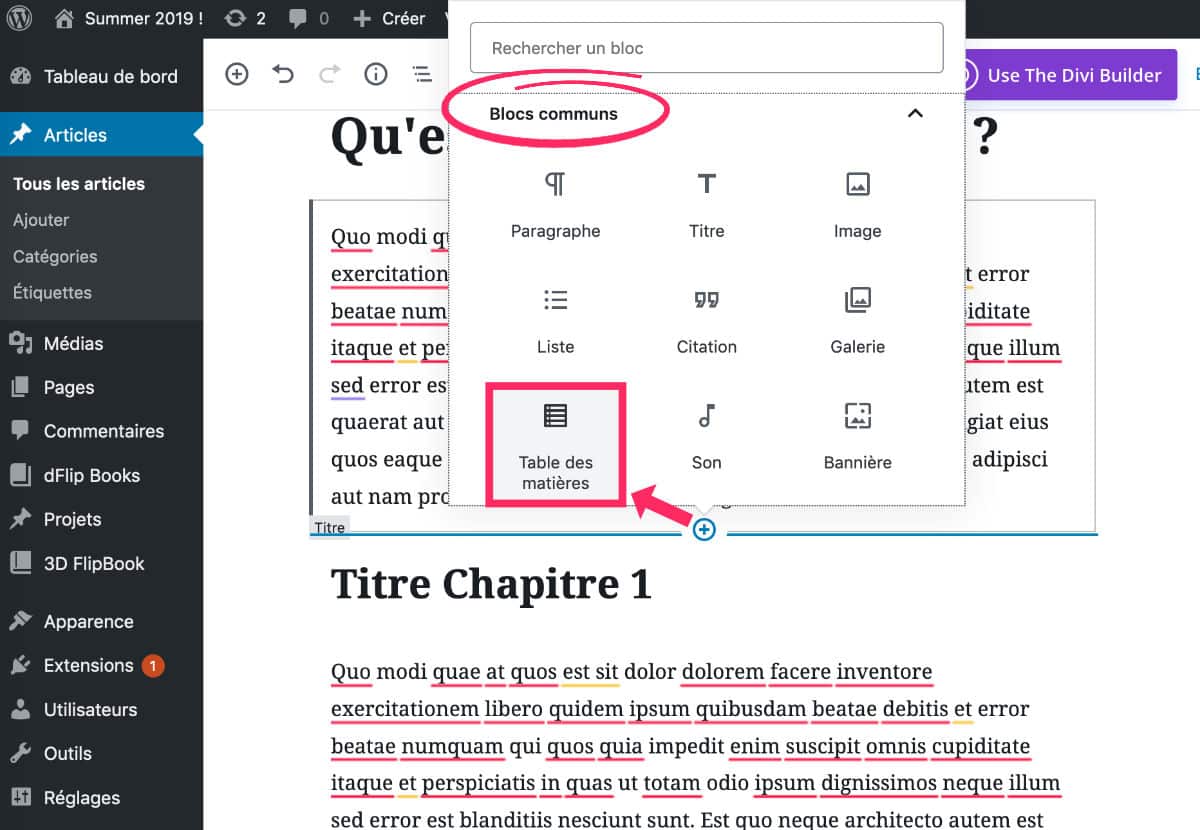
When writing your articles with the new WordPress editor (Gutenberg), you can easily insert a "Table of Contents" block - available in "Blocs Communs" - where you want it.
This block will retrieve all the titles identified in your articles and list them as a clickable summary.
You have nothing else to do...
See more plugins compatible with Divi...and who really want you good 😉
3 - Insert a summary manually with Gutenberg
If you are a reluctant type and don't like to add plugins to gogo unnecessarily, then you should follow this second solution: manually add a table of contents using Gutenberg.
Ideally, you would need some HTML knowledge, but nothing very complicated if you follow these steps:
When your writing is complete or when your article plan is complete, you will need to add a IDENTIFIANT for each of your paragraphs.
Gutenberg's TITLE blocks are then ideal for this.
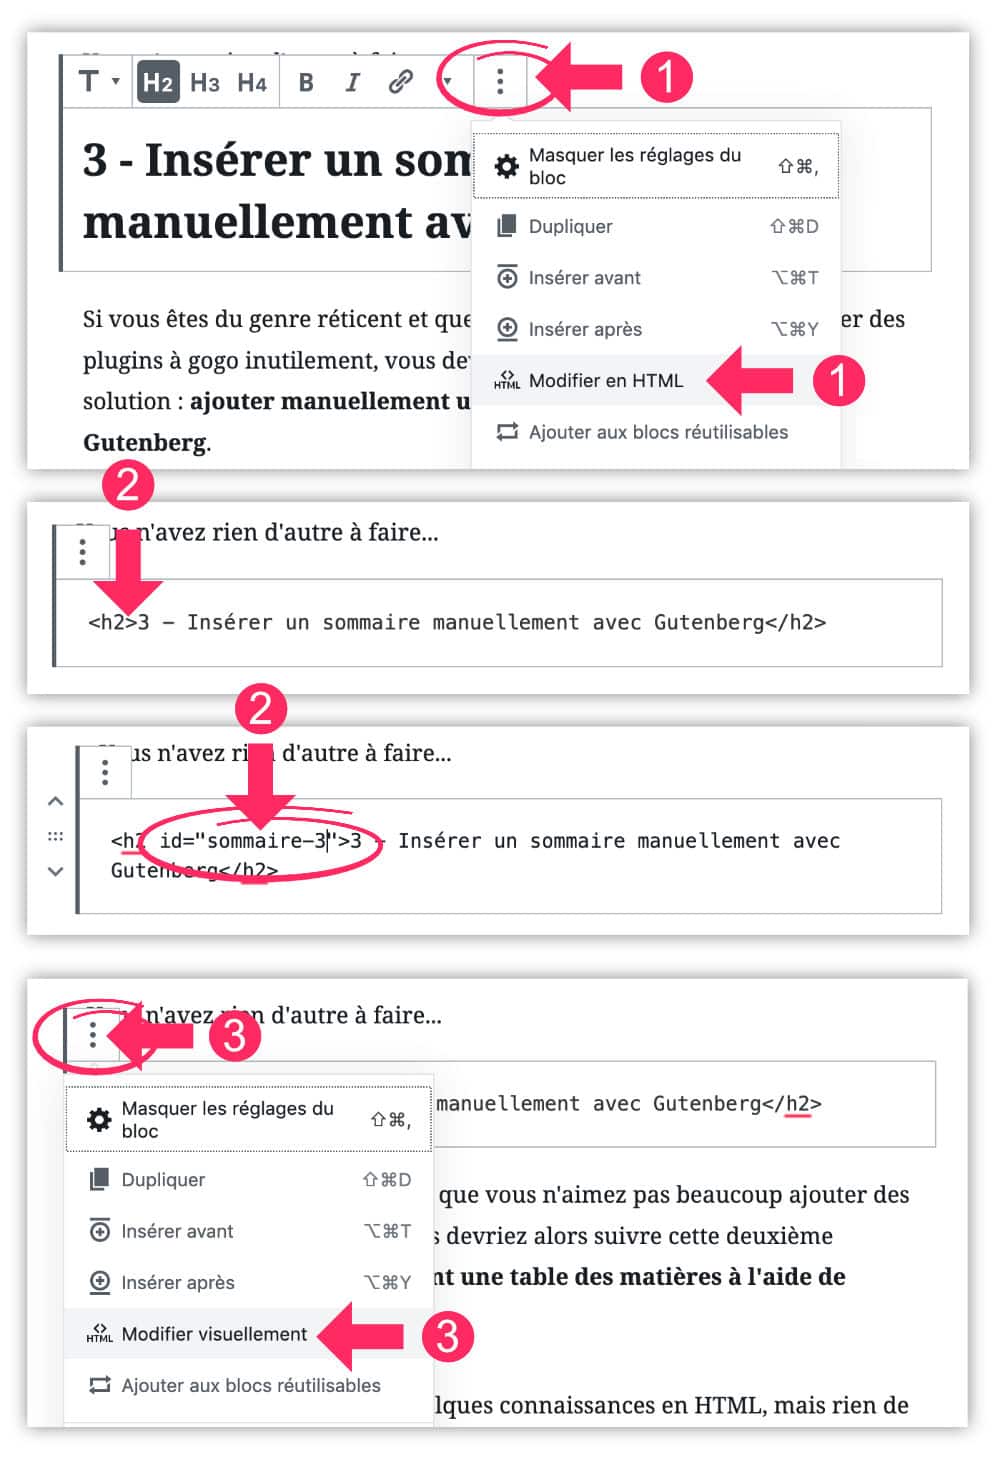
- Select the title block to change: click on the context menu (the 3 small points) and choose "Edit to HTML".
- You will see the HTML version of your title. It is placed in H2, H3 H4 tags etc. In this tag, you must add a unique identifier you will create for each title. The tag
<h2>must look like this<h2 id="mon-identifiant-1">. You will renew this action for each title by taking care of never use the same ID and without using special spaces or characters. - You can then close the HTML edition by selecting "Visually modify".
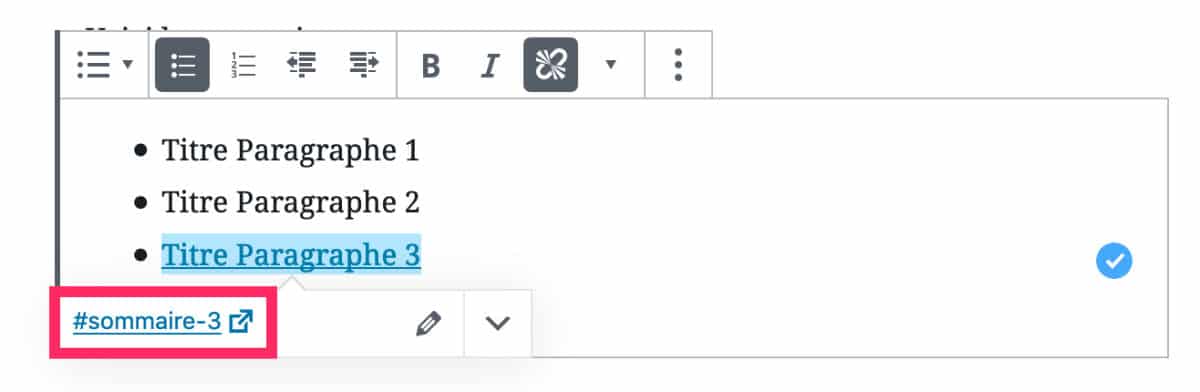
Once all your securities hold an ID, you can insert a "List Block" for list items in your table of contents.
For each item, simply insert a link such as #mon-identifiant-1, #mon-identifiant-2, #mon-identifiant-3 etc.
This allows create an internal link to the article which will lead the Internet user to the desired place.
It's time to test Divi for free to see what he's capable of... This way!
4 - Insert a table of contents manually with the Divi Builder
For create a table of contents in a page/article using the Divi BuilderIt's pretty much the same with Gutenberg:
First, you will need to insert as many lines (row) or sections as you will need a paragraph. Learn more about how the Divi Builder works.
When your paragraphs are well separated in different rows and sections, you can add an ID ( CSS ID) that will be used to create your table of contents.
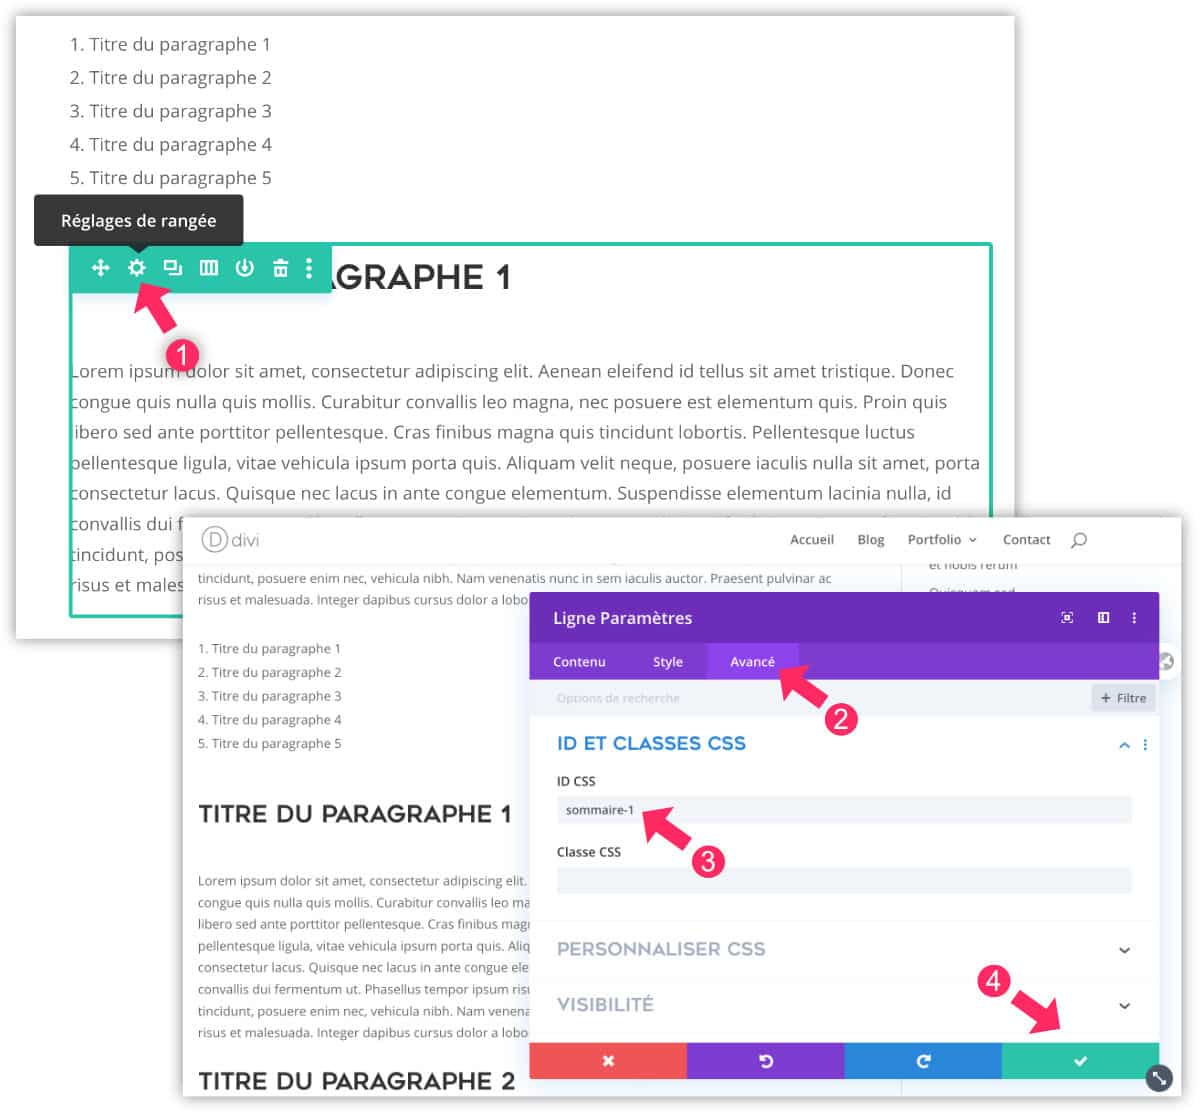
- Edit row settings
- Go to the Advanced tab
- In the " CSS ID" field, enter your unique identifier. For example:
sommaire-1. Do not use special characters or spaces. - Save your changes.
You will need to renew this step for each of your paragraphs.
Then you can create the summary using a Text module in which you will add a smart list (or numbered list if you prefer).

- Open the settings of Divi Text module
- Highlight one of the summary items (chip or numbered list)
- Click on the link insert icon
- Add the CSS identifier of the paragraph with a "hashtag" as a prefix. For example:
#sommaire-1 - Validate by clicking OK
- Renew these actions for each paragraph: IDs must be unique, remember.
- Save your changes.
There, you get a functional table of contents for your publication using the Divi Builder !
5 - Insert a summary manually with the classic WordPress editor
If you still use the old WordPress editor to write your blog articles, you can also add a table of contents easily.
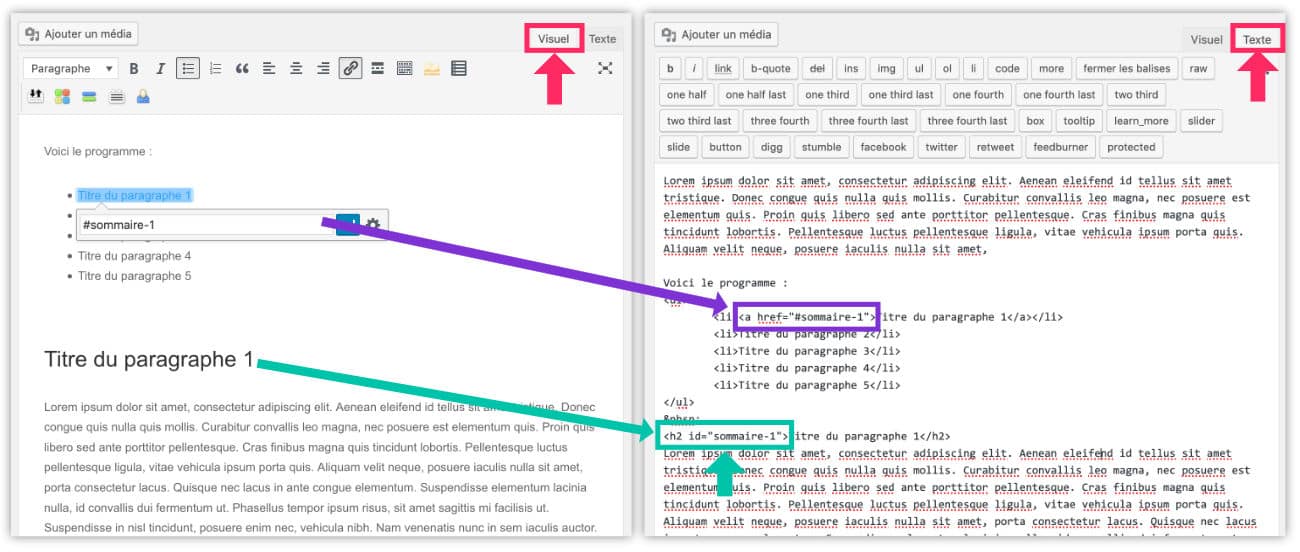
Just write your articles since VISUAL editor (left screen on the screenshot above) then switch to TEXT version (right screen on the screenshot above), to insert CSS (ID) identifiers into the H2, H3, H4 tags etc.
Finally, you can add these CSS IDs as a link address within your summary, as we saw earlier with Gutenberg or Divi Builder.
Discover many other tips and resources directly on the blog of Elegantthemes.
6 - In conclusion: manual or automated table of contents?
Methods manual are effective and gives you more freedom, however, it takes much more time only with the help of a plugin. Especially if your summary has to display nested lists!
If you want to be tempted by the method with plugin, know that it does not only exist LuckyWP, other free or freemium extensions are also available:


Très bel article… Je voulais moi même rajouter cette fonction primordiale en méthode manuelle afin de ne pas surcharger le nombre de plugins. Par contre, si d’autres personnes publient, ils n’y penseront pas.
En tous cas, très bien expliqué Lycia 😉
Bonjour
merci pour ce tuto qui est très bien !
J’ai utilisé la méthode dans le divi Builder cela marche très bien mais je remarque tout de même un soucis : la pagge descend trop bas lors du clic sur le lien et on se retrouve un tout petit peu plus bas dans la page, ce qui fait que le titre du paragraphe n’est pas visible.
Bref ça doit pouvoir se régler mais j’ignore comment, avez vous une idee?
Salut Romain.
Essaye de voir dans le sous-onglet Navigation > Paramètres généraux de Divi. Explications ici.
Ça pourrait corriger le problème. À voir 😉
Merci David,
Je l’ai fait en manuel jusqu’à cet article. C’était très fastidieux bien qu’il y avait certains avantages dont le fait de pouvoir choisir son ID.
😉
Salut Lycia,
J’ai installé Lycky WP Table of Contents pour éviter de m’embêter à le faire manuellement.
Le plugin est sympa. J’ai cependant quelques questions si cela ne t’embête pas.
1. Que conseilles-tu d’activer pour le SEO entre les options rel= »nofollow » et ?
Perso j’ai désactivé le noindex (pour que les titres soient indexés par Google) et activé nofollow (quel est sont utilité dans ce contexte ?)… C’est bon pour toi ?
2. Le balisage des titres est mieux en UL/LI ou en DIV ?
J’ai opté pour les listes UL/LI puisse que pour moi cela reste une liste.
3. J’ai des problèmes d’accès aux titres depuis la table des matières.
Lorsque je clique sur un titre, la page ne descends pas sur le bon titre… Mais sur un autre (souvent un ou deux titres qui se trouve avant).
Pourtant les #id correspondent bien entre la table de matière et les titres.
Pour info, je ne fait que sur 2 profondeur avec seulement les H2 et H3 (j’ai désactiver les autres). (exemple sur https://twp.proserv.fr/dolibarr-logiciel-erp-crm/)
As-tu aussi ce problème ?
Merci pour ton aide et au plaisir de te lire 😉
Salut David,
Alors, moi j’ai fait ces choix-là
– j’ai coché noindex
– je n’ai pas coché nofollow
– j’ai opté pour des tirets et non des underscores
– j’ai converti en minuscule
– j’ai choisi les LWPTOC1… : même si cela ne m’enchante pas, je préfère ça à des URL qui font 2km de long si le titre en question est trop long
Pour répondre à ton autre question : je n’ai aucun problème avec les renvois de titre. Mais effectivement, j’ai regardé ton lien et quand je clique sur le « 2 » ça renvoie sur le « 1.1 ». C’est très bizarre. Tu n’aurais pas un peu de code qui traîne et qui empêcherait le plugin de bien fonctionner ?
Bon, perso je n’ai jamais noté cela sur Astuces Divi mais qui sait ?
En tout cas, je gagne presque 10 minutes par article selon la complexité de la table des matières que je devais créer à la main et dont Gutenberg n’est pas du tout UX pour nous y aider !
Pour le noindex et nofollow, bizarre… tu ne veux pas que Google index ta TDM ?
Ou j’ai peut-être mal compris le fonctionnement.
Pour les tirets et minuscule, cela n’a pas d’importance étant en lwpto… en ID.
Pour mon problème, j’ai remarqué que le plugin insère des span devant chaque titre.
Mais pour ma part, il crée deux span au lieu d’un.
Le premier est n’importe quoi… ce qui fausse le truc.
Exemple, le titre 2 comporte span id=lwpto7 et ensuite un autre span id=lwpto2 (lui est bon)… Du coup, quand tu vas sur le 7ème ID, et bien il va sur le titre 2 🙁
Je vais désactiver AMP et faire d’autres tests (comme mettre les ID en titre et non lwpto…)
Si pas mieux -> ticket de support sur WordPress
Merci pour ta réponse 😉
Ah oui : AMP ? Moi je ne l’ai pas. Ça pourrait venir de là…
Pour le NOINDEX, je t’avoue avoir hésité mais voici ma philosophie :
1/ Lorsque je faisais mes TDM en HTML, j’avais noté que Google m’indexait mes liens (dans la Search Console). Résultat, un nombre incalculable d’URL indexées et peu de présentation dans la SERP et aussi peu de clic. J’ai pensé que cela n’était pas pertinent et pouvait diluer mon SEO. Je me trompe peut-être et si un expert SEO passe par là, j’aimerais bien son avis…
2/ La deuxième raison, et là pour le coup, je suis sûre de moi : si un jour, je décide de supprimer le plugin Lucky (pour cause de conflit, de faille de sécurité ou parce qu’il n’est plus maintenu), je devrais alors faire une redirection de chaque URL (chaque sous-URL) qui aura été indexée dans Google. Bon tu vas me dire : les REGEX c’est fait pour ça et je te dirais : oui, dans le cas où tu as choisi les URL avec LWPTOC … mais si tu as choisi la translitération de tes titres : tu es bon pour faire tes redirections à la main.
Qu’en penses-tu ?
Je suis d’accord avec toi pour le point N°2. C’est pour ca qu’il faut laisser les ID en LWPTO… histoire de faire des REGEX au cas où 🙂
Et puis, les #ID à rallonge c’est pas top.
Pour le point N°1 je suis partagé. C’est l’argument que tu présentes dans le chapitre 1 de ton article.
C’est vrai que du coup un nombre impressionnant d’URL sera indexé.
Mais ils ne sont pas intégré à ton site map. Cela ne reste que des liens ancre… Donc je sais pas, je suis loin d’être un expert SEO.
Si tu connais quelqu’un, je serai aussi intéressé par sa réponse concernant l’indexation des liens d’ancres (et non des ancres de lien lol), je ne trouve rien sur le net 😉
Je vais demander à notre ami Mickaël…
J’ai réécris le script.
Je suis parti de zéro. Il ne fait que 200 lignes en JS et 50 lignes en CSS et plutôt bien écrit. En effet, le plugin LyckyWP charge un script de plus de 1000 lignes et beaucoup de CSS… Sans compter tous les fichiers PHP qui sont exécutés. J’ai regardé, c’était une usine à gaz.
J’ai repris la quasi totalité des options proposées par le plugin LuckyWP et y ai rajouté quelques options importantes.
Par contre je ne rajoute pas de bloc dans Gutenberg, mais fait appel (avec un bloc HTML) a un short-code que j’ai créé et liste les options que je souhaite modifier si besoin (en fonction de l’article).
Si jamais tu es intéressée 😉
PS : J’attends la réponse de Mickaël avec impatience 😉
Merci David !
Tu es sacrément fort dis-moi ! C’est super de pouvoir éditer des plugins comme on le souhaite ! Ce n’est pas dans ma capacité malheureusement mais effectivement, c’est intéressant…
Du coup, tout est rentré dans l’ordre pour tes tables des matières ?
Concernant Mickaël, je l’attends toujours… je vais le relancer… mais tu sais, les SEO, ils ne sont jamais très pressés (LOL, petite blague pour le jour où il passera par là)
À bientôt
Lycia 😉
Oui plus de problème, vu que je sais ce que le script fait exactement.
J’ai rajouté une option où tu désignes une div qui contient les titres à indexer. Tu peux aussi ne pas prendre en compte des titres en rajoutant une classe sur les titres à ne pas indexer.
Seul problème, ce n’est pas compatible avec les pages AMP…
Ah oui mais si ce n’est pas compatible AMP, ce n’est pas très bon ? Quand tu dis « pas compatible », tu veux dire que ça ne s’affiche pas sur la version AMP ou que ça fait une erreur ?
Juste que ça ne s’affiche pas en AMP.
En effet, je construis la table des matières en jQuery, et comme les pages AMP ne prennent pas les scripts, la table des matières ne s’affiche pas. J’ai d’ailleurs fait en sorte qu’aucune partie de la table des matières ne s’affiche (encadré, etc…).
Mais je pense d’ailleurs que c’était à cause des pages AMP que LuckyWP posait problème.
Après concrètement ce n’est pas dramatique. La table des matières étant un petit plus, pas une nécessité.
Oui, merci David.
Effectivement, AMP enlève toutes les « fioritures » donc c’est un peu normal que la TOC n’apparaisse pas. En tout cas, bravo pour l’avoir codé toi-même…
Pour ma part, je me pose des questions, je continue à utiliser ce plugin (bien pratique) mais je n’aime pas être dépendante d’un plugin quel qu’il soit, ou du moins, le moins possible… Alors je le garde par fainéantise mais je sais que rien ne vaut « à la mano »… Et en même temps, il me fait gagner beaucoup de temps ! Entre les deux mon cœur balance…
En effet, mais le plugins LuckyWP fonctionne lui sur les pages AMP (enfin à mes souvenirs)… J’ai l’impression qu’il traite en amont lors de la demande du chargement de la page… Pas comme un JS qui lui se lance seulement une fois la page chargée.
Si tu veux que je te partage mon script n’hésite pas. Tu as mon mail/tel 😉
Merci David 😉 !
Salut Lycia, super article qui m’a permis une installation sans problème. J’aurais une question en ce qui concerne la partie divers. On nous propose de ne pas prendre en compte certains titres H1 H2… ou alors de le faire en choisissant le texte.
« Spécifiez les titres (un par ligne) à exclure de la table des matières.Utilisez un astérisque * comme caractère générique pour faire correspondre n’importe quel texte. »
Je ne sais pas du tout comment je dois écrire mon exclusion dans l’encart? J’ai en bas de page de mon article une baise H3 « Articles suivants » qui se joint à ma table des matières pas terrible. Merci beaucoup pour le coup de main 😉
Salut Julie, sur un de mes sites, je me suis trouvée avec le même souci. Les « articles à lire » de JetPack se retrouvaient dans ma table des matières. Effectivement, c’est ennuyeux… J’ai corrigé ça avec un peu de CSS (display none). Il te suffit de trouver la balise à exclure et le tour est joué. Tu t’y connais un peu en CSS ?
Normalement il n’y a que le titre à écrire. (comme il est écrit dans la table des matière)
On peut mettre un étoile avant ou après quelques mots si le titre comporte un texte variable.
Exemple pour le nombre de commentaire… Il faut mettre *commentaire*. Par contre si dans l’article il s’y trouve un titre avec le mot commentaire il ne sera pas pris en compte.
Ce sont les défauts que je trouvais à ce plugin : le fait de ne pouvoir définir une zone où sont pris en compte les titres.
bonjour,
j’ai construit mon site avec DIVI Builder
je viens de tester d’installer ce plugin.
lorsque j’active l’insertion auto, je vois bien apparaitre le sommaire sur les articles déjà publiés, mais pas sur mes brouillons, et si j’enlève l’insertion auto, je n’arrive pas à l’intégrer car le module « table des matières » n’apparait pas danas les modules de construction DIVI. y a-t-il une astuce ?
Salut Caroline.
Ok, je comprends.
Moi je l’utilise dans Gutenberg, donc, le module existe.
Pour le Divi Builder, il te suffit d’ajouter un shortcode dans un module de texte : lwptoc entre crochet (je ne veux pas l’insérer en commentaire alors je ne dois pas ajouter mes crochets, mais toi, oui). C’est écrit dans la documentation ici : https://fr.wordpress.org/plugins/luckywp-table-of-contents/ au paragraphe « Manual Insert ».
Bonjour,
Je viens de paramétrer l’extension. J’ai créé un article à l’adresse de mon site, https://divi.prenommer.com
En automatique, il m’est impossible d’afficher la table des matières ! Notamment à cette adresse : https://divi.prenommer.com/le-medecin-des-pauvres-du-venezuela-bientot-beatifie/
J’ai également testé sur la page Politique de Confidentialité. Rien à faire. Cela ne fonctionne pas. Est-ce le fait de n’avoir insérer aucun shortcode ?
Suis un peu perdu !
Merci d’avance si vous pouvez m’aidez,
Bien cordialement,
Claude
Salut Claude, soit tu utilises un shortcode soit tu paramètres le plugin pour que l’apparition de la table des matières soit automatique. As-tu bien vérifié cela dans les réglages de l’extension ?
Re-bonjour,
Cela fonctionne, je viens de voir que tous les titres (de H1 à H6) étaient cochés, j’ai coché seulement H1 ce qui me paraît logique finalement. Excepté qu’au déroulement du texte cela ne s’arrête que deux ou trois lignes en dessous de la section !
Bien cordialement
Claude
Bonjour Lycia,
J’ai paramétré l’extension afin que la table des matières apparaisse automatiquement. J’ai vérifié dans les réglages de LWPTOC et j’avais malencontreusement cochés 4 titres (de H1 à H4). Maintenant tout cela fonctionne je n’ai laissé cjoché que H1. Merci Lycia.
Bonne journée,
Claude
Super !
merci pour ce super travail. Toutes ces captures d’ecran.. J’ai choisi l’insertions automatique pour mes 83 articles mais le sommaire integre aussi les 3 titres des articles qui sont affichés dans le bloc « articles similaires ». Comment puis-je faire pour supprimer cela?
Salut Esther.
On peut facilement les cacher. Il faudrait que tu rajoutes ce code :
li.lwptoc_item:last-child {
display:none !important;
}
Si ça ne marche pas, donnes-moi l’URL de ton site, je regarderai de plus près.
merci beaucoup de ta reponse, tres concrete..mais il me manque un detail: je le mets où ce code magique??
Salut Esther, tu le mets à l’onglet Apparence > CSS Personnalisé
hello, encore merci pour ta reponse…..
Toute à ma joie d’avoir enfin le sesame, j’ai failli pleurer quand la clef n’est pas rentré dans la serrure!!
je n’ai pas trouvé « CSS personnalisé » dans l’onglet « apparence ». du coup j’ai cherché « CSS »… partout. j’ai trouve dans « gestion des titres » mais le code n’obtient pas le resultat souhaité.
Dans toutes mes bidouilles, j’ai vu que je pouvais exclure un titre en ecrivant « *mon tittre à exclure »…j’ai essayé, çà marche…à condition de saisir les 83 titres dejà en ligne + tous ceux à venir. En terme de travail çà ne m’inquiete pas mais la fenetrre de saisie a sans doute une limite de caracteres??
.
Comme tu me l’avais suggéré, je te donne l’URL de mon site.
desolée de ces tracasserie techniques.
Pardon, c’est Apparence > Personnaliser > CSS additionnel
C’est un onglet de WordPress, pas du plugin
le petit detail qui change tout!!
j’ai trouvé, j’ai essayé, çà n’a pas marché.
je ne veux pas t’embeter plus longtemps, tant pis…
merci en tout cas pour le temps que tu m »as consacré, c’est adorable.
cdlmt
Donne moi le lien de ton site, je regarde à l’occasion
merci pour ta gentille proposition. voici le lien https://www.choup.online/
Salut Esther.
Est-ce que tu peux essayer ce code :
.lwptoc_itemWrap:last-child
{
display:none !important;
}
.lwptoc_itemWrap:last-child(-1)
{
display:none !important;
}
.lwptoc_itemWrap:last-child(-2)
{
display:none !important;
}
.lwptoc_itemWrap:last-child(-3)
{
display:none !important;
}
Il y a de grandes chances que ça ne marche pas. Dans ce cas, tu regardes la pastille n°5 du chapitre 2.2.5 de mon article et tu choisis UL au lieu de DIV. Une fois que c’est fait, je regarderai à nouveau le code et je pense pouvoir trouver une solution. Tiens-moi au courant.
Ou bien essaye celui-ci, ça va marcher, je pense :
.lwptoc_item:last-child
{
display:none !important;
}
.lwptoc_item:last-child(-1)
{
display:none !important;
}
.lwptoc_item:last-child(-2)
{
display:none !important;
}
.lwptoc_item:last-child(-3)
{
display:none !important;
}
Sinon tu peux aussi faire :
.lwptoc_item:nth-last-child(-n+4) {
display: none !important;
}
Code identique.
Salut David ! Ça faisait un bail 😉 ! Pas mal l’idée mais tu crois que ça prend les 4 derniers dynamiquement ? Bon ben Esther n’a plus qu’à tester …
merci à tous les 2 pour la peine que vous vous donnez à mon sujet.
j’ai essayé TOUTES vos suggestions (mais j’ai pas compris la mention « meme code »).
rien n’a marché.
comme j’en avais marre de toutes ces bidouilles, j’ai pris le temps de saisir les titres à exclure « par le texte »…ouais, les 83 titres actuels… C’est surement pas propre, informatiquement parlant, mais çà marche!! donc çà me va.
cdlmt
@Esther, je pense que tu as mis ton code dans un mauvais endroit… Sinon je peux t’assurer que ce fonctionne.
Mais je te l’accorde, c’est un peu de la bidouille, c’est ce qui m’a fait développer mon propre plugins de table des matières, et j’ai poursuivi avec une barre de progression de lecture, un compteur de mots/temps de lecture et pour finir l’activation des titres de la TOC lors de la lecture.
@Lycia : Yes, j’essaie de sortir la tête de l’eau de temps en temps. J’étais sur un site immo qui m’a prit un peu de temps.
Oui ça prend bien les 4 derniers dynamiquement, c’est d’ailleurs une des propriété CSS qui est fait pour ça.
Je teste à chaque fois ici : https://css-tricks.com/examples/nth-child-tester/
Merci David 😉
Salut Lycia,
Est-ce que par hasard tu aurais de bons conseils pour installer un sommaire dans la sidebar qui défile à la lecteur ?
Avec ou sans plugin ? Et si possible un truc designable 🙂
Je cherche désespérément depuis quelques mois.
À chaque fois que je le vois sur un autre site, je trouve cela bien cool d’un point de vue UX, mais impossible de trouver comment faire.
Merci pour tes bons tuyaux.
Stéphanie
Bonjour,
Un grand merci pour ce tuto et cette aide car pour ma part, je suis très heureux de ce plugin.
J’ai néanmoins une question car je remarque que le défilement amène bien jusqu’au titre sur la version mobile tandis que sur la version website ordinateur, j’ai un défilement qui descend un peu trop.
Pour mieux comprendre, je vous invite à jeter un oeil sur le blog : http://www.welove-paris.com
Pourriez-vous me donner une astuce pour que le défilement soit bien identique sur les deux versions ? Ou une astuce pour faire en sorte que ce soit améliorer pour les lecteurs.
Salut Stéphanie.
Je ne sais pas trop si c’est ce que tu recherches mais le site Pour Pas un Rond utilises Easy Table of Content et ça donne le rendu que tu trouveras ici : https://www.pourpasunrond.fr/profil-linkedin-professionnel/.
Salut Chris, on dirait que le souci vient du header qui couvre l’ancre. Le scroll se passe bien mais il est masqué par le menu. De plus, je vois que c’est le thème Extra. As-tu contacté le support pour voir ?
Salut, j’ai trouvé cette ressource sur le site d’Elegantthemes : https://www.elegantthemes.com/blog/divi-resources/how-to-build-a-clickable-table-of-contents-for-a-blog-post-with-the-divi-layout-block
Je voulais avoir votre avis dessus.