
The Hungry theme is a WordPress theme sold on ThemeForest. He specialises in theme "restaurant site". In this article, I propose my feedback from a Divi redesign. I will explain the various steps that have been taken to go from Hungry to Divi.
From Hungry theme to Divi theme: before/after video
Step 1: Install a local WordPress
For this project, I used MAMP. I've had too many troubles with other solutions that I haven't taken the risk for a long time...
I made the choice of start from scratch. The contents of the old site were poor, there was almost nothing to conserve. Moreover, the Hungry theme had created many Custom Post Types useful for its operation (such as dishes, menus etc.). I never wanted to keep them.
So I created a new WordPress site, I installed the theme Divi as well as most plugins used in the old site.
I found equivalents for plugins that were no longer maintained by their developer. For example, I traded Delightful Download (a plugin that had not been updated for more than two years) by Download Monitor. Even if there was no problem (conflicts) with the old one, when a recast is made, it may as well be done "in full".
Do you know you can test Divi for free? See you on this page and click on "TRY IT FOR FREE"
Step 2: Content Tracking
Gradually, I rebuilt the existing site on my local version. Thus, the site in production (old site) was always accessible on the internet.
For a restaurant site, it is unimaginable to leave it in maintenance for several days, the time to make the redesign.
It is not a blog or a "common" showcase site: a restaurant site is necessary for the smooth running of daily activity. Internet users want to see the map and must be able to book online!
In short, I followed most of the pages and rebuilt the main menu (the structure of the site).
I took care of keep the SLUG on each page (the end of the URL) so that they match those of the old site. So I'd save some redirects later!
Step 3: Design
Besides having transcribed some of the content on the local site, we had to tackle design!
The advantage is I had "white card." That's pretty cool!
So I built my block by block pages. I didn't call for any ready-made pageseven if it would have been an easy solution.
I used the colors of the client's graphic chart and I enhanced my sections using the Dividers Divi.
Step 4: Features
In terms of functionality, nothing complicated: no online shop, no booking system, no newsletter, no blog. So the work was lightened!
Being supporter of every effortI still used tools that made it easier for me to do this.
For example, for the booking request form (this is not a system itself, only a form) built with Caldera Forms, I used the tool Export-Import plugin.
So I didn't have to rebuild the fields on the form. It was a child's game to export the settings from the old site and reimport them into the new one!
Step 5: SEO optimization
Since I'm back from scratch, I had to make a substantive work on SEO. Anyway, the old site wasn't top...
So I installed Yoast SEO and I optimized each page for a keyword, not to mention metadata optimization (title and description).
I also have optimized internal mesh as well as the content of each page, the alternative text of the images etc.
But the job SEO optimization Don't stop there. It must be constant, it is a work of substance.
Without forgetting that the theme Divi requires special attention in terms of SEO: read here how make Divi SEO-Friendly.
Step 6: Optimizing Performance
Although WP Rocket was already present on the old site, I improved its settings. But the bulk of the optimization work was done on the images...
During this redesign, I took the opportunity to import images ultra light. I did not retrieve the images used in the old site.
So I gained considerable weight and optimized loading time. As you can see below:
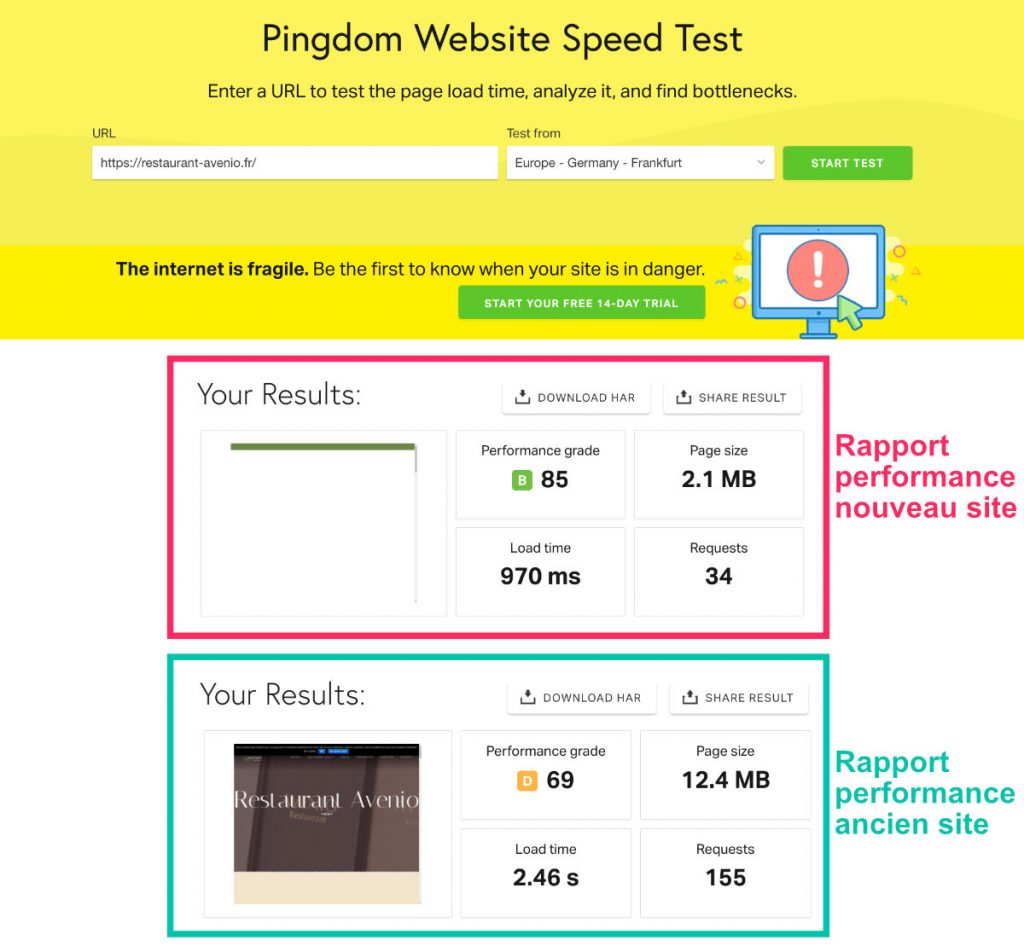
Former site performance report:
- Grade: D (69/100)
- Page size: 12,4 MB
- Loading time: 2.46 s.
- Number of requests: 155
New site performance report:
- Grade: B (85/100)
- Page size: 2,1 MB
- Loading time: 0.97 seconds.
- Number of requests: 34
During this redesign with Divi, the site really gained in performance. Google will see it quickly and the user will only appreciate this improvement!
Step 7: Migration
Arrive the fateful moment of migration. My local site was almost complete, so it was necessary exchange...
The idea is to import the new site in parallel with the old one, within the accommodation, using FileZilla.
To complete this delicate step, I used Duplicator. A plugin that assists us in migration. The concern is that I have done this step 5 times, without it ever succeeding. The export was always going well, the import too, but the host systematically sent me an error message.
I like trying to understand, but for the moment, I didn't understand where the mistake could come from... So I had two other options for migration: do it manually (which is not necessarily complicated but rather boring) use another plugin.
I tried the second solution, to use another plugin. At worst, if it didn't work, I'd have moved on to the other option...
So I made my migration with All In One WP Migration. Nothing to say, this solution made it easy for me to migrate, without trouble and at first!
Step 8: Redirections
Once my new site had taken the place of the oldAs a first step, the old URLs that were no longer available in the new site had to be followed.
For this, I used two tools: Integrity and Redirection
At first, before crushing the old site, I took care to recover all existing URLs. I didn't do this manually, of course, because WordPress creates many URLs without you knowing. So I used a little soft for Mac called Integrity (There are lots of equivalents). The latter gave me the entire list of URLs of my old site.
In a second time, after migration, I installed the plugin Redirection. Thanks to him, I was able to start track old URLs to avoid broken links This is bad for the SEO. Some redirections were simple, for others I used the option Regex. This allows for batch redirections and saves me valuable time.
Discover other tips and resources required for your Divi projects.
Step 9: Set the Details
Indeed, adjust the last little details and refine the work so that the site is close to "perfect" is certainly a double-edged stage. Either we screw her up or we spend some crazy time there!
I admit I haven't finished this stage yet. And yes, I'm a little silly to introduce you to this redesign before the site is "perfectly perfect"... But that's the game.
A site is never really over. It is a substantive and continuous work. Then when it doesn't suit us, well, we'll do it again!
For my part, I repeat my websites or those of my clients every 2 or 3 years. This is the maximum delay in the web!
At worst, you can grow up to 4 years but beyond that, you may have a somewhat obsolete site, either in terms of design or in terms of functionality.
In this last stage, we must not forget to integrate the code of Google Analytics in the new site. Not to mention revalidating the property with the Google Search Console (depending on the method used, this may not be necessary).
You will also need to check the mobile and tablet versions (it's easier when the site is online) to see if there is any defects in the design or adaptation to screens. And check if all forms and other features are correct.
Finally, the data from the Google Search Console to see if there is no problem (errors 404 or others)...
Need more resources on Divi? Visit ElegantThemes blog full of ideas and tutos!
Duration of the recast: Five days.
Summary of this redesign Divi:
- Install a local WordPress with Divi
Using software like MAMP For example. WordPress is available hereas regards Divi, you will need a license.
- Forward content
Try to keep the same SLUGS (URL endings) in order to have less work afterwards.
- Rebuilding Design
Build your pages from zero or import a Divi design ready.
- Add Features
Install all necessary extensions and replace obsolete plugins with equivalents.
- Optimize SEO
This step is not done in a few minutes, it is a work of substance. The idea is to go on good bases.
- Optimize performance
Google and Internet users like fast and efficient websites. Install and set a cache plugin as WP Rocket.
- Migration: exchange the old site with the new one
For easy migration, use a plugin as Duplicator or All In One WP Migration.
- Thinking about redirections
Check the links that have not been tracked. Make redirections using the plugin Redirection.
- Refine the details and ensure that the site functions properly
Step not to be overlooked. This is what one recognizes a well-made site ;-)... This step can take time!
Are you interested in practical cases? Read another practical case of redesign: from BeTheme in Divi.

Bonjour,
Je suis débutant dans le domaine. Je n’ai pas trop compris comment tout le processus se déroule je crois.
Lorsqu’on veut faire une refonte on doit aussi acheter un nouveau nom de domaine etc ?
Ou alors il s’agit de bien garder le squelette du site ( nom de dom, hebergement, url) , mais seulement changer sa peau ( le design, fonctionnalité etc).
Au fait, merci pour ce blog il est juste génial lorsqu’on débute avec divi et tout le système de création de site web 🙂 !
Hello Rdgs ! Merci à toi. Pour une refonte tu as diverses solutions. Dans le cas de cet article, j’ai refait un site de À à Z et je l’ai placé à la place de l’ancien. Dans d’autres cas tu peux simplement changer le thème WordPress et conserver l’existant, tu ne refais donc que le design. Et dans certains cas tu peux changer le nom de domaine mais peut-on appeler une refonte alors ? Je pense que serait plutôt une nouvelle création ou bien une migration… après ce ne sont que des termes 😉
bonjour,
tout d’abord je tiens à vous adresser un très chaleureux merci pour ce blog, je suis débutante et je dois dire que je trouve ici de précieuses ressources sans lesquelles je me sentirai un peu perdue !, et surtout qui me font de plus en plus apprécier Divi, (…alors que j’y étais plutôt allergique au début ;))
Je dois faire une refonte d’un site qui utilise le thème Oshine avec le builder Tastu.
La solution la simple me semble être effectivement de le faire en local (même si j’appréhende moi aussi la phase de migration… je ne l’ai faite qu’une fois, comme je disais je suis novice ^^, mais sur un WP vierge qui venait tout juste d’être crée.) J’aurai donc deux petites questions 🙂
la première, existe il une solution pour que mon client puisse voir l’évolution de la refonte si elle se fait en local ? sinon comment faire la refonte en ligne mais sans venir interférer avec le site actuel (vu que je compte partir d’un autre thème et builder…)
la deuxième : comment se passe la migration de local à en ligne par rapport aux données de l’ancien site (y a t il des précautions à prendre pour éviter des embûches ou cafouillages…)
Merci d’avance pour vos réponses,
et encore merci pour ce blog 🙂 !!!
Audrey
Bonjour Audrey et merci pour tes encouragements !
Alors, je vais essayer de répondre précisément à tes questions :
1/ Si tu choisis de développer le site en local et que tu veux que ton client puisse suivre l’évolution, il faudra choisir Local by Flywheel comme serveur local. Celui-ci te permet de partager une URL temporaire avec ton client.
2/ Tu peux aussi le faire en ligne dans un sous-dossier de ton hébergement ou bien sur un sous-domaine (par exemple : http://www.mondomaine.com/mondossier ou http://www.monsousdomaine.mondomaine.com). Mais dans ces cas, tu devrais avoir la possibilité de créer une 2ème base de données (selon l’offre de l’hébergeur, tu pourras pas) et en plus, tu devras aussi faire une migration ensuite vers le vrai nom de domaine (ainsi que nettoyer tout le reste). Donc ce n’est pas trop une bonne solution.
3/ Si tu développe de zéro en local, il faut que tu oublies les contenus de l’ancien site car ils seront écrasés après importation du nouveau site.
4/ Si l’ancien site n’a pas beaucoup de contenu, reprendre tout de zéro est une bonne solution.
Bref, on pourrait en discuter longtemps 😉 il n’y a pas de bonne ou mauvaise solution. C’est comme quand tu dois choisir un itinéraire pour aller d’un point A vers un point B en voiture 😉
J’espère t’avoir aidé.
re
merci pour ta réponse et tes pistes, cela me permet d’y voir plus clair en effet, et me conforte dans mon idée de le faire en local (le site a effectivement peu de contenu actuellement). Merci aussi pour le tuyau pour local by flywheel, je l’ai regardé de plus prêt et cet outil me paraît tres très interessant 😉
encore merci et très bon we à toi 🙂
Bonsoir Lycia
En voulant faire la refonte d’un site avec le thème DIVI, j’ai télécharger un layaout toute ma page est en décalé, le texte, les images, les boutons ne s’affichent pas au bonne endroit. Comment remédier a ce problème.
Salut Mimi tu dois avoir des problèmes de marges. Édite toutes les sections et mets les à zéro pour voir.