
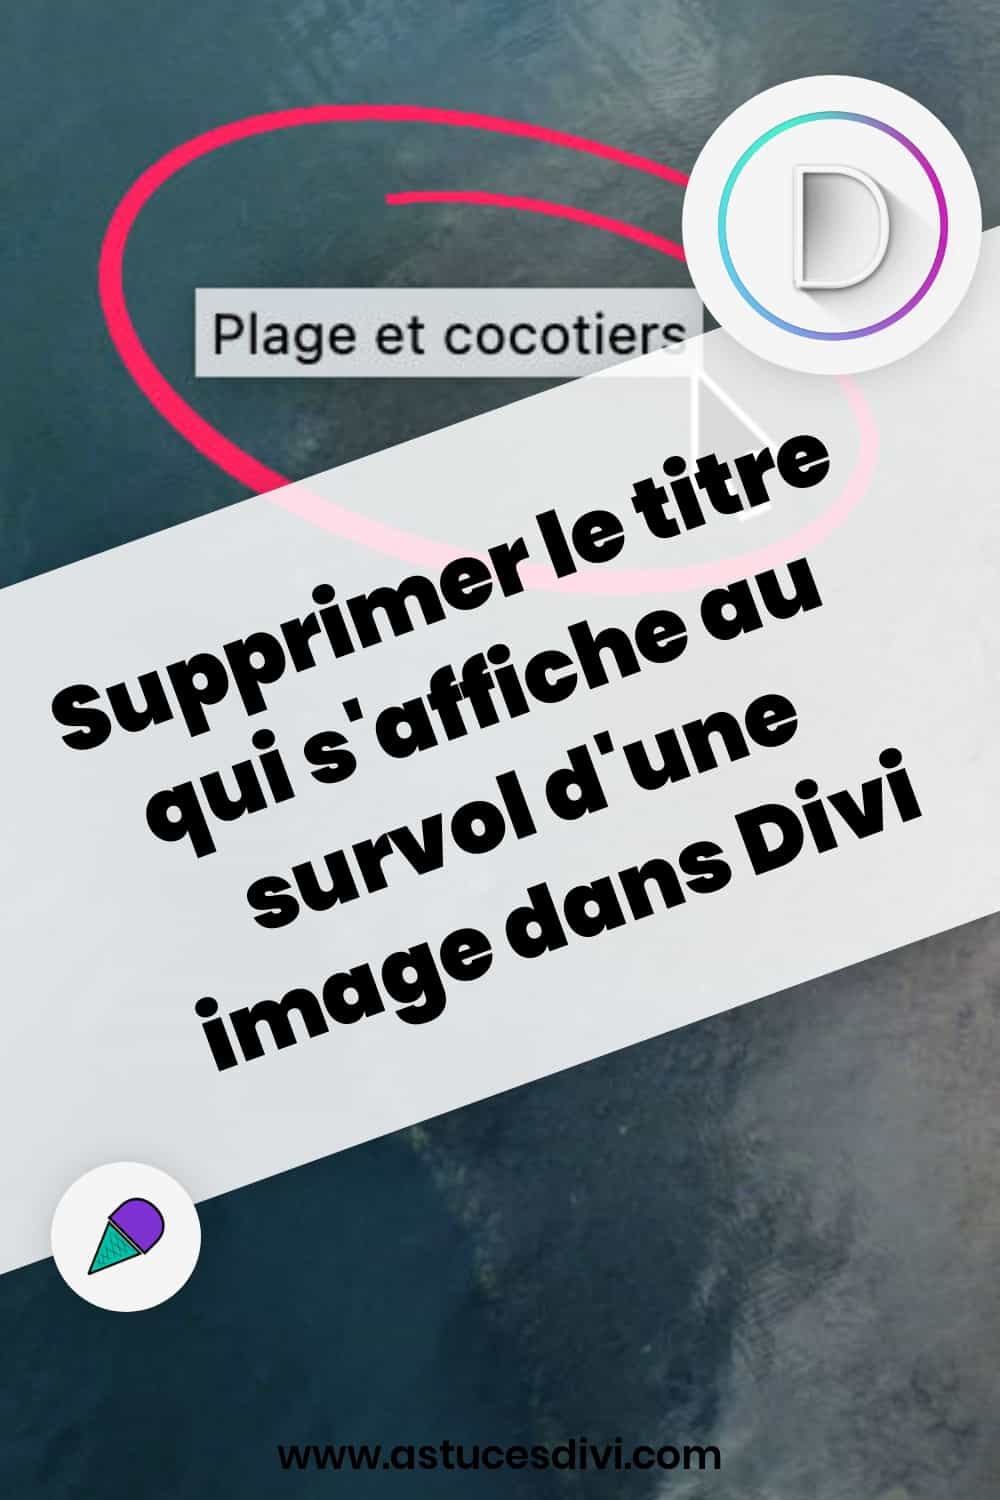
You may have noticed that a widget appears on the image overfly with the mouse in your Divi publications?
If you, or your client, find it boring, you will be able to solve this problem in less time than I need to write this mini tutorial!
I'll show you two methods: with or without extension.
Note to understand better: the help page appears when the user passes his mouse over an image of your site. This means that this is a change in Javascript. Indeed, JS is the language used to make interactions between the site and the Internet user. As a result, this toolbox cannot be hidden/deleted with CSS (which is a much easier language to learn and master). This code could be changed in a child theme, but it would be much more complicated...
1 - Remove the title of the image on the mouse overfly with plugin
There are various ways in which add code in Divi, first see the method that uses the extension Snippet code.

- Go to the tab Extensions > Add, seize Snippet code in the search bar.
- Install and then activate the extension.
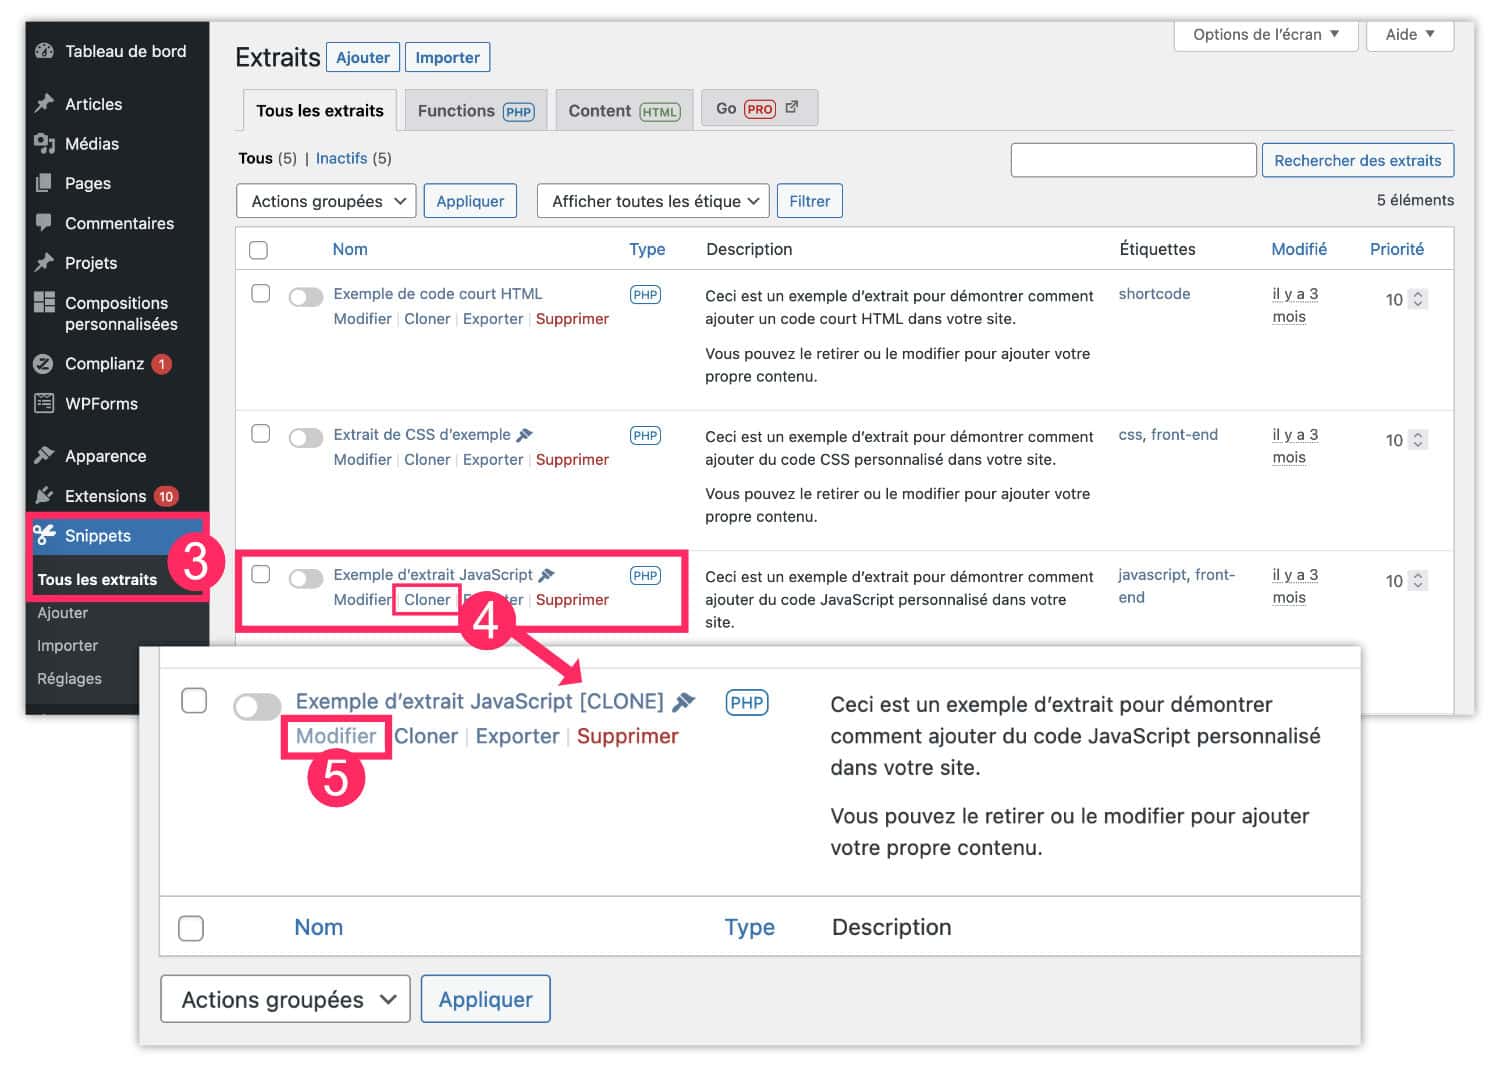
- Go to the tab Snippets > All extracts.
- Find example of Javascript extract, then click on Cloner*.
- You will find this clone at the bottom of the extract list. Click Modify.
- Give your snippet a title to find it more easily in the snippet list.
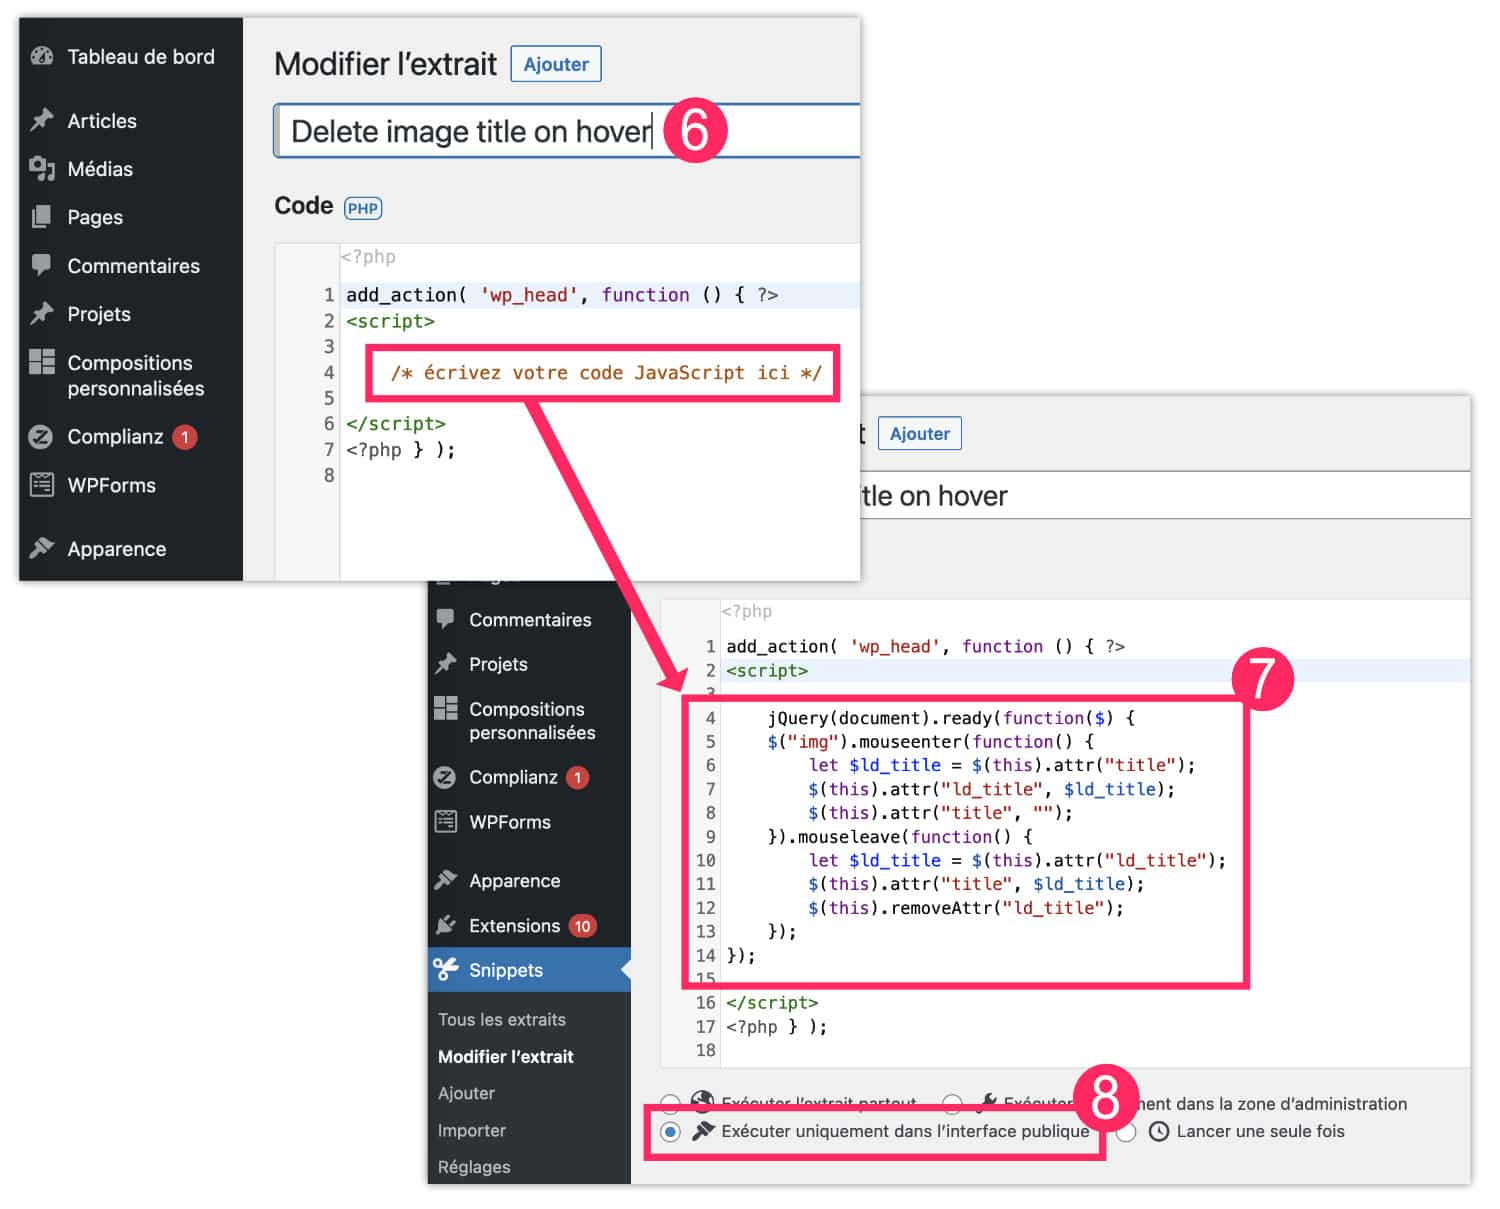
- Instead of "Write your JavaScript code here", copy and paste the following code:
add_action( 'wp_head', function () { ?>
<script>

	jQuery(document).ready(function($) {
    $("img").mouseenter(function() {
        let $ld_title = $(this).attr("title");
        $(this).attr("ld_title", $ld_title);
        $(this).attr("title", "");
    }).mouseleave(function() {
        let $ld_title = $(this).attr("ld_title");
        $(this).attr("title", $ld_title);
        $(this).removeAttr("ld_title");
    });
});

</script>
<?php } );- Choose (or store) the option "Run only in the public interface".
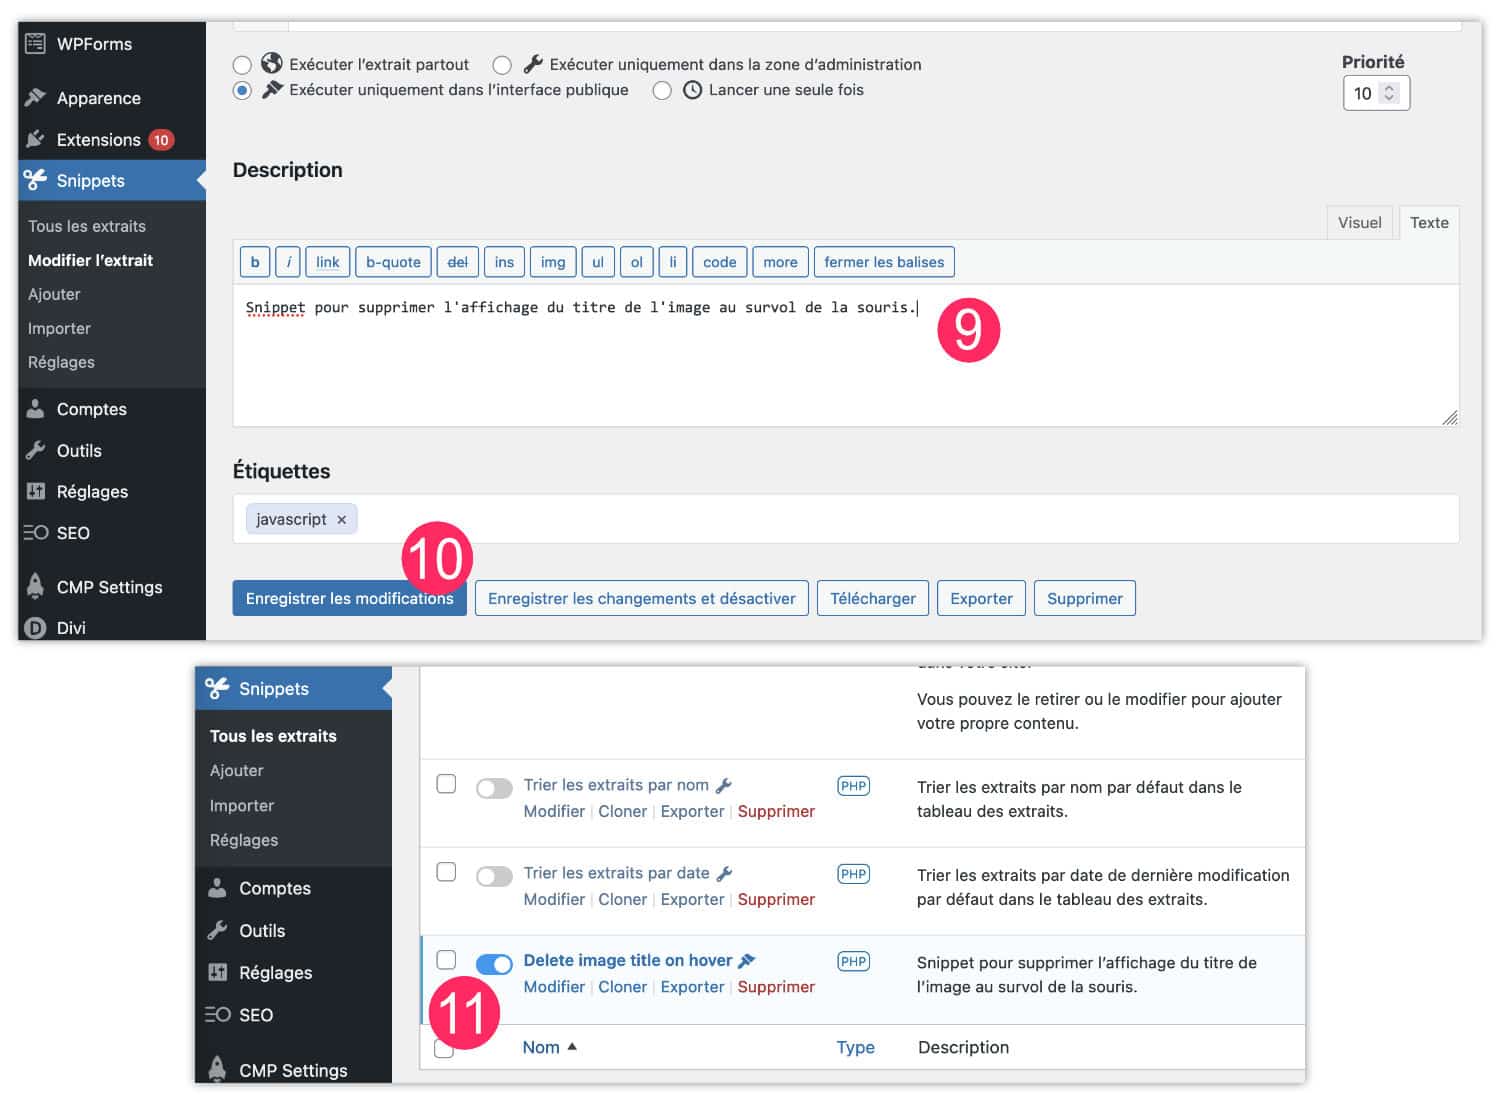
- Below the snippet, a field allows you to enter a desciption. This will allow you later to remember what this piece of code is for.
- Save your changes.
- Back in the snippet list, check that the Toggle is positioned to the right and blue. This makes your code active (if the Toggle is grayed, your code is inactive).

Now go for a walk on your site... Mouse-flying widgets should be gone!
Did you know that? You can test Divi for free by visiting on this page and by clicking on "TRY IT FOR FREE"
*Important: if you do not have an example of a blank JS code that you can CLONER, simply add a new snippet PHP and paste the code below (this is the same code as the previous one, but it contains the function add_action) :
add_action( 'wp_head', function () { ?>
<script>

	jQuery(document).ready(function($) {
    $("img").mouseenter(function() {
        let $ld_title = $(this).attr("title");
        $(this).attr("ld_title", $ld_title);
        $(this).attr("title", "");
    }).mouseleave(function() {
        let $ld_title = $(this).attr("ld_title");
        $(this).attr("title", $ld_title);
        $(this).removeAttr("ld_title");
    });
});

</script>
<?php } );
2 - Delete the image title on the mouse overfly without plugin
It's the fastest method. No need to install a new extension, Divi allows us to do this from its options.
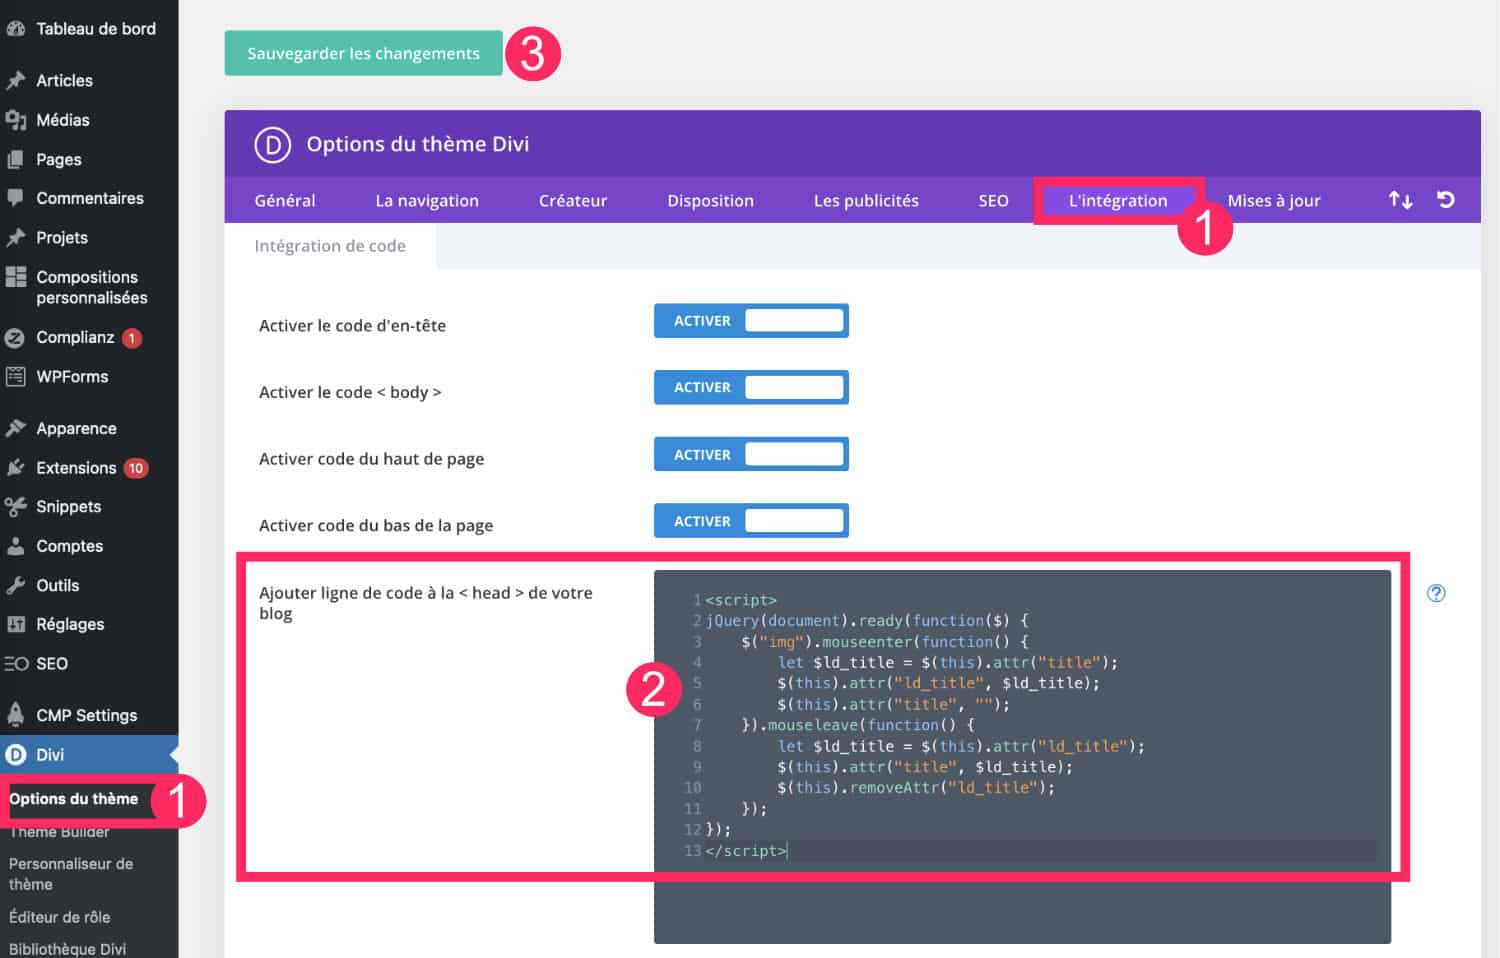
- Go to the tab Divi > Theme Options > Integration
- In the insert "Add code line to the
<head>of your blog", copy and paste the following code. - Save your changes.
Here is the code to use:
<script>
jQuery(document).ready(function($) {
    $("img").mouseenter(function() {
        let $ld_title = $(this).attr("title");
        $(this).attr("ld_title", $ld_title);
        $(this).attr("title", "");
    }).mouseleave(function() {
        let $ld_title = $(this).attr("ld_title");
        $(this).attr("title", $ld_title);
        $(this).removeAttr("ld_title");
    });
});
</script>
The original code comes from the site LearnHowWP.
Now, you can check the images of your site: the title's tooltips no longer appear on the mouse's fly.
Notez : il s'agit du même code utilisé pour la méthode Code Snippet, mis à part que celui-ci embarque les balises <script>
3 - What's the best method?
How to add a stylish and inverted cursor to your Divi page
Some users do not like to add plugins yet and always, so they will opt for the method with Divi options.
Toutefois, la méthode avec Code Snippets offre quelques avantages :
- Si le code est défectueux pour X raisons (vous avez mal copié-collé, la source où vous avez trouvé votre snippet est obsolète, etc), vous pouvez facilement désactiver le snippet grâce à son Toggle bleu.
- If the added code breaks your site, it is much easier to temporarily disable a plugin via FTP rather than the Theme Divi.
- If you're starting, it's a good way to check if it works before you get your snippet permanently into Divi options.
- This allows you to properly store your snippets: if you have a lot of snippets, it can be difficult to identify them if they are all after them in the theme options (Integration tab).
Pour aller plus loin, voici quelques articles qui pourraient vous intéresser :
- Les snippets utiles pour Divi
- How to turn your cursor into a button when you fly over an item using Divi
- Comment changer le curseur de la souris avec une image personnalisée
- Comment ajouter un curseur stylé et inversé à votre page Divi
- Comment modifier une image au hover avec Divi ?
Need more resources on Divi? Visit ElegantThemes blog full of ideas and tutos! Or learn how to effectively use this theme through my training Divi !
Salut Lydia,
Ça faisait longtemps.
Je crois qu’il y a une propriété CSS pour ça, à mes souvenir.
Ou au moins jouer sur le cursor ou pointer-event…
Au plaisir de te lire.
Ah, je vais regarder… comment tu vas depuis le temps ?
Merci pour cette astuce rapide !!
Cool !
Bonjour !
Effectivement David, si tu mets en CSS » pointer-events: none; » cela désactive l’infobulle.
Mais dans mon cas, j’ai mis des images clicables dans mon menu, et cela désactive le fait de cliquer, donc je cherche une autre solution.
J’ai mis le script dans Intégration mais cela continue de s’afficher.
Si vous n’avez pas de comportement spécifique sur vos image.
img[title] , picture[title] {
pointer-events: none;
}
Bonjour,
J’ai essayé la méthode avec code snippets mais le plugin a du changé parce que je ne trouve pas « l’exemple d’extrait Javascript » dans « tous les extraits »
En tout cas merci pour les autres conseils sur le site j’y viens régulièrement.
Oui c’est dommage, Code Snippet est plus restreint maintenant, c’est vraiment pas cool
Bonjour,
Merci pour cette belle astuce !
Cela fonctionne très bien mais pour mes galeries d’images j’utilise Modula, et là ça ne marche pas
Une idée?
ouaahhhh, top, merci pour cette astuce !!
Merci Stéphanie
Merci Philippe, ah non, je ne connais pas Modula ;-(