
The Divi theme and its Divi Builder offer countless customization options. Just know them well to set the smallest pixel of a layout... Yet, there are still some places where the developers of Elegantthemes have decided for us, leaving us no option to correct some design elements here and there... And this is where the SNIPPETS for Divi!
Yes, thanks to a simple copy and paste, you will correct these unwanted little designs on your site.
I publish this article today but pin it somewhere because with every new snippet I need for my own Divi projects, I will come and share them here. So this is a V1 for this evolutionary article!
- What is a Snippet?
- How to use the Divi snippets offered here?
- 1 - Delete the grey line under the Divi menu
- 2 - Remove the grey line from the Divi sidebar
- 3 - Reduce the font of the Search button
- 4 - Remove the list chips at the foot of Divi page
- 5 - Remove the shadow under the main menu of Divi
- 6 - Add a background image to the main menu
- 7 - Get a menu that changes color automatically
- 8 - Fix the toolbar of the Divi Text module
- 9 - Stop the images in the Blog module
- 10 - Show update date of a blog article
- 11 - Change the color of WooCommerce's Promo badge
- 12 - Allow parallax on mobile screens
- 13 - Open the footer icons in a new browser tab
- 14 - Insert a dynamic year in your publications
- 15 - Remove the widget that appears on an image overfly
- Snippets for Divi: In conclusion...
What is a Snippet?
Snippet is an anglophone word that could be translated as "extract" in French... This is in fact a portion of code ready to be copied and glued to your site. Once this code is added, the desired functionality or design must be immediate.
The Snippets are a real happiness for WordPress/Divi users who have no code skills, as this allows them to correct their small worries without calling on a developer.
I must confess that when I started with WordPress, I didn't even know where to place the Snippets that I found on the Web. I also didn't know how to recognize the difference between CSS or JS and I didn't know how to manipulate these lines of code... In short, how everything is learned!
Need to master Divi? Discover my training that accompanies you step by step in the understanding and use of Divi! Learn more about Divi training.
How to use the Divi snippets offered here?
I'll offer you various Snippets Divi to achieve various immediate outcomes. Just copy and paste the given code. To help you, I will tell you where to place this code, but for your learning, I recommend you read this guide carefully to find out add code in Divi.
Note that the proposed codes can be modified by you to better match your graphic chart, so don't hesitate to change the color codes, pixel values, etc.
Ah! And when I think about it: if the code doesn't work, think about emptying your cache or checking that the quotes or apostrophe are straight, because it can be changed when copy-paste...
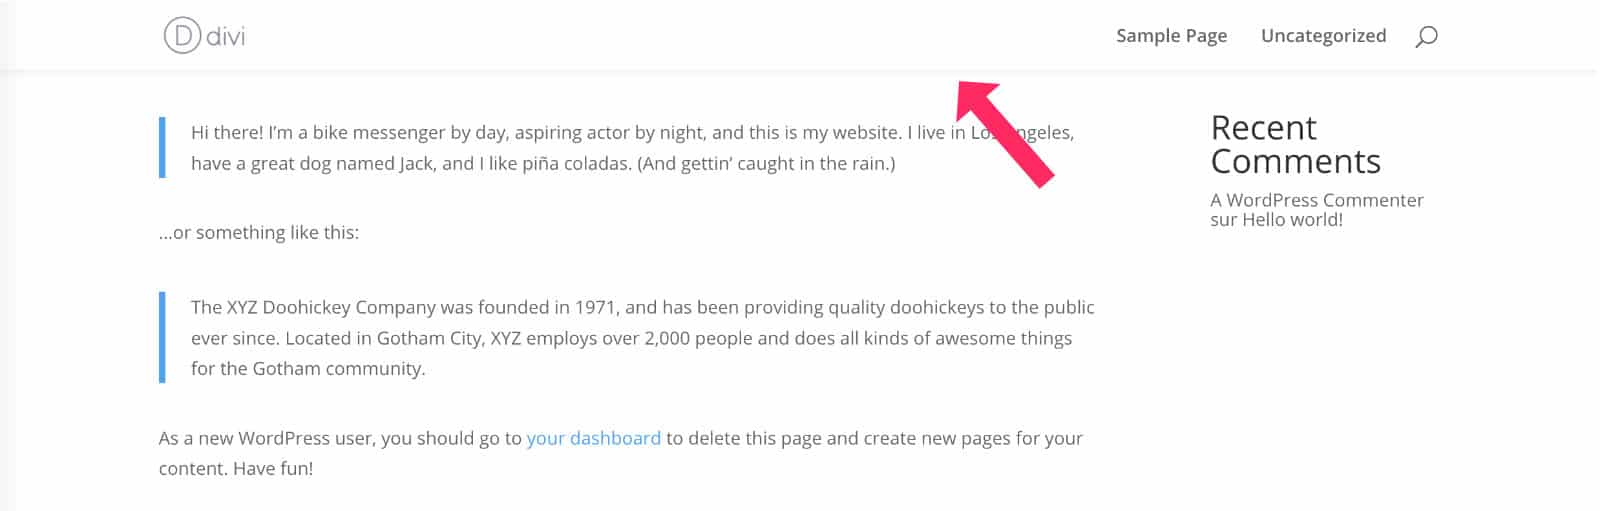
1 - Delete the grey line under the Divi menu
Ah, she pisses you off that one?! Many of you ask me this question regularly: "how to remove the grey line under the menu"...
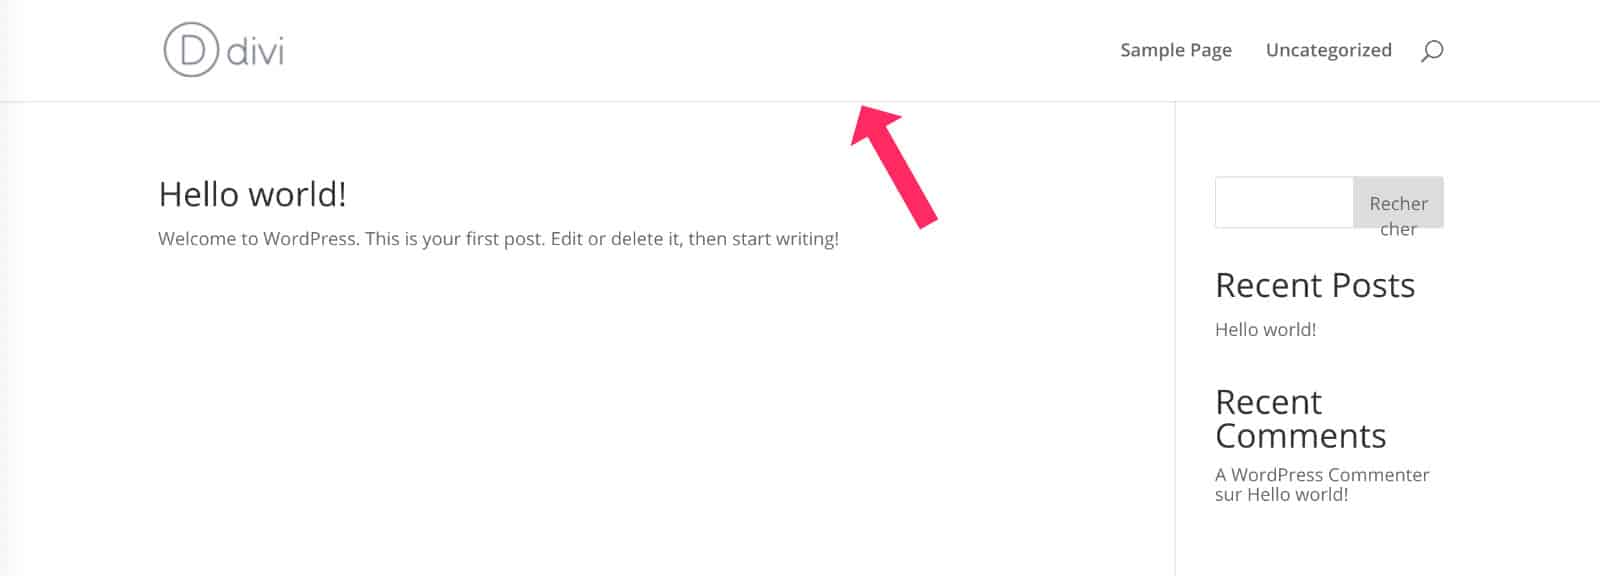
So here's the answer:
/* supprimer la ligne grise sous le menu de Divi */

#main-header {
-webkit-box-shadow: none;
-moz-box-shadow: none;
box-shadow: none;
}
💡 Placez ce code dans la style sheet of your theme child - or in the tab Divi > Theme Options > Customize CSS - or in the tab Appearance > Customize > Additional CSS.
Did you know that? You can test Divi for free by visiting on this page and by clicking on "TRY IT FOR FREE"
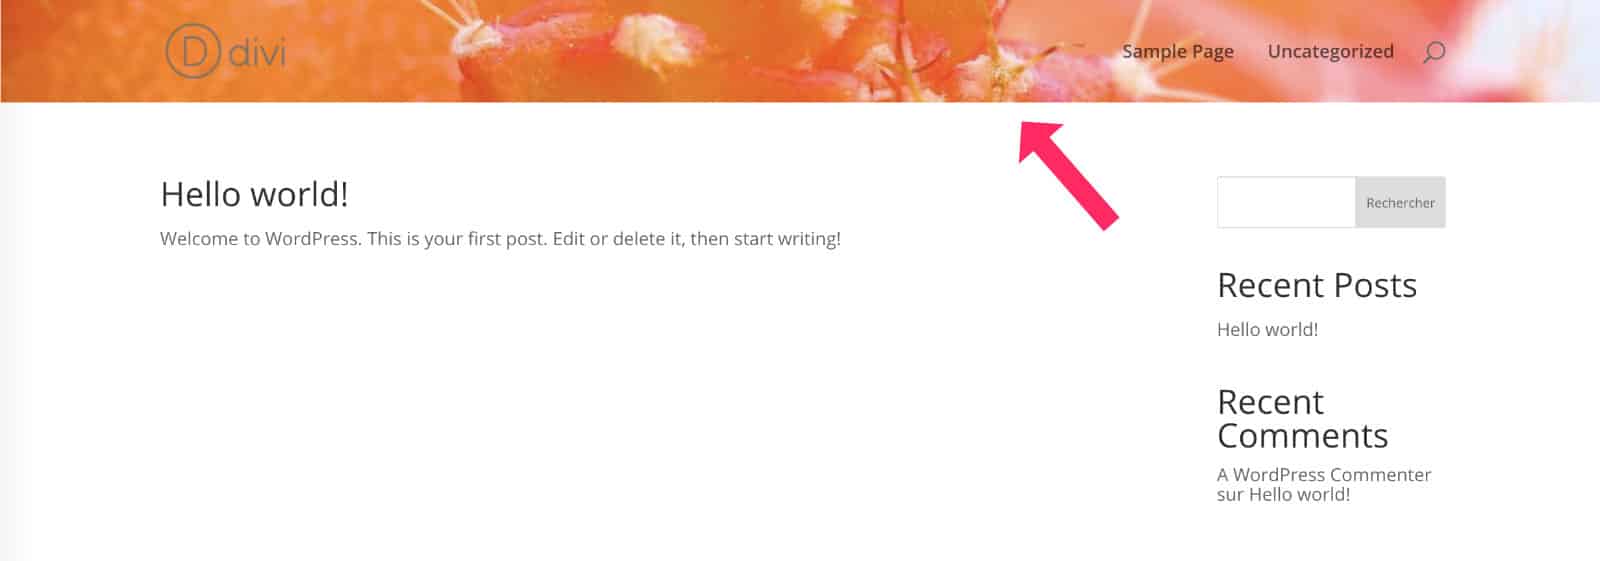
2 - Remove the grey line from the Divi sidebar
This one looks less disturbing, but on some sites, keeping this grey line that separates the main content from the sidebar can be unsightly...
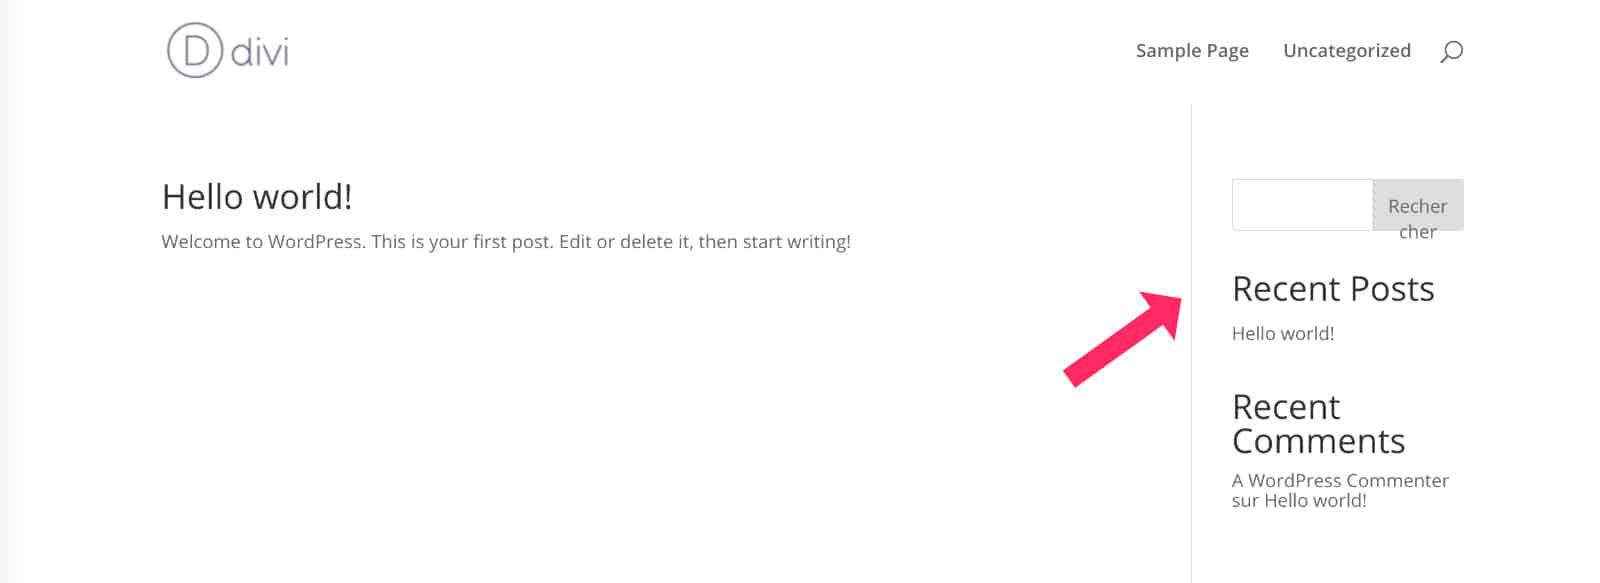
So here's the solution:
/* supprimer la ligne grise de la sidebar Divi */
#main-content .container::before {
    background-color: rgba(0, 0, 0, 0);
}
💡 Placez ce code dans la style sheet of your child theme - or in the tab Divi > Theme Options > Customize CSS - or in the tab Appearance > Customize > Additional CSS.
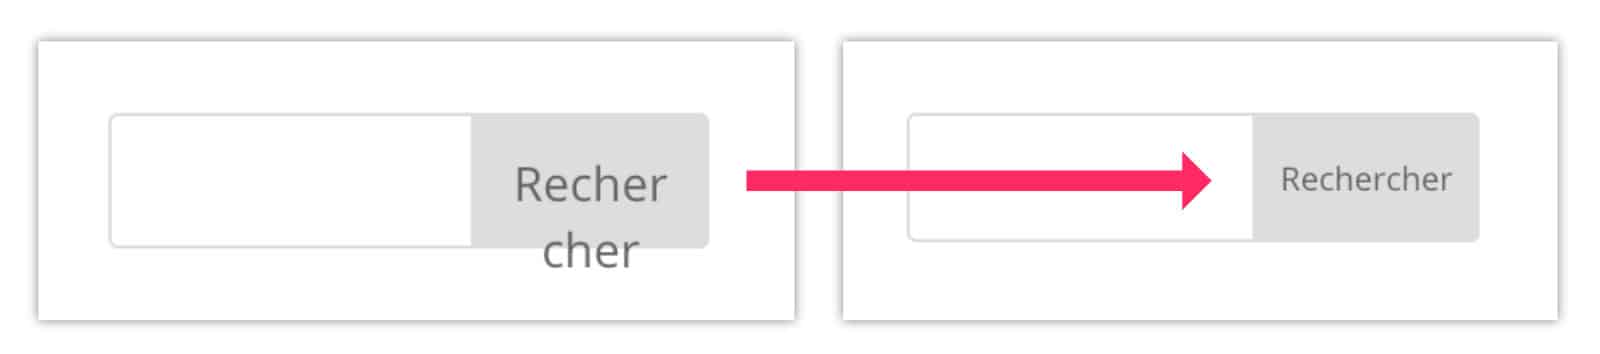
3 - Reduce the font of the Search button
You hate this one, I'm sure! You don't like the word "search" truncated. Indeed, for Anglophones (search) the button does not pose a problem, but for Francophones, it is a concern...
/* réduire la police pour le bouton rechercher */
.et_pb_widget .wp-block-search__button {
    font-size: 10px;
}
See also this tutorial for optimize your result page Research with Divi.
💡 Placez ce code dans la style sheet of your child theme - or in the tab Divi > Theme Options > Customize CSS - or in the tab Appearance > Customize > Additional CSS.
4 - Remove the list chips at the foot of Divi page
If you use widgets at the foot of the page, it is possible that ugly chips appear and come to disrupt your design...
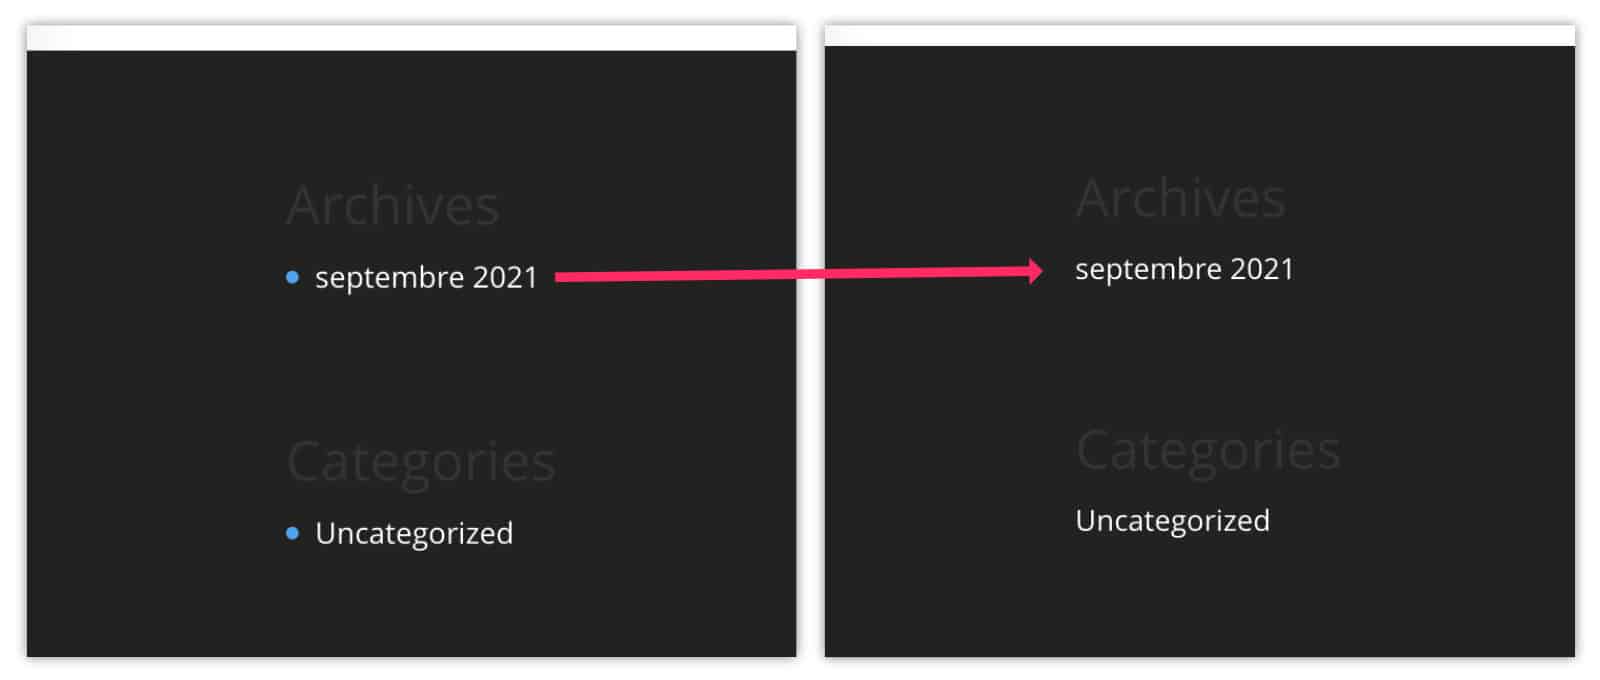
Here's the solution:
/* supprimer les puces de liste en pied de page */
#footer-widgets .footer-widget li::before {
display:none;
}
#footer-widgets .footer-widget li {
    padding-left: 0px;
}
💡 Placez ce code dans la style sheet of your child theme - or in the tab Divi > Theme Options > Customize CSS - or in the tab Appearance > Customize > Additional CSS.
5 - Remove the shadow under the main menu of Divi
This Snippet Divi could also serve you, if you want to get a flat design...
/* supprimer l'ombre sous le menu */
#main-header.et-fixed-header {
   -webkit-box-shadow:none!important;
   -moz-box-shadow:none !important;
   box-shadow:none !important;
}
💡 Placez ce code dans la style sheet of your child theme - or in the tab Divi > Theme Options > Customize CSS - or in the tab Appearance > Customize > Additional CSS.
Need to master Divi? Discover my training that accompanies you step by step in the understanding and use of Divi! Learn more about Divi training.
6 - Add a background image to the main menu
This is less common but perhaps you would like to add a decorative image in the background of your menu...
/* ajouter une image de fond dans le menu principal */
#main-header {
background-size: initial;
background-repeat: no-repeat;
background-image: url(placez ici l'URL de votre image) !important;
background-position: center;
}
💡 Placez ce code dans la style sheet of your child theme - or in the tab Divi > Theme Options > Customize CSS - or in the tab Appearance > Customize > Additional CSS.
To add background images in the background of your pages, this way.
7 - Get a menu that changes color automatically
If you want to give peps to your site, you could choose a main menu with changing colors, as here:
/* couleurs changeantes dans le menu principal */
#main-header {
-webkit-animation: random 15s infinite;
animation: random 15s infinite;
}
@keyframes random {
15% { background-color: #e3ff87; }
30% { background-color: #ff7c96; }
45% { background-color: #6ffffa; }
60% { background-color: #ef6b30; }
75% { background-color: #bf69b1; }
}
💡 Placez ce code dans la style sheet of your child theme - or in the tab Divi > Theme Options > Customize CSS - or in the tab Appearance > Customize > Additional CSS.
If you wish to apply this change colors on other elements of your site, read this tutorial.
8 - Fix the toolbar of the Divi Text module
If you use the Divi Builder to write long texts, you must have noticed that you had to scroll up to format the text you are writing.
It's annoying if your text is long...
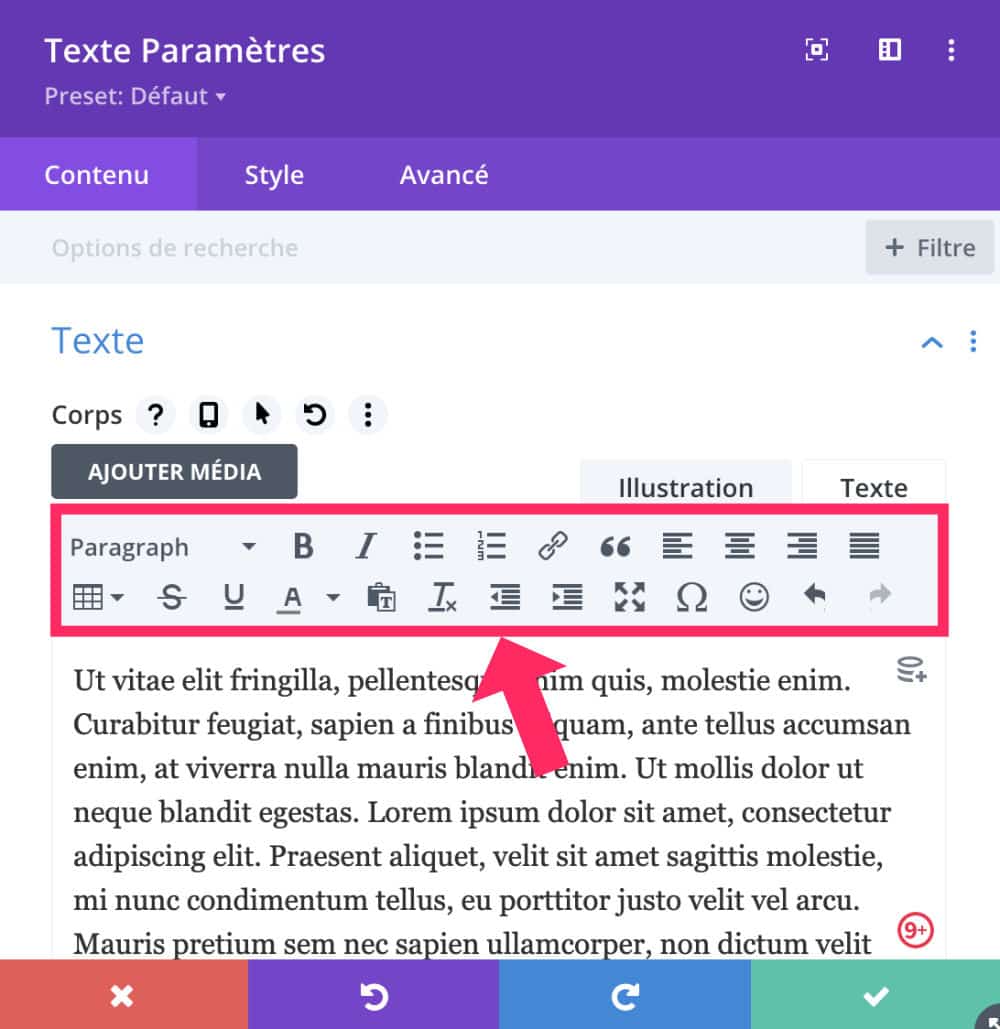
The solution is to add this little Snippet:
/* toolbar sticky au scroll */
.mce-top-part {
	position: sticky !important;
	top: -60px;
}
💡 Placez ce code dans la style sheet of your child theme - or in the tab Divi > Theme Options > Customize CSS - or in the tab Appearance > Customize > Additional CSS.
Be careful, this code only works if you use Divi in Front Office. For other situations, visit the article dedicated to the fixed toolbar.
9 - Stop the images in the Blog module
You must have realized that the highlighted images of your articles may appear on the page of your blog using the Divi Builder Blog module...
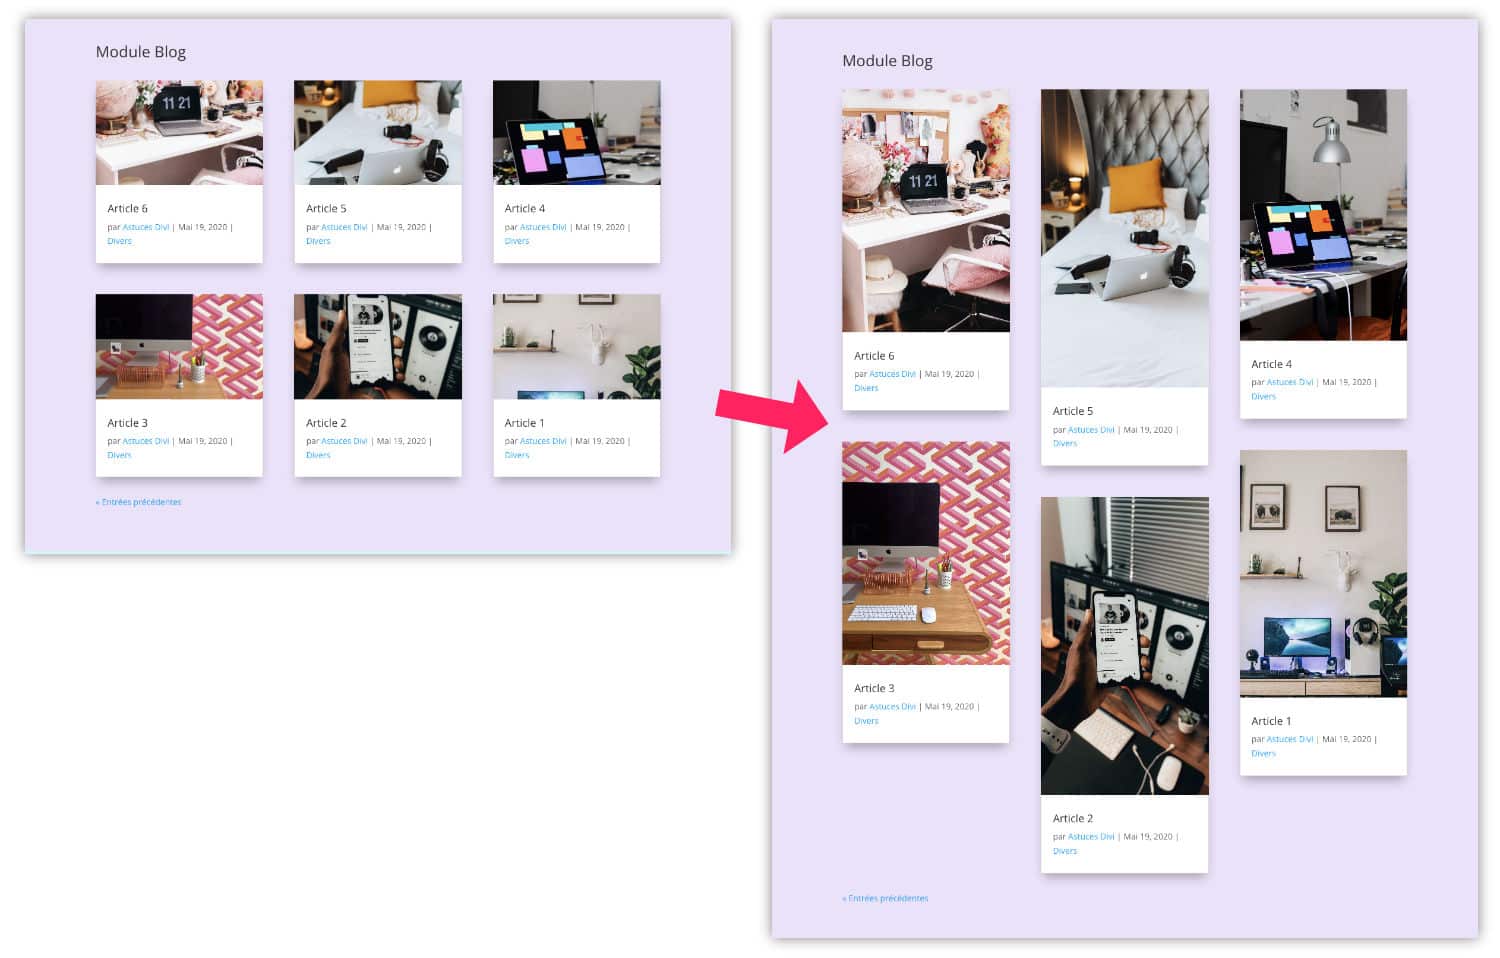
It is simple to correct this with this PHP Snippet:
// Begin stop cropping featured image in Divi Blog Module

function ld_blog_crop_image_width($width) {
	return 9999;
}
function ld_blog_crop_image_height($height) {
	return 9999;
}
add_filter( 'et_pb_blog_image_width', 'ld_blog_crop_image_width' );
add_filter( 'et_pb_blog_image_height', 'ld_blog_crop_image_height' );

// End stop cropping featured image in Divi Blog Module
Copy and paste the above code into the file functions.php your child theme.
For other tips, go to the article dedicated to cropping images in Divi.
Don't delay! Discover the theme Divi here !
10 - Show update date of a blog article
If you, too, want to display the update date of a blog post, like here on Divi Tips, know that it's not complicated...
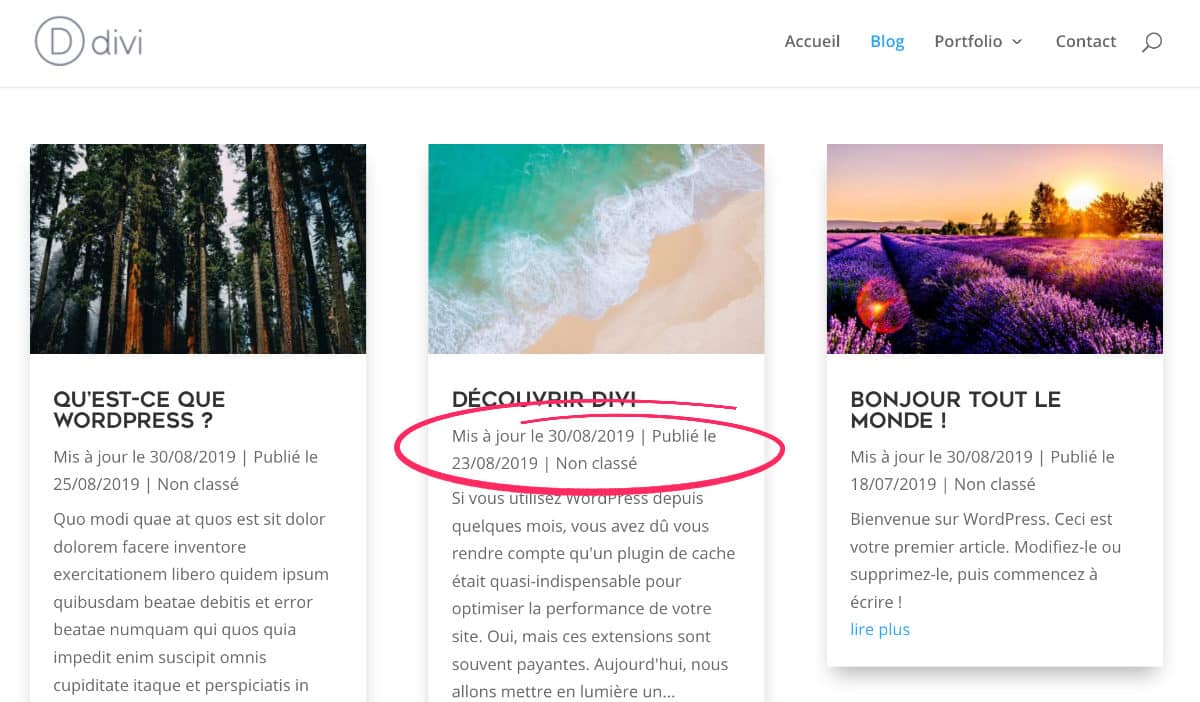
function ad_last_updated_post( $the_date ) {
    if ('post' === get_post_type() ) {
        $nb_days_between = (get_post_modified_time() - get_post_time())/86400;
        $nb_days_to_compare = '5';
        $last_modified =  sprintf( __( 'Mis à jour le %s', 'Divi' ), esc_html( get_post_modified_time( 'd/m/Y' ) ) );
        $published =  sprintf( __( 'Publié le %s', 'Divi' ), esc_html( get_post_time( 'd/m/Y' ) ) );
        $date = $nb_days_between > $nb_days_to_compare ? $last_modified . ' | ' .  $published : $published;
        return $date;
    }
}
add_action( 'get_the_date', 'ad_last_updated_post' );
add_action( 'get_the_time', 'ad_last_updated_post' );
Copy and paste this snippet into the file functions.php your child theme.
For other tips about update date of an article, visit here.
11 - Change the color of WooCommerce's Promo badge
If your shop gives you a twist and you can't customize it as you wish, here is a snippet to change the color of this badge in CSS:
/* changer la couleur du badge promo woocommerce */

 .woocommerce span.onsale, .woocommerce-page span.onsale {
     background: #974df3 !important;
 }
💡 Placez ce code dans la style sheet of your child theme - or in the tab Divi > Theme Options > Customize CSS - or in the tab Appearance > Customize > Additional CSS - Don't forget to change the color code (#974df3) by yours.
12 - Allow parallax on mobile screens
If you created a layout with parallax effects, they may not work properly on mobile screens. If you want to keep your parallax effects on this type of screen, you will need to add the following code:
<script>
    jQuery(document).ready(function($) {
      // Mobile device check
      $is_mobile_device = null !== navigator.userAgent.match(/Android|webOS|iPhone|iPad|iPod|BlackBerry|IEMobile|Opera Mini/);
      if ($is_mobile_device) {
        // Function to check if an element is in the Viewport
        isInViewport = function(elem) {
            elementTop = elem.offset().top, elementBottom = elementTop + elem.outerHeight(), viewportTop = $(window).scrollTop(), viewportBottom = viewportTop + $(window).height();
            return elementBottom > viewportTop && elementTop < viewportBottom;
        };
        // Apply Parallax transform calculations when scrolling
        $(window).scroll(function() {
            $(".et_parallax_bg").each(function() {
               var $this_parent = $(this).parent();
               // Check if the parent element is on-screen
               var $is_visible = isInViewport($this_parent);
               if ($is_visible) {
                 element_top = $this_parent.offset().top,
                 parallaxHeight = $(this).parent(".et_pb_fullscreen").length && $(window).height() > $this_parent.innerHeight() ? $(window).height() : $this_parent.innerHeight(),
                 bg_height = .3 * $(window).height() + parallaxHeight,
                 main_position = "translate(0, " + .3 * ($(window).scrollTop() + $(window).height() - element_top) + "px)";
                 $(this).css({height: bg_height,"-webkit-transform": main_position,"-moz-transform": main_position,"-ms-transform": main_position,transform: main_position});
               }
            });
        });
      }
    });
</script>
Place this Divi snippet in a Code module within the layout where the parallax is located or place this snippet on the tab Divi > Theme option > Integration : add this code in the section Head Your site. In this case, The parallax effect will apply to the entire site.
For more information, see the tutorial on Parallax for Divi.
13 - Open the footer icons in a new browser tab
If you do not use the Builder Theme to build the footer of your site, you may want the footer icons to open in a new tab (new window), in this case you will need this Divi Snippet:
/* Ouvrir les icônes du footer dans une nouvelle fenêtre */

<script type="text/javascript">
jQuery(document).ready(function(){
jQuery(".et-social-icon a").attr('target', '_blank');
});
</script>
Place this code on the tab Divi > Theme option > Integration : add this code in the section Head Your site.
For more tips, go to the tutorial dedicated to icons in the footer.
14 - Insert a dynamic year in your publications
If you want your publications to be always "up-to-date" and don't want the inserted dates to look obsolete, you can easily create a shortcode to display a dynamic date. For example, this is useful if you publish an article like "Best Guide 2021 of ...", so in 2022 you won't have to come back to change the date, it will be automatic...
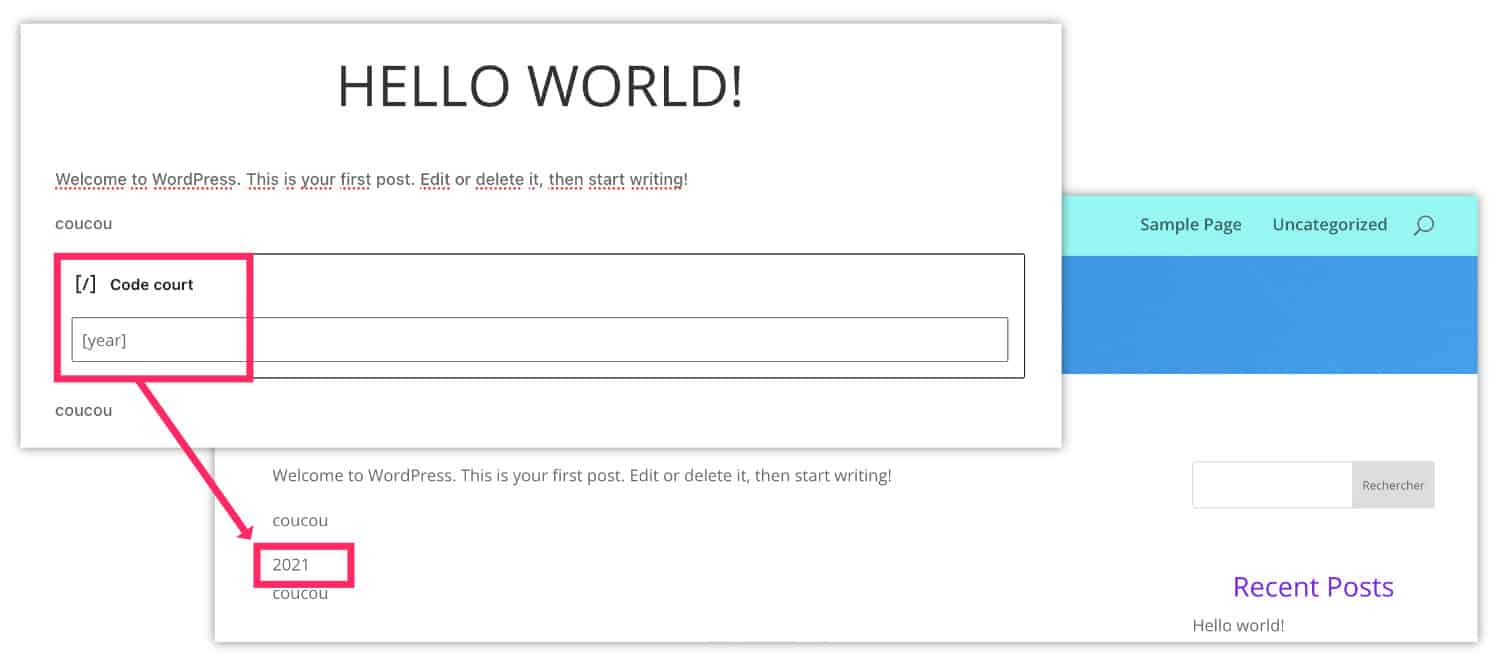
// Créer le shortcode [year] pour afficher l’année courante

function year_shortcode() {
$year = date('Y');
return $year;
}
add_shortcode('year', 'year_shortcode');
Copy and paste this snippet into the file functions.php of your child theme, then place the shrotcode [year] in your publications when you need them. PS: This does not work in Divi's footer.
Need more resources on Divi? Visit ElegantThemes blog full of ideas and tutos! Or learn how to effectively use this theme through my training Divi !
15 - Remove the widget that appears on an image overfly
You would like to delete the tooltips that appear when you pass the mouse over an image in your Divi site. This is very easy!
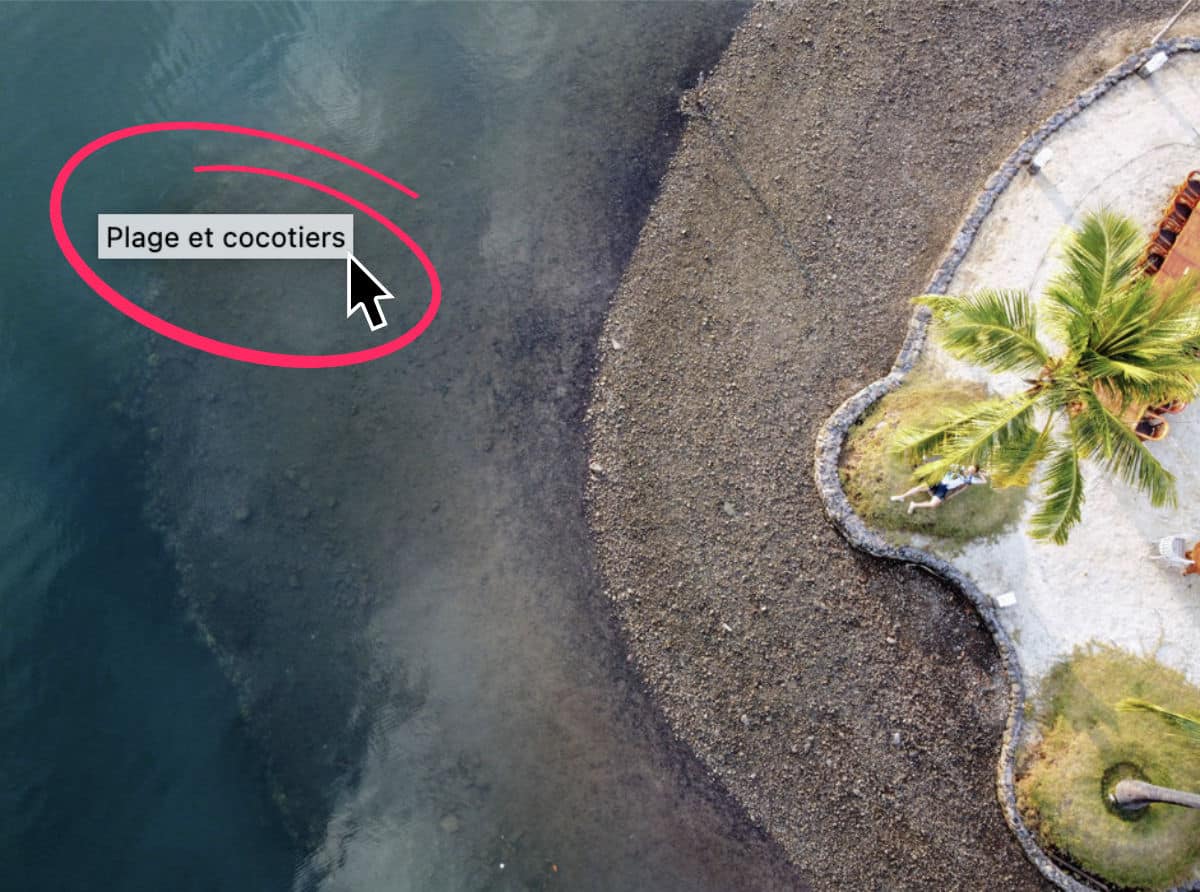
Simply add the following code in the section <head> on your site:
<script>
jQuery(document).ready(function($) {
    $("img").mouseenter(function() {
        let $ld_title = $(this).attr("title");
        $(this).attr("ld_title", $ld_title);
        $(this).attr("title", "");
    }).mouseleave(function() {
        let $ld_title = $(this).attr("ld_title");
        $(this).attr("title", $ld_title);
        $(this).removeAttr("ld_title");
    });
});
</script>
💡 Je vous propose deux méthodes pour implémenter ce JavaScript : avec ou sans plugin. Le mieux est de lire attentivement l'atircle qui traite de la removal of the image title on the mouse overfly.
Snippets for Divi: In conclusion...
As explained at the beginning of this article, stay connected as this article will evolve over time! I will regularly add new Snippets simple, useful and easy to use!
And do not hesitate to leave a small incentive comment and share this article on your networks, it might be useful to your audience 😉


Comme d’habitude, un article très utile pour tirer le meilleur de Divi . Merci Lycia !!
Un grand merci pour « La bibliothèque des Snippets pour Divi » Vraiment très utile, encore MERCI.
Merci Christine 😉
Bonjour Lycia,
Il y a un petit souci de css sur cette page
https://astucesdivi.com/snippets-pour-divi/
Tout le bas de page est collé à droite, et la sidebar d’inscription est passée en bas. J’ai pas le souci sur les autres posts.
En affichage tel c’est OK, ça décale sur mes Media Queries Portable et bureau.
Je suis sur Macbook dernier système, avec une version Firefox à jour.
Mais tu es peut-être déjà entrain de régler le PB ;-).
Boonne journée
Michel
Merci Michel ! Je vais regarder, c’est peut-être le cache
Pour le snipped 10 : ne fonctionne chez moi que si j’utilise les entités HTML pour les caractères accentués :
$last_modified = sprintf( __( ‘Mis à jour le %s’, ‘Divi’ ), esc_html( get_post_modified_time( ‘d/m/Y’ ) ) );
$published = sprintf( __( ‘Publié le %s’, ‘Divi’ ), esc_html( get_post_time( ‘d/m/Y’ ) ) );
Merci Philippe pour ta contribution
Bonjour Lycia, comme d’habitude c’est top, je dispose déjà du book divi et wordpress. Merci
Question je cherche à enregistrer mes propres snippets dans la bibliothèque divi, mais je ne les retrouve pas ensuite. Y a t il une manipulation spéciale à faire ?
Merci Maurice. Non les snippets ce sont des bouts de code qui se placent à divers endroits selon le code. Par exemple l’extension Code Snippet peut t’aider à les implémenter. Tout dépend du code ! Si c’est du CSS, ça peut se gérer depuis Apparence > Personnaliser > CSS additionnel par exemple.
Bonjour Lycia.
Merci pour ton article.
Aurais-tu une idée du code CSS ou de la manip pour supprimer les ombres des images dans les blogs stp ?
Par avance merci 🙂
Caroline.