
Divi makes it easy to reproduce a zoom effect over an image with a clickable superposition text. I suggest you find out how to get this trend effect that will enhance your home page or your calls to action...
Look what you will get with this tutorial:
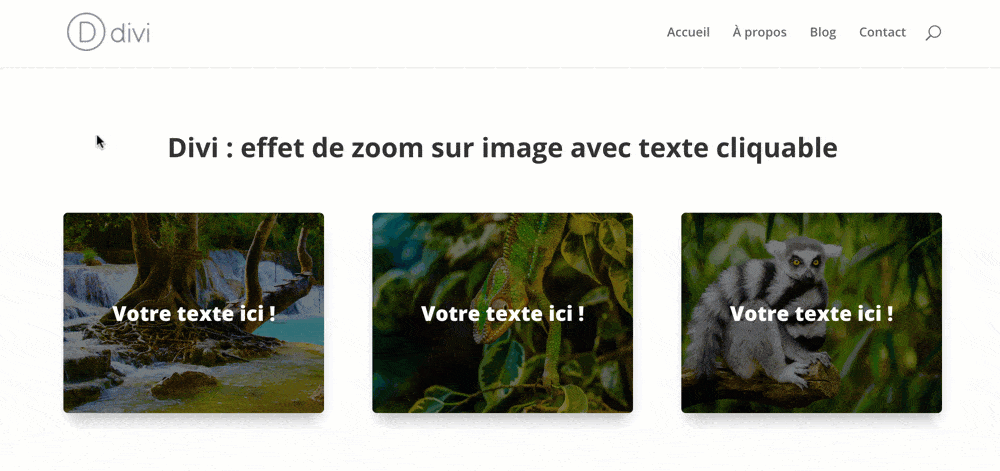
1 - Create an image with a clickable text in superposition
To obtain a image with superposition text, just "take the problem backwards" : we will use a Text module and add background image.
In the web, you often have to think this way: you visualize the purpose and look for the tools at your disposal to achieve it.

- Insert a line within your Divi layout. For example, choose a line 3/3.
- Insert a Text module.
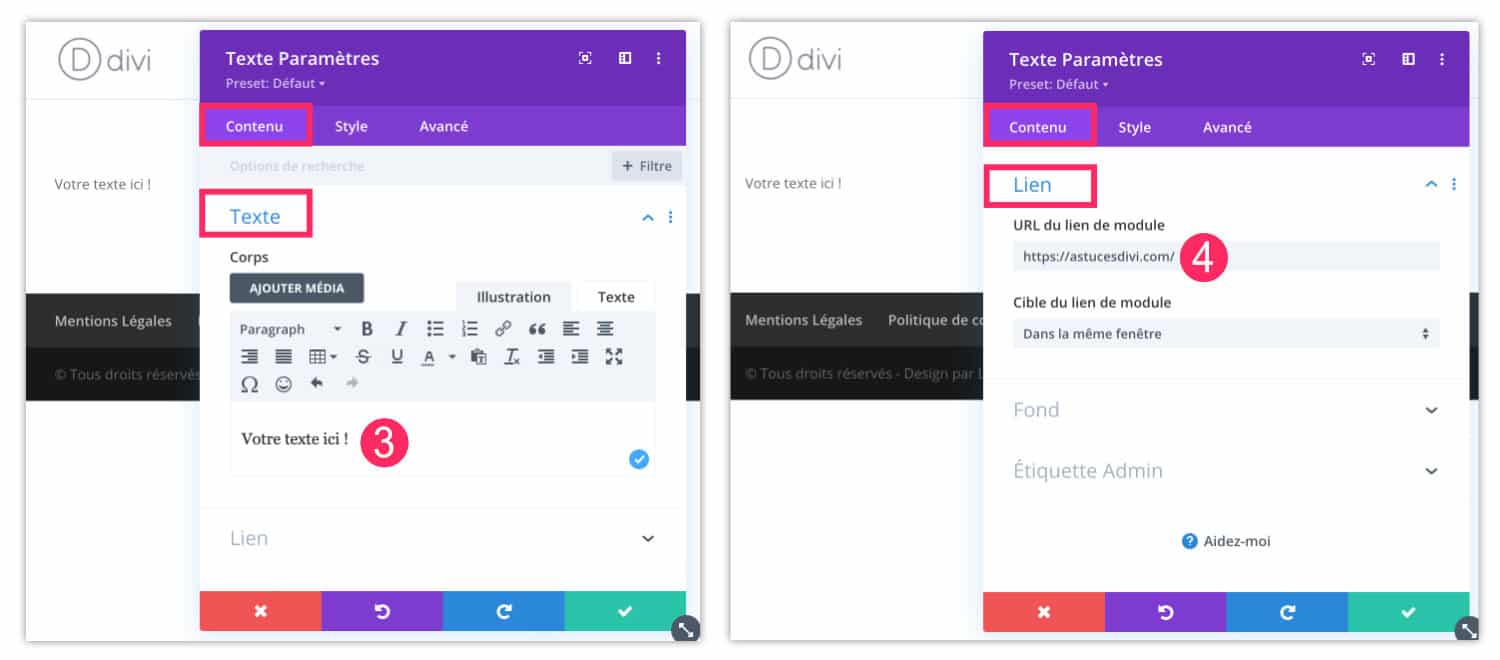
- In the tab Content > Text, enter your call to action text. For my example, I noted "Your text here" But it's up to you to note what you want.
- In the tab Contents > Linkenter the Web address to which the module should return.
Now you can add a background image:
- In the tab Content > Background, select the image icon and add a background image.
- For now, your module is not entirely in line with what one might expect from a zoom effect on a picture, but wait, it's coming...
- Always in the tab Content > Background, select now gradient icon. Click "+ Background degraded".
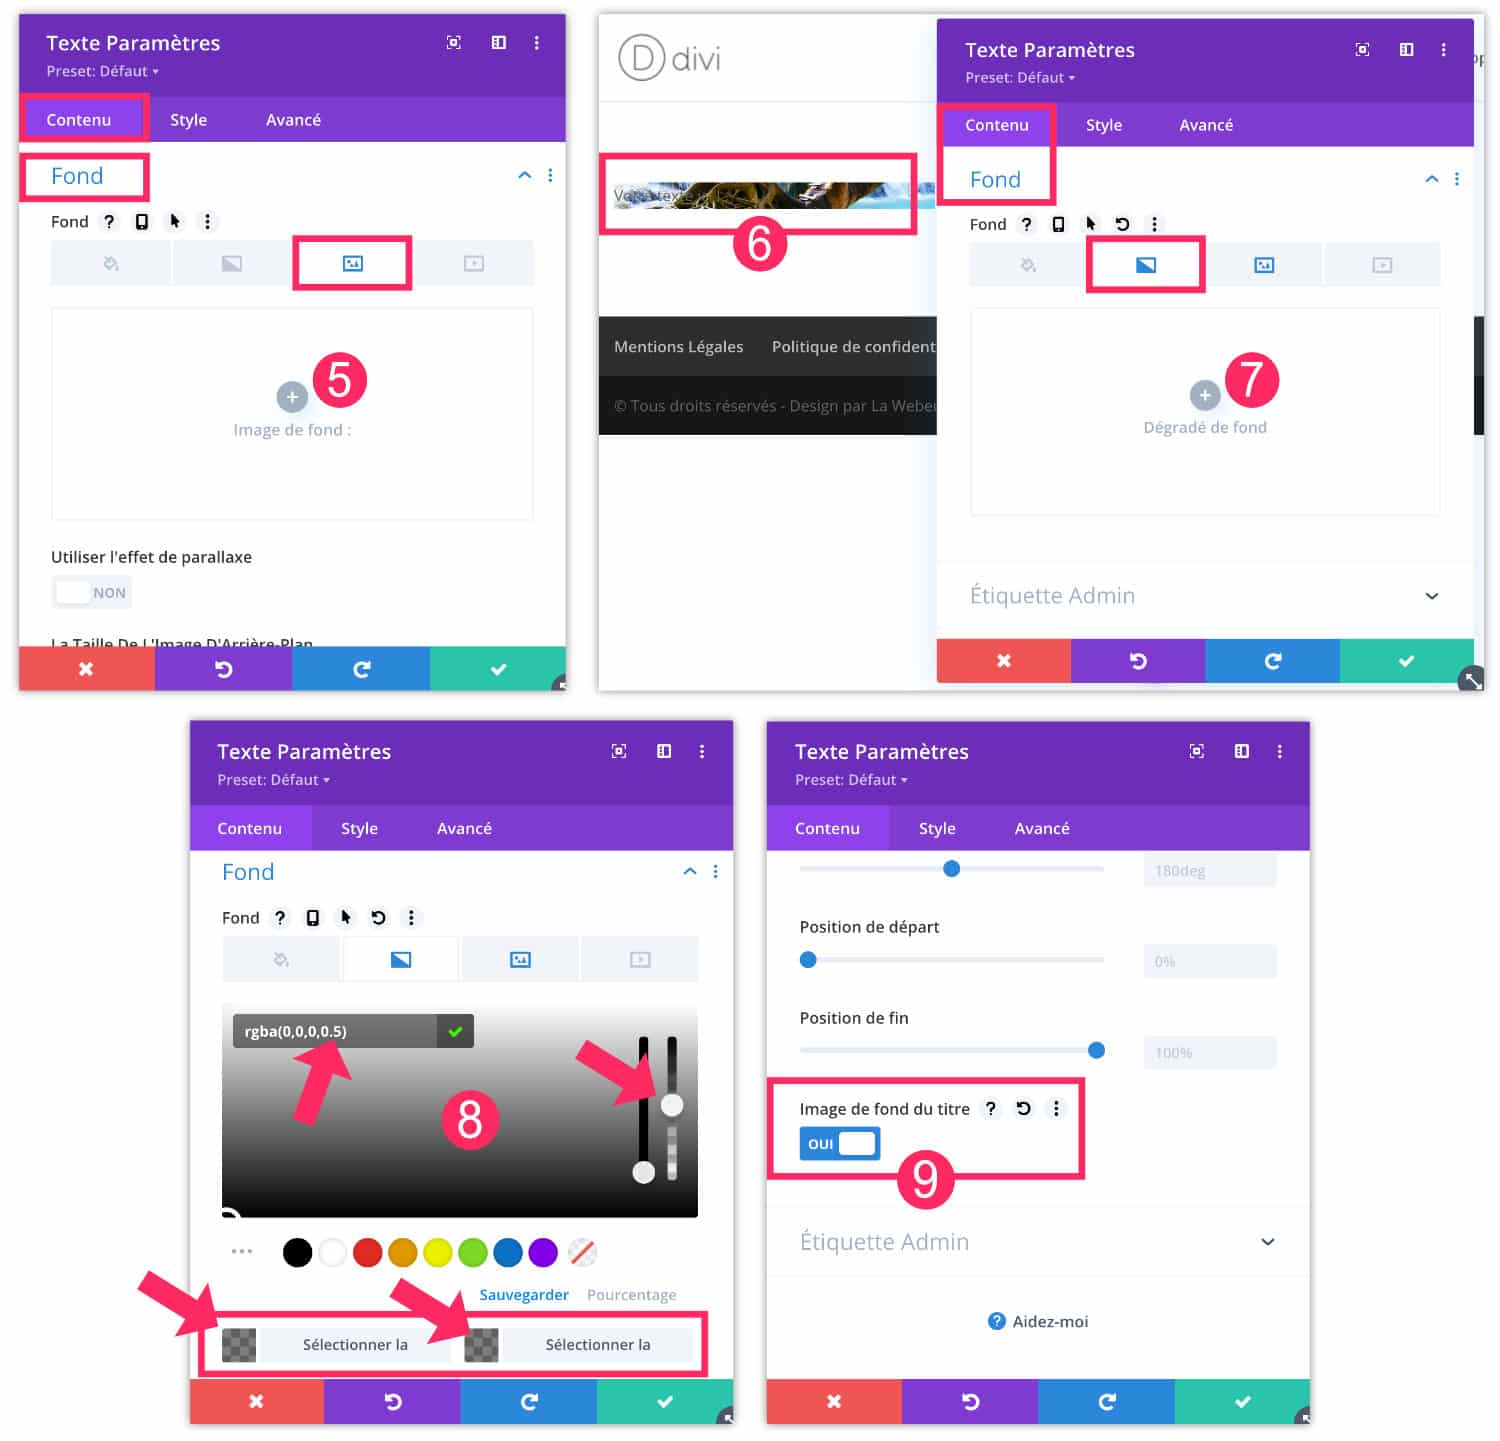
- As a gradient consists of 2 colors, you can select them one after the other to define a black with an opacity of 50%, for example. In my video, it's easier to understand...
- A little below, you will see an option named "background image of the title", activate it. This allows you to drag the opaque black gradient between the background image and the text of the module. You can imagine then that this text module is composed of 3 levels of superposition, a bit like photoshop layers.
Do you know you can test Divi for free? See you on this page and click on "TRY IT FOR FREE"
This being done, we will stylize the module so it starts to look like a real image clickable with zoom effect :
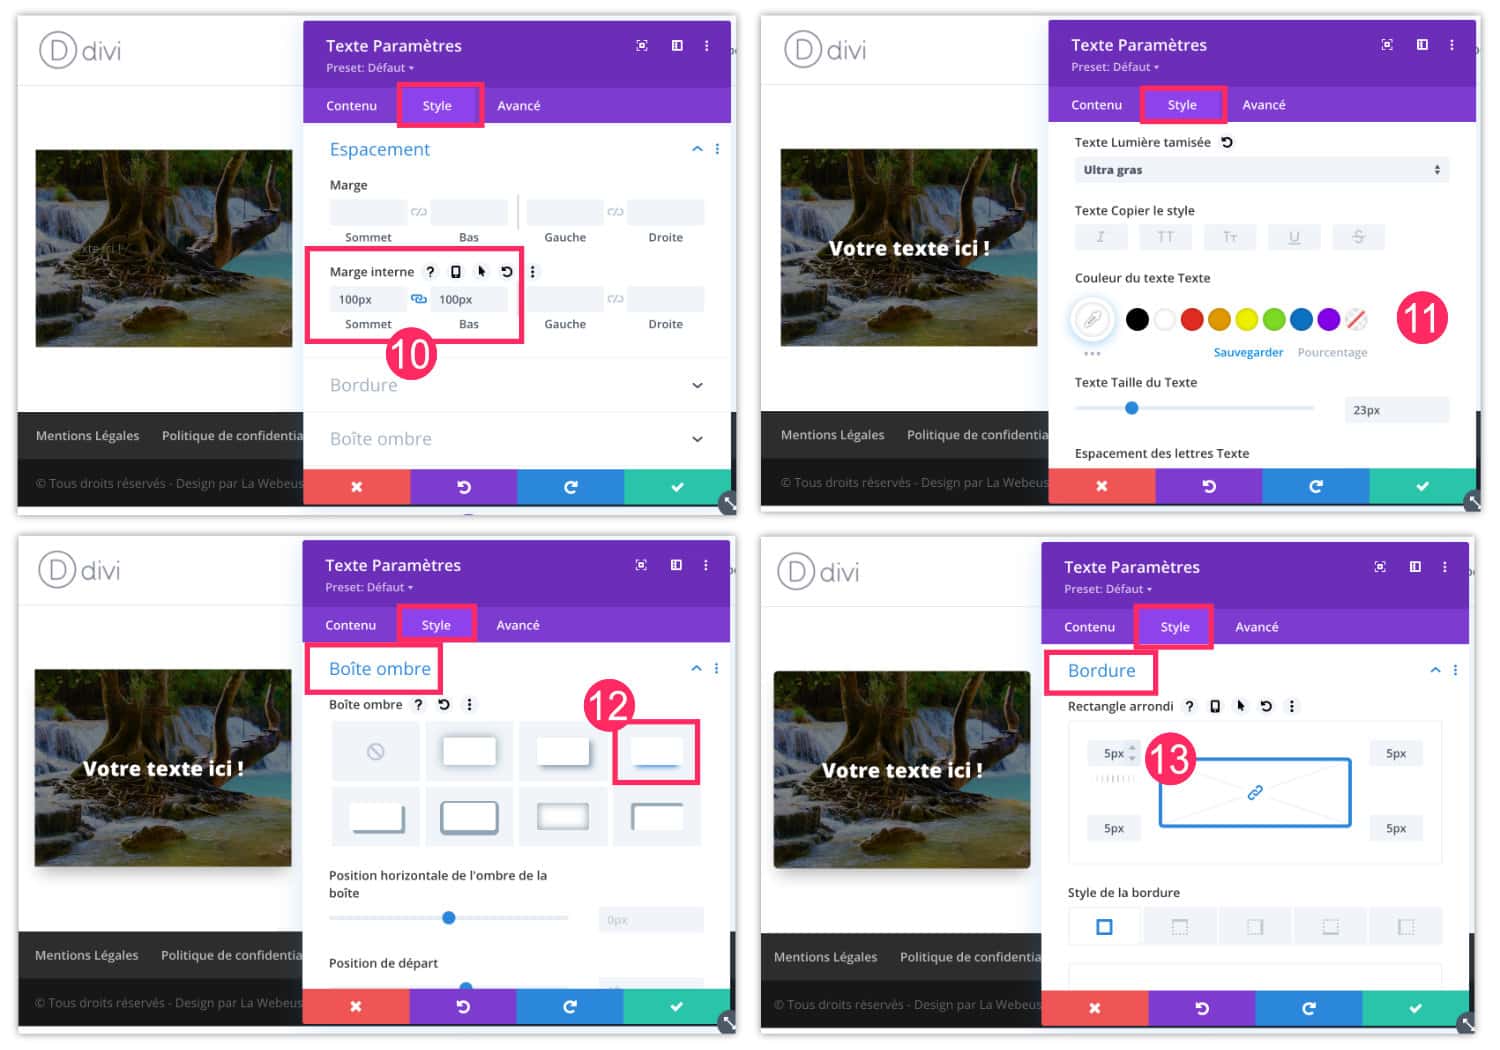
- Go to the tab Style > Spacing and add internal margin at the top and bottom. For example, 100px is a suitable value. Now we're starting to see the picture better in the background.
- Then the tab Style > Text allow you to stylize the text placed on the image. In my example, I put it in bold, white, with a centered alignment and increased the size. Since the background is quite dark, the white text comes out perfectly. You can use other colors but make sure it stays legible.
- On the tab Style > Shadow box, you can add a small shade to give a 3D effect to the module.
- On the tab Style > Border, you can possibly round the corners of the module a little bit. For example, I applied a value of 5px to all four angles.
Here you are now in possession of a text module with an image in the background. This module is clickable and will be perfect for a call to action. But the little one is still missing zoom effect Nice...
2 - Reproduce the zoom effect on an image
Don't leave the module yet, there are still two small adjustments to make...
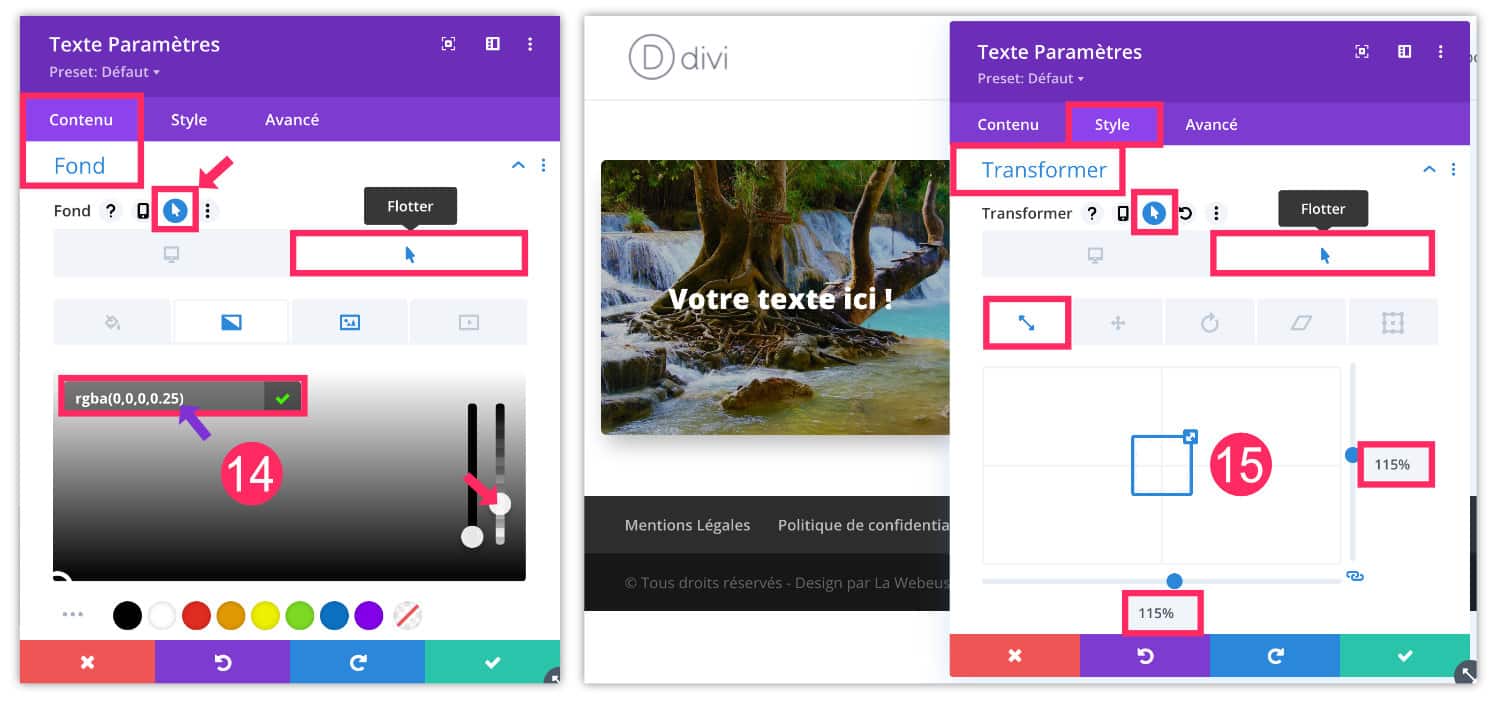
- On the tab Content > Background, click on the icon "arrow" which allows to activate the Hover feature (surrounding the mouse). Make sure that the tab "float" is well selected (still the arrow icon). Then select the gradient tab and reduce the strength of its black color by adding a little more transparency, for example 25%. The idea is that the image has a clearer look on the mouse.
- Finally, go to the tab Style > Transformer to add this famous zoom effect on the module. We want the zoom to take place when the user moves the mouse over the module (hover), so you have to activate the functionality "float" As in the previous stage. Then click the arrow icon, select the first tab (transformation scale) and increase the module size to 115% for example. This will allow the module to be magnified over the mouse and offer zoom effect expected. Save the module.
3 - Duplicate modules as required
Once your module is perfect and you have finished all customizations, you can duplicate the module as many times as you want. This will save you time on the design of your layout.
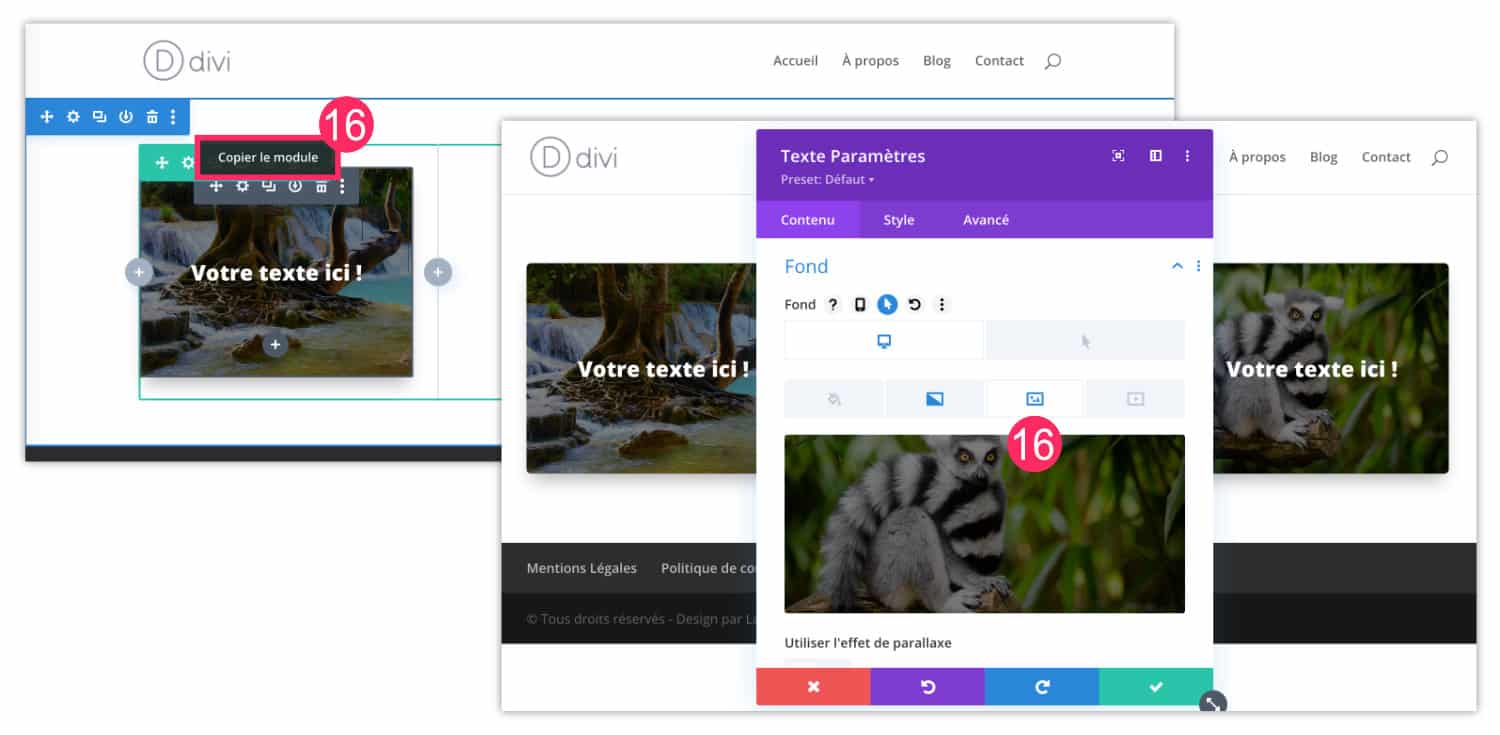
- Click copy the module and remember to change the background image and destination URL.
4 - Zoom effect with Divi: video tutorial
This tutorial is simple but if you want to see it in video, it's here:
5 - In conclusion: a successful zoom effect!
A zoom effect on an image with clickable text is so easy to achieve with Divi! No need to use third party extensions for that!
In fact, I can imagine the site of a graphic designer (or any other art profession) use this system to display a portfolio and return the user to each Project page.
You can of course go much further than that and add a pivot of the image to the flyover, change the size or color of the text, etc!
It is precisely the purpose to use a theme like Divi : you can customize your site As you wish.
These other articles that deal with images in Divi may interest you:
- Image cropping problem Divi
- How to add 360° images in Divi
- Get square images in the blog and gallery module
- How to create a transition with a scroll zoom
- Allow gradients on a parallel axis background
- Design custom image overlays with Divi
Merci pour cet effet hyper sympa et très facile à faire une fois le fonctionnement de Divi Builder.
Je suis en train de créer mon site et cela me permet d’ajouter un aspect pro très plaisant.
Merci Virginie 😉
Génial, merci Lycia !!
Merci Marine 🙂
Cc.
TOP TUTO. J’aime.
Comment cela se fait sur ELEMENTOR ??
Avec Elementor ? Je sais pas mais il doit sûrement avoir des options similaires
merci pour tout tes tuto tu vas m’être d’une grande aide mention + pour ton site !
Merci beaucoup
tres beau tuto mais comment s’appel-t-il ? sur DIVI pro
Aucune idée
Tuto très bien. Juste une question ! quand mon image se zoom , elle n’apparait pas en entière, est-ce normal
Bizarre…
Je découvre votre site une pépite !!!! je sens que je vais y passer beaucoup de temps merci pour tout le partage !!!
Merci Myriam
Merci pour cette belle lecture, je pourrais apprendre beaucoup. Meilleures salutations, Nick
Merci Nick