If you use Divi regularly, you must have realized that Adding a gradient overlay AND Adding a parallax effect are not compatible on background images of your Divi sections. In other words: a gradient on a parallel axis image is impossible with Divi !
I am well aware that all these words can scare because it is a very particular jargon that mixes English terms with the jargon of the web.
But don't worry, we'll discuss this in detail, and, as a bonus, we'll see how to make this possible. with a simple CSS code line (ideal beginner)
Here is a video that explains what you will be able to do with the content of this article:
1 – What is an overlay or an overlay gradient?
In WebDesign, the term "overlay" means a "overlay".
The term is often used "overlay" When you talk about a image. It's actually a color overlay which is placed above an image. This color is often affixed with opacity to preserve the visual Background image.
One gradient-overlay is therefore a color overlay in gradient above an image.
The overlays are often proposed to improve the design of a clickable image.
For example, it is quite common to see the forward images of blog article with an overlay as the mouse passes (at the hover) and even an icon that appears.
At the UX level (user experience) this allows the user to understand that the image is clickable.
2 - What is a "parallax effect"?
This is not the first time that we have approached the parallax term on this blog!
Parallax effect is a fairly common practice in the webdesign. Visual rendering is often very successful and it gives depth to your Divi layouts.
Thanks to the parallax, you can fix your background images during the scroll ( CSS parallax), or you can unsynchronize the background scroll with the scroll of the upper plane (actual parallax)... We'll see all of this in an explanatory video below.
However, in a previous article we saw that The parallax effect was capricious in mobile version... Same for this article: it will pose some problems... which we will solve in 2 times 3 movements!
Do you know you can test Divi for free? See you on this page and click on "TRY IT FOR FREE"
3 – Divi Options: Cannot associate both!
Yes, yes. add a gradient to a parallax image This article would not have to exist.
But it's not!
Sometimes we notice bugs or inconsistencies within our favorite WordPress tools. We think they'll be fixed quickly... No!
Don't tell me that Elegant Themes is not aware of this concern for gradient on a parallel image!
Anyway, since nothing is done... I propose a simple, fast and efficient solution!
This video explains the whole procedure for allow a gradient on a parallel axis image :
4 - Allow a gradient on a parallel axis image: explanations!
As you could see in the previous video, add a gradient to a parallax image is really not complicated. Especially since Divi makes all the tools available to us in order to get there easily and quickly!
Let's go back to these steps:
First, you need to edit the parameters of the section (or module) that contains your background image:

Simply click on the toothed wheel icon... A popup will open:
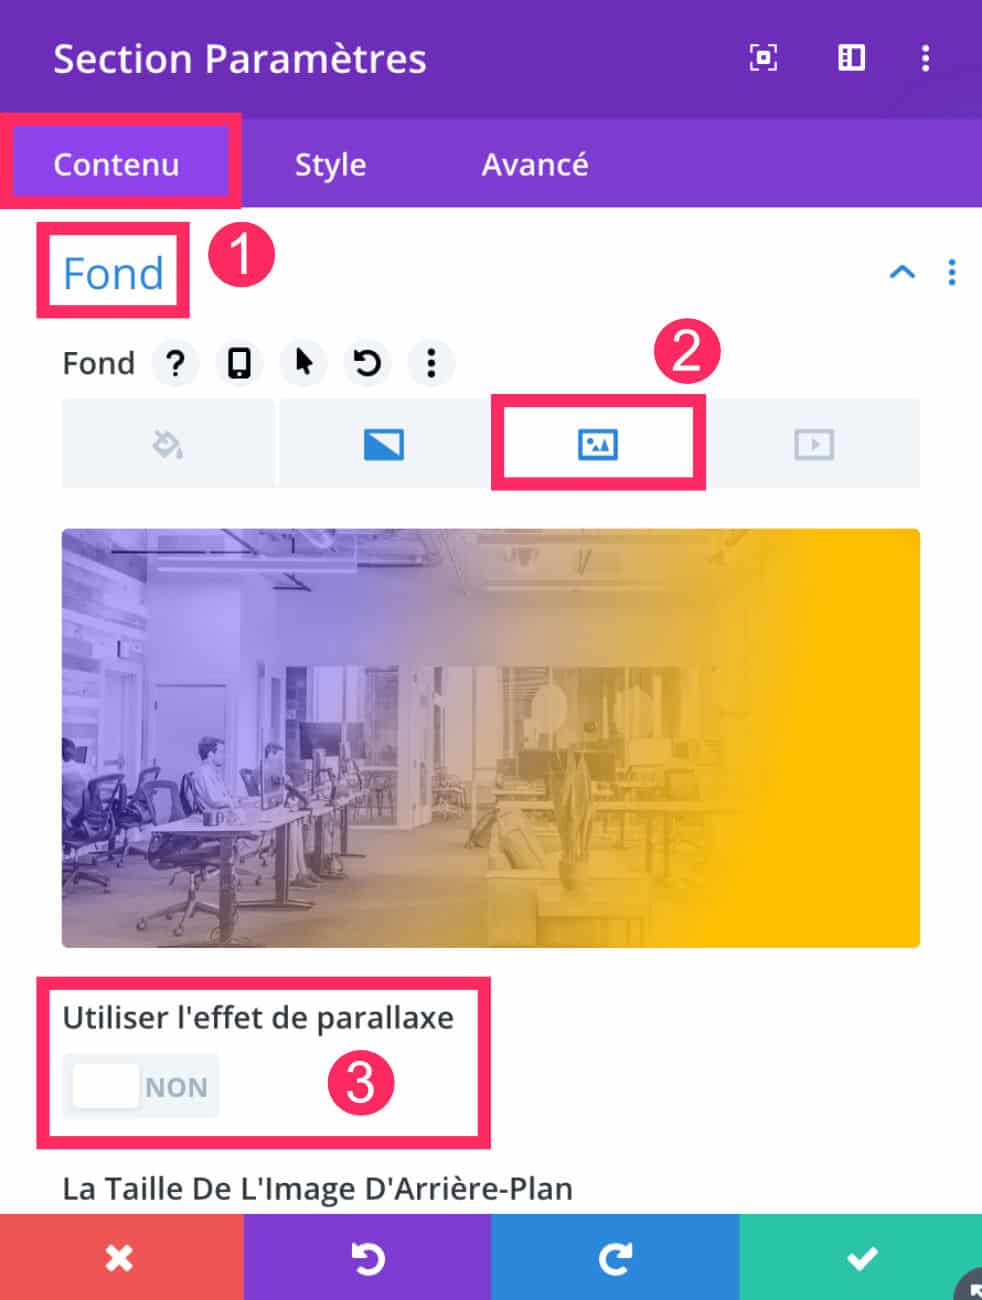
- In the tab Content > Background
- Select the background image icon and import your image from the media library or from your local drive.
- Under no circumstances check the option "use parallax effect".
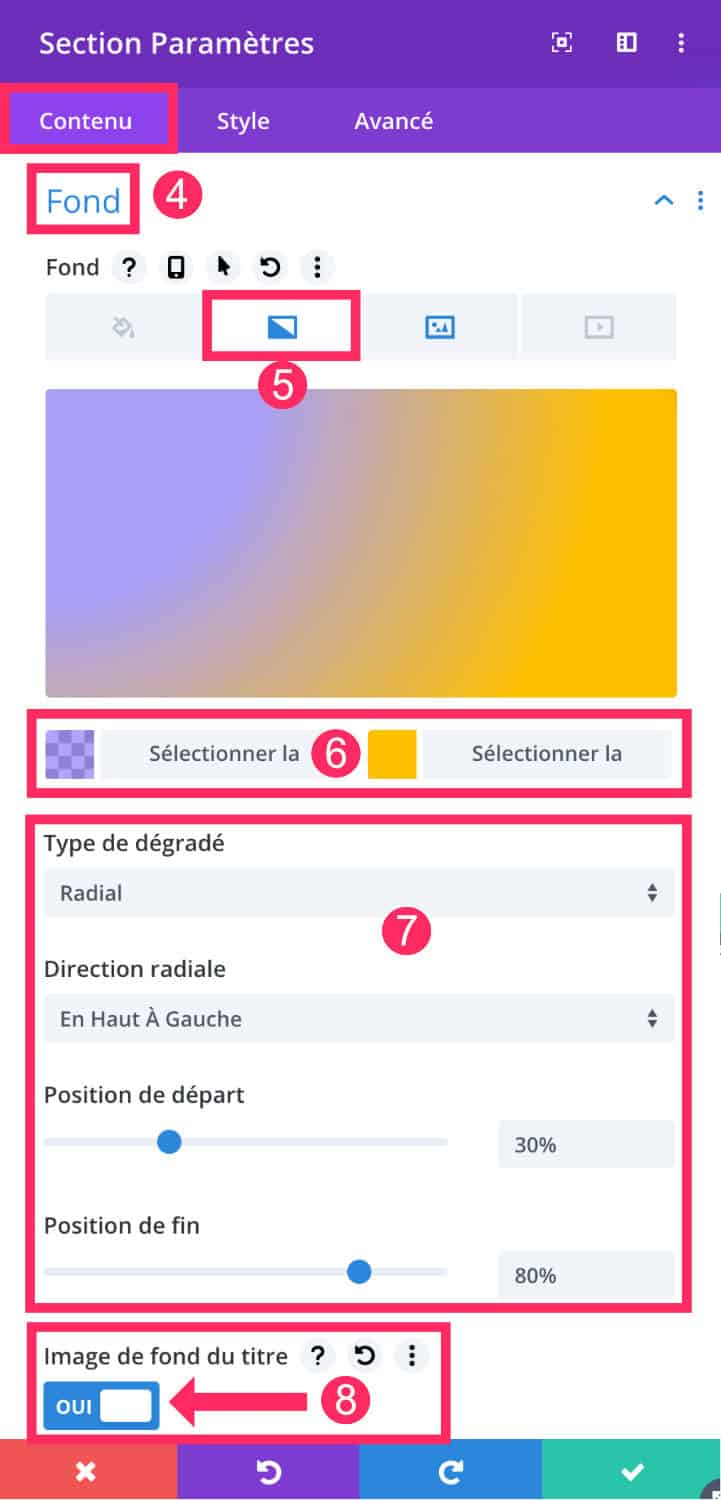
- Always on the tab Content > Background.
- Select the gradient icon this time.
- Choose the two colors that will compose your gradient. For my example, I chose a transparent purple and a full yellow.
- Define your gradient options: linear or radial. Then set the starting and ending position. This will have an impact on the design of the gradient.
- Don't forget to check the option « background image of the title ». This allows to place the gradient above the background image (as explained in the video).
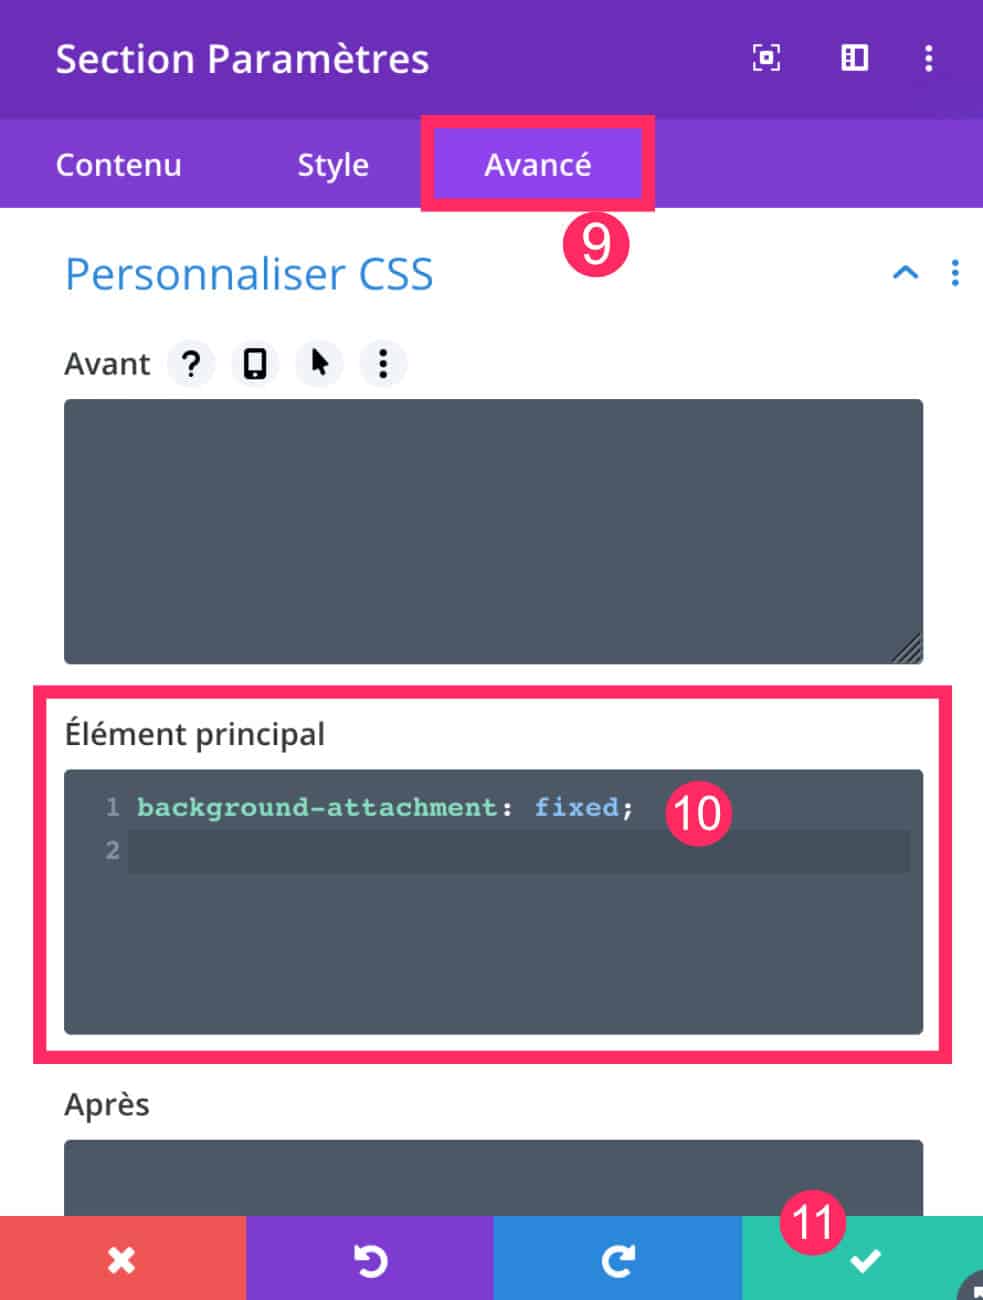
Finally, you will need to add some CSS for get a parallax effect on your image with an overlay gradient :
- Always in section settings, go to Advanced tab
- In "Main element", enter this CSS line of code:
background-attachment: fixed;This line of code is sufficient to achieve the expected effect but you could add other parameters if the result is not suitable, for example:
background-repeat: no-repeat;
background-attachment: fixed;
background-position: top center;
background-size: cover;- Remember to save your changes.
If you want to know more about the CSS property "background", I advise you to read this article which explains in detail this property and its values. This will allow you to understand which CSS calls you can make to manage your background images.
5 - A gradient on a parallax image: a history of taste... or WebDesign!
If you regularly read this blog, you must have understood that I am an "unconditional fan" of scroll and parallelxe hi hi hi!
Remember:
- Footer Unveiling at Scroll
- Scroll in a mockup
- Image that scrolls to the mouse hover
- Menu that attaches to the scroll
- Footer menu
- Etc.
Is that a taste story? Maybe a webdesign story or a trend story?
Still is it that a web site using neither parallax nor scroll dynamics is so... boring?
Yes and no...
It all depends on what type of site we are on. For example, the tax website or the CNIL website does not use this type of design... Why? These are institutional sites that cannot afford it... But for all the other site themes, why not?
The gradients and the background in parallel axis bring dynamism, identity, emotion...
And you? What do you think?
Discover many other tips and resources directly on the blog ofElegantthemes.


Hello Lycia,
Super tips !
* « si je dois continuer, tout simplement » -> ah oui carrément ;))
Merci à toi ! @+ Jean-Marc
PS : suis déjà abonné !
Merci Jean Marc 🙂
Salut Lycia
Pour commencer j’aimerais te dire un grand merci pour ce tuto, j’en avais besoin.
Ensuite te féliciter pour la vidéo, car je sais que ce n’est pas facile de s’enregistrer en face d’une caméra, c’est même un challenge, j’ai essayé juste comme ça pour m’amuser, et j’ai vite abandonné.
Pourtant j’ai l’habitude de parler en face d’un public.
Alors si tu continue, nous en profiterons et toi je pense que ça sera de plus en plus facile où en tout les cas tu prendra plus d’assurance et de plaisir.
Voilà pour ce que j’en pense et surtout encore félicitation et merci.
Merci Jean Luc 😉
Bonjour Lycia,
Merci pour ce post. Très simple. Très bien expliqué.
Grâce à tes tutos, ma culture DIVI s’agrandit et donne des idées créatives intéressantes. Donc on continue ! ;oD
Bonne journée
JC
Merci JC ! 😉
Magnifique astuce ! Merci beaucoup, je suis tombé dessus par hasard en cherchant justement comment faire 🙂 Et toujours très bien expliqué, super !
Bonjour Lycia,
Merci pour ce tutoriel très intéressant mais j’ai un problème.
Ça fonctionne parfaitement sur Mac, Pc windows et smartphones android mais sur l’iphone que j’utilise pas du tout.
Je sais qu’on peut désactiver le parallaxe sur téléphone mais bon c’est dommage si tu as une solution je suis preneur.
Merci beaucoup.
Tu es sûr que ça marche pas sur iPhone ?
Je crois que j’ai une soluce pour toi : https://astucesdivi.com/parallaxe-mobile-divi/
Je suppose que tu dois coupler les deux tutos pour que ça fonctionne.
Re bonjour Lycia, non malheureusement ça ne fonctionne pas sur Apple mais parfaitement sur mon Android.
J’ai testé aussi sur ton site et le problème est identique.
Après je pense que c’est peut être la version de l’iphone c’est un 6s, peut être que ça marche mieux sur les modèles récents.
J’ai essayé de cumuler avec le tutoriel sur la parallaxe mobile et le JS mais rien n’y fait.
Si tu veux aller jeter un coup d’œil en cette période de confinement : https://mathieupagnier.com
Encore moi, du coup non le problème ne vient pas de la version de l’iphone, je viens de tester sur le 11 et ça ne fonctionne toujours pas malheureusement….
Bonjour Lycia,
Un grand merci pour cet article tutoriel car il est vrai que c’était vraiment un problème.
Et votre site est une mine d’information pour les utilisateurs DIVI
Encore merci.
Amicalement
Merci David
Bonsoir Lycia, comme d’habitude un tuto au top !
MERCI
Merci
Merci Lycia!
Bonne astuce – J’aime normalement placer mon CSS dans la feuille de style mais cela fonctionne très bien!
Merci Merci Merci!
Bonjour,
Merci pour ce tuto.
Je rencontre également un souci sur affichage iPad, iPhone. J’ai mis un dégradé noir au dessus d’une image de fond et utilisé background-attachment : fixed pour avoir un effet parallaxe. Malheureusement sur iPhone et iPad, le fond de cette section est noir.
J’ai inséré le script présent sur le second tutoriel et ça n’a pas eu d’impact.
Depuis la rédaction de cet article, quelqu’un a-t’il trouvé une solution pour ce souci?
Merci encore et bonne journée,
Céline
Salut Celine. Ça doit fonctionner, il faut vérifier si le code que tu as inséré est bon, quelque fois ça peut mal s’écrire en faisant un copié-collé
Bonjour,
Magnifique tuto comme d’habitude, mais pour moi, cela ne fonctionne pas. J’ai vérifié et je n’ai fait aucune erreur.
Est ce qu’entre temps, Divi a modifié quelque chose qui rend la manip’ inopérante ?
Je ne sais pas mais en tout cas l’overlay dégradé n’apparait pas…
Fileri, ça doit marcher, j’en ai fait un il n’y a pas longtemps. Divi n’a rien changé
Bonjour Lycia et merci pour ta réactivité.
J’ai de nouveau vérifié. Je ne comprend pas. Regardes par toi-même : https://combidream.fr
Il s’agit de la section entre le mur d’images et la section Instagram.
Quand je regardes via la console, je vois pourtant bien la prise en compte du CSS :
https://zupimages.net/viewer.php?id=21/42/3x7c.jpg
Là, je sèche…
Bon… Je reviens un peu honteux…
Honteux de ne pas avoir lu SCUPULEUSEMENT ce tuto et de t’avoir fait perdre un temps précieux. J’étais persuadé qu’il fallait activer le parallaxe vu qu’on veut un dégradé en parallaxe.
Mais je n’ai pas bien lu. Il ne faut SURTOUT PAS l’activer, même s’il est encadré dans ce tuto (voir le point 3 ci-dessus). Et le résultat qu’on obtient en back office, quand on suit pas à pas le tuto (déformation de l’image de fond), m’a tellement dérouté que je n’ai pas vérifié le rendu en front office qui, lui, est parfait.
Moralité : un tuto se lit avec concentration et vérifiez bien le rendu en front office avant de conclure que la manip ne fonctionne pas.
Merci Lycia;)
Merci Jean Marc
Bonjour Lycia,
Belle année à toi !;)
Me revoilà de nouveau. .. Je m’aperçois que la manip ne fonctionne ni sur tablette, ni sur smartphone Apple. Est ce que tu rencontres le même problème ?
J’ai mis en place ce qui est indiqué içi : https://astucesdivi.com/parallaxe-mobile-divi/
Mais rien n’y fait. La manip fonctionne sur un Mac, un Pc, peu importe les navigateurs. Mais dès qu’on est sur une tablette Apple ou iPhone, ça ne fonctionne plus, et ce, avec n’importe quels navigateurs.
Voici le site le question : https://combidream.fr
A très vite;)
JM
Hello Jean Marc ! As-tu suivi le tutoriel à la lettre ? Car ça marche et c’est justement le but de ce tuto 😉 peut-être un souci de cache ou de classe CSS ?
Bonjour Lycia,
Me revoilà de nouveau avec toujours le même problème non résolu.
Je précise que je ne fais pas d’erreur de code puisque l’effet fonctionne parfaitement sur mon Realme 7pro qui tourne sous Android. Le problème ne se pose QUE sur iPad et iPhone. Aucun problème sur iMac, macbook, pc, tablettes et smartphone sous Android.
Je suis allée sur le site du créateur du code qui est dans ce tuto : https://astucesdivi.com/parallaxe-mobile-divi/
Il a mis un exemple en bas de sa page : https://divihype.com/how-to-add-mobile-parallax-to-your-divi-website/
Là, ça fonctionne. Mal parce que ca saccade quand on scroll, mais l’effet parallaxe est bien là.
Pourtant, je vois bien dans les commentaires que beaucoup d’autres personnes rencontrent le même problème que moi.
Mais malgré des heures de recherche, je ne vois pas d’où vient le problème…
Ah tu m’en vois désolée. Il faudrait investiguer plus profondément. Car dans mon tuto, ça marchait bien. Mais je n’ai pas réessayé.