Use all the features of the Divi Visual Builder?
If you start with Divi, it is not obvious to explore all the options and features that the Visual Builder !
In this article, I show you some tips that will allow you to be more efficient and productive when you use the Divi Builder Page.
- 1 – Wired display in 1 click
- 2 - Locking a Divi module
- 3 – Select Divi Visual Builder Interface Type
- 4 - Insert page settings from Visual Builder
- 5 - Extend the styles of any Divi module to the entire page
- 6 - Return to an earlier version with "revisions"
- 7 – Get help and resources directly in Visual Builder
- 8 - The test is a child's play!
- 9 - The end word...
1 – Wired display in 1 click
For the nostalgic, those who loved build their layout from back office, Divi Visual Builder allows to enable "Wire display".
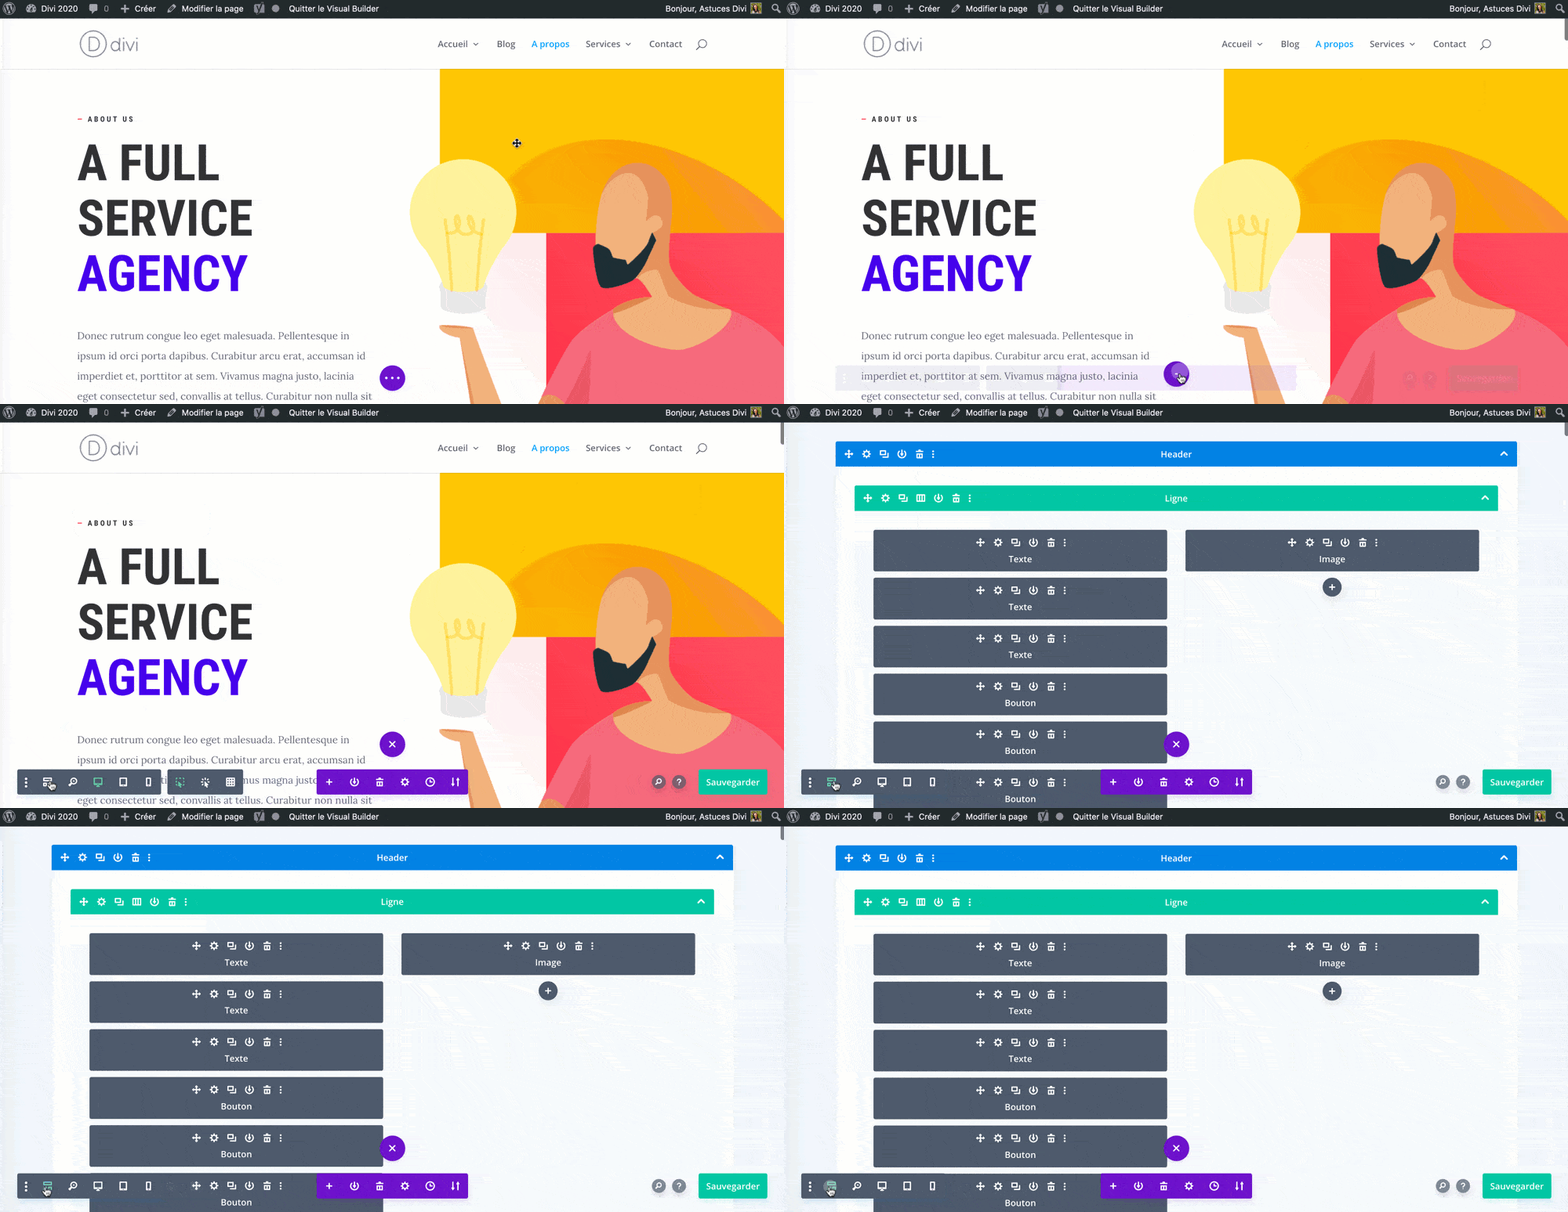
In just one click, the layout is built as a "brick".
This way of displaying the construction of the page is sometimes necessary to see more clearly in its composition.
This makes it possible to check, at first glance, the placement of sections (blue or purple), lines (green) and modules (grey).
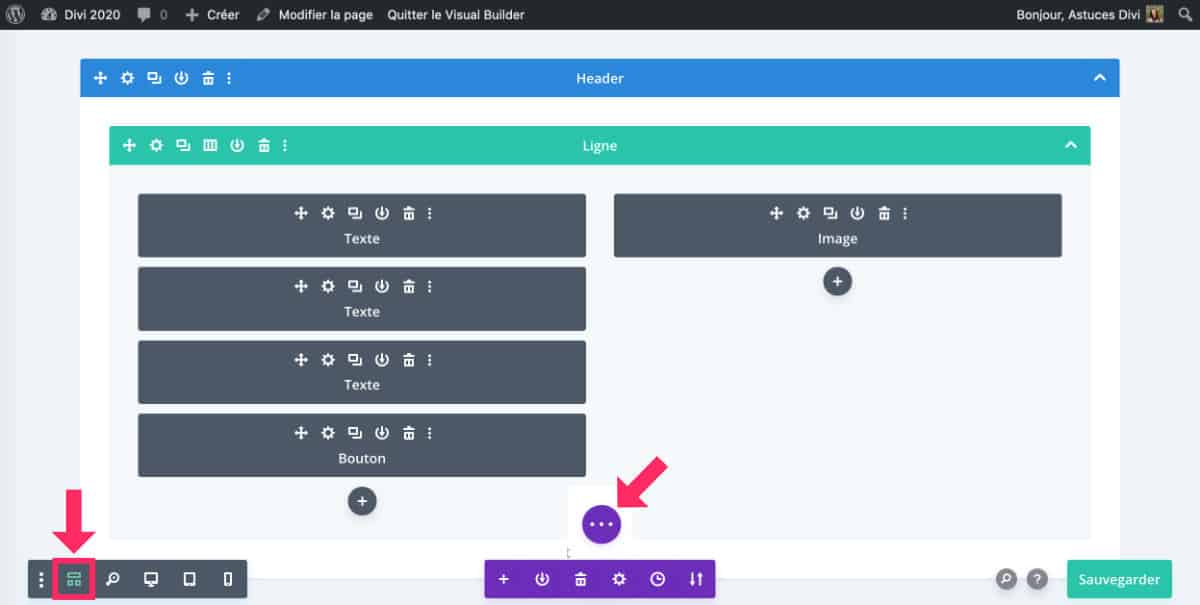
For display layout in wired mode, just open the options from the purple button at the bottom of the page and click on the 2nd brick icon in the bottom left corner. Click it again to return to a normal display.
Also read: 7 hidden features of Divi for Gutenberg!
2 - Locking a Divi module
Are you the kind of guy who starts something, finishes it and doesn't come back on it anymore?
Great, this hidden option is for you!
The Visual Builder locks the modules. Once you think your module is complete and perfect, you can lock it.
This allows you to quickly see the parts of the layout that are completed and those that are not yet completed.
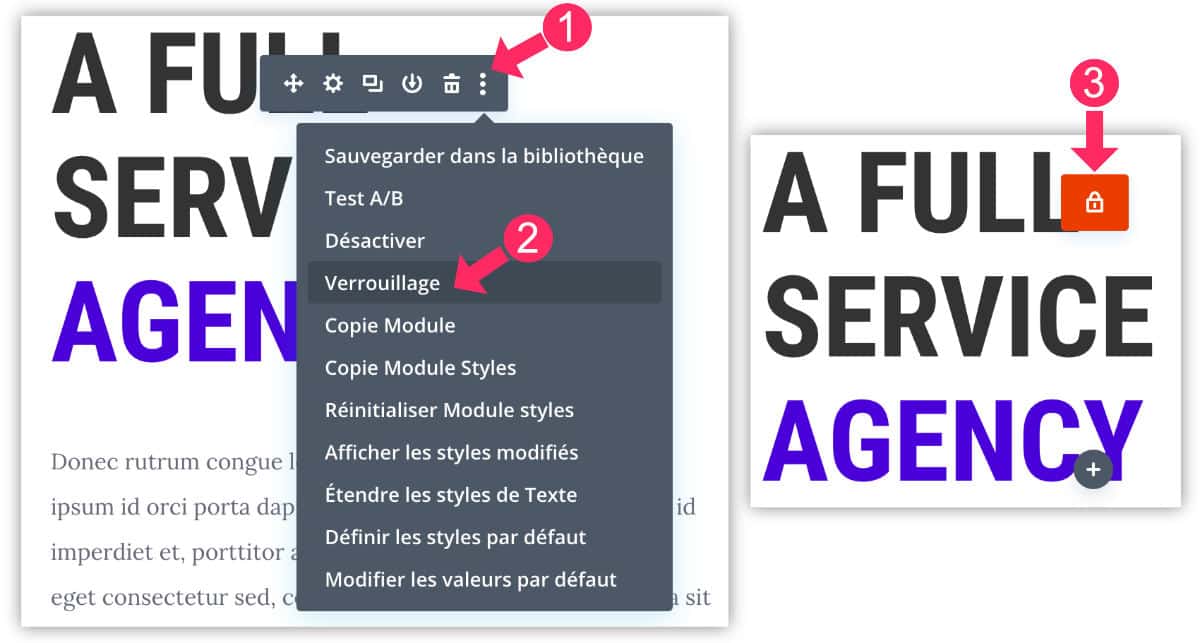
Each Divi module, section or line, is likely to be locked:
- Go to the additional options of the element to lock: click on the icon of the 3 small points.
- Select the " Lock" option.
- A red padlock appears on the locked module.
If you need to unlock it, just click it and the module is editable again.
Don't delay! Discover the theme Divi here !
3 – Select Divi Visual Builder Interface Type
The Visual Builder interface can be used in 3 modes:
- The "Move Module" mode.
- The mode "Unlock the module".
- The "grid" mode.
You can show the 3 shortcut icons which will allow you to switch from one mode to another in just one click.
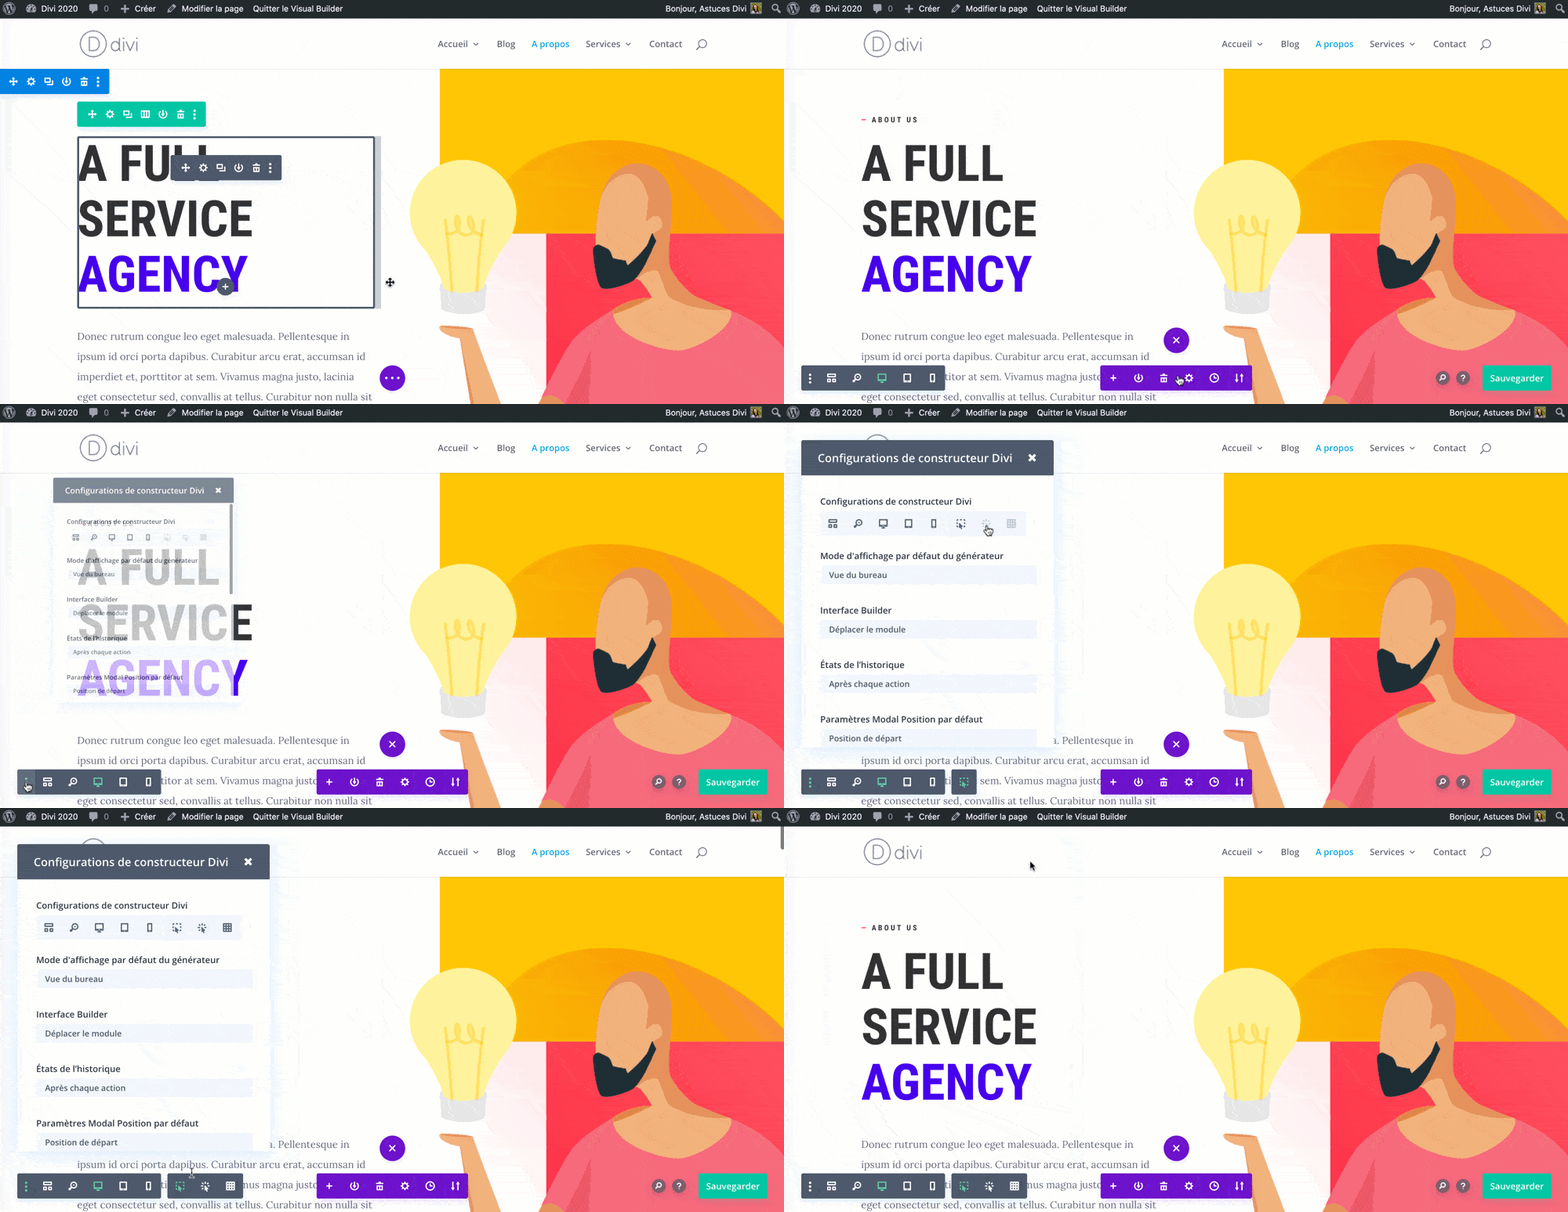
- Click the purple button at the bottom of the page (3 small points) to make the additional options appear.
- Click on the first icon in the bottom left corner (still the 3 small points).
- A window appears: you can click on the last 3 grey icons (Divi Builder Settings) to add shortcuts.
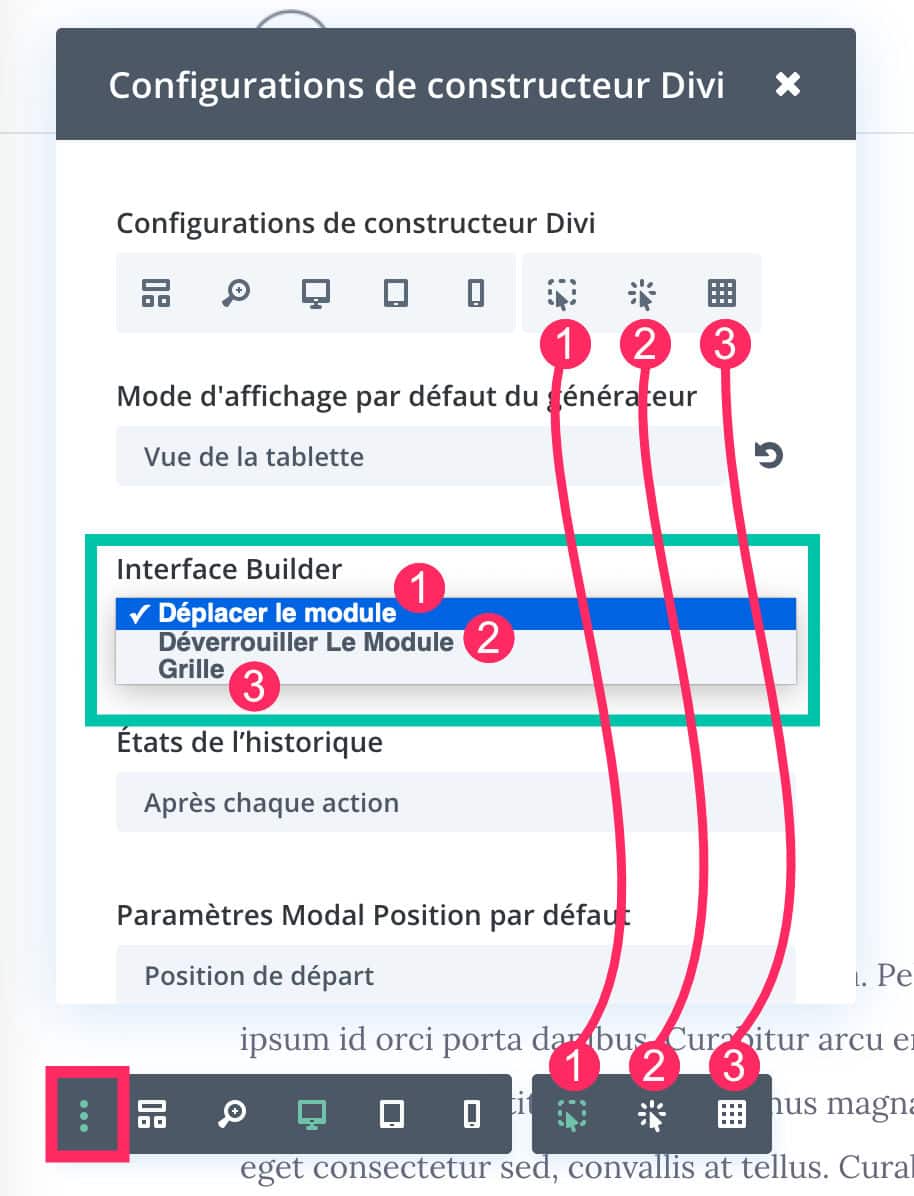
These 3 display modes are also available from the drop-down menu called "Interface Builder". Here you can choose the default display mode.
3.1 – Visual Builder interface in "Move Module" mode
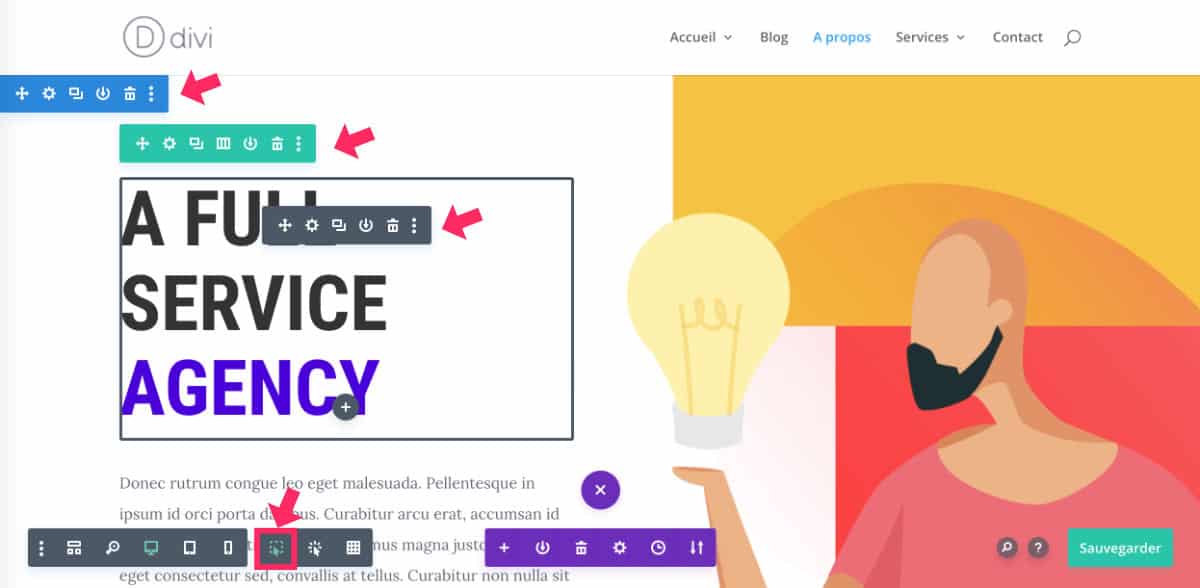
The "Move Module" mode is the default mode, the one you certainly know.
It allows to get a layout that displays its composition only when you pass the mouse on the screen (show on the hover).
With this mode, you will need to hover over the module or section to edit to display its options. When your mouse comes out of the window, your layout is "clean", like the one that the internet user sees when he visits your site.
3.2 – Visual Builder interface in "Unlock Module" mode
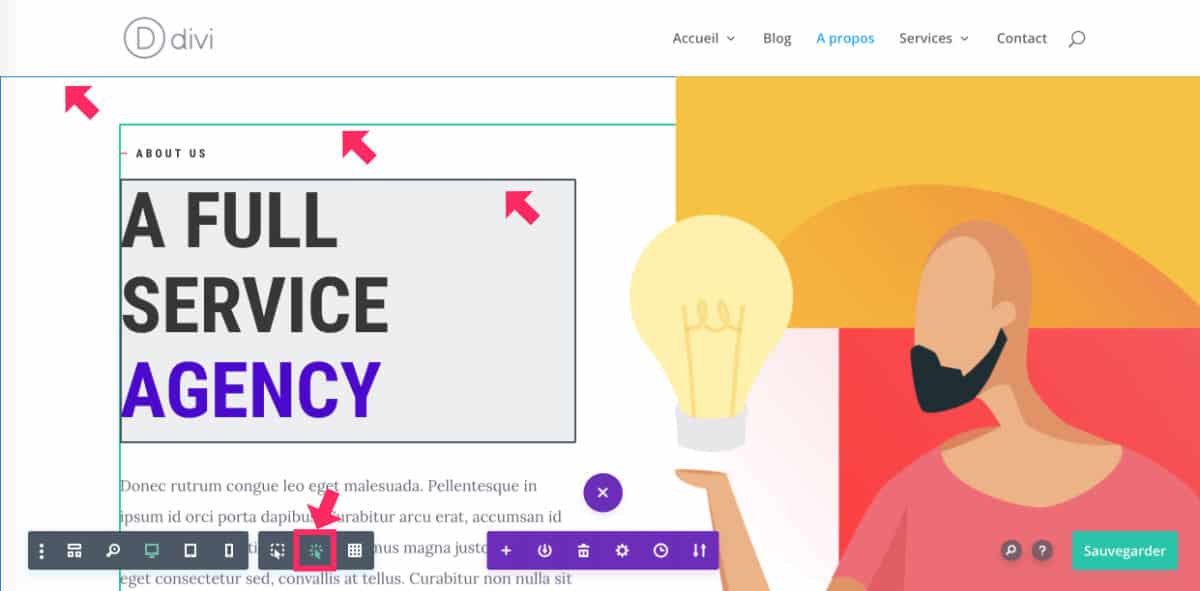
Even if translation is not very good, "Unlock Module" mode allows to obtain color frames around sections/lines/modules in order to get a general idea of the layout composition.
At the mouse hover, the editing options will appear.
3.3 – Visual Builder interface in grid mode
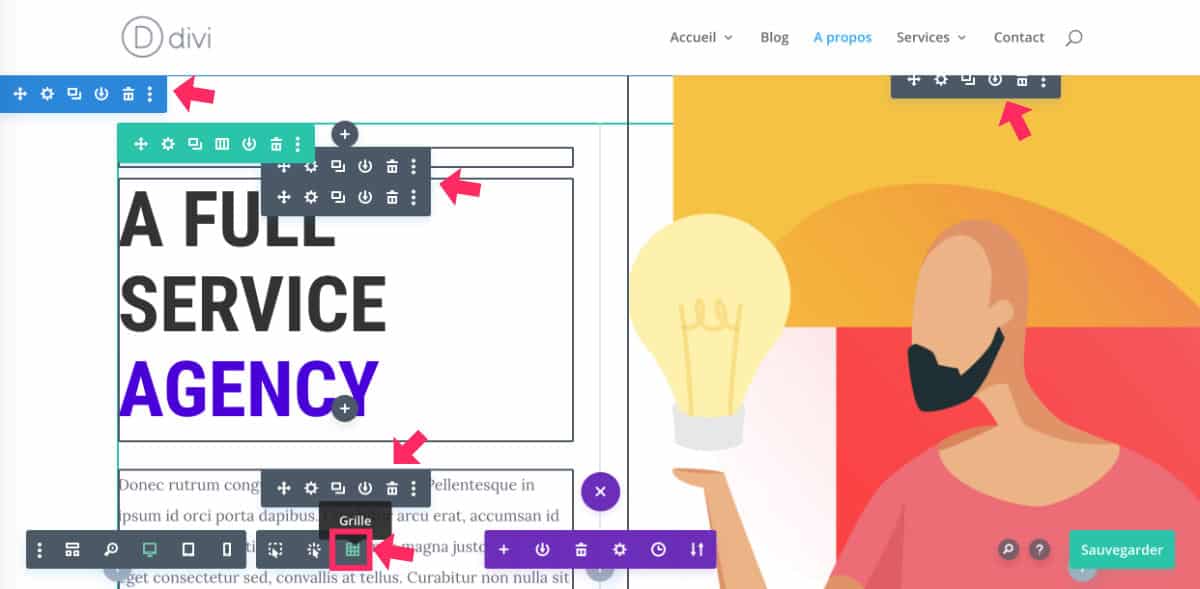
The Grid mode displays all sections/lines/modules with their edit menu. This allows you to reach them easily and quickly.
For my part, it is not uncommon to have to switch from one mode to another, especially when certain sections or modules overlap and the editing options are difficult to reach. The wired mode is also a great help in this type of configuration.
Do you know you can test Divi for free? See you on this page and click on "TRY IT FOR FREE"
4 - Insert page settings from Visual Builder
If you need to change the page title, add a forward image or refine extract for improve your SEO, you don't need return to the back-end of your page... Did you know that?
An option of Divi Visual Builder allows you to reach these page settings directly...
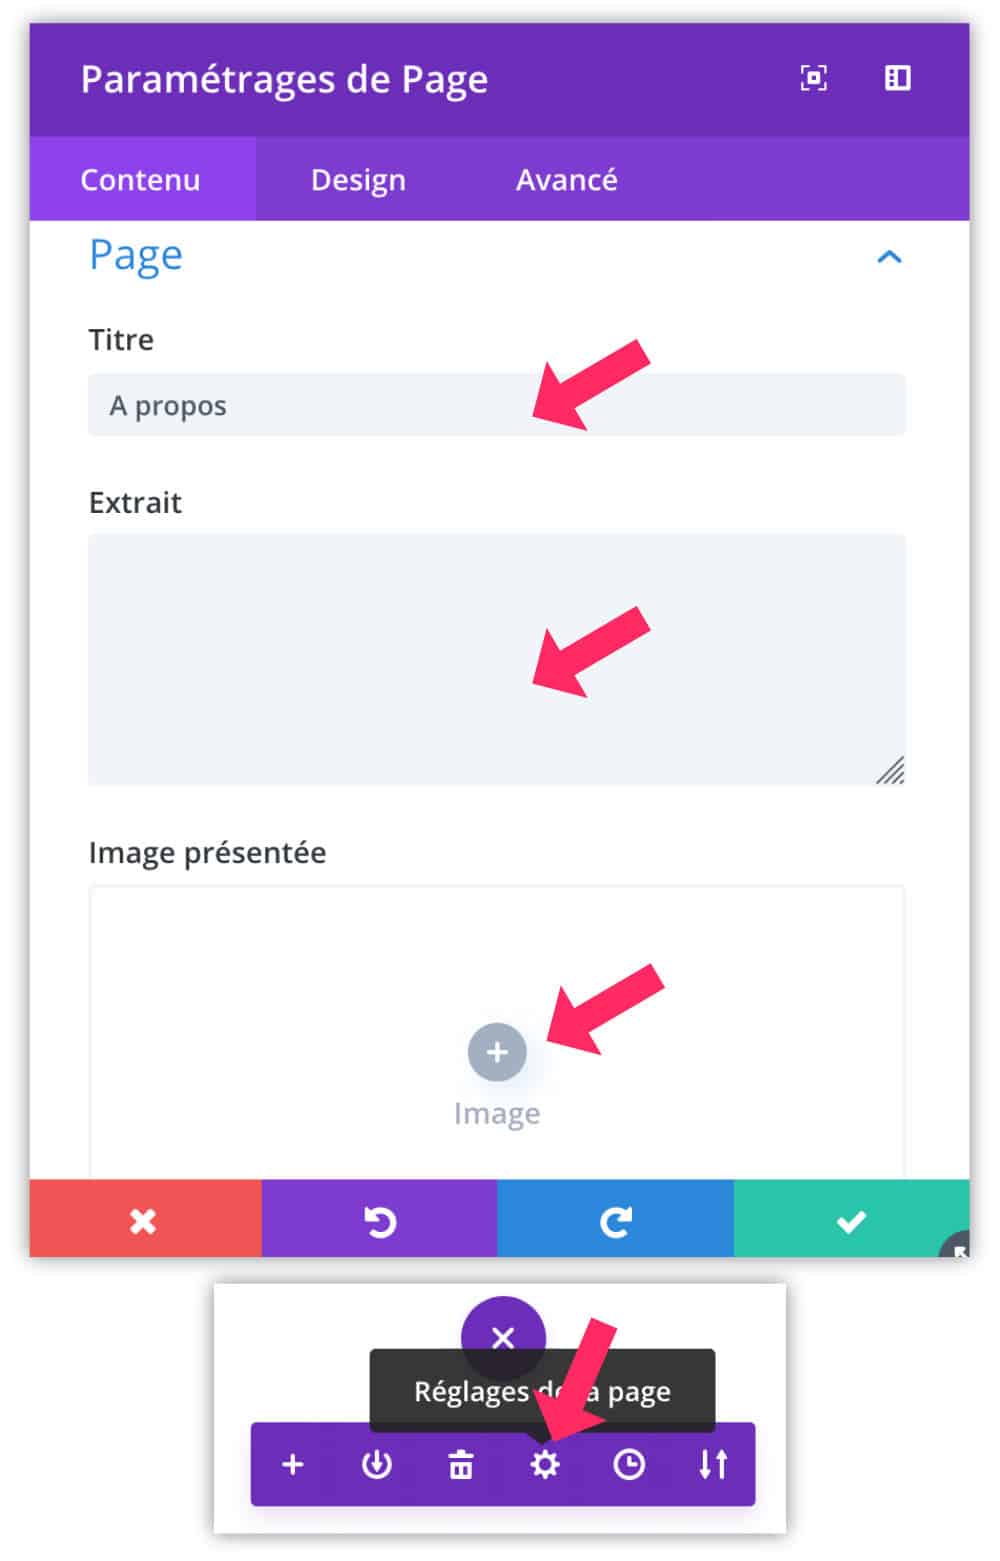
- Click the purple button at the bottom of the page (the 3 small points), to make the additional options appear.
- Click on the icon of the curved wheel.
- A pop-up appears and allows you to change these settings: page title, extract and forward image.
5 - Extend the styles of any Divi module to the entire page
This is an option that will save you crazy time!
Imagine you just finished a very complex layout and finally, your client (or you) decides to change main color, typo or even font size...
Are you really going to modify module by module and spend more unnecessary hours on your project? I've been through this, too...
Don't worry about Divi!
Option "Extend styles" is perfect to apply the modification of an element on the set of a line, section or page !!!
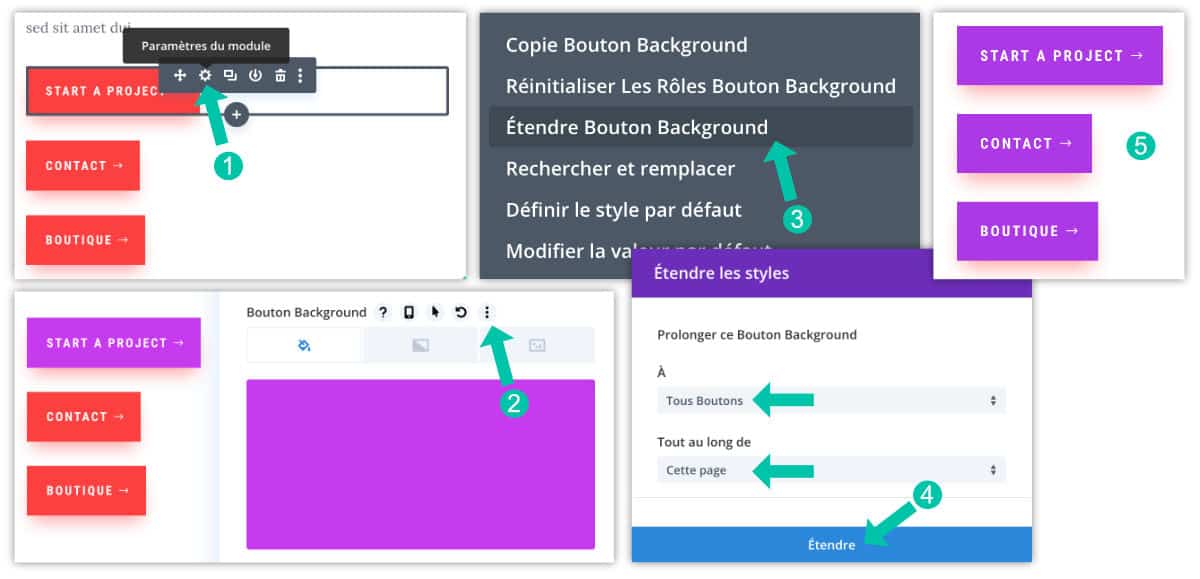
On this example, my buttons are red. If, in the end, I decide to pass them in purple, I would like to avoid doing the action 3 times (or as many times as there are buttons)...
So I just have to:
- Opening the parameters of a module here is the first button.
- Make my changes: this can be the size of the button, adding a border, adding a shadow, changing the background color, etc. Once this change is made, just click on the icon of the 3 small points that appears on the flyover near the option.
- Choose "extend xxxxx". In my case, it's « extend background button ».
- Choices will appear: to "all buttons", throughout "this page". From the drop-down menus, you can choose the conditions to apply this new style. Finish with Expand.
This video is certainly more explicit...
6 - Return to an earlier version with "revisions"
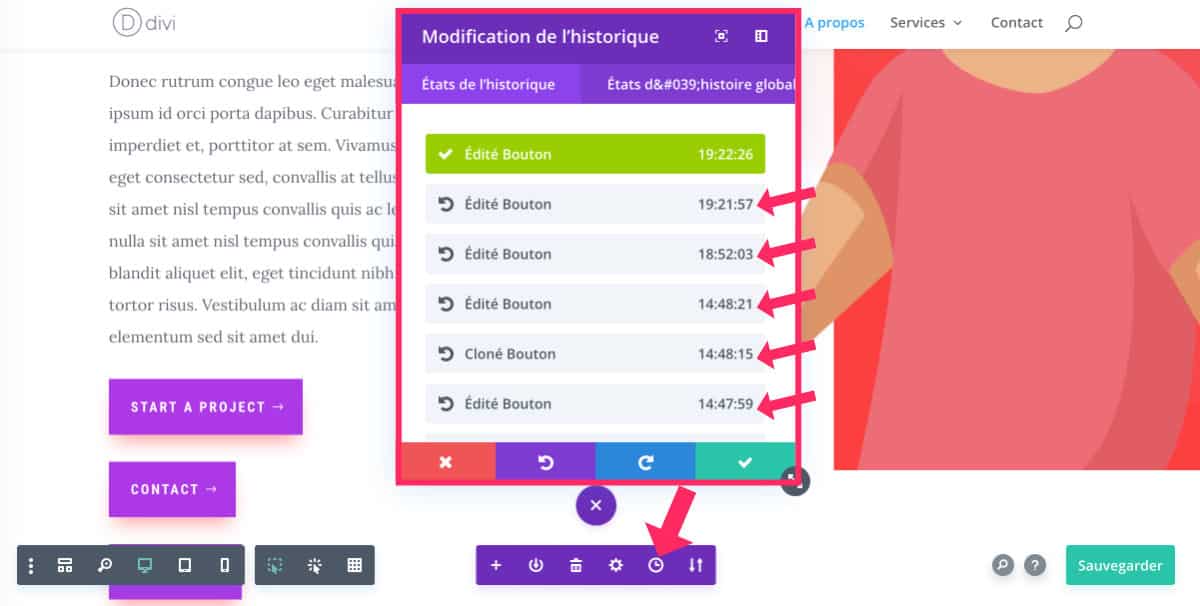
The Visual Builder Gives you the right to error!
If you have just changed something that is not right for you or you have mistakenly deleted a module or section, you can go back.
To show the history of your changes, open the context menu at the bottom of the page (violet button) and click on the clock icon.
The list of changes appears with the schedule. Select the version you want to re-enter and then confirm.
7 – Get help and resources directly in Visual Builder
Need help to better use Divi Visual Builder?
You may not need to search Google for a solution... Maybe she's right here in front of you?
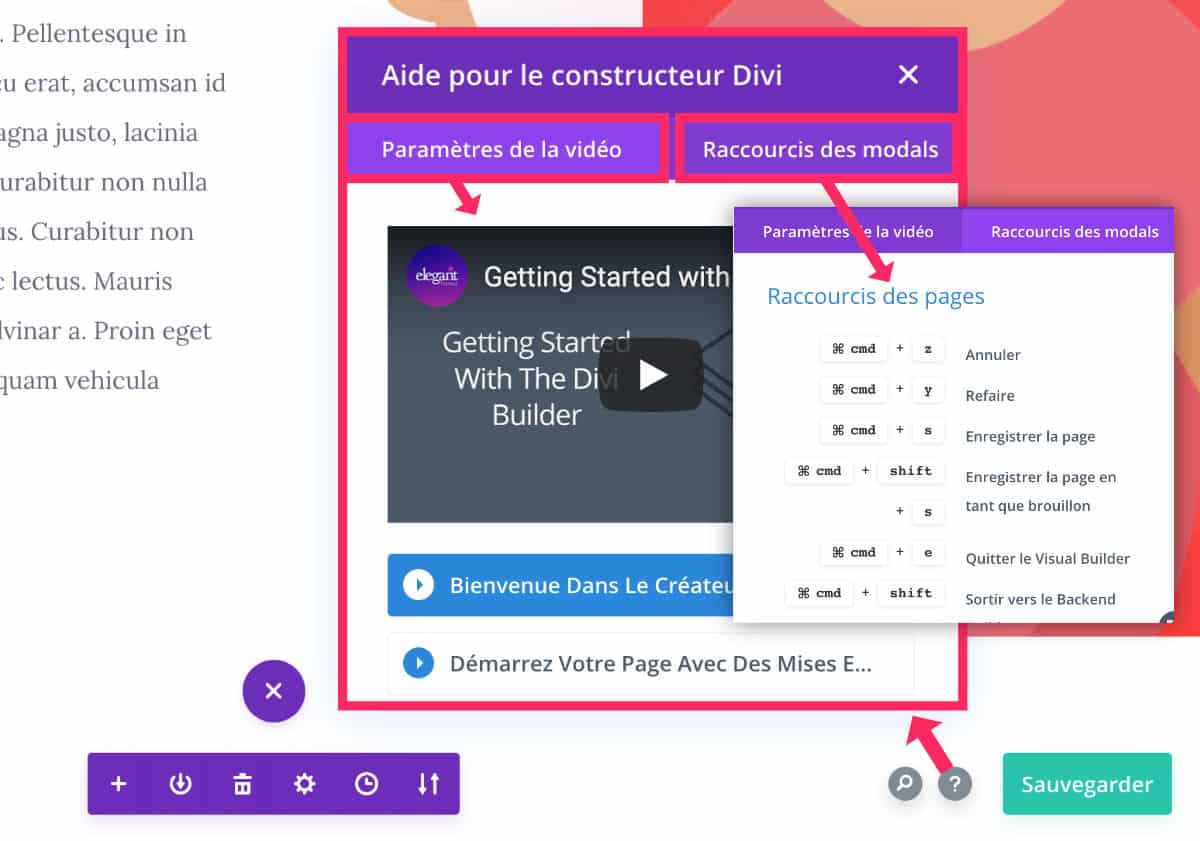
Have you ever clicked on the question mark icon at the bottom right?
A popup opens and allows you to view video tutos and even access to the list of Divi keyboard shortcuts.
Get a complete list of the Divi Visual Builder keyboard shortcuts here!
With these shortcuts, you can save a lot of time, especially if your main activity is based on site design WordPress with Divi.
The icon of the magnifying glass, right next door, allows you to quickly search for an answer to a question.
8 - The test is a child's play!
Have you ever used the A/B Testing functionality offered with the Divi Visual Builder?
It's really easy to set up and it's usable on any section/line or module of the Divi Builder...
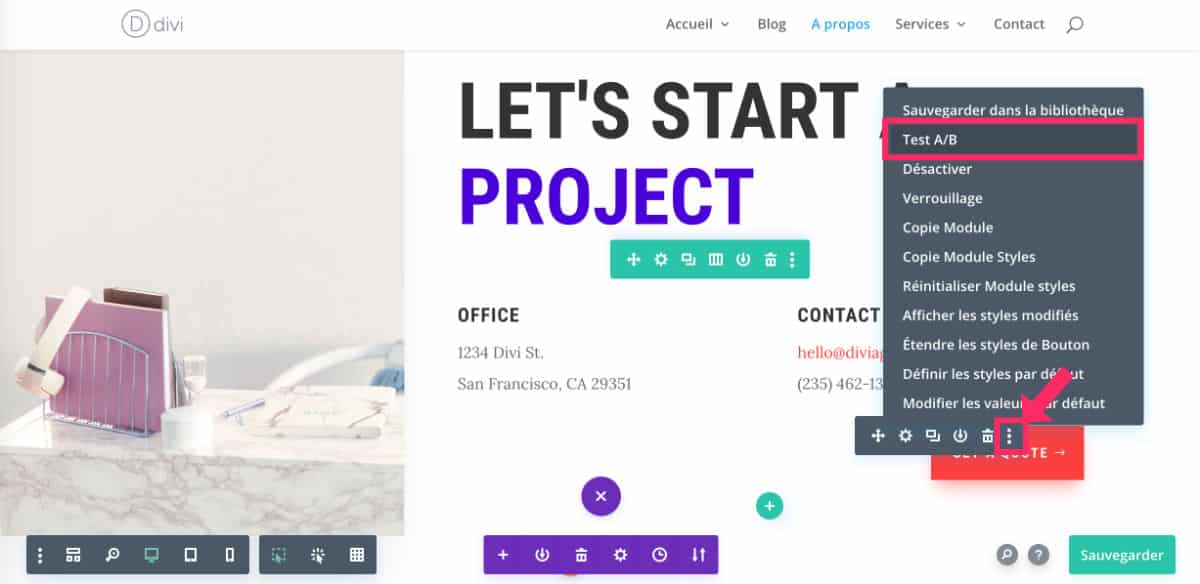
All the time, go to the optional menu (3 small points icon) of the module or section to duplicate in A/B Testing. Choose: Test A/B.
A popup will open and you can click on the item that will be tested A/B. You will see that the cursor becomes round to target the item.
At that time, the element will be duplicated.
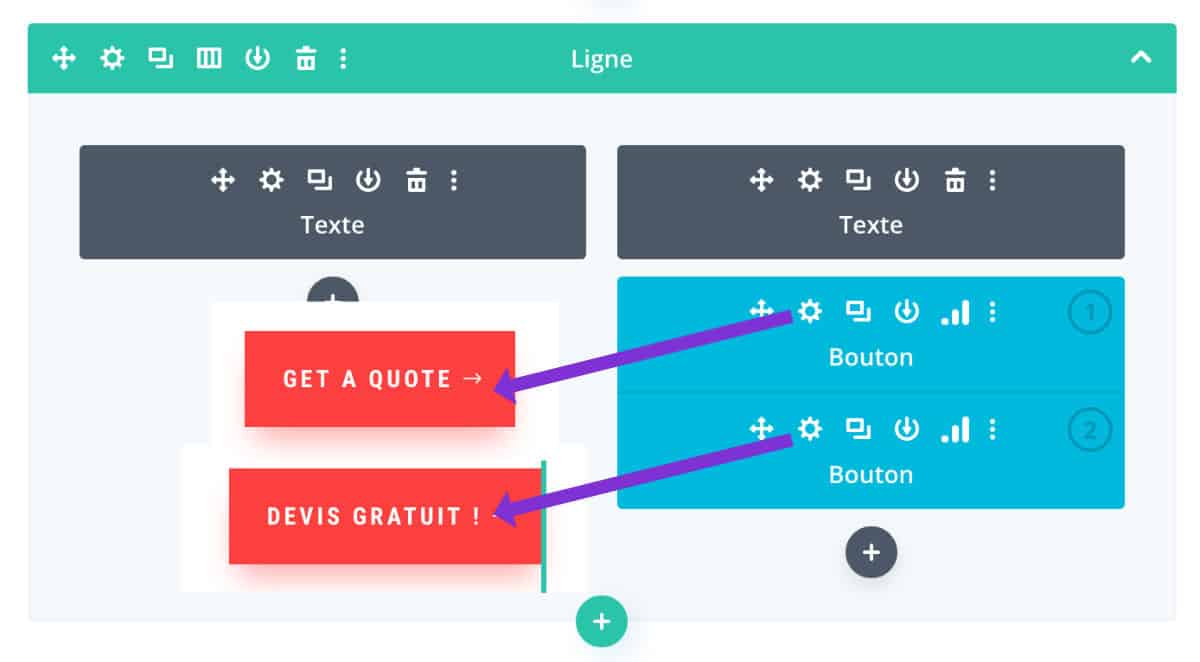
If you don't see it, switch to wired display mode (as seen in this article) and you will see that the item has been duplicated.
You can then edit them to make variations. For example: "free quote" or "contact us".
A/B Testing will allow you to check which CTA works best.
The idea is to test version A for a given period, then version B for another period. Then decide which version will be implemented over the long term.
A/B Testing is a very effective marketing technique to measure commitment and click rate.
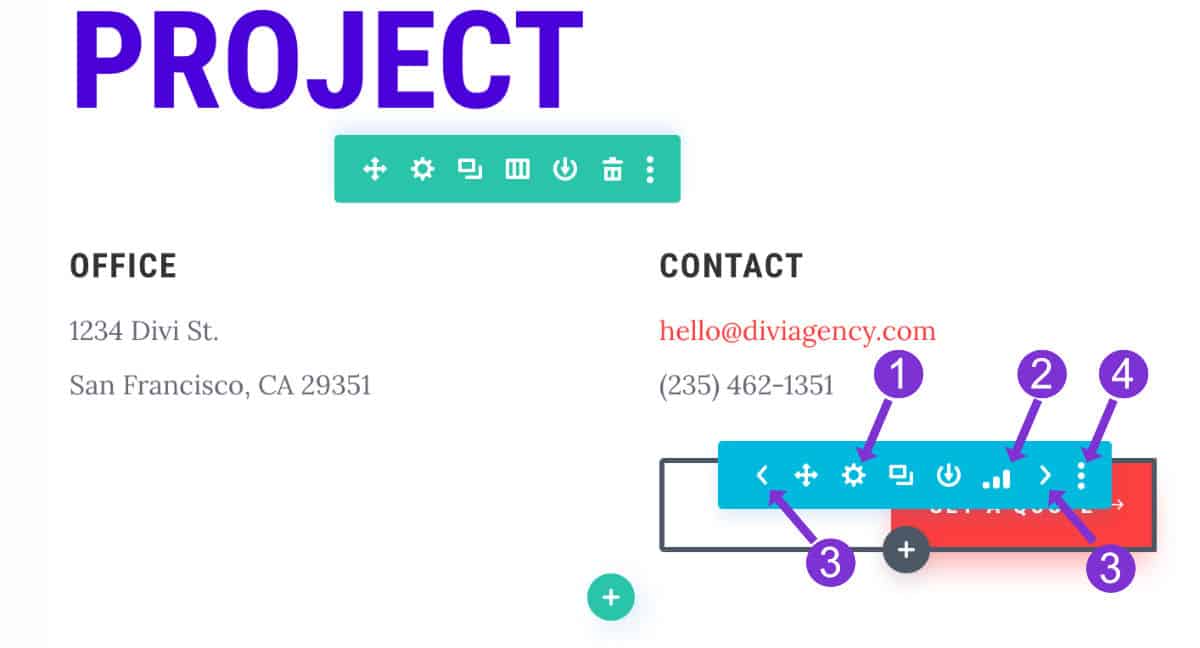
When one of your elements is subjected to an A/B test period, you will easily recognize it as it becomes blue. You can then:
- Set settings as usual.
- Obtain statistics at the end of the trial period.
- Switch from one version to another by clicking on the side arrows.
- Go to the context menu to terminate the test or access other options.
Statistics will give you access to valuable information such as:
- The number of clicks
- The number of views
- The rebound rate
- The commitment rate
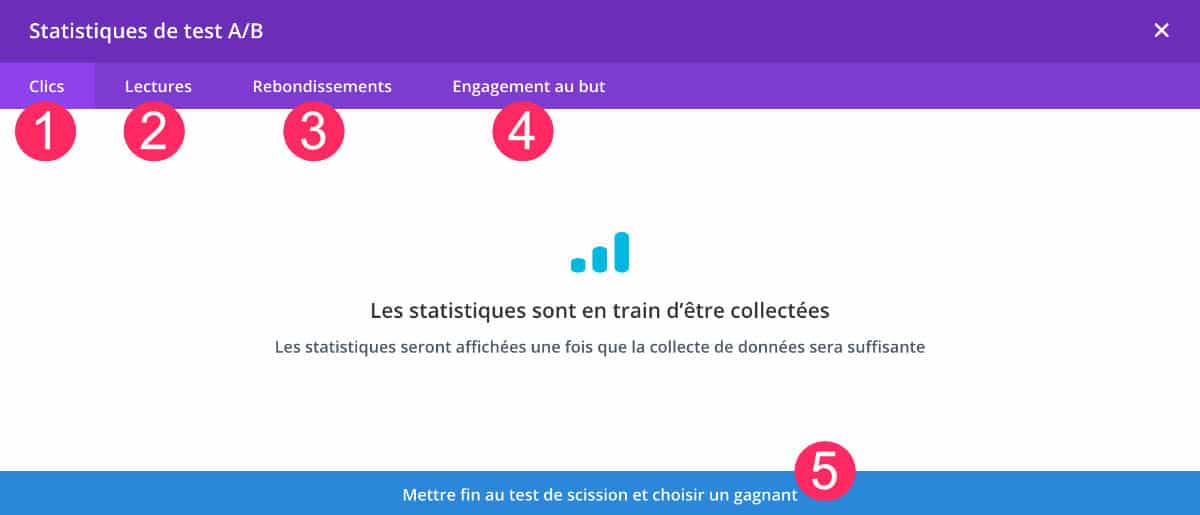
This is in all respects the data and KPI needed to study the effectiveness of a marketing campaign.
All official resources related to Livi testing is available here.
9 - The end word...
I confess not yet know all the corners and Hidden options of Divi and his Visual Builder.
Although I use Divi daily for my clients' projects, mine or even my training, there is always something to discover...
I'd be glad to know if you already knew and used these Visual Builder's "hidden options" or if you see other pretty nice ones that I might have forgotten in this list: say it in comment!


Merci pour ces astuces.
J’utilise DIVI pour mes clients et je tenais à vous remercier pour toutes les astuces que vous apportez.
Samir
wpcreationweb.com
Merci Samir !
Hello Lycia
Super ces astuces, je ne les connaissais pas, et pourtant je suis assez curieux. Je suis content de connaitre ton blog.
Merci encore
Super Jean Luc !
Super article et super site. J’utilise également beaucoup Divi avec mes clients et pour mes propres sites et je dois dire que ça m’a donné envie de tester le A/B testing.
c’est TOP toutes ces astuces !! tout est TOP sur ce site ma référence absolue
en plus comme j’ai tout en anglais et que je suppose que les lignes sont dans l’ordre ça va m’aider
merci encore
Merci Michelle
Top, merci 🙂
Débutante dans le freelance et après une formation courte de DIVI, merci pour tous les conseils, j’y trouve toujours la solution.
MErci à toi 😉
Bonjour
J’ ai un souci pour creer mes articles
Apres en avoir crée un avec le divi builder , qd je creer un 2 eme des que je l’ edite c’ est le premier qui apparait
Si je le modifie ds divi c’ est alors le premier qui est modifié ????
Merci beaucoup pour ces astuces bien utiles au quotidien 🙂