
When you use the Text module Divi with several paragraphs, the toolbar slides with your text. So if you need to change the text styles - add from fat, of italics or a simple link - you need to highlight the text, go up to find the toolbar and go down. It's kind of annoying... In this article, I propose a quick tip that will allow you to fix this toolbar, so it will remain constantly accessible (at scroll), no matter the length of your text.
Front - non-fixed toolbar:
After - fixed toolbar:
1 - What is the "toolbar" of the Text module?
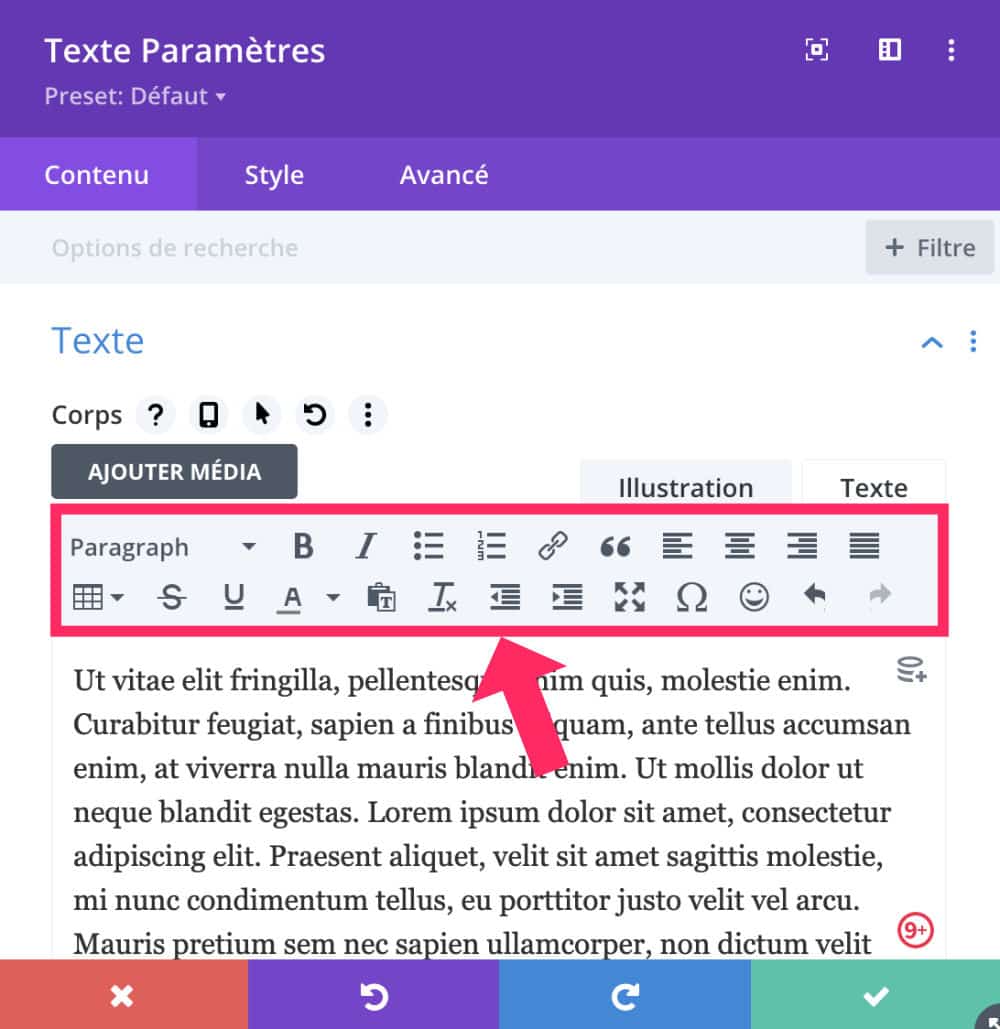
What I call the toolbar, it's the style editing menu available in each text box of each Divi module and in particular in the Text module.
This toolbar contains all the necessary options to enrich your text:
- add fat
- put in italics
- insert lists
- insert links
- stress
- choose text alignment
- add a title hierarchy
- etc.
Finally, here we find the options proposed the classic WordPress editorbefore the appearance of Gutenberg.
Did you know that? You can test Divi for free by visiting on this page and by clicking on "TRY IT FOR FREE"
2 - Why fix that toolbar? (+ video)
As you can see in the video, this action is simple to do, but it does not bring anything in terms of design for your site or your client's. Indeed, but fix this toolbar will bring you great comfort when creating your content with the Divi Visual Builder. Basically, you gain in efficiency and productivity!
If the video doesn't work, Here is the link.
Don't delay! Discover the theme Divi here !
3 - CSS Snippet for a "sticky to scroll" toolbar
When you need to modify an item of your site with CSS, your browser is your best ally. Just use the feature "to inspect the element" in order to find an existing CSS class to modify it then...
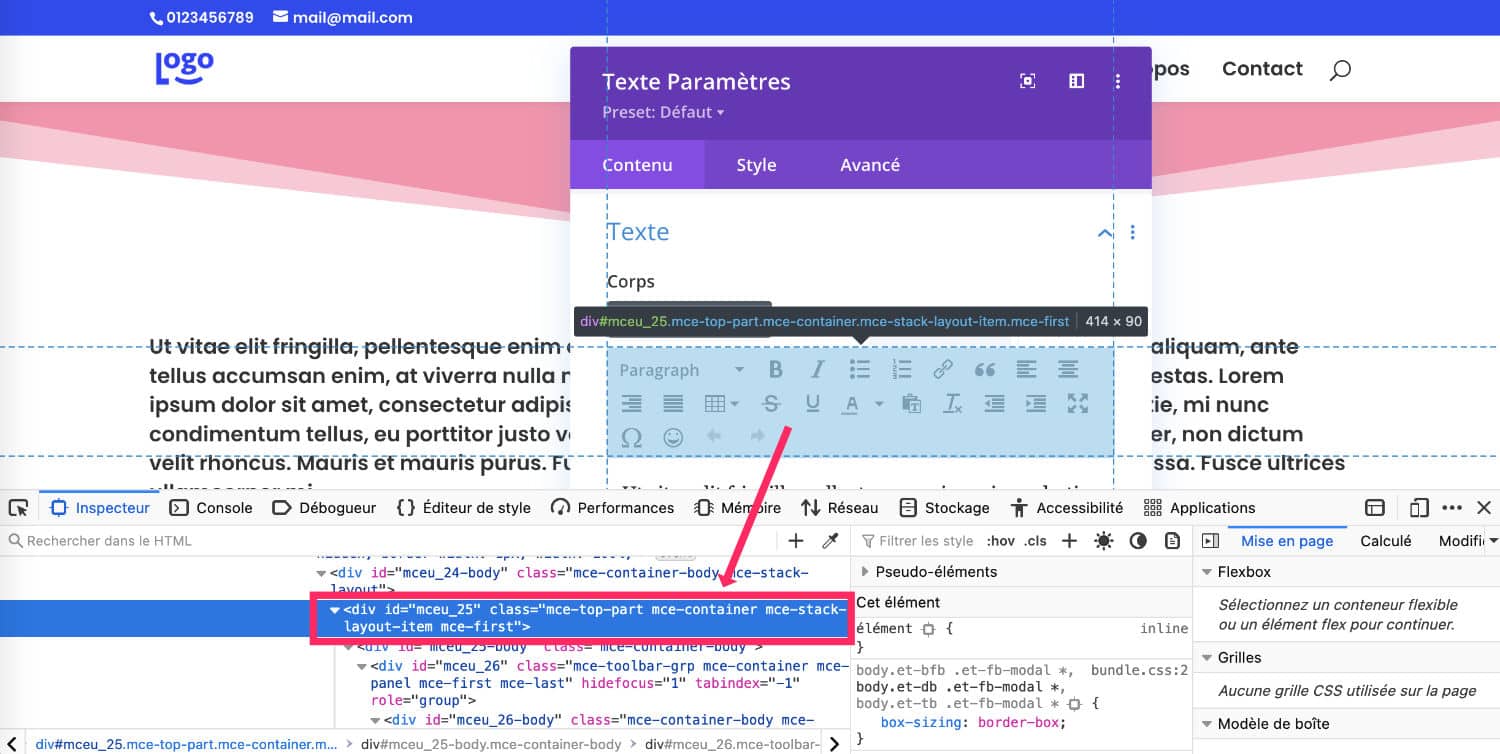
On this screenshot, I used my browser inspector to find the item to change. When it highlights, I click on and at the bottom of the browser, the corresponding HTML code is highlighted in blue. I find then 4 classes used including the class "mce-top-part".
Once this is identified, all you have to do is create the Snippet CSS appropriate for fix the toolbar. Here it is:
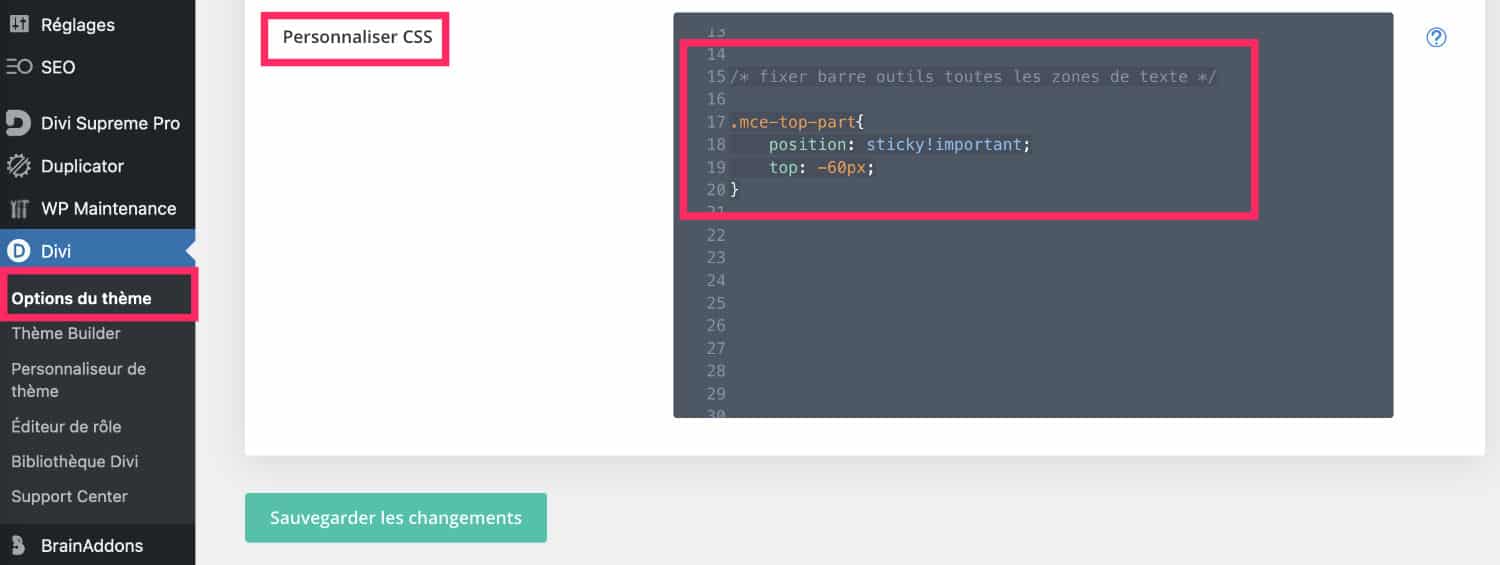
/* toolbar sticky au scroll */
.mce-top-part {
	position: sticky !important;
	top: -60px;
}
Copy and paste this code into the tab dedicated field Divi > Theme option > Customize CSS.
Note that this code will affect all Divi modules which use a text box, almost all the modules!
Reminder: there are others ways to add code to Divi. Discover also my library Snippets for Divi !
4 - Position ticky or position fixedd ?
To fix an item in a web page, the most effective property is the "Position" property. But the question you may be asking yourself is: why use the value Sticky instead of value Fixed ?
The Sticky value allows the element to remain fixed within its container (of its parent element), while the Fixed value remains fixed relative to the browser window.
In this case, if you use the value Fixed for Sticky, you will see that the behavior of the toolbar is not at all in line with our expectations.
To understand better, scroll through the window below:
Need to master Divi? Discover my training that accompanies you step by step in the understanding and use of Divi! Learn more about Divi training.
5 - Compatibility with the back office builder
This chapter was added after the initial publication of the article only a few hours ago. Indeed, some of you have pointed out that the CSS code I give in this article in Chapter 3 does not "function"...
I assure you, it works... but only if you use the Visual Builder front-office. For those who use the Divi Builder back-office, the code doesn't work... And I found out why!
So here are some details:
5.1. - If you use the old version of the Divi Builder
In my opinion it's a very bad idea... so on the tab Divi > Theme Options > Creator > Advanced, you have enabled the option "Classic Editor", you then use the old version of Divi that has stopped evolving since 2018...
Besides, if you use this version, there is a great chance that your back-office edition will row as never before, it's slow, it's slow!
In short, if you prefer to keep this configuration, here is what you need to do for fix the toolbar of the Divi Text module :

- If on the tab Divi > Theme Options > Creator > Advanced, you have enabled the option "classic editor", you use the old version of Divi.
- The back-office sections and modules resemble the n°2 tablet of this screenshot.
- You even need to see a notification inviting you to use "Divi's new experience"... and for good reason!
- It is still possible to set the toolbar of the Divi Text module.
- But in this case, the CSS will not suffice! You will need to add the following code to the functions.php file of your Divi child theme.
add_action('admin_head', 'toolbar_sticky');

function toolbar_sticky() {
  echo '<style>
	.mce-top-part {
    	position: sticky !important;
    	top: -30px;
	}
  </style>';
}
Note: the plugin Classic Editor can also reproduce this option of Divi that I advise you not.
5.2. - If you use the Divi Builder back-office
If you have enabled the option to keep the classic editor and that of the new experience of the Divi Builder but that you continue to edit your publications from back office (and not from the front-end as I show in my video), in this case you will also have to use a different code...
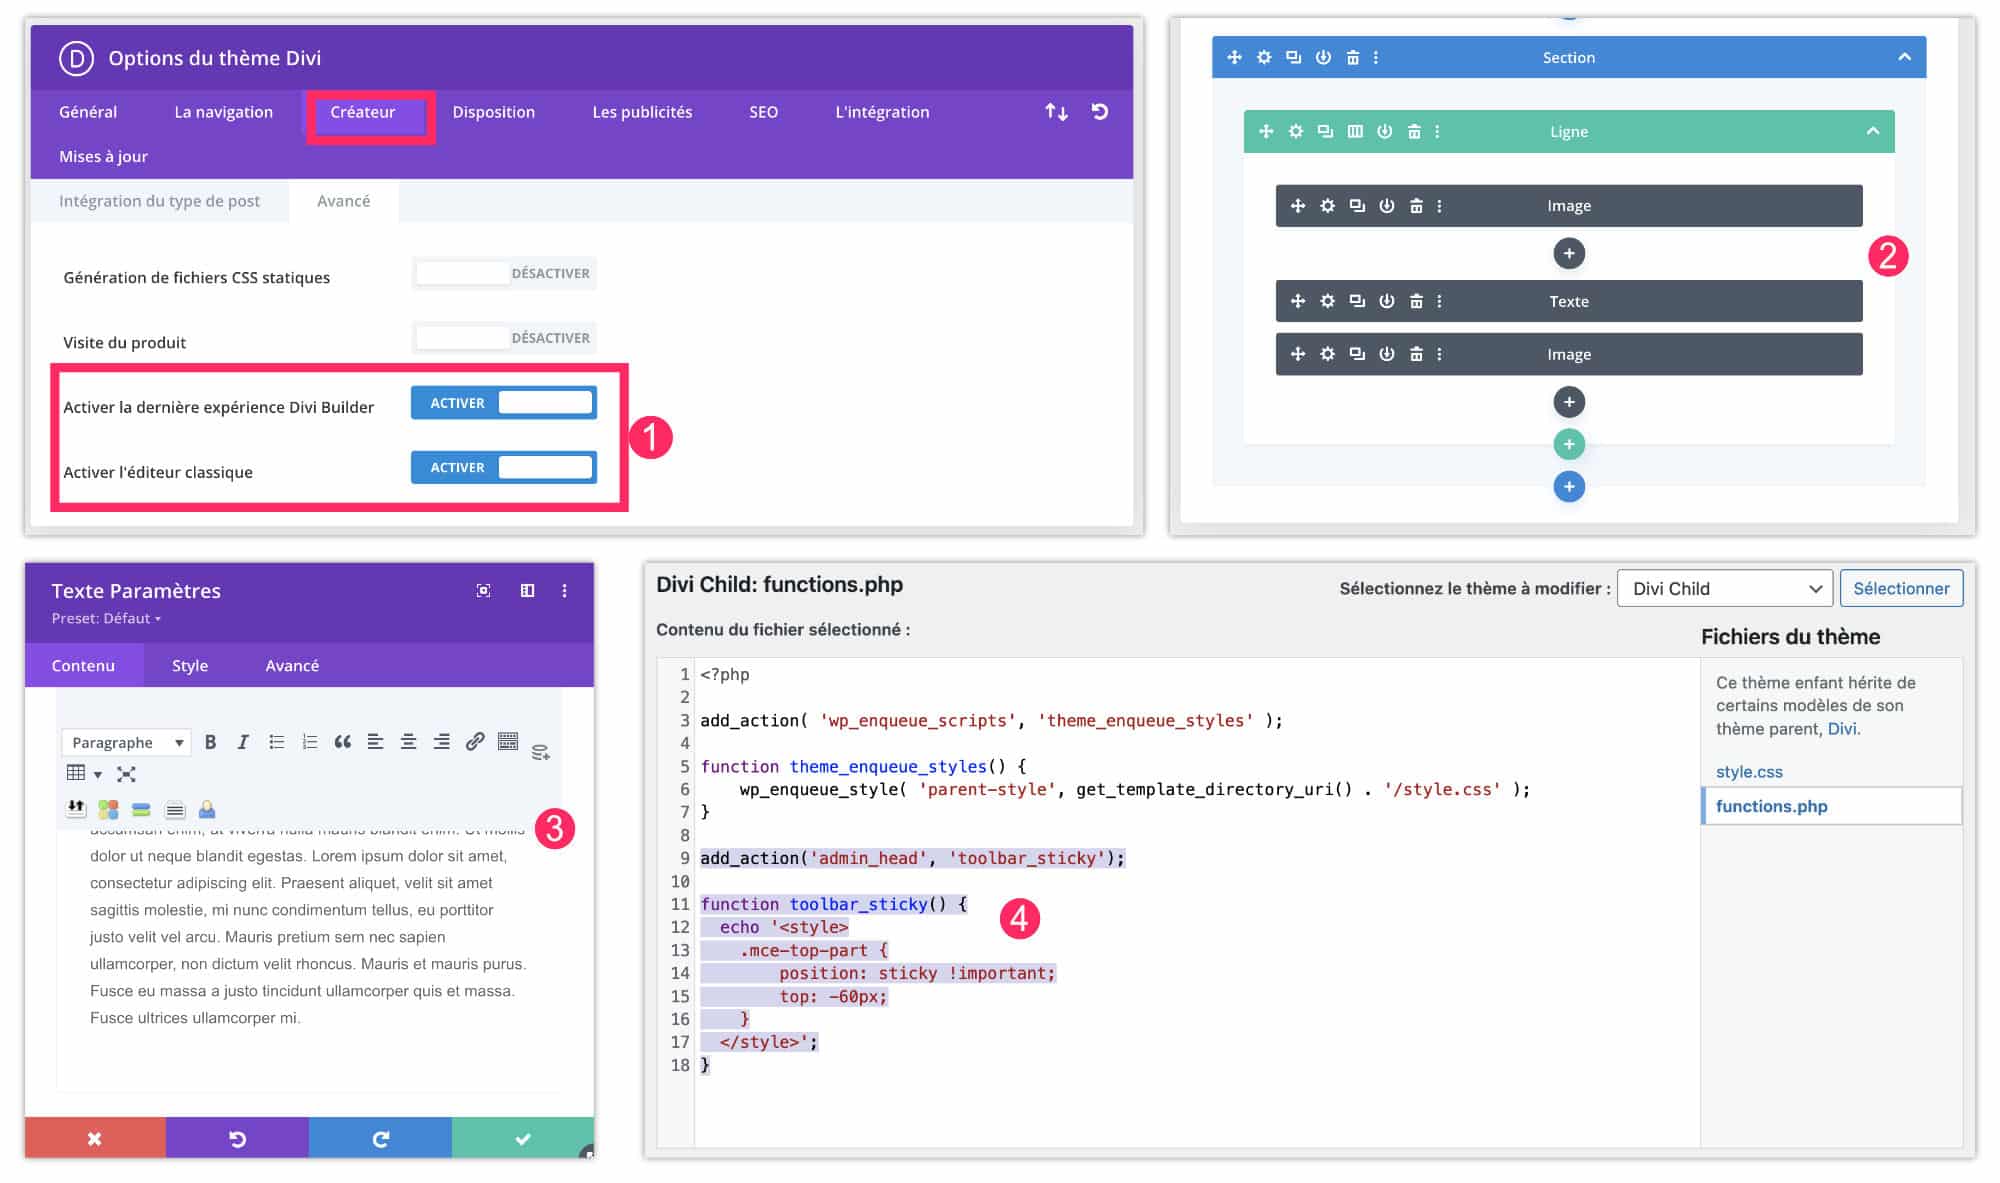
- If on the tab Divi > Theme Options > Creator > Advanced, you have enabled the option "last Divi Builder experience" and the option "Classical editor", you can continue to build your layout from the back office.
- The back-office sections and modules resemble the n°2 tablet of this screenshot.
- It is still possible to fix the toolbar of the Divi Text module.
- But in this case, the CSS will not suffice! You will need to add the following code to the file functions.php of your child theme.
add_action('admin_head', 'toolbar_sticky');

function toolbar_sticky() {
  echo '<style>
	.mce-top-part {
    	position: sticky !important;
    	top: -60px;
	}
  </style>';
}
Note: The difference between the two codes for the back office is the value of the CSS property "Top". One is at -30px and the other is at -60px.
6 - Conclusion and additional resources
With this little trick, you will save redundant actions, increase productivity and efficiency when creating your next content! What do you say? Have you ever noticed that this toolbar disappeared at the scroll ?
Here are some other Divi resources that may interest you:
- Create a button back up with Divi
- Create a Sticky menu as a flip tab
- Create a stickery menu on the scroll
- Create a "Sticky" page footer only with Divi options
- Create a Hello Bar with Divi
- Fix your blog sidebar
Comment fixer la barre d’outils du module Texte de Divi ?
_______________________________________
Bonjoir,
Votre code ci-dessous ne fonctionne pas ?
/* toolbar sticky au scroll */
.mce-top-part {
position: sticky !important;
top: -60px;
}
Amicalement
Merci beaucoup pour cette astuce très utile au quotidien.
Merci Philippe
Salut Daniel,
En fait, il fonctionne seulement lorsqu’on utilise le Visual Builder. Je viens donc de mettre à jour l’article pour vous donner le code à utiliser si vous utilisez le Divi Builder en back-office et non en front-office. Tu trouveras toutes les explications dans le chapitre 5 : https://astucesdivi.com/fixer-barre-outils-module-texte/#lwptoc5
Merci pour la précision apportée au commentaire de Daniel car j’étais arrivé de mon coté à la même conclusion; mais pas de problème car je suis aussi utilisateur du Divi builder, mais je n’avais pas testé
Testé cette fois ci avec le Divi Builder, c’est OK, ça marche et c’est très pratique.
Merci
Cdt
Merci du retour Denis 😉
Super astuce ! Merci
Bonjour,
Je voudrais mettre une barre de notification fixe au dessus du menu haut horizontal, quelqu’unsait comment on fait ?
Merci beaucoup pour votre réponse
Il suffit d’activer la deuxième zone de menu